You must log in to Personal Assistant's administration interface to view or change the Personal Assistant configuration. Personal Assistant manages logins based on Windows 2000 local user accounts. You must use an account with administrative privileges on the Windows 2000 system running the administration interface in order to change the Personal Assistant configuration.
Procedure
Step 1 From an Internet Explorer 5.0 or Netscape Navigator 4.5 or higher web browser window, open the Personal Assistant Administrator page using this format:
For example, if you installed the administration interface on a server named paserver, the URL would be http://paserver/pasystemadmin.
The login screen displays.
Step 2 Enter a Windows 2000 local user name, with administrator authority, and its password. The user name must be defined on the system running the administrator interface.
Step 3 Click OK.
Personal Assistant logs you onto the system, and you can access the various configuration pages.
Step 4 Click Logout in the menu bar to log out of the system when you are finished configuring Personal Assistant.
The system automatically logs you out after 30 minutes of inactivity.
You must configure the global settings to enable the basic server and speech-recognition server communications capabilities. These settings must be valid for Personal Assistant to work correctly.
When you make changes to the system configuration, the changes apply to all the Personal Assistant servers.
Procedure
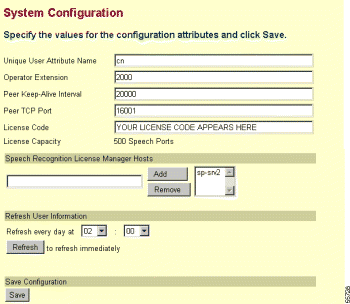
Step 1 Select System> System Configuration.
The System Configuration page displays (see Figure 4-1).
See the "System Configuration" section for a detailed explanation of each field. At a minimum, you should configure these settings:
Unique User Attribute Name—This is the field name that uniquely identifies users in your corporate directory.
If you are using Cisco CallManager's DC directory, the unique name is cn. If you are using a separate directory, ask the directory administrator for the name. Personal Assistant uses this to uniquely identify each user. For example, even if two users have the same name (John Smith), they would have unique e-mail addresses, and this is what Personal Assistant uses to uniquely identify them.
Operator Extension—Although not required, you should enter the telephone extension of the corporate operator here. Calls transfer to this number if a user is encountering too many speech errors while using Personal Assistant.
License Code—The license key for the speech recognition software.
Speech Recognition Server Hosts—Identify the speech servers. Enter the IP address or DNS name of the speech server in the edit box, and click Add. This list creates the speech server cluster. The speech servers are not activated until the next refresh. You can click Refresh to activate immediately, but this procedure might take some time to complete.
Speech Recognition License Manager Hosts—Identify one or two servers that should be used as the license manager hosts. All Personal Assistant servers include license managers, but you must identify which ones will be actively used for distributing licenses.
Enter the IP address or DNS name of the Personal Assistant server you want to use in the edit box and click Add. Cisco recommends that you identify two servers, so that there is a backup license manager. Speech recognition only works if there is at least one active license manager.
Refresh User Information—Pick a time of day for Personal Assistant to automatically refresh cached user information from the corporate directory. This ensures that information is up-to-date, and that the speech recognition software has the data required to understand spoken commands.
Depending on the size of your corporate directory, it can take a significant amount of time to download this information, compile it, and publish it to the speech servers. Therefore, the default setting is 2:00 a.m. when the usage load is likely to be low.
Step 3 Click Save to save and activate your changes.
If you find that users are having problems using the speech recognition interface for Personal Assistant, you can fine tune the speech recognition, or Dial By Name, parameters. Problems that you can address include:
Users being transferred to the operator too often because:
There are a large number of similarly named people in your phone directory.
Frequent errors occur in Personal Assistant understanding a user's spoken commands.
Users ask for help from Personal Assistant too often during a session.
Users being asked too often to confirm their commands.
Before You Begin
Personal Assistant uses defaults for all speech recognition parameters, and these should work well with most installations. Confirm that problems your users are having are widespread before making changes. If changes are necessary, trial and error is the only way to determine effective settings for these parameters for your specific needs.
Procedure
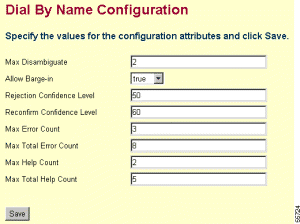
Step 1 Select System>Dial By Name.
The Dial By Name Configuration page displays (see Figure 4-2).
Step 2 If you are trying to resolve problems in which users are being transferred to the operator too quickly, you can make these changes:
If users are being transferred to the operator because there are a lot of similarly named people in your phone directory, change the Max Disambiguate parameter.
This setting determines the number of options (people, numbers, and so on) a user can select from when trying to call a person with a common name, such as John Smith. By increasing this number, Personal Assistant presents additional selections and reduces transfers to the operator.
If Max Disambiguate is 3, a user will be presented with up to three selections if there are two or three people with the requested name. Therefore, if three people in your company share the name "John Smith", Personal Assistant plays the spoken voice and extension for each of the three, allowing users to select the appropriate one. If there are more than three people with the name John Smith, the user is transferred to the operator.
If users are being transferred to the operator because they are encountering speech-recognition errors, you can increase the number of errors allowed. When the Max Error Count is reached during a dialog, or the Max Total Error Count is reached during an entire session, the user is transferred to the operator. However, if you set the value too high, users might become frustrated with using Personal Assistant.
If users are being transferred to the operator because they are requesting help too often, you can increase the number of times they are allowed to request help. When the Max Help Count is reached during a dialog, or the Max Total Help Count is reached during an entire Personal Assistant session, the user is transferred to the operator.
If Personal Assistant is being interrupted too often and fails to provide the users with the appropriate prompts, change the Allow Barge-In setting to False.
Barge-in allows a user to interrupt Personal Assistant and issue a command in the middle of a prompt. However, in situations with excessive background noise, Personal Assistant might be accepting the noise as valid interruptions.
Step 3 If you are trying to resolve problems in which users are being asked to confirm their commands too often, you can change the Rejection Confidence Level and Reconfirm Confidence Level parameters.
The speech-recognition software assigns a percentage confidence level to every recognized utterance.
If the software is less confident that it understood the speaker than the Rejection Confidence Level (default is 50%), Personal Assistant tells the user it did not understand the request: "Sorry I didn't understand." The user can then repeat or rephrase the request.
If the confidence level is between Rejection Confidence Level and the Reconfirm Confidence Level percentages, Personal Assistant tells the speaker its interpretation of the request and asks the speaker to confirm the interpretation: "John Smith? Is this correct?" The speaker can then say yes or no. If yes, Personal Assistant completes the request. If no, the speaker must repeat or rephrase the request.
If the confidence level is higher than the Reconfirm Confidence Level, Personal Assistant initiates the speaker's request without asking for confirmation: "Calling John Smith." The speaker can stop Personal Assistant by saying "cancel" or "no."
If you set Reconfirm Confidence Level too high, users will have to reconfirm most commands. If you set it too low, Personal Assistant might initiate too many unintended tasks.
Step 4 Click Save to save and activate your changes.
Tips
You must enter the operator's extension on the System Configuration page in order for the user to be transferred to the operator.
Personal Assistant can integrate with the Cisco Unity voice mail system. You must have the voice mail server set up and configured on a separate system from Personal Assistant. Refer to the documentation included with Cisco Unity to install and configure it.
You must configure the voice mail settings to enable users to access their voice mail through Personal Assistant. The voice mail configuration is also used when processing users' call routing rules that send incoming calls directly to voice mail.
Before You Begin
Personal Assistant must have administrator access to the Cisco Unity Server to obtain users' mailbox account information and stored voicemail messages. These voicemail settings are also used to redirect calls to a user's voicemail without ringing the user's phone, based on the user's rules that include voicemail as a destination.
Procedure
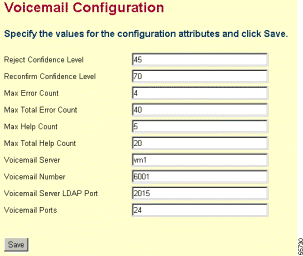
Step 1 Select System>Voicemail.
The Voicemail Configuration page displays (see Figure 4-3).
Step 2 Update the settings to reflect your voice mail system. Most of these fields have default settings that should work for most installations. See the "Voice Mail Configuration" section for descriptions of the fields.
At a minimum, you must update these fields:
Voicemail Server—The IP address or DNS name of your voice mail server.
Voicemail Number—The telephone extension of the voice mail system.
Voicemail Server LDAP Port—The LDAP port the voice mail system uses. This field is configured to use the default LDAP port for the voice mail system. You only need to update the field if you are using a different port.
Voicemail Ports—The number of licensed voice mail ports, which indicates the maximum number of simultaneous voice mail sessions available to Personal Assistant.
Step 3 Click Save to save and activate your changes.
Note Restart the Personal Assistant server if you make changes to the
Voicemail Server or the Voicemail Server LDAP Port. Changes to
other voice mail parameters are effective immediately and do not
require a restart. See the
"Starting and
Stopping the Servers and License Manager" section
for details about restarting the Personal Assistant server.
You must configure the telephony interface between Personal Assistant and Cisco CallManager so that Personal Assistant can successfully receive and transfer telephone calls. The settings you enter here must correspond to the Personal Assistant user you created in Cisco CallManager (see the "Adding a Personal Assistant User" section).
Procedure
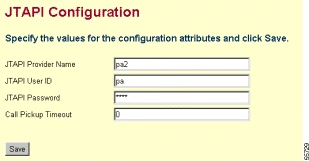
Step 1 Select System>JTAPI.
The JTAPI Configuration page displays (see Figure 4-4).
JTAPI Provider Name—The DNS name or IP address of the Cisco CallManager server.
JTAPI User Name—The user name that Personal Assistant uses when logging into Cisco CallManager. This is the user name for the Personal Assistant user added to Cisco CallManager.
JTAPI Password—The password for the user account. This is the password for the Personal Assistant user added to Cisco CallManager.
Step 3 In the Call PickupTimeout field, enter the amount of time (in milliseconds) that Personal Assistant should ring an extension before moving on to the next extension, when employing a call routing rule that specifies multiple phone numbers should be rung in succession.
Step 4 Click Save to save and activate your changes.
Personal Assistant can provide e-mail paging and calendar-based call routing services. Personal Assistant integrates with Microsoft Exchange to provide calendar-based call routing, and if you are using Cisco Unity, Personal Assistant can integrate with the Exchange server you are already using. You must configure the messaging parameters to enable these services for your users. If you do not want to enable these services, leave the settings on this page blank.
Before You Begin
Personal Assistant must have administrator access to Microsoft Exchange to obtain a user's calendar information. This information is used when evaluating call routing rules that include calendar-based conditions.
Procedure
Step 1 Select System>Messaging.
The Messaging Configuration page displays (see Figure 4-5).
You can create global dialing rules to automatically modify incoming and outgoing telephone numbers. These changes only affect the user's use through Personal Assistant; they do not apply to the telephony system outside of Personal Assistant. For example, if a user simply picks up the telephone and dials a number, these rules will not be applied. The user must be connected to Personal Assistant, and must be dialing the number through Personal Assistant, for the rules to be applied.
These global rules are applied before any dialing rules that users create for Personal Assistant.
Procedure
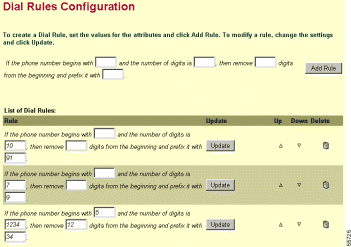
Step 1 Select System>Dial Rules.
The Dial Rules Configuration page displays (see Figure 4-6).
Add Rule—This section contains a fill-in-the-blank sentence and the Add Rule button.
List of Dial Rules—This is a list of your rules, in order of priority. Rules are applied top to bottom. If a number satisfies the rule's conditions, the rule is applied and no subsequent rules are considered.
Step 2 Fill in the blanks in the Add Rule section to create the desired dialing rule. Each blank is optional, but you must fill in at least one condition and one consequence for the rule to be applied.
Conditions—You can distinguish between telephone numbers based on the initial string of digits or by the length of the number, or both. The distinguishing string of digits can be as long as the number. When determining the length, do not count hyphens or spaces in the number. For example, a number such as 510-555-1212 is a 10-digit number; the hyphens are ignored.
Consequences—You can remove numbers from the front of the dialed number, or you can add numbers to the front, or both.
For example, you could create a rule that states: "If the phone number begins with blank and the number of digits is 7, then remove blank digits from the beginning and prefix it with 9." This rule then automatically enters a 9 when dialing an outside number.
Step 3 Click Add Rule when satisfied with the rule.
Personal Assistant adds the rule to the bottom of the list of rules.
Step 4 If the rule is not positioned where you want it in the list of rules, use the up and down arrows until it is correctly positioned.
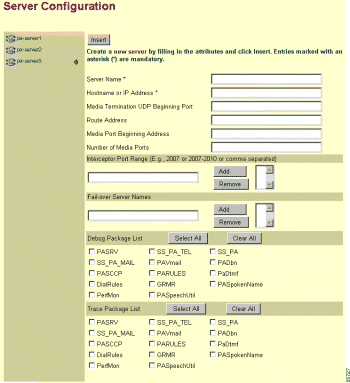
The left column lists the Personal Assistant servers you have already added to the Personal Assistant server cluster. Click a server name to view and change the server's properties.
The primary Personal Assistant server is indicated by the red arrow that points to it. The primary server is chosen automatically, based on alphabetical order.
The right column contains the settings for the selected server. When you initially open the page, this column contains empty settings, so that you can add a new Personal Assistant server. When viewing an existing server's properties, click Insert to add a new server.
Step 2 Fill in the settings for a new server, or change the existing settings, as appropriate. "Server Configuration" section for explanations of each setting. At a minimum, you must configure the following settings:
Server Name—A unique name for the server. This is not the same as the DNS name or IP address of the server. Instead, it is a name used internally by Personal Assistant. Choose a naming convention that is meaningful to you.
Hostname or IP Address—The DNS name or IP address of the Personal Assistant server.
Number of Media Ports—The number of ports you want to support on the server. This number determines how many simultaneous speech-recognition sessions the server can handle. The number you choose depends on the server platform you are using, and whether you are using failover with your servers (see the Failover Servers setting below). See the "Creating Server Clusters" section for information about the maximum ports that are available for the various hardware platforms and installation configurations.
Interceptor Port Range—The telephone extensions for which you want this Personal Assistant server to intercept incoming calls. Personal Assistant intercepts calls to these extensions so that it can apply the user's call routing rules. This list is central to Personal Assistant's functioning; getting Personal Assistant to intercept calls to these extensions requires careful planning and changes to the extension's properties in Cisco CallManager.
Read these topics for detailed explanations and examples:
Failover Server Names—The ordered list of servers that should take over for the server if it becomes disabled. Using Personal Assistant's failover capability requires careful planning, and affects the number of telephony ports you can define for the servers. See the "Creating Server Clusters" section for an explanation of configuring Personal Assistant clusters with and without failover.
Step 3 Save your changes:
If you are creating a new server, click Insert. Personal Assistant saves the server's settings and adds it to the servers listed in the left column.
If you are updating an existing server, click Save. Personal Assistant saves and activates your changes.
Tips
Do not configure the debug or trace settings unless instructed to by Cisco Technical Support. Debug and trace affect server performance, and generate a large amount of data that only Cisco can interpret. These features exist for Cisco's use to help identify and fix any problems you encounter with the software. See the "Collecting Trace and Debug Information" section for more information.
You can remove a server by selecting it in the left column, and then clicking Delete when the server's properties are displayed.
The Personal Assistant server restarts automatically when any changes, except those made to the trace and debug settings, are saved. To manually start or stop the servers, or to verify that a particular server is up and running, use the Control Center by selecting System > Control Center. See "Starting and Stopping the Servers and License Manager" section for details.