|
|

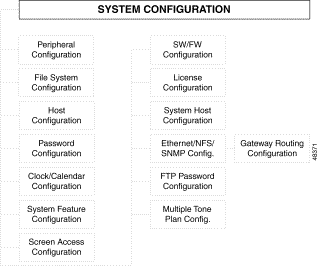
Two System Configuration utilities provide additional control of TeleRouter operation. The Host Configuration screen is used to activate/deactivate TeleRouter operation and configure TeleRouter to operate in an unhosted environment. The System Features Configuration contains a system feature setting that improves TeleRouter processing in an unhosted environment. These functions are accessed from the Database Administration Menu screen, and are organized as shown in Figure 4-1.

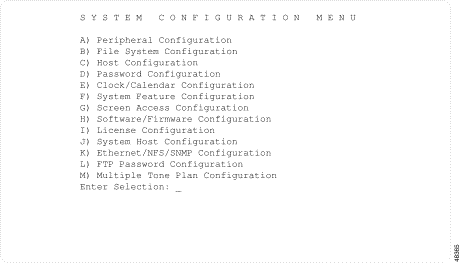
To access the System Configuration menu (see Figure 4-2) from the Main menu, type B and press Enter.

The cursor is located in the Enter Selection data entry field. To access a function, type the letter that precedes it and press Enter.
The Host Configuration utility is used to configure host interfaces and software overlays and indicate the status of alarm conditions for host interfaces. TeleRouter operation is enabled when you select TeleRouter in the Internal interface field. If the internal interface is not configured (no value selected), TeleRouter call routing is not performed.
To operate TeleRouter in a stand alone configuration (unhosted environment), do not define any SIO or Ethernet host links in the additional interface fields. If TeleRouter is enabled and no host links are defined, all system call processing is performed using the TeleRouter call routing instructions.
The trace field under the Overlay host name field works in conjunction with the System Trace Configuration. When this option is activated, the system trace files contain listings of the commands and reports generated by the overlay.
 |
Note In addition to standard system host commands and reports, TeleRouter uses several commands in the $50 to $5E range that are proprietary and therefore not documented in the Cisco VCO/4K Standard Programming Reference or Cisco VCO/4K Extended Programming Reference. |
To access the Host Configuration screen from the System Configuration menu, type C and press Enter. The first Host Configuration screen is displayed (see Figure 4-3). The cursor is located in the first Interface field.

The Host Configuration utility consists of three screens. Use the Prev Screen and Next Screen keys to page through the listings. Use the Print Screen key to obtain a hard copy of these screens.
From the Host Configuration screen, you can configure up to three types of host interfaces. The fields displayed on the screen are determined by the value specified in the Interface field. The fields that apply to TeleRouter are defined as follows.
Interface—Data entry via Select key. Specifies the type of interface being configured. Also determines what data entry fields are displayed on the screen. The valid value is:
Trace—Data entry via main keypad. Specifies if the trace utility is enabled for this interface. The system trace utility is described in "Maintenance." The valid values are:
To enable TeleRouter operation, complete the following steps:
Step 1 Access the Host Configuration utility (refer to the "Host Configuration" section).
The cursor is located in the Overlay data entry field.
Step 2 Press Select until TeleRouter is displayed in the field and press the Next Field key.
The cursor moves to the Trace data entry field.
Step 3 Type the correct value to enable or disable tracing for the Internal interface. Proceed based on the following:
Step 4 To define an external interface, use the Select key to display the correct interface value. The data entry fields displayed are determined by the value specified in the Interface field.
Step 5 Use the Prev Field and Next Field keys to position the cursor in the data entry field to be specified. Fill in the field using the Select key, Reverse Select key, or the main keypad.
Step 6 Repeat Step 5 for all fields required for the link configuration to be defined.
Step 7 To define additional interfaces, press Tab to move to the next Interface data entry field and repeat Step 4 through Step 6. If no additional interfaces are to be defined, go to Step 8.
Step 8 Press Enter.
The following message appears:
Press ENTER to update configuration
Step 9 Press Enter.
The following message appears:
Host configuration updated
The configuration data is written to the database, and the link is taken out of service and reestablished. This process takes several seconds.
Step 10 Press Exit to return to the System Configuration screen.
You can modify system operating characteristics to meet specific application requirements. An additional TeleRouter-specific system feature can be enabled using the System Features function under the System Configuration menu. Use the Suppress PSC/Rule Abort Messages feature when operating TeleRouter in an unhosted environment.
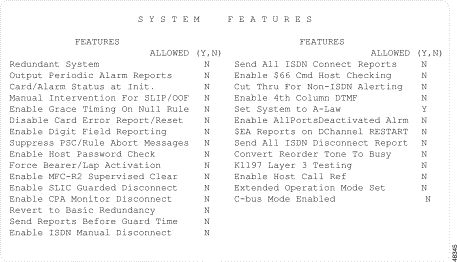
To access the System Features screen (see Figure 4-4) from the System Configuration menu, type F and press Enter. The cursor is located in the first Allowed (Y,N) data field.

There is one System Features Display screen. Use the Print Screen key to obtain a hard copy of this screen.
The System Features Display screen has the following fields:
FEATURES—Display only. Indicates the system feature. TeleRouter features are listed in the "Features Affecting TeleRouter" section.
Allowed (Y,N)—Data entry via main keypad. Indicates if the corresponding feature is enabled.
This section describes system features affecting TeleRouter. For a complete description of all system features, refer to the Cisco VCO/4K System Administrator's Guide.
When enabled, this feature prevents Permanent Signal Condition and inpulse rule abort messages from being written to the system log. Certain types of line equipment use the tones issued during Permanent Signal processing to determine disconnects. This feature suppresses the PSC messages generated by this normal occurrence with these line types. Also, certain situations may generate inpulse rule abort messages due to incoming call abandons prior to call routing. This feature prevents system log files from becoming filled with inpulse rule abort messages.
The Disable Host Setup Timing feature should remain set to N when you operate TeleRouter in an unhosted environment. This setting causes Reorder and Permanent Signal processing on incoming ports when no outgoing ports are available from the Primary, Secondary and Final resource groups. When this feature is set to Y, the port remains in CP_SETUP state indefinitely.
Enabling or disabling system features does not immediately change the system configuration. The system must be reset in order to put any system feature change in effect.
To enable or disable TeleRouter system features, complete the following steps:
Step 1 Display the System Features Display screen (refer to the "System Features" section).
The cursor is located in the first Allowed (Y,N) field.
Step 2 Use the Prev Field and Next Field keys to position the cursor in the Allowed (Y,N) field corresponding to the feature you want to enable/disable.
Step 3 Type Y or N (depending upon the setting you want for that feature).
The database is automatically updated.
Step 4 Repeat Step 2 and Step 3 for each feature setting you want to change.
Step 5 Press Exit to return to the Database Administration Menu or Maintenance Menu screen.
Step 6 Press the Alarm Arbiter Card (AAC) RESET button to put the changes into effect.
To leave the System Features Display screen without making any changes, press Exit, Prev Menu, or Main Menu. No changes are made to the database unless you press Enter. Once the changes are made, you should reset the system. Refer to the Cisco VCO/4K System Administrator's Guide for more information.
![]()
![]()
![]()
![]()
![]()
![]()
![]()
![]()
Posted: Sat Sep 28 18:00:40 PDT 2002
All contents are Copyright © 1992--2002 Cisco Systems, Inc. All rights reserved.
Important Notices and Privacy Statement.