|
|

March 17, 1997
These release notes identify the Cisco Internetwork Operating System (Cisco IOS) Release 11.2 feature packs for Cisco 2500 series routers (Cisco and CiscoPro models). Product numbers for supported feature packs are as follows:
These release notes include tables that identify feature packs and tables that show the specific features comprising available feature sets for each supported Cisco router. These release notes also help you navigate the electronic documentation for Cisco IOS Release 11.2 documentation. The Cisco Router Software Loader, delivered on the same CD-ROM as the Cisco IOS feature sets, is designed to work from a PC running Microsoft Windows 95. These release notes also describe how to install the router software feature sets using a PC running Microsoft Windows 3.1.
These release notes contain the following sections:
The Cisco Router Software Loader supports the following Cisco 2500 series routers:
The Router Software Loader contains an upgrade utility that permanently modifies a CiscoPro router so that it will accept the Cisco IOS Release 11.2 software images.
The utility changes the router's SysObjectID SNMP MIB (used for network management) from CiscoPro to that of a Cisco router. The software banner also changes so that it no longer identifies the router as a CiscoPro product.
 | Caution If, when using the Router Software Loader, you select Preconfigured router and you uncheck the Configure Ethernet interface 0 box (or Token Ring 0), the upgrade utility will load selected Cisco image successfully to the router's Flash memory, but the router will reboot in ROM monitor mode. |
If this happens, log into the router via the console port with Telnet or terminal emulation software. At the prompt ("rommon 1>" or ">"), enter the b flash command. The router will reboot to the new image in Flash memory.
| Caution Remember that you must manually change the Configuration Register of the router back to the original setting it had before the loading process. After the router reboots, enter enable mode by typing enable <Return>, followed by the password if set. Enter configuration mode by typing config t <Return>, then enter the commands: config-register 0x2102 <Return> and exit <Return>. |
The upgrade utility must be in the same directory as the selected image. If it is not, the upgrade utility will inform you that the image is not present. If you use an image directory other than the one on the CD, make sure you copy the proper upgrade utility to that directory. The Cisco 2500 series upgrade utility is cpa25-upgrade-l.112-3.P.
This section describes the Cisco feature packs, listing the software feature sets comprising each pack. You can use this information to identify your feature pack set in conjunction with the corresponding information provided in the tables in the section "Cisco IOS Release 11.2 Feature Sets,". Tables in that section identify which features are supported for a feature set on a specific platform.
Table 1 identifies each feature pack as specified on the label of the CD containing the router software. It also lists the feature sets comprising the feature pack, giving the DOS and UNIX filenames of the images. The table provides a brief description of each feature set and the router platform on which the feature set runs.
| Feature Sets Included | DOS Filename | UNIX Filename | Description |
|---|---|---|---|
| Cisco 2500 IP Feature Pack Release 11.2 (model number CD25-C-11.2=) | |||
| 80135403 | c2500-i-l | IP feature set for Cisco 2500 series routers |
| Cisco 2500 IP Plus Feature Pack Release 11.2 (model number CD25-CP/E-11.2=) | |||
| 80135503 | C2500-is-l | IP Plus feature set for Cisco 2500 series routers |
| 80146001 | C2500-c-l | Remote access server feature set for Cisco 2500 series routers |
| Cisco 2500 IP Plus 40 Feature Pack Release 11.2 (model number CD25CW-11.2=) | |||
| 8135603 | C2500-is40-l | IP Plus 40 feature set for Cisco 2500 series routers |
| Cisco 2500 IP Plus 56 Feature Pack Release 11.2 (model number CD25-CY-11.2=) | |||
| 80135703 | C2500-is56-l | IP Plus 56 feature set for Cisco 2500 series routers |
| Cisco 2500 IP/IPX/AT/DEC Feature Pack Release 11.2 (model number CD25-B-11.2=) | |||
| 80135003 | C2500-d-l | IP/IPX/AppleTalk/DECnet feature set for Cisco 2500 series routers |
| Cisco 2500 IP/IPX/AT/DEC Plus Feature Pack Release 11.2 (model number CD25-BP-11.2=) | |||
| 80135103 | C2500-ds-l | IP/IPX/AppleTalk/DECnet Plus feature set for Cisco 2500 series routers |
| Cisco 2500 IP/IPX/AT/DEC Plus 40 Feature Pack Release 11.2 (model number CD25-BW-11.2=) | |||
| 80135203 | C2500-ds40-l | IP/IPX/AppleTalk/DECnet Plus 40 feature set for Cisco 2500 series routers |
| Cisco 2500 IP/IPX/AT/DEC Plus 56 Feature Pack Release 11.2 (model number CD25-BY-11.2=) | |||
| 80135303 | C2500-ds56-l | IP/IPX/AppleTalk/DECnet Plus 56 feature set for Cisco 2500 series routers |
| Cisco 2500 Enterprise Feature Pack Release 11.2 (model number CD25-A-11.2=) | |||
| 80135803 | C2500-j-l | Enterprise feature set for Cisco 2500 series routers |
| Cisco 2500 Enterprise Plus Feature Pack Release 11.2 (model number CD25-AP-11.2=) | |||
| 80135903 | C2500-js-l | Enterprise Plus feature set for Cisco 2500 series routers |
| Cisco 2500 Enterprise Feature Pack Release 11.2 (model number CD25-AW-11.2=) | |||
| 80136003 | C2500-js40-l | Enterprise Plus 40 feature set for Cisco 2500 series routers |
| Cisco 2500 Enterprise Feature Pack Release 11.2 (model number CD25-AY-11.2=) | |||
| 80136103 | C2500-js56-l | Enterprise Plus 56 feature set for Cisco 2500 series routers |
This section includes two tables: Table 2 identifies the memory required to run each feature set; Table 3 describes the memory delivered by default and the available memory upgrades.
You can use Table 2 to identify the memory required for your configuration based on the image you run. You can then check this against Table 3 to determine how much memory is available on the router as the factory default and the upgrades that you can obtain to satisfy your requirements.
| Feature Set | Description | Flash Memory Requirements | DRAM Memory Requirements |
|---|---|---|---|
| Cisco 2500 IP Feature Pack Release 11.2 | |||
| IP feature set for Cisco 2500 series routers | 8 MB | 4 MB |
| Cisco 2500 IP Plus Feature Pack Release 11.2 | |||
| IP Plus feature set for Cisco 2500 series routers | 8 MB | 4 MB |
| Remote Access Server feature set for Cisco 2500 access servers | 8 MB | 4 MB |
| Cisco 2500 IP Plus 40 Feature Pack Release 11.2 | |||
| IP Plus 40 feature set for Cisco 2500 routers | 8 MB | 4 MB |
| Cisco 2500 IP Plus 56 Feature Pack Release 11.2 | |||
| IP Plus 56 feature set for Cisco 2500 routers | 8 MB | 4 MB |
| Cisco 2500 IP/IPX/AT/DEC Feature Pack Release 11.2 | |||
| IP/IPX/AppleTalk/DECnet feature set for Cisco 2500 routers | 8 MB | 4 MB |
| Cisco 2500 IP/IPX/AT/DEC Plus Feature Pack Release 11.2 | |||
| IP/IPX/AppleTalk/DECnet Plus feature set for Cisco 2500 routers | 8 MB | 4 MB |
| Cisco 2500 IP/IPX/AT/DEC Plus 40 Feature Pack Release 11.2 | |||
| IP/IPX/AppleTalk/DECnet Plus 40 feature set for Cisco 2500 routers | 8 MB | 4 MB |
| Cisco 2500 IP/IPX/AT/DEC Plus 56 Feature Pack Release 11.2 | |||
| IP/IPX/AppleTalk/DECnet Plus 40 feature set for Cisco 2500 routers | 8 MB | 4 MB |
| Cisco 2500 Enterprise Feature Pack 11.2 | |||
| Enterprise Feature Pack for Cisco 2500 routers | 8 MB | 6 MB |
| Cisco 2500 Enterprise Plus Feature Pack 11.2 | |||
| Enterprise Plus Feature Pack for Cisco 2500 routers | 8 MB | 6 MB |
| Cisco 2500 Enterprise Plus 40 Feature Pack 11.2 | |||
| Enterprise Plus 40 Feature Pack for Cisco 2500 routers | 8 MB | 6 MB |
| Cisco 2500 Enterprise Plus 56 Feature Pack 11.2 | |||
| Enterprise Plus 56 Feature Pack for Cisco 2500 routers | 8 MB | 6 MB |
Table 3 shows the amount of both Flash and main memory delivered by default on a Cisco 2500 series router. It also lists the available memory upgrades.
| Memory Type | Default | Upgrade Options |
|---|---|---|
Flash | 8 MB | 4-MB upgrade: MEM4F= 8-MB upgrade: MEM8F= |
Main | 4 MB | 8-MB upgrade: MEM8D= |
This section describes several solutions to problems you might encounter when using the Router Software Loader. These solutions are additions to the loader's online help.
This installation tip provides a possible recovery solution in the event that you are unable to connect to your router. You can skip this section unless you are experiencing a connection error.
In some cases, you might receive the following error message while connecting to the target router:
"Failed to configure the router to enable the Cisco IOS software image and configuration
file upload and download operations. You may want to check the router to make sure that
the selected interface exists."
If you encounter this message, try increasing the Short Timeout value in the Options dialog box, especially if one of the following situations applies:
This installation tip applies to the Cisco 2505, 2507, 2516, CPA2505, CPA2607, and CPA2516. When connecting to one of these routers via the Router Software Loader, you must first enable the hub port used to connect the router to your PC. To enable the hub port, you will need to log into the router via the console port. You can log into the console port using Telnet or terminal emulation software. (If you use terminal emulation software, configure the software settings to 9600 baud, no parity, 8 data bits, and 1 stop bit.)
An example of enabling the hub port follows:
Step 1 When the router boots up, enter the enable mode as follows:
router> enable

password: <password>
router#
Step 2 Enter the configuration mode and enable the hub port, as follows:
router# configure terminal
Step 3 Enter the following configuration commands, one per line and end with Ctrl-Z.
router(config)# hub ether 0 port number of PC connection

router(config-hub)# no shutdown
Step 4 Exit the configuration mode by entering the commands as follows:
router(config-hub)# exit

router(config)# exit

router#
Step 5 Log out of the router and start the Router Software Loader application.
The following installation tip applies to any Cisco 1600 series or Cisco 2500 series router that has two or more Flash memory partitions. If you are unsure whether your router has multiple Flash memory partitions, issue the show flash command at the router prompt as shown in Step 4 of this section.
The Router Software Loader always copies to the default Flash memory partition of the router. In most cases, the default partition is partition 1. However, if your run-from-flash (RFF) router is running a Flash image located in partition 1, the default partition is partition 2. In this case, the Router Software Loader will copy the new image to partition 2, and reload the router with the image that still resides in partition 1.
We recommend that you unpartition your Flash memory before using the Router Software Loader to upgrade your router's Cisco IOS image.
To unpartition your Flash memory, take the following steps:
Step 1 Log into the router via the console port using Telnet or terminal emulation software. (If you use terminal emulation software, configure the software settings to 9600 baud, no parity, 8 data bits, and 1 stop bit.)
Step 2 When the router boots up, enter the enable mode, as follows:
router> enable

password: <password>
router#
Step 3 Erase the contents of the Flash memory partition except the one currently in use (this partition will be in the Read ONLY state in the partition listing), as shown below.
router# erase flash

Partition   Size    Used      Free      Bank-Size  State          Copy Mode
  	1         8192K   3724K     4467K     8192K      Read ONLY      RXBOOT-manual
  	2         8192K   3724K     4467K     8192K      Read/Write     Direct

System flash directory, partition 2:
File  Length   Name/status
  	1   3813972  cpa25-y-l.111-6.1
[3814036 bytes used, 4574572 available, 8388608 total]

Erase flash device, partition 2? [confirm]
Are you sure? [yes/no]: y

Erasing device... eeeeeeeeeeeeeeeeeeeeeeeeeeeeeeee ...erased

router#
Step 4 Enter the show flash command to verify that the desired Flash memory partitions have been erased:
router# show flash

System flash directory, partition 1:
File  Length   Name/status
  	1   3813972  cpa25-y-l.111-6.1
[3814036 bytes used, 4574572 available, 8388608 total]
8192K bytes of processor board System flash (Read ONLY)


System flash directory, partition 2:
No files in System flash
[0 bytes used, 8388608 available, 8388608 total]
8192K bytes of processor board System flash (Read/Write)
You are now ready to unpartition the Flash memory.
Step 5 Enter the configuration mode and enter the partition command to create a single Flash memory partition, as follows:
router# configure terminal

Enter configuration commands, one per line.  End with cntrl/z.
router(config)# partition flash 1
Step 6 Exit the configuration mode and verify that flash memory now has a single partition, as follows:
router(config)# exit

router# show flash


System flash directory:
File  Length   Name/status
 	1   3813972  cpa25-y-l.111-6.1
[3814036 bytes used, 12963180 available, 16777216 total]
16384K bytes of processor board System flash (Read ONLY)

router#
You can now log out of the router and start the the Router Software Loader application.
As part of the connection procedure, the Router Software Loader writes the current running configuration of the router to the startup configuration in NVRAM. This operation overwrites the previous startup configuration file.
| Caution If your router is running in ROM monitor mode or from the bootstrap image in ROM, and if the current startup configuration was created while running a full Cisco IOS system image, you should copy the startup configuration file to a network server before running the Router Software Loader. Otherwise, you might lose several configuration commands that are not supported by the bootstrap image, such as all routing and bridging configurations. As an option, if the router has a valid Cisco IOS image in Flash memory, you can reboot the router from the image in Flash before running the Router Software Loader. This way, your configuration commands will not be lost when the Router Software Loader writes the image to NVRAM. To do this, log into the router via the console port using Telnet or terminal emulation software. (If you use terminal emulation software, configure the software settings to 9600 baud, no parity, 8 data bits, and 1 stop bit.) Then follow Step 1 through Step 7 to reboot from Flash memory. |
Refer to the following steps to determine the operation mode of your particular router, and then how to reboot the router to run the image in Flash memory:
Step 1 After logging into the router, observe the command prompt.
If the prompt appears as a "rommon 1>" or ">," the router is operating in ROM monitor mode.
Step 2 To boot the router from the image in Flash memory, enter the following command:
> b flash
The router will now load the Flash memory image. When the image is loaded, you can log out and start the Router Software Loader application.
If the prompt appears as "[router name](boot)>" or "[router name](boot)#," the router is running the bootstrap image.
Step 3 Enter the show version command at the prompt and examine the Configuration Register value shown in the last line of the show version output.
Step 4 If your router shows the "[router name](boot)>" prompt, enter the enable command and supply the password if necessary.
Step 5 If the last digit of the Configuration Register is greater than 1, enter the reload command to reboot the router to run the image in Flash memory.
Step 6 If the last digit of the Configuration Register is less than 2, you must change the Configuration Register value before reloading, as follows:
router# configure terminal
Step 7 Enter the following configuration commands, one per line and end with Ctrl-Z:
router(config)# config-register 0x2102

router(config)# exit

router# reload
The router will now reboot and load the image in Flash memory. (If you were logged in via Telnet, you will be logged out automatically when the reboot operation begins.)
After the router reboots, you can log out and start the Router Software Loader application.
This section identifies specific features supported on Cisco 2500 series routers. Table 4 lists feature sets that are identical to their Cisco counterparts. Features marked with "yes" are supported; features marked with "-" are not supported. Features marked with "Plus" are offered only in the Plus feature sets, not in the basic feature set. Features marked with "Encrypt," indicate the addition of 40-bit (Plus 40) or 56-bit (Plus 56) data encryption feature sets. You can use the information given in the tables provided in this section in conjunction with the information provided in the section "Cisco Feature Pack Descriptions,", to determine which features a particular feature set supports.
| Features | IP Routing | IP/IPX/AppleTalk/DEC | Enterprise |
|---|---|---|---|
| LAN Support |
|
|
|
Apollo Domain | - | - | Yes |
AppleTalk 1 and 21 | - | Yes | Yes |
Banyan VINES | - | - | Yes |
Concurrent routing and bridging (CRB) | Yes | Yes | Yes |
DECnet IV | - | Yes | Yes |
DECnet V | - | - | Yes |
GRE | Yes | Yes | Yes |
Integrated routing and bridging (IRB)2 | Yes | Yes | Yes |
IP | Yes | Yes | Yes |
LAN extension host | Yes | Yes | Yes |
Multiring | Yes | Yes | Yes |
Novell IPX3 | - | Yes | Yes |
OSI | - | - | Yes |
Source-route bridging4 | - | - | - |
Transparent and translational bridging | Yes | Yes | Yes |
XNS | - | - | Yes |
| WAN Services |
|
|
|
Combinet Packet Protocol (CPP) | Yes | Yes | Yes |
Dialer profiles | Yes | Yes | Yes |
Frame Relay | Yes | Yes | Yes |
Frame Relay SVC Support (DTE) | - | - | Yes |
Frame Relay traffic shaping | Yes | Yes | Yes |
Half bridge/half router for CPP and PPP | Yes | Yes | Yes |
HDLC | Yes | Yes | Yes |
IPXWAN 2.0 | - | Yes | Yes |
ISDN5 | Yes | Yes | Yes |
Multichassis Multilink PPP (MMP) | - | - | Yes |
PPP6 | Yes | Yes | Yes |
SMDS | Yes | Yes | Yes |
Switched 56 | Yes | Yes | Yes |
Virtual Private Dial-up Network (VPDN) | - | Yes | Yes |
X.257 | Yes | Yes | Yes |
| WAN Optimization |
|
|
|
Bandwidth-on-demand | Yes | Yes | Yes |
Custom and priority queuing | Yes | Yes | Yes |
Dial backup | Yes | Yes | Yes |
Dial-on-demand | Yes | Yes | Yes |
Header8, link and payload compression | Yes | Yes | Yes |
Snapshot routing | Yes | Yes | Yes |
Weighted fair queuing | Yes | Yes | Yes |
| IP Routing |
|
|
|
BGP | Yes | Yes | Yes |
BGP49 | Yes | Yes | Yes |
EGP | Yes | Yes | Yes |
Enhanced IGRP | Yes | Yes | Yes |
Enhanced IGRP Optimizations | Yes | Yes | Yes |
ES-IS | - | - | Yes |
IGRP | Yes | Yes | Yes |
IS-IS | - | - | Yes |
Named IP Access Control List | Yes | Yes | Yes |
Network Address Translation (NAT) | Plus | Plus | Plus |
NHRP | Yes | Yes | Yes |
On Demand Routing (ODR) | Yes | Yes | Yes |
OSPF | Yes | Yes | Yes |
OSPF Not-So-Stubby-Areas (NSSA) | Yes | Yes | Yes |
OSPF On Demand Circuit (RFC 1793) | Yes | Yes | Yes |
PIM | Yes | Yes | Yes |
Policy-based routing | Yes | Yes | Yes |
RIP | Yes | Yes | Yes |
RIP Version 2 | Yes | Yes | Yes |
| Other Routing |
|
|
|
AURP | - | Yes | Yes |
IPX RIP | - | Yes | Yes |
NLSP | - | Yes | Yes |
RTMP | - | Yes | Yes |
SMRP | - | Yes | Yes |
SRTP | - | - | Yes |
| Multimedia and Quality of Service |
|
|
|
Generic traffic shaping | Yes | Yes | Yes |
Random Early Detection (RED) | Yes | Yes | Yes |
Resource Reservation Protocol (RSVP) | Yes | Yes | Yes |
| Management |
|
|
|
AutoInstall | Yes | Yes | Yes |
Automatic modem configuration | Yes | Yes | Yes |
HTTP Server | Yes | Yes | Yes |
RMON events and alarms | Yes | Yes | Yes |
RMON full | Plus | Plus | Plus |
SNMP | Yes | Yes | Yes |
Telnet | Yes | Yes | Yes |
| Security |
|
|
|
Access lists | Yes | Yes | Yes |
Access security | Yes | Yes | Yes |
Extended access lists | Yes | Yes | Yes |
Kerberized login | - | - | Yes |
Kerberos V client support | - | - | Yes |
Lock and key | Yes | Yes | Yes |
MAC security for hubs11 | Yes | Yes | Yes |
MD5 routing authentication | Yes | Yes | Yes |
Network layer encryption (40-bit or export controlled 56-bit DES)12 | Encrypt | Encrypt | Encrypt |
RADIUS | Yes | Yes | Yes |
Router authentication | Encrypt | Encrypt | Encrypt |
TACACS+13 | Yes | Yes | Yes |
| IBM Support (Optional) |
|
|
|
BAN for SNA Frame Relay support | Plus | Plus | Yes |
Bisync | Plus | Plus | Yes |
Caching and filtering | Plus | Plus | Yes |
DLSw+ 14 | Plus | Plus | Yes |
Downstream PU (DSPU) concentration | Plus | Plus | Yes |
Frame Relay SNA support (RFC 1490) | Plus | Plus | Yes |
Native Client Interface Architecture (NCIA) Server | Plus | Plus | Yes |
NetView Native Service Point | Plus | Plus | Yes |
QLLC | Plus | Plus | Yes |
Response Time Reporter (RTR) | Plus | Plus | Yes |
SDLC integration | Plus | Plus | Yes |
SDLC transport (STUN) | Plus | Plus | Yes |
SDLC-to-LAN conversion (SDLLC) | Plus | Plus | Yes |
SNA and NetBIOS WAN optimization via local acknowledgment | Plus | Plus | Yes |
SRB/RSRB15 | Plus | Plus | Yes |
SRT | Plus | Plus | Yes |
TG/COS | - | - | Yes |
TN3270 | - | - | Yes |
| Protocol Translation |
|
|
|
LAT | - | - | Yes |
Rlogin | - | - | Yes |
| Remote Node16 |
|
|
|
ARAP 1.0/2.017 | - | Yes | Yes |
Asynchronous master interfaces | Yes | Yes | Yes |
ATCP | - | Yes | Yes |
CPPP | Yes | Yes | Yes |
CSLIP | Yes | Yes | Yes |
DHCP | Yes | Yes | Yes |
IP pooling | Yes | Yes | Yes |
IPX and ARAP on virtual async interfaces | - | - | Yes |
IPXCP8 | - | Yes | Yes |
MacIP | - | Yes | Yes |
NASI | - | Yes | Yes |
NetBEUI over PPP | Yes | Yes | Yes |
PPP | Yes | Yes | Yes |
SLIP | Yes | Yes | Yes |
| Terminal Services16 |
|
|
|
LAT18 | - | - | Yes |
Rlogin | Yes | Yes | Yes |
Telnet | Yes | Yes | Yes |
TN3270 | - | - | Yes |
X.25 PAD | Yes | Yes | Yes |
Xremote | - | - | Yes |
In addition to the Cisco IOS feature sets, the CD-ROM also contains the Router Software Loader, which you can use to download the software to the router. The booklet included with the CD-ROM explains how to install the software on a PC running Windows 95, but you can also install the software using Windows 3.1.
This section describes how to install the software images from the CD-ROM using a PC running Windows 3.1. The process requires that you first obtain a Trivial File Transfer Protocol (TFTP) application or a remote copy protocol (rcp) application, which you can use to set up your PC as a TFTP server or an rcp server. You can use either the copy tftp flash or copy rcp flash command to download the software images to the router from a system running Windows 3.1.
This section provides steps that enable you to install the router software using a TFTP application and a PC running Windows 3.1.
To install the software using an rcp application, follow the same steps but use rcp instead of TFTP. You must also substitute the copy rcp flash command for the copy tftp flash command in Step 8. See the next section, "Command Reference Information for TFTP and rcp," for detailed information about the copy rcp flash and copy tftp flash commands.
Step 1 Install any TFTP application on the PC. (Not provided by Cisco.)
Step 2 Launch the TFTP application on the PC, usually by double-clicking the application icon or its filename.
Step 3 Set up the PC as a TFTP server using the TFTP application setup or configuration facility.
The user interface of most TFTP applications includes a setup facility that allows you to specify the PC as a server. For example, from the TFTP menu of one application, you can select Settings to display a panel that includes a checkbox beside the word Server. To configure the local PC as a server, click in this checkbox.
| Caution Be certain to set up your local PC as a TFTP server. If you overlook this step, you will not be able to copy the new software images. If you are using rcp instead of TFTP, you should also be certain to set up your local PC as an rcp server before you copy the software images. |
Step 4 Establish a console session from your local PC (which is now configured as a TFTP server) to the router. You can do this in two ways:
Step 5 Connect your PC's Ethernet port to the router's Ethernet port using the 10BaseT crossover cable provided.
In the following steps, you will upgrade your CiscoPro router to a Cisco Enterprise router. If you have a CiscoPro CPA1000, CPA1600, CPA2500 or CPA4500 router and plan to install an 11.2 image on the router, you must perform Step 6 through Step 13. These steps upgrade your router to allow Enterprise images to run on it. Refer to the Note on page 3 for details.
Step 6 From the console, enter the following configuration command:
# config terminal
Step 7 From the console, enter the following configuration command:
# config-reg 0x2102
Step 8 At the router prompt, enter the following command to copy the router upgrade utility from the CD-ROM drive of the PC to the router:
(In the next series of steps, you download the Cisco IOS 11.2 images that you want installed on your upgraded router.)
# copy tftp flash
Step 9 When prompted, enter the IP address of your local Windows 3.1-based PC, as in the following example:
Address or name of remote host [255.255.255.255]? 131.108.1.1
This is the IP address of your local PC, not the router.
Step 10 When prompted, enter the full pathname of the image to be copied to the router as in the following example:
Source file name? d:\cpswinst\images\cpa25-upgrade-l.112-3.P
Step 11 In response to the following prompt, enter the destination filename and press Enter to indicate that you want to copy the image:
Destination file name [d:\cpswinst\images\cpa25-upgrade-1.112-3.p]? cpa25-upgrade-l.112-3.P
(This is the name of the image file on the router, not the full pathname of the image on the CD-ROM on the PC.)
During the transfer process, messages indicate that the software has accessed the file you have specified and is loading it.
Step 12 Enter yes or no in response to the prompt asking if you want to erase the existing image in the router's Flash memory before copying the new one:
Erase flash device before writing? [confirm] yes
When copying to Flash memory, the system provides an option to erase existing internal Flash memory before writing onto it. The entire copying process takes several minutes and differs from network to network.
The exclamation point (!) indicates that the copy process is taking place. Each exclamation point indicates that ten packets have been transferred successfully. A series of "V" characters indicates that a checksum verification of the image is occurring after the image is written to Flash memory.
Step 13 Enter the reload command to reload the router:
# reload
At this point your CiscoPro router has been upgraded to a Cisco Enterprise router. Because the original Cisco IOS image, which resided in Flash memory, was erased during the upgrade process, the router should now be running in bootstrap (boot)# mode.
Step 14 At the router prompt, enter the following command to copy the new software image from the CD-ROM drive of the PC to the router:
(boot)# copy tftp flash
In the next series of steps, you download the Cisco IOS 11.2 images that you want installed on your upgraded router.
Step 15 When prompted, enter the IP address of your local Microsoft Windows 3.1-based PC as in the following example:
Address or name of remote host [255.255.255.255]? 131.108.1.1
This is the IP address of your local PC, not that of the router.
Step 16 When prompted, enter the full pathname of the Cisco IOS 11.2 image to be copied to the router as in the following example:
Source file name? d:\cpswinst\images\80135403.bin
This example specifies the IP feature set for Cisco 2500 series routers.
Step 17 In response to the prompt, enter the destination filename and press Enter to indicate that you want to copy the image.
This is the name of the image file on the router, not the full pathname of the image on the CD-ROM attached to the PC.
Destination file name [d:\cpswinst\images\]?c2500-i-l
During the transfer process, the software displays messages indicating that it has accessed the file you have specified and is loading it.
Step 18 Enter yes or no in response to the prompt asking if you want to erase the existing image copy resident in the router's Flash memory before copying the new one.
Erase flash device before writing? [confirm] yes
When copying to internal Flash memory, the system provides an option to erase existing internal Flash memory before writing onto it. The entire copying process takes several minutes and differs from network to network.
The exclamation point (!) indicates that the copy process is taking place. Each exclamation point (!) indicates that ten packets have been transferred successfully. A series of "V" characters indicates that a checksum verification of the image is occurring after the image is written to Flash memory.
Step 19 Enter the reload command to reload the router:
(boot)# reload
This section includes detailed information about the copy rcp flash and copy tftp flash commands. This information supplements the information provided in the steps described in the section "Installation Process,".
To copy a file from a network server to the router or to another destination using rcp, use the copy rcp flash EXEC command:
copy rcp flash
flash | Specifies internal Flash memory as the destination of the copy operation. |
EXEC
The rcp protocol requires that a client send the remote username of an rcp request to the server. When you enter the copy rcp flash command, by default the Cisco IOS software sends the username associated with the current teletype (TTY), if that name is valid. For example, if the user is connected to the router through Telnet and the user was authenticated through the username command, then the software sends that username as the remote username.
If the TTY username is invalid, the software uses the host name as the both the remote and local usernames. To specify a different remote username to be sent to the rcp server, use the ip rcmd remote-username command. You can also specify the path of an existing directory along with the remote username.
| Caution The remote username must be associated with an account on the destination server. If you do not use the ip rcmd remote-username command to specify the name of a remote user associated with an account on the server, then the remote username associated with the current TTY process must be associated with an account on the server. If there is no username for the current TTY process, then the host name must be associated with an account on the server. If the network administrator of the destination server did not establish accounts for the remote username used, this command will not execute successfully when a default remote username is used. |
If you copy a system image from a PC used as a file server, the remote host computer must support the remote shell (rsh) protocol.
Use the copy rcp flash command to copy a system image from a network server to the router's internal Flash memory using rcp. The Cisco IOS software prompts for the address of the rcp server and rcp filename. When you enter this command, the system provides an option to erase existing Flash memory before writing onto it. The entire copying process takes several minutes and differs from network to network.
Before booting from Flash memory, verify that the checksum of the image in internal Flash memory matches the checksum listed in the README file distributed with the system software image. The checksum of the image in Flash memory is displayed at the bottom of the screen when you issue the copy rcp flash command. The README file was copied to the rcp server automatically when you installed the system software image.
The following example shows how to use the copy rcp flash command on a Cisco 4500 router. The interface might differ slightly on other systems. This example copies a system image named file1 from the netadmin1 directory on the remote server named SERVER1.CISCO.COM with an IP address of 131.108.101.101 to Flash memory. To ensure that enough Flash memory is available to accommodate the system image to be copied, the Cisco IOS software allows you to erase the contents of Flash memory first.
Router1# configure terminal


Router1(config)# rcmd remote-username netadmin1

Router(config)# Ctrl-Z

Router# copy rcp flash


System flash directory, partition 2:
File  Length   Name/status
  1   984      file1 [deleted]
  2   984      file1
[2096 bytes used, 8386512 available, 8388608 total]
Address or name of remote host [255.255.255.255]? 131.108.101.101
Source file name? file1

Destination file name [file1]?
Accessing file 'file1' on 131.108.101.101...
Loading dirt/ssangiah/file1 .from 131.108.101.101 (via Ethernet0): ! [OK]

Erase flash device before writing? [confirm]
Flash contains files. Are you sure you want to erase? [confirm]

Copy 'file1' from server
  as 'file1' into Flash WITH erase? [yes/no] yes

Erasing device... eeeeeeeeeeeeeeeeeeeeeeeeeeeeeeee ...erased
Loading file1 from 131.108.101.101 (via Ethernet0): !
[OK - 984/8388608 bytes]

Verifying checksum...  OK (0x14B3)
Flash copy took 0:00:01 [hh:mm:ss]
The following example shows sample output resulting from copying a system image into a partition of Flash memory. The system prompts only if there are two or more read/write partitions or one read-only and one read/write partition and dual Flash memory bank support in boot ROMs. If the partition entered is not valid, the process terminates. You have the option to enter a partition number, a question mark (?) for a directory display of all partitions, or a question mark and a number (?number) for a directory display of a particular partition. The default is the first read/write partition.
Router# copy rcp flash


System flash partition information:
Partition   Size     Used    Free    Bank-Size   State       Copy-Mode
    1       4096K    2048K   2048K   2048K       Read Only   RXBOOT-FLH
    2       4096K    2048K   2048K   2048K       Read/Write  Direct

[Type ?<no> for partition directory; ? for full directory; q to abort]
Which partition? [default = 2]
If the partition is read-only and has dual Flash memory bank support in boot ROMs, the session continues as follows:
                               ****  NOTICE  ****
Flash load helper v1.0
This process will accept the copy options and then terminate
the current system image to use the ROM based image for the copy.
Routing functionality will not be available during that time.
If you are logged in via telnet, this connection will terminate.
Users with console access can see the results of the copy operation.
                               ---- ******** ----
Proceed? [confirm]
System flash directory, partition 1:
File  Length   Name/status
  1   3459720  master/igs-bfpx.100-4.3
[3459784 bytes used, 734520 available, 4194304 total]
Address or name of remote host [255.255.255.255]? 131.108.1.1

Source file name? master/igs-bfpx-100.4.3

Destination file name [default = source name]?
The file will be copied into the partition given earlier by the user:
Loading master/igs-bfpx.100-4.3 from 131.108.1.111: !
Erase flash device before writing? [confirm]
Flash contains files. Are you sure? [confirm]
Copy 'master/igs-bfpx.100-4.3' from TFTP server
as 'master/igs-bfpx.100-4.3' into Flash WITH erase? [yes/no] yes
If the partition is read/write, the session continues as follows:
System flash directory, partition 2:
File  Length   Name/status
  1   3459720  master/igs-bfpx.100-4.3
[3459784 bytes used, 734520 available, 4194304 total]
Address or name of remote host [255.255.255.255]? 131.108.1.1

Source file name? master/igs-bfpx.100-4.3
Destination file name [default = source name]?
The file will be copied into the partition given earlier by the user:
Accessing file 'master/igs-bfpx.100-4.3' on ABC.CISCO.COM...
Loading master/igs-bfpx.100-4.3 from 131.108.1.111: !
Erase flash device before writing? [confirm]
Flash contains files. Are you sure? [confirm]
Copy 'master/igs-bfpx.100-4.3' from TFTP server
as 'master/igs-bfpx.100-4.3' into Flash WITH erase? [yes/no] yes
boot config
boot system flash
cd
copy flash rcp
ip rcmd remote-username
verify flash
To copy a file from a TFTP server to the router or to another destination, use the copy tftp flash EXEC command.
copy tftp flash
flash | Specifies internal Flash memory as the destination of the copy operation. |
EXEC
The system prompts for the address of the TFTP server and TFTP filename if you do not provide them at the command line. When copying to internal Flash memory, the system provides an option to erase existing internal Flash memory before writing onto it. The entire copying process takes several minutes and differs from network to network.
Before booting from Flash memory, verify that the checksum of the image in Flash memory matches the checksum listed in the README file distributed with the system software image. The checksum of the image in Flash memory is displayed at the bottom of the screen when you enter the copy tftp flash command. The README file was copied to the TFTP server automatically when you installed the system software image.
Examples
The following example shows sample output of copying a system image named file1 into Flash memory:
Router# copy tftp flash


System flash directory, partition 2:
File  Length   Name/status
  1   984      file1 [deleted]
  2   984      file1
[2096 bytes used, 8386512 available, 8388608 total]
Address or name of remote host [255.255.255.255]? 223.255.254.254

Source file name? file1

Destination file name [file1]?
Accessing file 'file1' on 223.255.254.254...
Loading dirt/ssangiah/file1 .from 223.255.254.254 (via Ethernet0): - [OK]

Erase flash device before writing? [confirm]
Flash contains files. Are you sure you want to erase? [confirm]

Copy 'file1' from server
  as 'file1' into Flash WITH erase? [yes/no] yes

Erasing device... eeeeeeeeeeeeeeeeeeeeeeeeeeeeeeee ...erased
Loading file1 from 223.255.254.254 (via Ethernet0): !!!!...
[OK - 984/8388608 bytes]

Verifying checksum...  OK (0x14B3)
Flash copy took 0:00:01 [hh:mm:ss]
The exclamation point (!) indicates that the copy process is taking place. Each exclamation point indicates that ten packets have been transferred successfully. A series of "V" characters indicates that a checksum verification of the image is occurring after the image is written to Flash memory.
The following example shows sample output resulting from copying a system image into a partition of Flash memory. The system will prompt only if there are two or more read/write partitions or one read-only and one read/write partition and dual Flash memory bank support in boot ROMs. If the partition entered is not valid, the process terminates. You can enter a partition number, a question mark (?) for a directory display of all partitions, or a question mark and a number (?number) for directory display of a particular partition. The default is the first read/write partition.
Router# copy tftp flash


System flash partition information:
Partition   Size     Used    Free    Bank-Size   State       Copy-Mode
    1       4096K    2048K   2048K   2048K       Read Only   RXBOOT-FLH
    2       4096K    2048K   2048K   2048K       Read/Write  Direct

[Type ?<no> for partition directory; ? for full directory; q to abort]
Which partition? [default = 2]
If the partition is read-only and has dual Flash memory bank support in boot ROMs, the session continues as follows:
                               ****  NOTICE  ****
Flash load helper v1.0
This process will accept the copy options and then terminate
the current system image to use the ROM based image for the copy.
Routing functionality will not be available during that time.
If you are logged in via telnet, this connection will terminate.
Users with console access can see the results of the copy operation.
                               ---- ******** ----
Proceed? [confirm]
System flash directory, partition 1:
File  Length   Name/status
  1   3459720  master/igs-bfpx.100-4.3
[3459784 bytes used, 734520 available, 4194304 total]
Address or name of remote host [255.255.255.255]? 131.108.1.1

Source file name? master/igs-bfpx-100.4.3

Destination file name [default = source name]?
The file will be copied into the partition given earlier by the user:
Loading master/igs-bfpx.100-4.3 from 131.108.1.111: !
Erase flash device before writing? [confirm]
Flash contains files. Are you sure? [confirm]
Copy 'master/igs-bfpx.100-4.3' from TFTP server
as 'master/igs-bfpx.100-4.3' into Flash WITH erase? [yes/no] yes
If the partition is read/write, the session continues as follows:
System flash directory, partition 2:
File  Length   Name/status
  1   3459720  master/igs-bfpx.100-4.3
[3459784 bytes used, 734520 available, 4194304 total]
Address or name of remote host [255.255.255.255]? 131.108.1.1

Source file name? master/igs-bfpx.100-4.3

Destination file name [default = source name]?
The file will be copied into the partition given earlier by the user:
Accessing file 'master/igs-bfpx.100-4.3' on ABC.CISCO.COM...
Loading master/igs-bfpx.100-4.3 from 131.108.1.111: !
Erase flash device before writing? [confirm]
Flash contains files. Are you sure? [confirm]
Copy 'master/igs-bfpx.100-4.3' from TFTP server
as 'master/igs-bfpx.100-4.3' into Flash WITH erase? [yes/no] yes
copy flash tftp
verify
verify flash
For detailed information about this software release, see the Cisco IOS release notes shipped with your router and also located on the Documentation CD-ROM. Information about the feature pack described in this release note includes the following:
Cisco IOS software documentation is provided on the Documentation CD that is included with your feature pack. Documentation about Cisco IOS Release 11.2(3) and 11.2(3)P describes the software images included on this feature pack CD.
To locate this documentation, you can either use the Documentation CD or go to www.cisco.com, select Products and Ordering, Documentation, Cisco IOS Software Configuration, and Cisco IOS Release 11.2. The documentation for Cisco IOS Release 11.2 is organized as follows:
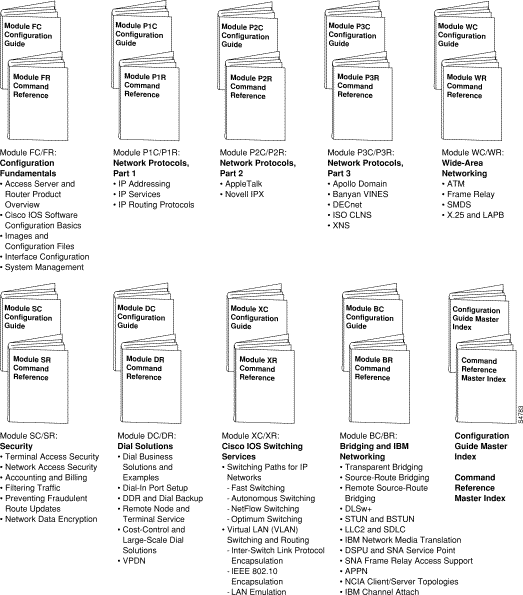
Cisco IOS configuration guides describe system configuration and maintenance tasks and provide comprehensive configuration examples. The configuration guides do not include command syntax for every command, so you should use them in conjunction with the command references. The Cisco configuration guides give in-depth descriptions of configuration tasks.
Cisco IOS command references describe the commands necessary for configuring and maintaining your system. If you are new to Cisco software, you should use the Cisco command references in conjunction with the configuration guides to reference commands and detailed information pertaining to their use. If you are an experienced network administrator, you might want to use the Cisco command references as standalone manuals.
Cisco Connection Online (CCO) is Cisco Systems' primary, real-time support channel. Maintenance customers and partners can self-register on CCO to obtain additional information and services.
Available 24 hours a day, 7 days a week, CCO provides a wealth of standard and value-added services to Cisco's customers and business partners. CCO services include product information, product documentation, software updates, release notes, technical tips, the Bug Navigator, configuration notes, brochures, descriptions of service offerings, and download access to public and authorized files.
CCO serves a wide variety of users through two interfaces that are updated and enhanced simultaneously: a character-based version and a multimedia version that resides on the World Wide Web (WWW). The character-based CCO supports Zmodem, Kermit, Xmodem, FTP, and Internet e-mail, and it is excellent for quick access to information over lower bandwidths. The WWW version of CCO provides richly formatted documents with photographs, figures, graphics, and video, as well as hyperlinks to related information.
You can access CCO in the following ways:
For a copy of CCO's Frequently Asked Questions (FAQ), contact cco-help@cisco.com. For additional information, contact cco-team@cisco.com.
If you are a network administrator and need personal technical assistance with a Cisco product that is under warranty or covered by a maintenance contract, contact Cisco's Technical Assistance Center (TAC) at 800 553-2447, 408 526-7209, or tac@cisco.com. To obtain general information about Cisco Systems, Cisco products, or upgrades, contact 800 553-6387, 408 526-7208, or cs-rep@cisco.com.
![]()
![]()
![]()
![]()
![]()
![]()
![]()
![]()
Posted: Tue Dec 17 19:29:12 PST 2002
All contents are Copyright © 1992--2002 Cisco Systems, Inc. All rights reserved.
Important Notices and Privacy Statement.