|
|

The VRC application runs on a Sun server and provides a GUI client running within a browser on PCs running the Windows operating system.
VRC software is used to provide basic dial plan provisioning and network configuration when integrated with Packet Telephony Center (PTC).
The client is provided as web pages accessed with a web browser. Before you begin, read the following tips for troubleshooting client operations:
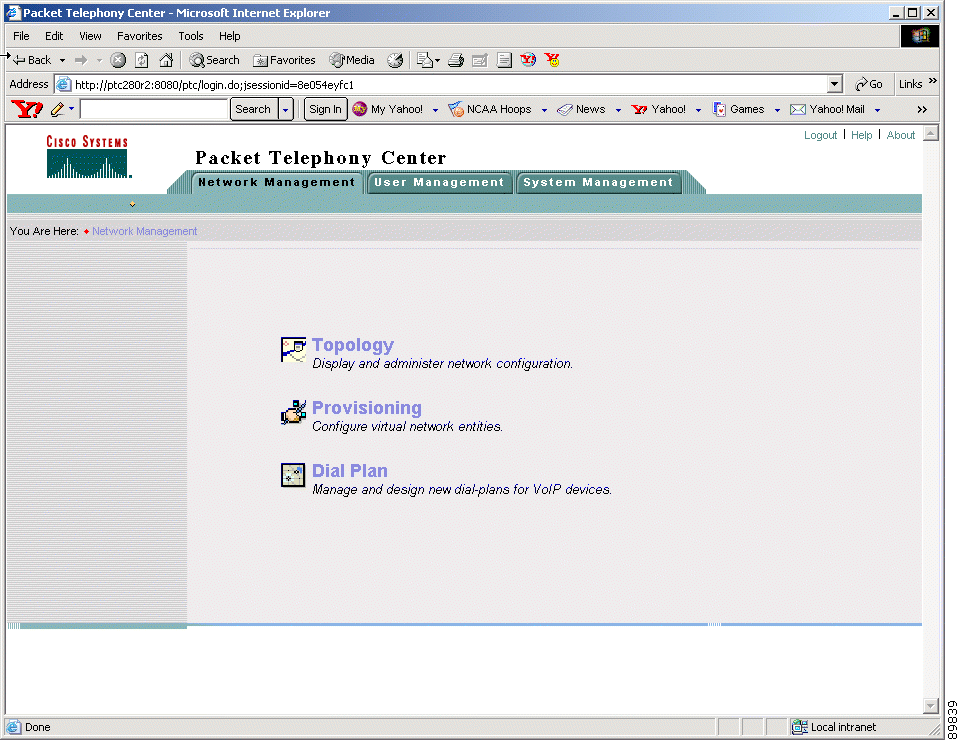
The VRC client is launched from the PTC application. The Dial Plan icon, which is used to launch VRC, is located on the main window of the PTC user interface. Figure 2-1 shows the main window that appears after a successful log in to PTC.
To access VRC from the PTC user interface
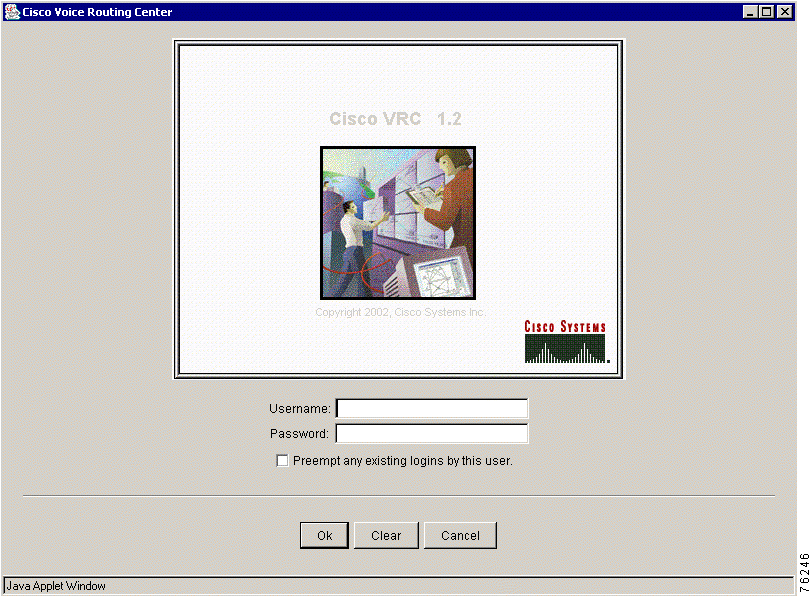
Step 2 Enter your Username and Password and click OK.
Step 3 Use the check box to preempt any previous logins.
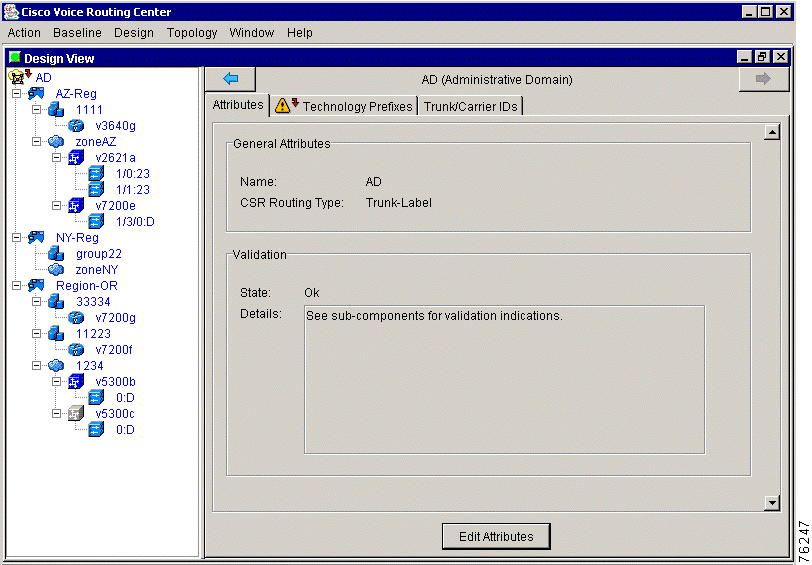
Step 4 Click OK. The main Cisco Voice Routing Center window appears (Figure 2-3).
Step 5 Choose your operation from the VRC menus.
Step 2 To exit from the browser window, restore your browser window, and choose Close from the File menu.
Table 2-1 lists the options available from the VRC main menus.
This section provides you with a quick overview of the Voice Routing Center and lists the first steps to take when you use the VRC to open an existing dial plan or to create a new dial plan.
The VRC is designed so that a user can make dial plan changes for the whole network (Administrative Domain, or AD), or only within a partition of the network (region). There can only be one design session open per region. The advantage of regional administration is that multiple users can concurrently be doing regional designs.
Only one user at a time can do AD level designs and that design session blocks all regional design sessions.
This section describes a quick start for:
 |
Note The quick start is an overview of the required operations. For detailed information about each task, refer to the appropriate sections in this user guide. |
The following tasks provide a quick start for creating a new dial plan:
1. Add your elements to the topology by using batch import or by manually adding each element to the topology in the Topology View. If you are using VRC integrated with PTC, add the elements using the PTC Topology Manager. In either case, if an element is not present in the topology then it cannot participate in the dial plan.
2. Start a new design session.
3. Add your elements to the design session dial plan.
4. Configure regions, zones, routes, gatekeeper groups, and directory gatekeeper groups as desired.
5. Use the Validate operation to identify any inconsistencies and errors in the dial plan. See "Troubleshooting Cisco VRC" to help you correct any errors. Refer back to Step 4 to make corrections to your configurations.
6. Commit your design session to establish a baseline dial plan. After you commit a dial plan design, you are advised of the elements that receive a new configuration CLI. You can also preview the configuration CLI for those elements.
The following tasks provide a quick start for creating a new dial plan by discovery:
1. Add your elements to the topology by using batch import or by manually adding each element to the topology in the Topology View. If you are using VRC integrated with PTC, add the elements using the PTC Topology Manager. An element must exist in the topology to participate in the dial plan.
2. Execute a discovery of the network at the Administrative Domain (AD) level. VRC uses this information to establish a baseline dial plan. If there are any problems with the dial plan from VRC's perspective, you receive error, warning, or informational messages. See "Troubleshooting Cisco VRC" to help you correct any errors.
3. Make the necessary corrections to your configurations. View the generated CLI for any element to determine if your corrections achieve the expected result.
4. Use the Validate operation to identify any inconsistencies and errors in the dial plan. Refer back to Step 3 to make corrections to your configurations.
5. Commit your design session to establish a baseline dial plan. After you commit a dial plan design, you are advised of the elements that receive a new configuration CLI. You can also preview the configuration CLI for those elements.
The following tasks provide a quick start for starting a new dial plan design:
1. Add your elements to the topology using batch import or by manually adding each element to the topology in the Topology View. If you are using VRC integrated with PTC, add the elements using the PTC Topology Manager. An element must exist in the topology to participate in the dial plan.
2. Start a new design. The baseline dial plan, which is the last committed dial plan design, is displayed. Start a new design from the baseline dial plan.
3. Configure regions, zones, routes, gatekeeper groups, and directory gatekeeper groups as desired.
4. Use the Validate operation to identify any inconsistencies and errors in the dial plan. See "Troubleshooting Cisco VRC," to help you correct any errors. Refer back to Step 3 to make corrections to your configurations. View the generated CLI for any element to determine if you achieved the expected result.
5. Commit your design session to establish a baseline dial plan. After you commit a dial plan design, you are advised of the elements that receive a new configuration CLI. You can also preview the configuration CLI for those elements.
The following tasks provide a quick start for opening an existing dial plan design:
1. Open an existing design. Choose a previously saved design file.
2. Configure regions, zones, routes, gatekeeper groups, and directory gatekeeper groups as desired. Any new element must be added in the topology before you can add it to the dial plan.
3. Use the Validate operation to identify any inconsistencies and errors in the dial plan. See "Troubleshooting Cisco VRC," to help you correct any errors. View the generated CLI for any element to determine if you achieved the expected result.
4. Commit your design session to establish a baseline dial plan. After you commit a dial plan design, you are advised of the elements that receive a new configuration CLI. You can also preview the configuration CLI for those elements.
![]()
![]()
![]()
![]()
![]()
![]()
![]()
![]()
Posted: Fri May 9 17:18:25 PDT 2003
All contents are Copyright © 1992--2003 Cisco Systems, Inc. All rights reserved.
Important Notices and Privacy Statement.