|
|

This chapter describes the Topology View in the Cisco Voice Routing Center (VRC) server application. The Topology View is only available when you are using VRC as a standalone application. When you are using VRC integrated with Packet Telephony Center (PTC), the PTC Topology Manager is used instead of the VRC Topology View.
The Topology View provides an overview of the regions and the elements within each region.
From the Topology View, you can:
The following rules apply when using the Topology View:
To open the Topology View, choose Open Topology from the Topology menu. The Topology View window appears (Figure 6-1).
The Topology View window has two tabs:
The Regions tab lists all regions in the AD (Figure 6-1). The Regions tab lists the name of each region and the state of the region. You can add, delete, and modify the attributes of a region.

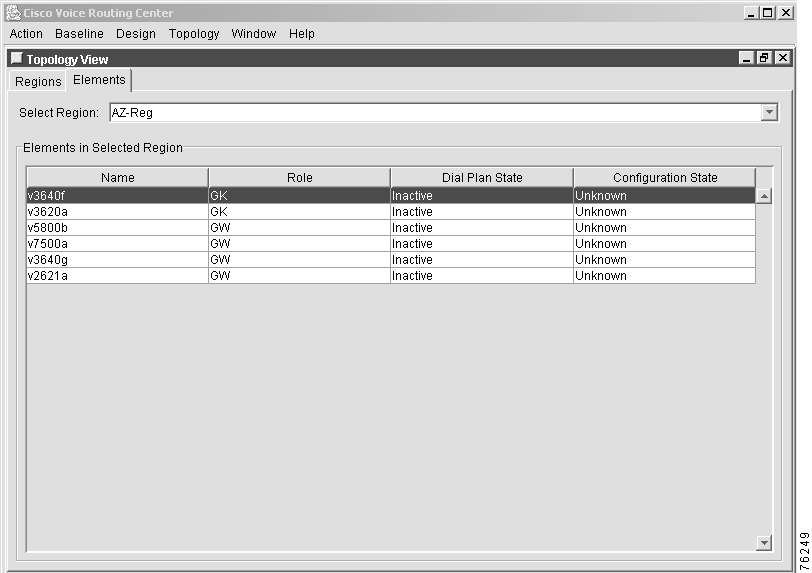
The Elements tab lists all elements for each region (Figure 6-2). The Elements tab shows the name, role, state, and configuration state of the elements in the selected region.
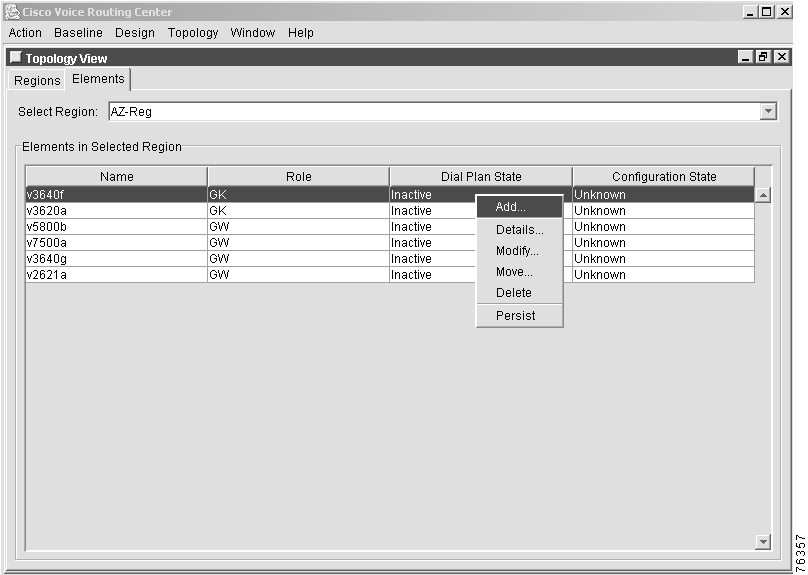
You can add, view details, modify, move, delete, and persist an element from the menu (Figure 6-3) when you right-click the selected element.
Use the Refresh Display option from the Window menu to show modifications in your window.
This procedure allows you to import topology information from a batch file through the user interface.
To import topology information, follow these steps:
Step 1 Choose Import Topology from the Topology menu. The Import Topology window displays a list of available topology batch files.
Step 2 Select the file that you want to import.
 |
Note The topology batch files must reside in the /tftpboot/gdpm/batch/ directory to import them from the user interface. |
Step 3 Click Import to import the topology or click Cancel to cancel the procedure.
The following example shows the format of a data file for a topology batch import file.
|
Note This example lists syntax rules and notes about batch import files. The area between the dotted lines is for information only. |
#-------------------------------------------------------------------------

# Sample Data File for Topology Batch Import

# ------------------------------------------

#

# Syntax:

# # 							- commented line

# 	$entity=<entityName> 				- a entity name descriptor

# 	$attributes=|attr1|attr2|... - attribute descriptor

# 	data1|data2|... 				- field data in the attributes order.

#

# Notes:

# 	* Attribute names are case sensitive

# 	* Any line starting with a char other than $ or | is ignored.

# 	* Any blank space between || in a data field are not ignored.

#

# * For Network elements the mandatory attributes are:

# 		scopeName, role, ipAddr, & mgmtIPAddr

#

# * Unspecified attributes take default values, if the attribute is

# not mandatory. The default values are:

# 		regPassword = ""

# 		privPassword = ""

# 		vtyPassword = ""

# 		secPassword = ""

# 		userId = ""

# 		telnetPort = 23

# 		vendor = "Cisco"

# 		distProtocol = "CLI/Telnet"

# 		discProtocol = "CLI"

# 		osVersion = set by discovery

# 		platform = set by discovery

# 		ieIPAddr = null (IP address of the Cisco IE2100)

#

#------------------------------------------------------------------------
The following is an example of a batch import file.
$entity=Scope

$attributes=|name|type|parent

|Region-A|Region|AD0

|Region-B|Region|AD0


# Note: "scopeName" used in the NetworkElement must be the "name" of an

# 	existing Scope or a newly added Scope.


$entity=NetworkElement

$attributes=|name|regPassword|privPassword|vtyPassword|userId|ipAddr|mgmtIPAddr|role|scope
Name

## ----- END -----
|
Note After you import the topology, we recommend that you delete the import batch file from the /tftpboot/gdpm/batch/ directory to protect the security of the element passwords. |
![]()
![]()
![]()
![]()
![]()
![]()
![]()
![]()
Posted: Mon Oct 14 09:54:16 PDT 2002
All contents are Copyright © 1992--2002 Cisco Systems, Inc. All rights reserved.
Important Notices and Privacy Statement.