|
|

This document describes how to install a WAN tap into a rack panel.
The rack panel can house three different types of WAN taps:
The following sections contain installation instructions:
Before beginning the installation process, read the following installation warnings:
 | Warning This warning symbol means danger. You are in a situation that could cause bodily injury. Before you work on any equipment, be aware of the hazards involved with electrical circuitry and be familiar with standard practices for preventing accidents. To see translations of the warnings that appear in this publication, refer to the Regulatory Compliance and Safety Information document that accompanied this device. |
 | Warning Only trained and qualified personnel should be allowed to install, replace, or service this equipment. |
 | Warning The safety cover is an integral part of the product. Do not operate the unit without the safety cover installed. Operating the unit without the cover in place will invalidate the safety approvals and pose a risk of fire and electrical hazards. |
 | Warning Before opening the chassis, disconnect the telephone-network cables to avoid contact with telephone-network voltages. |
 | Warning Do not work on the system or connect or disconnect cables during periods of lightning activity. |
 | Warning Hazardous network voltages are present in WAN ports regardless of whether power to the unit is OFF or ON. To avoid electric shock, use caution when working near WAN ports. When detaching cables, detach the end away from the unit first. |
 | Warning To avoid electric shock, do not connect safety extra-low voltage (SELV) circuits to telephone-network voltage (TNV) circuits. LAN ports contain SELV circuits, and WAN ports contain TNV circuits. Some LAN and WAN ports both use RJ-45 connectors. Use caution when connecting cables. |
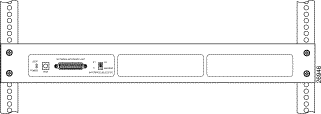
To install a rack panel, Cisco Systems recommends that you first secure the tap(s) to the rack panel, then mount the populated rack panel onto an equipment rack.
To install the rack panel, follow these steps:
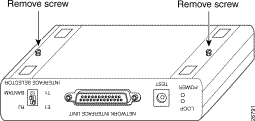
Step 1 Remove (and set aside) the two screws on the bottom side of the WAN tap (Figure 1).
Step 2 Turn the tap right-side up.
Step 3 Place the tap into the rack panel.
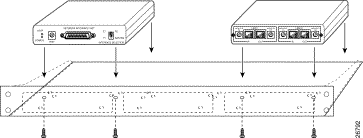
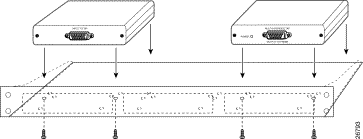
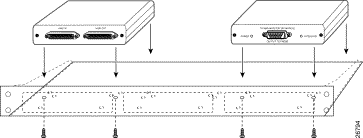
Step 4 From the underside of the rack panel, align the holes on the bottom of the tap (where you removed the screws in Step 1), with the holes in the rack panel (Figures 2 through 4).
Step 5 Secure the tap to the rack panel by screwing the two screws (removed in Step 1) into the holes of the rack panel and tap (Figures 2 through 4).
Step 6 Repeat Steps 1 through 5 for each WAN tap that you want to secure to the
rack panel.
To attach a populated rack panel to a standard 19-inch equipment rack, follow these steps:
Step 1 Determine the area on the equipment rack in which you will position the rack panel (either above or below the SwitchProbe device).
Step 2 Align the mounting holes on the rack panel with the desired holes on the equipment rack.
Step 3 Insert the screws into the desired holes.
Step 4 Tighten each screw until the rack panel is securely attached to the equipment rack.
Figure 5 shows a populated rack panel mounted in a standard equipment rack.
Cisco Connection Online (CCO) is Cisco Systems' primary, real-time support channel. Maintenance customers and partners can self-register on CCO to obtain additional information and services.
Available 24 hours a day, 7 days a week, CCO provides a wealth of standard and value-added services to Cisco's customers and business partners. CCO services include product information, product documentation, software updates, release notes, technical tips, the Bug Navigator, configuration notes, brochures, descriptions of service offerings, and download access to public and authorized files.
CCO serves a wide variety of users through two interfaces that are updated and enhanced simultaneously: a character-based version and a multimedia version that resides on the World Wide Web (WWW). The character-based CCO supports Zmodem, Kermit, Xmodem, FTP, and Internet e-mail, and it is excellent for quick access to information over lower bandwidths. The WWW version of CCO provides richly formatted documents with photographs, figures, graphics, and video, as well as hyperlinks to related information.
You can access CCO in the following ways:
For a copy of CCO's Frequently Asked Questions (FAQ), contact cco-help@cisco.com. For additional information, contact cco-team@cisco.com.
Cisco documentation and additional literature are available in a CD-ROM package, which ships with your product. The Documentation CD-ROM, a member of the Cisco Connection Family, is updated monthly. Therefore, it might be more current than printed documentation. To order additional copies of the Documentation CD-ROM, contact your local sales representative or call customer service. The CD-ROM package is available as a single package or as an annual subscription. You can also access Cisco documentation on the World Wide Web at http://www.cisco.com, http://www-china.cisco.com, or http://www-europe.cisco.com.
If you are reading Cisco product documentation on the World Wide Web, you can submit comments electronically. Click Feedback in the toolbar and select Documentation. After you complete the form, click Submit to send it to Cisco. We appreciate your comments.

![]()
![]()
![]()
![]()
![]()
![]()
![]()
![]()
Posted: Fri Sep 6 19:56:47 PDT 2002
All contents are Copyright © 1992--2002 Cisco Systems, Inc. All rights reserved.
Important Notices and Privacy Statement.