|
|

Cisco SwitchProbe devices are hardware devices with embedded firmware (specialized agent software) that collect a variety of statistical information about network operation. The SwitchProbe device collects this information by examining every packet passed on the network segment to which the agent is attached. The agent stores this statistical information locally within continuous counters that can be reset as desired.
These devices provide protocol monitoring and decoding when you use them with a client equipped with protocol decode software. All models also support the MIB II system and interface groups.
This document describes how to install and configure the Multiport T1/E1 WAN SwitchProbe device and its accessories. This device collects Remote Monitoring (RMON) and RMON2 data and is available in two configurations:
The Multiport T1/E1 WAN SwitchProbe device can support a 6 MB inverse multiplexer (IMUX) connected to a single interface.
The device contains one of the following network interface cards:
Each WAN interface can be configured to monitor traffic for its data-link connection identifier (DLCI) components. The SwitchProbe device can monitor up to 256 DLCIs aggregated from all interfaces. For example:
For a complete description of commands used to configure and maintain the device, refer to the SwitchProbe Installation and Configuration Guide and the Using the Campus TrafficDirector Application publication.
This document includes the following sections:
Command descriptions use the following conventions:
boldface font | Commands and keywords are in boldface. |
italic font | Arguments for which you supply values are in italics. |
[ ] | Elements in square brackets are optional. |
Screen examples use the following conventions:
| Terminal sessions and information the system displays are in |
boldface screen font | Information you must enter is in boldface screen font. |
[ ] | Default responses to system prompts are in square brackets. |
Notes use the following conventions:
Cautions use the following conventions:
 | Caution Means reader be careful. In this situation, you might do something that could result in equipment damage or loss of data. |
Warnings use the following conventions:
 | Warning This warning symbol means danger. You are in a situation that could cause bodily injury. Before you work on any equipment, you must be aware of the hazards involved with electrical circuitry and familiar with standard practices for preventing accidents. To see translated versions of the warnings, refer to the appendix "Translated Safety Warnings" in the Using the Campus TrafficDirector Application publication. |
The Multiport T1/E1 WAN SwitchProbe device is housed in a chassis that measures 17 inches wide by 16.5 inches deep by 5.25 inches high (13.3 cm by 43.18 cm by 41.91 cm). You can mount this device in a 19-inch equipment rack.
The device is designed to operate in a normal office environment and can be placed on a table or mounted in an equipment rack near the network segment it serves. The site must be equipped as follows:
| Caution To prevent the device from overheating, do not operate it in an area that exceeds the maximum recommended ambient temperature of 104° F (40° C). To prevent airflow restriction, allow at least 3 inches (7.6 cm) of clearance around the ventilation openings. |
| Caution You must provide adequate ventilation with at least 6 inches (15.24 cm) of clearance at the rear and front so the fan can exhaust air from the unit. |
| Caution Before plugging the power cord into the unit and the power source, verify that the power source to be used is compatible with the power supply requirements. |
| Warning Do not work on the system or connect or disconnect cables during periods of lightning activity. |
| Warning A voltage mismatch can cause equipment damage and may pose a fire hazard. If the voltage indicated on the label is different from the power outlet voltage, do not connect the chassis to that receptacle. |
| Warning Read the installation instructions before you connect the system to its power source. |
| Warning Only trained and qualified personnel should be allowed to install or replace this equipment. |
Before unpacking the carton, ensure that there is no visible damage to the carton. If there is damage, notify your carrier representative, and arrange for the representative to be present while the carton is unpacked.
Open the carton and carefully remove the device. Inspect it for any obvious damage that may have occurred during shipment. If you notice any damage, contact the carrier.
Remove the remaining items from the carton and verify that you have received the following items:
This section describes the physical features of the Multiport T1/E1 WAN SwitchProbe device and its accessories. General configuration instructions are included in the SwitchProbe Installation and Configuration Guide.
| Caution To prevent possible damage to the device, be sure to read the section "Site Requirements." |
Figure 1 shows the front panel of the device.

The four LEDs on the top left of the front panel of the chassis are described in Table 1.
| LED Label | Color | Status | Meaning |
|---|---|---|---|
POWER | Green | On | Indicates that proper power is being supplied to the device. This LED is normally on. |
Off | Indicates that proper power is not being supplied to the device. | ||
FAULT | Red | On or blinking | Indicates a hardware or software error in the device. |
Off | Indicates that the device is working correctly. | ||
DIAG |
|
| Reserved for future diagnostic use. |
ACTIVITY | Amber | On | Indicates heavy traffic on the network. |
Blinking | Indicates moderate traffic on the network. | ||
Off | Indicates no traffic on the network. |
A small pinhole is located to the left of the chassis LEDs on the front panel (see Figure 1). The manual reset switch is inside this pinhole. To manually reset the device, insert a small object (such as the tip of a pen) and lightly press the reset switch.
The two-port Multiport T1/E1 WAN SwitchProbe device has four interfaces:
The four-port Multiport T1/E1 WAN SwitchProbe device has six interfaces:
The Multiport T1/E1 WAN interfaces support connections to V.35, X.21, EIA/TIA-449, and EIA-530. Each WAN interface is a single port with a 26-pin D-type connector. Use an appropriate adapter cable and WAN tap for each supported connection.
The WAN interface operates in monitor mode only (tracking network traffic).
The Ethernet interface (interface 1) supports 10Base2 (Thinnet), 10Base5 (Thicknet), or 10BaseT unshielded twisted pair (UTP). The factory-established configuration is indicated on the front panel with an appropriate label.
The connector for each topology is as follows:
Interface 1 communicates with the TrafficDirector network monitoring software in manage mode, but you can also configure the interface to simultaneously track network traffic and communicate with the TrafficDirector software in manage and monitor mode. For more information on configuring the interfaces, see "Configuring the Multiport T1/E1 WAN SwitchProbe Device," and the SwitchProbe Installation and Configuration Guide.
Table 2 describes the LEDs on the Ethernet interface card.
| LED Position | LED Color | Status | Meaning |
|---|---|---|---|
Left | Green | On | Indicates that a link signal has been detected. |
Off | Indicates that no link signal has been detected or no cable is attached. | ||
Right | Amber | On | Indicates heavy network traffic. |
Blinking | Indicates moderate network traffic. | ||
Off | Indicates no network traffic. |
The Token Ring interface supports UTP and shielded twisted pair (STP) connections. The factory-established configuration is indicated on the front panel with an appropriate label. The connector for each topology is as follows:
The Token Ring interface communicates with the TrafficDirector network monitoring software in manage mode, but you can also configure the interface to simultaneously track network traffic and communicate with the TrafficDirector software in manage and monitor mode. For more information on configuring the interfaces, see "Configuring the Multiport T1/E1 WAN SwitchProbe Device," and the SwitchProbe Installation and Configuration Guide.
The console port is a serial DB-9 male connection. You can connect an ASCII data terminal to the console port and use the command-line interface to configure the device IP address, gateway address, and subnet mask. You can also use an ASCII data terminal to display debug and boot messages or change configuration parameters. For more information, refer to the SwitchProbe Installation and Configuration Guide.
The remote port is the Serial Line Internet Protocol (SLIP) port. This 9-pin, male, D-type connector supports RS-232 signals.
The remote port can only be used to exchange management data to and from an attached device such as a management station or a modem. You must configure the remote port to manage mode. The remote port can be the secondary management port if communication to the primary management port is lost.
To adjust the baud rate of the remote port, see the Cisco SwitchProbe Installation and Configuration Guide.
Configurable DIP switches (labeled SW1) are located on the front panel of the device between the console port and the remote port. Use these switches as follows:
The DIP switches on Multiport T1/E1 WAN SwitchProbe devices are aligned horizontally (on is left, off is right).
Table 3 shows the valid settings.
| Switch | Setting | Result |
|---|---|---|
1 | Off (default) | Boot from Flash memory |
2 |
| Reserved |
3, 4 | 3 = off | Console port = 1200 bps |
3 = off | Console port = 2400 bps | |
3 = on (default) | Console port = 9600 bps | |
3 = on | Console port = 19200 bps |
Figure 2 shows the rear panel of the device.
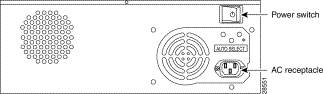
The power switch is on the upper right of the rear panel of the device.
| Caution To avoid damaging the device, you cannot turn the power off for four seconds after you turn the power on. |
The power socket is located on the lower right rear panel of the device. The power socket has three metal prongs.
Each SwitchProbe device is equipped with an AC power cord for connection to an appropriate power source. To connect the device to a power source, see "Connecting a Multiport T1/E1 WAN SwitchProbe Device to a Power Source."
| Caution The device is designed to work with TN power systems. |
| Caution Care must be taken when connecting units to the supply circuit so that wiring is not overloaded. |
| Warning Do not work on the system or connect or disconnect cables during periods of lightning activity. |
| Warning Before working on equipment that is connected to power lines, remove jewelry (including rings, necklaces, and watches). Metal objects heat up when connected to power and ground and can cause serious burns or weld the metal object to the terminals. |
| Warning To prevent the switch from overheating, do not operate it in an area that exceeds the maximum recommended ambient temperature of 104° F (40° C). To prevent airflow restriction, allow at least 3 inches (7.6 cm) of clearance around the ventilation openings. |
| Warning This product relies on the building's installation for short-circuit (overcurrent) protection. Ensure that a fuse or circuit breaker no larger than 120 VAC, 15A U.S. (240 VAC, 10A international) is used on the phase conductors (all current-carrying conductors). |
| Warning A voltage mismatch can cause equipment damage and may pose a fire hazard. If the voltage indicated on the label is different from the power outlet voltage, do not connect the chassis to that receptacle. |
| Caution To prevent any possible damage to the device, and to ensure that it operates correctly, never use the Power Out socket. |
To mount the device in a standard 19-inch equipment rack, you must first attach mounting brackets to the device. An accessory kit that includes two mounting brackets and eight Phillips screws is shipped with each device.
To attach the mounting brackets to the SwitchProbe device, see Figure 3 and follow these steps:
Step 1 Stand the device upright with the front panel facing you.
Step 2 Align the four holes of one of the mounting brackets with the four holes on the right side of the device.
Step 3 Insert four screws through the holes on the bracket and into the device.
Step 4 Tighten the screws until the mounting bracket is securely attached to the device.
Step 5 Align the four holes of the other mounting bracket with the four holes on the left side of the device.
Step 6 Insert four screws through the holes on the bracket and into the device.
Step 7 Tighten the screws until the mounting bracket is securely attached to the device.

To mount the front-access device in a standard 19-inch equipment rack, see Figure 4 and follow these steps:
Step 1 Slide the device (with the front panel facing you) into the equipment rack.
Step 2 Align the holes on the attached mounting brackets with the desired holes on front of the equipment rack.
Step 3 Insert the screws (provided with the device) into the desired holes of the mounting bracket.
Step 4 Tighten each screw until the device is securely attached to the equipment rack.
Figure 4 shows a Multiport T1/E1 WAN SwitchProbe device mounted in an equipment rack.

To connect a Multiport T1/E1 WAN SwitchProbe device to a power source, follow these steps:
Step 1 Using the AC power cord included with the device, connect one end of the cord to the power socket.
| Warning This equipment is intended to be grounded. Ensure that the host is connected to earth ground during normal use. |
Step 2 Connect the other end of the AC power cord to a suitable power source.
| Caution To prevent any possible damage to the device, and to ensure that it operates correctly, never use the Power Out socket. |
You connect the Multiport T1/E1 WAN SwitchProbe device to a network segment with a WAN tap kit.
| Warning Before connecting the device to the network, be sure to read the section "Site Requirements." Make sure that the device has been configured with an IP address, subnet mask, and default gateway address. |
The WAN tap monitors the data terminal equipment (DTE) and data circuit-terminating equipment (DCE) circuits of a link between a router and a channel service unit/data service unit (CSU/DSU). The SwitchProbe device can be connected and disconnected without disrupting the link between the router and the CSU/DSU. The WAN tap kit consists of a Y-shaped tap cable, a straight tap cable, and a tap unit.
To install this kit, refer to Figure 5 and proceed as follows:
Step 1 Insert the one-foot section of the Y-shaped cable between the router and the CSU/DSU.
This section of the Y-shaped tap cable has identical connectors on each end (connector styles include V.35, X.21, EIA/TIA-232, EIA/TIA-449, and EIA-530).
| Caution Never use force to connect the cables. Forcing connectors can permanently damage the connector's pins. |
Step 2 Insert the six-inch section of the Y-shaped cable into the tap unit.
The section of the Y-shaped tap cable contains a DB-26 connector.
Step 3 Insert one end of the 15-foot straight tap cable into the tap unit and insert the other end into the WAN port on the SwitchProbe device.
This cable has two DB-26 connectors (one at each end).
Step 4 Turn on the device.
The POWER LED on the tap unit lights up and remains on while the tap unit receives power.

You can connect a management device to the Multiport T1/E1 WAN SwitchProbe device in one of two ways:
The Multiport T1/E1 WAN SwitchProbe device supports out-of-band management through the serial port labeled Remote using SLIP or through the Ethernet or Token Ring interface.
You can use the SLIP connection as a secondary connection through which you access all network statistics. The SLIP link is normally used as a backup link when the network is not operational or when the agent is not accessible. For more information and connection instructions, refer to the SwitchProbe Installation and Configuration Guide.
To perform out-of-band management through the active Ethernet interface, follow these steps:
Step 1 Connect an Ethernet cable to the Ethernet interface.
Step 2 Configure the interface mode to manage.
For more information and configuration instructions, refer to the SwitchProbe Installation and Configuration Guide.
You must set the Token Ring interface to match the speed of the network before you connect it, or it might interfere with network operations.
To perform out-of-band management through the active Token Ring interface, follow these steps:
Step 1 Connect an Ethernet cable to that Token Ring interface.
Step 2 Configure the interface mode to manage.
For more information and configuration instructions, refer to the installation chapter of the SwitchProbe Installation and Configuration Guide.
The Multiport T1/E1 WAN SwitchProbe device supports side-band management (manage and monitor mode on the same interface) through the active Ethernet interface or through the active Token Ring interface. To make a side-band connection, follow these steps:
Step 1 Connect an Ethernet cable to the active Ethernet interface on the front panel, or connect a Token Ring cable to the active Token Ring interface on the front panel.
Step 2 Configure the interface mode to manage and monitor.
For more information and configuration instructions, refer to the SwitchProbe Installation and Configuration Guide.
To configure the Multiport T1/E1 WAN SwitchProbe device, refer to the SwitchProbe Installation and Configuration Guide. The screens, selections, and procedures for configuring the device are the same as the screens, selections, and procedures for basic SwitchProbe device configuration with the following two minor exceptions:
Interface number: 1


[1] Change IP Address               204.240.143.113
[2] Change Net Mask                 255.255.255.0
[3] Change Default Gateway Address  204.240.143.1
[4] Change Read Community           public
[5] Change Write Community          public

[8] Select Interface                Ethernet
[9] Change Server Address           204.240.143.16
[10] Upgrade Software
[11] Enter Command-line mode
[12] Reset Agent

[13] Go to Next Page

          Enter your response or Enter "exit" to logout

Selection #:
Selection #: 8


[1] ETHERNET 	        MODE = MANAGE
[2] SERIAL 						          MODE = MANAGE
[3] WAN              MODE = MONITOR
[4] WAN              MODE = MONITOR
[5] WAN              MODE = MONITOR
[6] WAN              MODE = MONITOR

New Interface [1]:
Table 4 lists the technical specifications of the Multiport T1/E1 WAN SwitchProbe device.
The device is compliant with FCC part A and complies to all relevant Underwriters Laboratories (UL) and Canadian Standards Association (CSA) safety standards.
| Item | Specification | |
|---|---|---|
Power consumption | 240W maximum | |
Power input | 110 VAC @ 60 Hz or 240 VAC @ 50 Hz (auto-switching) | |
Operating temperature | 32º to 104ºF (0º to 40ºC) | |
Storage temperature | -104º to +140ºF (-40º to +60ºC) | |
Humidity | 5% to 95% (noncondensing) | |
Dimensions (H x W x D) | 5.25 x 17 x 16.5 in. (excluding 1 in.-wide rack-mount clips) | |
Weight | 24 pounds | |
Memory | ||
| RAM | 64 MB) |
Port type |
| |
| Ethernet (interface 1) | One of the following ports is configured at the factory as the active port:
|
| Token Ring (interface 1) |
|
| Console and remote | Connector style—DB-9 male connector |
| WAN (interface 3) | DB-26 (male) support V.35, X.21, EIA/TIA-449, and EIA-530 |
Network management standards
| SNMP V1 | |
Manage/monitor interfaces and available modes |
| |
Cisco documentation and additional literature are available in a CD-ROM package, which ships with your product. The Documentation CD-ROM, a member of the Cisco Connection Family, is updated monthly. Therefore, it might be more current than printed documentation. To order additional copies of the Documentation CD-ROM, contact your local sales representative or call customer service. The CD-ROM package is available as a single package or as an annual subscription. You can also access Cisco documentation on the World Wide Web at http://www.cisco.com, http://www-china.cisco.com, or http://www-europe.cisco.com.
If you are reading Cisco product documentation on the World Wide Web, you can submit comments electronically. Click Feedback in the toolbar and select Documentation. After you complete the form, click Submit to send it to Cisco. We appreciate your comments.
Cisco Connection Online (CCO) is Cisco Systems' primary, real-time support channel. Maintenance customers and partners can self-register on CCO to obtain additional information and services.
Available 24 hours a day, 7 days a week, CCO provides a wealth of standard and value-added services to Cisco's customers and business partners. CCO services include product information, product documentation, software updates, release notes, technical tips, the Bug Navigator, configuration notes, brochures, descriptions of service offerings, and download access to public and authorized files.
CCO serves a wide variety of users through two interfaces that are updated and enhanced simultaneously: a character-based version and a multimedia version that resides on the World Wide Web (WWW). The character-based CCO supports Zmodem, Kermit, Xmodem, FTP, and Internet e-mail, and it is excellent for quick access to information over lower bandwidths. The WWW version of CCO provides richly formatted documents with photographs, figures, graphics, and video, as well as hyperlinks to related information.
You can access CCO in the following ways:
For a copy of CCO's Frequently Asked Questions (FAQ), contact cco-help@cisco.com. For additional information, contact cco-team@cisco.com.

![]()
![]()
![]()
![]()
![]()
![]()
![]()
![]()
Posted: Fri Sep 6 20:23:26 PDT 2002
All contents are Copyright © 1992--2002 Cisco Systems, Inc. All rights reserved.
Important Notices and Privacy Statement.