Command descriptions use the following conventions:
boldface font
Commands and keywords are in boldface.
italic font
Arguments for which you supply values are in italics.
[ ]
Elements in square brackets are optional.
Screen examples use the following conventions:
screen font
Terminal sessions and information the system displays are in screen font.
boldface screen font
Information you must enter is in boldface screen font.
[ ]
Default responses to system prompts are in square brackets.
Notes use the following conventions:
Note Means reader take note. Notes contain helpful suggestions or references to material not covered in the publication.
Cautions use the following conventions:
Caution
Means reader be careful. In this situation, you might do something that could result in equipment damage or loss of data.
Warnings use the following conventions:
Warning
This warning symbol means danger. You are in a situation that could cause bodily injury. Before you work on any equipment, you must be aware of the hazards involved with electrical circuitry and familiar with standard practices for preventing accidents. To see translated versions of the warnings, refer to the appendix "Translated Safety Warnings" in the publication Using TrafficDirector.
Site Requirements
The OC-3 ATM SwitchProbe device is designed to operate in a normal office environment and can be placed on a table or mounted in an equipment rack near the network segment it serves. The site must be equipped with the following:
A power source within seven feet (2.133 m) of the unit
Warning
This product relies on the building's installation for short-circuit (overcurrent) protection. Ensure that a fuse or circuit breaker no larger than 120 VAC, 15A U.S. (240 VAC, 10A international) is used on the phase conductors (all current-carrying conductors).
The appropriate physical connection to the network link to be monitored
The appropriate physical connection to the network segment used to communicate with the management software such as an Ethernet or EIA/TIA-232 connection
Note EIA/TIA-232 and EIA/TIA-449 were known as recommended standards RS-232 and RS-449 before their acceptance as standards by the Electronics Industries Association (EIA) and Telecommunications Industry Association (TIA).
Before beginning the installation process, read the following installation cautions and warnings:
Note To see the warnings in multiple languages, see the translated safety warnings appendix in the Cisco SwitchProbe Installation and Configuration Guide.
Caution
To prevent possible damage to the device, read the section "Site Requirements" in this document.
Warning
The safety cover is an integral part of the product. Do not operate the unit without the safety cover installed. Operating the unit without the cover in place will invalidate the safety approvals and pose a risk of fire and electrical hazards.
Warning
Read the installation instructions before you connect the system to its power source.
Warning
Only trained and qualified personnel should be allowed to install, replace, or service this equipment.
Warning
Ultimate disposal of this product should be handled according to all national laws and regulations.
Warning
The device is designed to work with TN power systems.
Warning
Before working on a system that has an on/off switch, turn OFF the power and unplug the power cord.
Warning
To prevent the device from overheating, do not operate it in an area that exceeds the maximum recommended ambient temperature of 104° F (40° C). To prevent airflow restriction, allow at least 3 inches (7.6 cm) of clearance around the ventilation openings.
Warning
To prevent bodily injury when mounting or servicing this unit in a rack, you must take special precautions to ensure that the system remains stable. The following guidelines are provided to ensure your safety:
This unit should be mounted at the bottom of the rack if it is the only unit in the rack.
When mounting this unit in a partially filled rack, load the rack from the bottom to the top with the heaviest component at the bottom of the rack.
If the rack is provided with stabilizing devices, install the stabilizers before mounting or servicing the unit in the rack.
Unpacking an OC-3 ATM SwitchProbe Device
Before unpacking the shipping carton, ensure that there is no visible damage to the carton. If there is damage, notify the carrier representative, and arrange for a representative to be present while you unpack the carton.
After opening the shipping carton and removing the unit, inspect it for any obvious damage that might have occurred during shipment. If any damage is present, file a claim with the carrier.
Inspect the shipping carton contents and verify that you have received the following:
One Cisco OC-3 ATM SwitchProbe device
One 110V power cord (optional outside of the United States)
One fiber-optic splitter tap
One three-meter, SC-duplex-to-dual-SC-duplex multimode fiber cable
One 24-foot, SC-to-SC multimode fiber cable
Cisco SwitchProbe Installation and Configuration Guide
This document
Note Remove the dust caps from the fiber-optic ports before connecting the fiber-optic cable. Save these dust caps for future use.
Physical Features of the OC-3 ATM SwitchProbe Device
This section describes the physical features of the OC-3 ATM SwitchProbe device.
Note Before connecting this device to the network, you must configure it with an IP address, subnet mask, and default gateway address. For more information, see the initialization chapter in the Cisco SwitchProbe Installation and Configuration Guide. To connect this device to the network, see the section "Connecting an OC-3 ATM SwitchProbe Device to the Network" in this document.
The OC-3 ATM SwitchProbe device is part of the PB8 SwitchProbe device series and is housed in front-access chassis that measures 17 inches wide, by 16.5 inches deep, by 5.25 inches high (13.3 by 43.18 by 41.91 cm). You can mount this devices in a 19-inch equipment rack. For instructions on mounting the device in a rack, see the installation chapter in the Cisco SwitchProbe Installation and Configuration Guide.
The following sections describe each area of the OC-3 ATM SwitchProbe devices:
Table 1 describes the four LEDs on the top left of the chassis front panel.
Table 1: Chassis LEDs
LED Label
LED Color
Status
Meaning
POWER
Green
On
Proper power is being supplied to the device. This LED is normally on.
Off
Proper power is not being supplied to the device.
FAULT
Red
On or Blinking
Hardware or software error in the device.
Off
Device is working properly.
DIAG
Reserved for future diagnostic use.
ACTIVITY
Amber
On
Heavy network traffic.
Blinking
Moderate network traffic.
Off
No network traffic.
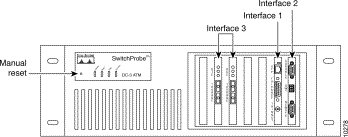
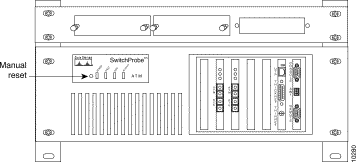
Manual Reset Button
There is a small pin hole (Figure 1) to the left of the LEDs that provides access to the manual reset button. To manually reboot the device, insert a small object such as the tip of a pen, and push inward. A slight press of the manual reset button reboots the device.
Note When you reset a SwitchProbe device, all counters are cleared to zero. Any changes you made to the device settings (using the Agent Configuration Utility) since the previous reset take effect.
You can also reset the device using the Reset Agent option of the Agent Configuration Utility. For more information about this option, see the Cisco SwitchProbe Installation and Configuration Guide.
Interfaces
The following sections describe the interfaces on the OC-3 ATM SwitchProbe devices:
The OC-3 ATM SwitchProbe device contains the following two network interface cards:
Ethernet—Interface 1. The default mode of this interface (manage) allows the SwitchProbe device to communicate on the network by exchanging (sending and receiving) commands with a management station. You can change the mode of the Ethernet interface using the Agent Configuration Utility. However, to maintain peak performance, Cisco Systems recommends that you maintain the interface in manage mode. For information about configuring network interfaces, see the Cisco SwitchProbe Installation and Configuration Guide.
For information about the Agent Configuration Utility, see:
The initialization chapter in the Cisco SwitchProbe Installation and Configuration Guide.
The Ethernet interface (interface 1) supports 10Base2 (Thinnet), 10Base5 (Thicknet), or 10BaseT unshielded twisted pair (UTP). The factory configuration is indicated on the front panel with an appropriate label. The connector for each topology is as follows:
15-pin D-type attachment unit interface (AUI) for 10Base5 (Thicknet)
BNC for 10Base2 (Thinnet)
RJ-45 jack for 10BaseT (UTP)
ATM—Interface 3. This interface supports OC-3 multimode fiber only. The physical ATM interface consists of two interface cards—one card for a DTE connection, and one card for a DCE connection. Each ATM interface card contains an SC connector and three LEDs. The ATM interface operates in monitor mode only (tracking network traffic).
Peripheral Controller Card
The Peripheral Controller Card (PCC), always designated as interface 2, has the following three external components:
Remote Port—Serial Line Internet Protocol (SLIP) port. This 9-pin, male, D-type connector supports RS-232 signals. The port specifications are listed in Table 2.
The remote port can only be used to exchange management data to and from an attached device such as a management station or a modem. You must configure the remote port to manage mode. The remote port can be the secondary management port if communication to the primary management port is lost.
Note The remote port cannot be used to monitor a network segment.
To adjust the baud rate of the remote port, see the Cisco SwitchProbe Installation and Configuration Guide.
Table 2 shows the console and remote port specifications.
Table 2: Console and Remote Port Specifications
Port Setting
Specification
Line rate
9600 bps (default)
Line code
ASYNC
Line interface
EIA/TIA-232
No. of bits
8
No. of stop bits
1
Parity
None
Note EIA/TIA-232 and EIA/TIA-530 were known as recommended standards RS-232 and RS-530 before acceptance as standards by the Electronic Industries Association (EIA) and Telecommunications Industry Association (TIA).
DIP Switches (SW1)—Configurable DIP switches (labeled SW1) between the console and remote ports used for adjusting the baud rate of the console port and setting the device's boot mode.
Switch 1—Specifies whether the device boots from FLASH memory or erasable programmable read-only memory (EPROM).
Switch 2—Not used.
Switches 3 and 4—Specifies the console port baud rate.
Note Cisco SwitchProbe devices have the latest version of agent firmware loaded in both EPROM and FLASH memory. If an updated version becomes available, you might need to upgrade the agent firmware. For information about updating the firmware, see the Cisco SwitchProbe Installation and Configuration Guide.
Because SwitchProbe devices boot from FLASH memory by default, all upgraded agent firmware is written to FLASH memory. Regardless of any upgrade, the factory-installed, original version of agent firmware remains in the EPROM. Therefore, if a firmware upgrade fails, you can force the device to boot from the EPROM by setting DIP switch 1 to on. The agent will boot from the EPROM and use the original version of firmware.
If the FLASH becomes corrupted, the agent automatically boots from EPROM, regardless of the setting of DIP switch 1.
Ethernet Interface LEDs
The Ethernet interface card contains two LEDs, described in Table 4.
Table 4: Ethernet Interface LEDs
LED Position
LED Color
Status
Description
Left LED
Green
On Off
Link signal detected. No link signal detected or no cable attached.
Right LED
Amber
On Blinking Off
Heavy network traffic. Moderate network traffic. No network traffic.
Note The power supply automatically adjusts to the applied voltage. There is no switch to change input voltage if the device is moved from the United States to Europe.
OC-3 ATM SwitchProbe Device Accessories
The following sections describe the physical features of the OC-3 ATM SwitchProbe device accessories.
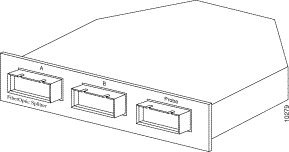
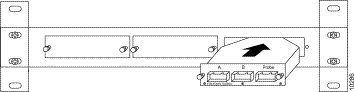
The OC-3 ATM SwitchProbe device requires a fiber-optic splitter tap (shipped with the device) to monitor the network. The splitter tap is passive—link integrity is maintained whether the device is on or off.
The fiber-optic splitter tap (Figure 5) contains three female SC duplex connection ports (labeled A, B, and Probe).
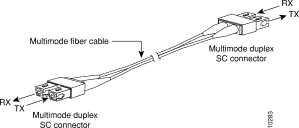
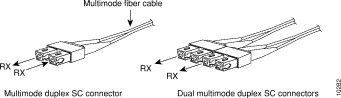
One 4-foot SC-duplex-to-dual-SC-duplex multimode fiber cable (Figure 7) is also shipped with the OC-3 ATM SwitchProbe device.
Note The multimode duplex SC connectors contain only receive (RX) connections.
Figure 7: SC-Duplex-to-Dual-SC-Duplex Multimode Fiber Cable
Fiber-Optic Splitter Tap Rack Panel (Optional)
The fiber-optic splitter tap rack panel (Figure 8) is not shipped with the OC-3 ATM SwitchProbe device, but can be purchased separately from Cisco Systems. The rack panel allows you to mount up to three fiber-optic splitter taps in a standard 19-inch equipment rack.
Figure 8 shows the installation of the fiber-optic splitter tap.
Figure 8: Fiber-Optic Splitter Tap Rack Panel
Mounting an OC-3 ATM SwitchProbe Device in an Equipment Rack
To mount the device in a standard 19-inch equipment rack, follow these steps:
Step 2 Slide the device (with the front panel facing you) into the equipment rack.
Step 3 Align the holes on the mounting brackets with the desired holes on the equipment rack.
Step 4 Insert screws (provided with the device) into the desired holes of the mounting bracket.
Step 5 Tighten each screw until the device is secured to the equipment rack.
Figure 9 shows an OC-3 ATM SwitchProbe device mounted in an equipment rack.
Figure 9: OC-3 ATM SwitchProbe Device and Fiber-Optic Splitter Tap Rack Panel Mounted in Standard 19-Inch Equipment Rack
Attaching the Fiber-Optic Splitter Tap Rack Panel (Optional)
Note The fiber-optic splitter tap rack panel is not shipped with the OC-3 ATM SwitchProbe device, but can be purchased separately from Cisco Systems.
To attach the fiber-optic splitter tap rack panel to a standard 19-inch equipment rack, follow these steps:
Note The rack panel contains one open slot to house one fiber-optic splitter tap. To install more than one splitter tap into the rack panel, you must remove the panel slot covers before you attach the panel to the equipment rack.
Step 1 Determine the area on the equipment rack where you want to position the rack panel (either above or below the SwitchProbe device).
Step 2 Align the rack panel mounting holes with the desired holes on the equipment rack.
Step 3 Insert screws into the desired holes.
Step 4 Tighten each screw until the rack panel is secured to the equipment rack.
Figure 10 shows a fiber-optic splitter tap rack panel mounted in an equipment rack (above an installed OC-3 ATM SwitchProbe device).
Figure 10: OC-3 ATM SwitchProbe Device and Fiber-Optic Splitter Tap Rack Panel Mounted in Standard 19-Inch Equipment Rack
Installing a Fiber-Optic Splitter Tap in a Rack Panel
To install a fiber-optic splitter tap in a rack panel that is already attached to a standard equipment rack, refer to Figure 11 and follow these steps:
Step 1 Slide the splitter tap (with the connection ports facing you) into an open slot on the rack panel.
Step 2 Secure the splitter tap to the rack panel by pushing the splitter tap's two fastener buttons into their respective holes on the rack panel.
Figure 11: Installing a Fiber-Optic Splitter Tap Into a Rack Panel
Connecting an OC-3 ATM SwitchProbe Device to the Network
Note Before connecting a DS-3 ATM SwitchProbe device to the network, you must configure it with an IP address, subnet mask, and default gateway address. For more information, see the initialization chapter in the Cisco SwitchProbe Installation and Configuration Guide.
Before connecting this device to the network, note the following warnings:
Note To see the warnings in multiple languages, refer the translated safety warnings appendix in the Cisco SwitchProbe Installation and Configuration Guide.
Warning
This equipment is to be installed and maintained by service personnel only as defined by AS/NZS 3260 Clause 1.2.14.3 Service Personnel.
Warning
The telecommunications lines must be disconnected 1) before unplugging the main power connector and/or 2) while the housing is open.
Warning
Do not work on the system or connect or disconnect cables during periods of lightning activity.
The fiber-optic splitter tap (Figure 12) has three female SC duplex connection ports (labeled A, B, and Probe).
Figure 12: Fiber-Optic Splitter Tap
Connecting the Fiber-Optic Splitter Tap to the Network Segment
To connect the fiber-optic splitter tap to the network, see Figure 13 and follow these steps:
Step 1 Remove all dust caps from the fiber-optic splitter tap connector ports.
Step 2 Remove all dust caps from connectors at the ends of the cables you will be using.
Note Keep these caps for future use.
Step 3 Make sure that a multimode fiber cable with SC male connectors is connected to an ATM switch, server, or router. This device will be the DCE device.
Step 4 Connect the other end of the multimode fiber cable with SC male connectors to the splitter tap's female SC duplex connector labeled A.
Step 5 Connect one end of the 24-foot, fiber cable (with male SC connectors) that came with the OC-3 ATM SwitchProbe device to a second ATM switch, server, or router. This device will be the DTE device.
Step 6 Connect the other end of the 24-foot, fiber cable (that came with the device) to the splitter tap's female SC duplex connector labeled B.
There should now be one cable extending from the DCE device to the splitter tap's A connector, and another cable from the DTE device to the splitter tap's B connector.
To connect the fiber-optic splitter tap to the OC-3 ATM SwitchProbe device, see Figure 13 and follow these steps:
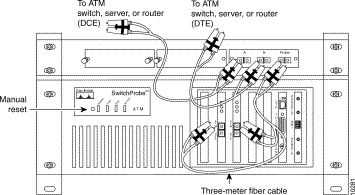
Step 1 Connect the single-duplex end of the 4-foot SC duplex multimode fiber cable shipped with the SwitchProbe device to the splitter tap's female SC duplex connector labeled Probe.
The other end of the three-meter SC duplex multimode fiber cable splits into two separate ends. Note that the SC connectors only contain receive (Rx) connections.
Step 2 Connect each end of the cable into the ATM interface cards of the OC-3 ATM SwitchProbe device as follows:
(a) Connect the twin-duplex end of the cable labeled DCE into the ATM DCE port on the SwitchProbe device.
(b) Connect the twin-duplex end of the cable labeled DTE into the ATM DTE port on the SwitchProbe device.
Figure 13: Connecting a Fiber-Optic Splitter Tap to an ATM Network (Simplified View)
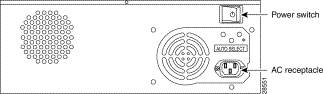
Connecting an OC-3 ATM SwitchProbe Device to a Power Source
To connect an OC-3 ATM SwitchProbe device to a power source, follow these steps:
Step 1 Using the AC power cord included with the device, connect one end of the cord to the Power In socket.
Warning
This equipment is intended to be grounded. Ensure that the host is connected to earth ground during normal use.
Step 2 Connect the other end of the AC power cord to a suitable power source.
Note Depending on the voltage applied from the power source, the power supply will automatically switch to the appropriate condition.
Making Management Connections
You can connect a management device to the OC-3 ATM SwitchProbe device using either of these methods:
Out-of-band management connection—The OC-3 ATM SwitchProbe device supports out-of-band management through the serial port labeled Remote using SLIP. You can use the SLIP connection as a secondary connection through which you access all network statistics. The SLIP link is normally used as a backup link when the network is not operational or when the agent is not accessible.
For more information and connection instructions, see the CiscoSwitchProbe Installation and Configuration Guide.
You can use the active Ethernet interface by connecting an Ethernet cable to that Ethernet interface and configuring the interface mode to manage.
For more information and configuration instructions, see the Cisco SwitchProbe Installation and Configuration Guide.
Configuring the OC-3 ATM SwitchProbe Device
To configure the OC-3 ATM SwitchProbe device, see the Cisco SwitchProbe Installation and Configuration Guide. The screens, selections, and procedures for configuring the device are the same as the screens, selections, and procedures for basic configuration with the following two minor exceptions:
The default value in the Select Interface field (option 8) of the Agent Configuration Utility menu is ATM:
Interface number : 1


[1] Change IP Address               204.240.143.158
[2] Change Net Mask                 255.255.255.0
[3] Change Default Gateway Address  204.240.143.1
[4] Change Read Community           public
[5] Change Write Community          public

[8] Select Interface                ETHERNET
[9] Change Server Address           204.240.143.16
[10] Upgrade Software
[11] Enter Command-line mode
[12] Reset Agent

[13] Go to Next Page

          Enter your response or Enter "exit" to logout

Selection#:
The interface options are Ethernet, Serial, and ATM [DTE+DCE] :
Table 6 lists the terminology used in this document:
Table 6: Terminology Used in This Document
Term
Definition
AAL
ATM adaptation layer—Layer of the ATM protocol reference model that converts ATM cells into a format (such as packets) that can be read at a higher layer, and conversely converts higher layer information into ATM cells.
There are several ATM adaptation layers (AAL 1 through AAL5). In local area ATM, AAL5 is the adaptation layer of choice for data transmission.
ATM
Asynchronous Transfer Mode---Connection-oriented, high-speed technology based on fixed-length cells that transmits data over a WAN or LAN.
CIP
Classical IP over ATM---Internet Engineering Task Force (IETF) specification that defines the implementation of traditional IP over ATM. CIP, defined in RFC 1577, exclusively targets TCP/IP at Level 3 of the OSI model.
LANE
LAN Emulation---ATM Forum specification that defines how legacy LANs can interoperate with ATM devices. LANE focuses on emulating Level 2 LAN protocols of the OSI model (Media Access Control [MAC] and Logical Link Control [LLC]).
MPOA
Multiprotocol over ATM---ATM Forum specification that defines the implementation of multiple network-layer protocols over ATM. Focuses on emulating all three OSI model network layer LAN protocols.
OC-3
Optical Carrier 3---ATM physical layer specification that defines the use of fiber-optic media for transmission at 155 Mbps.
STS-n
Synchronous Transport Signal---SONET1 standard for transmission over OC-n optical fiber by multiplexing level n STS-1 frames (where n is an integer).
UNI
User-Network Interface---Interface between an ATM end-device and a private ATM switch, or between a private ATM switch and a public-carrier ATM network.
ATM Statistics in the RMON MIB
The OC-3 ATM SwitchProbe device assembles ATM cells into AAL5 protocol data units (PDUs). The device converts these PDUs into Ethernet-format frames to allow existing Remote Monitoring (RMON and RMON2) functionality to be implemented. ATM-specific physical layer statistics (such as Cells, CallAttempts, and Calls) are mapped to certain etherStats objects in the Ethernet Statistics Group of the Ethernet RMON MIB. (See Table 7.) The resulting MIB is a shadow of the Ethernet RMON MIB.
Table 7: ATM Statistics Information Mapped to Ethernet RMON MIB
ATM-Specific Information
Description
Mapped to (etherStats object of Ethernet Statistics Group in Ethernet RMON MIB)
Cells
Total number of error-free cells detected.
etherStatusUndersizePkts
CallAttempts
Number of call attempts detected on all signaled ATM connections.
etherStatsJabbers
Calls
Number of successfully established calls detected on all signaled ATM connections.
etherStatsFragments
F5OAMCells
Number of F5OAM (operations and maintenance) cells.
etherStatsOversizePkts
CRCErrors
Cyclic redundancy check errors—the sum of AAL5 PDUs detected with CRC32 errors plus non-AAL5 cells detected with CRC10 errors.
etherStatsCRCAlignErrors
CLPCount
Number of AAL5 PDUs detected with cell loss priority (CLP) bit set to 1.
etherStatsCollisions
Technical Specifications
Table 8 lists the technical specifications of the OC-3 ATM SwitchProbe device.
Standards compliance for all SwitchProbe devices is as follows:
Compliance—CE Marking
Safety—UL1950, CAN/CSA-C22.2, No. 950-95, EN 60950, and IEC 60950
EMI—FCC Class A, EN 55022 Class A, and VCCI Class A
100-115/220-240 /VAC, 7/4 A, 50-60 Hz (auto-switching)
Operating temperature
32º to 104ºF (0º to 40ºC)
Storage temperature
-40º to 140ºF (-4º to 60ºC)
Humidity
5% to 95% relative humidity (noncondensing)
Dimensions (H x W x D)
5.25 x 17 x 16.5 in. (excluding 1 in.-wide rack-mount clips) 13.34 x 43.18 x 41.91 cm (excluding 2.54 cm-wide rack-mount clips)
Weight
24 pounds (10.89kg)
Memory
RAM Flash
128 MB 512 KB
Port type
Ethernet (interface 1)
Thicknet port—DB-15 connector for 10Base Thinnet port—BNC connector for 10Base2 UTP port—RJ-45 connector for 10BaseT
Console and remote (interface 2)
Connector style—DB-9 male connector Line speed—9600 bps (default) Line code—Asynchronous Line interface—EIA/TIA-232 Number of bits—8 Number of stop bits—1 Parity—None
ATM (interface 3)
OC-3 multimode fiber interface with two SC connectors
Cisco Connection Online (CCO) is Cisco Systems' primary, real-time support channel. Maintenance customers and partners can self-register on CCO to obtain additional information and services.
Available 24 hours a day, 7 days a week, CCO provides a wealth of standard and value-added services to Cisco's customers and business partners. CCO services include product information,productdocumentation, software updates, release notes, technical tips, the Bug Navigator, configuration notes, brochures, descriptions of service offerings, and download access to public and authorized files.
CCO serves a wide variety of users through two interfaces that are updated and enhanced simultaneously: a character-based version and a multimedia version that resides on the World Wide Web (WWW). The character-based CCO supports Zmodem, Kermit, Xmodem, FTP, and Internet e-mail, and it is excellent for quick access to information over lower bandwidths. The WWW version of CCO provides richly formatted documents with photographs, figures, graphics, and video, as well as hyperlinks to related information.
Modem: From North America, 408 526-8070; from Europe, 33 1 64 46 40 82. Use the following terminal settings: VT100 emulation; databits: 8; parity: none; stop bits: 1; and connection rates up to 28.8 kbps.
For a copy of CCO's Frequently Asked Questions (FAQ), contact cco-help@cisco.com. For additional information, contact cco-team@cisco.com.
Note If you are a network administrator and need personal technical assistance with a Cisco product that is under warranty or covered by a maintenance contract, contact Cisco's Technical Assistance Center (TAC) at 800 553-2447, 408 526-7209, or tac@cisco.com. To obtain general information about Cisco Systems, Cisco products, or upgrades, contact 800 553-6387, 408 526-7208, or cs-rep@cisco.com.
Cisco documentation and additional literature are available in a CD-ROM package, which ships with your product. The Documentation CD-ROM, a member of the Cisco Connection Family, is updated monthly. Therefore, it might be more current than printed documentation. To order additional copies of the Documentation CD-ROM, contact your local sales representative or call customer service. The CD-ROM package is available as a single package or as an annual subscription. You can also access Cisco documentation on the World Wide Web at http://www.cisco.com, http://www-china.cisco.com, or http://www-europe.cisco.com.
If you are reading Cisco product documentation on the World Wide Web, you can submit comments electronically. Click Feedback in the toolbar and select Documentation. After you complete the form, click Submit to send it to Cisco. We appreciate your comments.