|
|

This chapter describes how to install CiscoWorks Blue SNA View on AIX, HP-UX, and Solaris operating systems and has the following main sections:
Before you install SNA View 1.2 on your workstation, do the following:
You use the System Management Interface Tool (SMIT), an IBM AIX system administration facility, to install and configure CiscoWorks Blue SNA View on AIX from a local or remote CD-ROM drive. The example of the installation and configuration process described in this chapter uses the graphical user interface (GUI) version of SMIT; you can use the ASCII version called SMITTY, if you prefer. See your IBM documentation for more information about SMIT and SMITTY.
In the process of installing and configuring the CiscoWorks Blue SNA View workstation application, you do the following procedures:
This section also contains instructions for deinstalling CiscoWorks Blue SNA View software.
If you are upgrading from SNA View Release 1.1 to 1.2, the installation program saves all domain configuration files in the $CWBROOT/snaview/backup directory. If you want to migrate those configuration files to Release 1.2, copy the desired configuration files from the $CWBROOT/snaview/backup directory to the /etc directory. The $CWBROOT directory is the installation directory, which is usually /usr/cw-blue. (Configuration files are named in the format svopen_config_DOMAINNAME, where DOMAINNAME is the name of the SNA domain.)
Installation is the transfer of software from the SNA View distribution medium to the AIX system.

| Caution CiscoWorks Blue SNA View can be installed only in the /usr/cw-blue directory. If you create a file system, its mount point must be /usr/cw-blue. |
To install CiscoWorks Blue SNA View from a mounted CD-ROM drive, perform the following steps.
Step 1 Log in as the root user. (For instructions about how to become the root user, see "Becoming the Root User" in the "Preparing to Install CiscoWorks Blue SNA View" chapter.)
Step 2 Enter the smit command to start SMIT:
smit
Step 3 On the System Management menu, select Software Installation & Maintenance.
Step 4 On the next menu, select Install/Update Software.
Step 5 On the next menu, select Install and Update from LATEST Available Software. The Install and Update from LATEST Available Software menu is displayed, as shown in Figure 3-1.
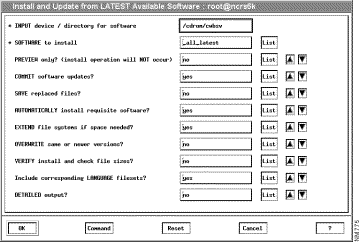
Step 6 On the Install and Update from LATEST Available Software menu, enter the installation directory and filenames:
Step 7 Click OK.
The Install and Update from LATEST Available Software menu displays additional fields, as shown in Figure 3-2.
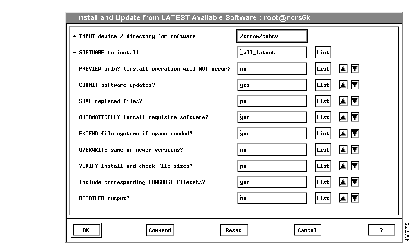
Step 8 Click OK.
Step 9 In response to the "ARE YOU SURE?" prompt, click OK when you are sure you want to install the modules you just highlighted. An animated man is displayed on the SMIT menu.
While the animated man is running, SMIT installs the selected modules in the
/usr/cw-blue directory, and CiscoWorks Blue SNA View modifies SMIT to allow subsequent configuration and deinstallation of CiscoWorks Blue SNA View.
If the man raises his hands and SMIT displays OK, the process has succeeded.
If the man falls, installation has failed. If the reason is not apparent, read the installation log file $HOME/smit.log or /usr/cw-blue/install/cwb_install.log and send it to a Cisco TAC representative.
Step 10 Click Done.
Step 11 If Step 9 indicated success, click the Return to: System Management button and go to the following section, "Configuring SNA View on AIX."
In the event of failure, terminate SMIT by pressing F12 or by selecting Exit SMIT from the Exit menu.
Configuring CiscoWorks Blue SNA View on AIX consists of specifying the mainframe domains with which SNA View is to operate and a set of parameters for each domain.
To configure the CiscoWorks Blue SNA View product, perform the following steps:
Step 1 Start SMIT if you have not already done so:
smit
Step 2 On the initial SMIT menu, select Communications Applications and Services.
Step 3 On the next menu, select Cisco Network Management Applications for AIX.
Step 4 On the next menu, select CiscoWorks Blue SNA View.
Step 5 On the CiscoWorks Blue SNA View menu, select Configure.
The SNA View menu appears, as shown in Figure 3-3.

Step 6 Identify the domain that you want to configure.
If you are reconfiguring an existing domain, click the List button and select a domain name from the list, as shown in Figure 3-4. Now go on to the next step.
If you are configuring a new domain, enter one or more new domain names, separated by spaces, in the "Domain Name(s)" field.
You can enter any 1- to 8-character alphanumeric value. Choose a name that is meaningful in your environment. This domain name will be added as an extension to all PU and LU names to create the format PUNAME.DOMAIN, which is used in the SNA View database and on the Maps views. You must use all uppercase characters in domain names.
To reconfigure an existing domain, you can specify an existing domain name. The configuration program displays a message asking you to confirm the reconfiguration of the existing file. You might want to reconfigure an existing domain if you migrated configuration files from a previous release of SNA View, as mentioned earlier in the section "Upgrading to SNA View Version 1.2 on AIX."
Step 7 Click OK. The svXconfig-win menu is displayed.
Step 8 On the svXconfig-win menu, enter the configuration parameters.
For information about the domain-specific parameters, see the section "Configuring Domain-Specific Parameters" later in this chapter.
Return here when you finish configuring the domain-specific parameters for that domain.
Step 9 When you are finished with the parameters of a given domain, click Save, then Quit.
Step 10 Repeat Step 8 and Step 9 for each SNA domain. The SMIT man should raise his hands to indicate success.
Step 11 Click Done, and then Cancel.
Step 12 You can now terminate SMIT by pressing F12 or by selecting Exit SMIT on the Exit menu.
You should now be able to access SNA View features from the CiscoWorks Blue Maps menus. If your SNA View workstation is connected to the mainframe using SNA LU 6.2, go to the section "Configuring LU 6.2 Connectivity to the Mainframe." If your SNA View workstation is connected to the mainframe using TCP/IP, go to the section "Configuring TCP/IP Connectivity to the Mainframe."
You can install and configure CiscoWorks Blue SNA View from a local or remote CD-ROM drive. There are four parts to the process.
If you do not know how to export and mount a CD-ROM drive from a local or remote system, see the appendix "Mounting a CD-ROM."
This section also contains instructions for deinstalling CiscoWorks Blue SNA View software.
If it is necessary to reinstall a CiscoWorks Blue product, deinstall the existing software using procedures in "Deinstalling SNA View on HP-UX or Solaris" later in this chapter and then reinstall the software as if it were a new installation.
If you are upgrading from SNA View Release 1.1 to 1.2, the installation program saves all domain configuration files in the $CWBROOT/snaview/backup directory. If you want to migrate those configuration files to Release 1.2, copy the desired configuration files from the $CWBROOT/snaview/backup directory to the /etc directory. The $CWBROOT directory is the installation directory, which is usually /opt/CSCOcb. (Configuration files are named in the format svopen_config_DOMAINNAME, where DOMAINNAME is the name of the SNA domain.)
After you mount the CD-ROM, use this procedure to install the software on the workstation.
The default for each prompt is the value in brackets. To accept any default value, press Enter. Note that you can press Break or Ctrl-C to stop the installation script at any time.
Step 1 Start the interactive installation and configuration script by entering the following commands:
Step 2 Next you will see a prompt. In response to the prompt, identify the source of the software to be installed.
On Solaris, to accept the default directory, press Enter.
On HP-UX, to accept the default directory, press Enter.
Step 3 In response to the following prompt, to accept the default, press Enter.
Step 4 In response to the next prompt, to accept the default, press Enter.
On Solaris:
On HP-UX:
Step 5 The installation program reviews your responses to the previous questions and asks the following question:
Press Enter to continue, or type n and press Enter to terminate installation.
The program installs the software from CD-ROM and reports on its progress.
Step 6 Examine the log file for error messages:
On Solaris, enter the following command:
where install_directory is the directory in which SNA View is installed, usually/opt/CSCOcb.
On HP-UX, enter the following command:
more /var/adm/sw/swagent.log
Press the Spacebar to advance the display one screen at a time.
Installation is complete. You can now proceed to the section "Configuring SNA View on HP-UX or Solaris."
This section describes how to configure SNA View on an HP-UX or Solaris workstation.
The default for each prompt is the value in brackets. To accept any default value, press Enter. Note that you can press Break or Ctrl-C to stop the configuration script at any time.
Step 1 Run the interactive configuration script by entering the following commands:
Step 2 The following prompt appears if you did not install SNA View in /opt/CSCOcb. Press Enter to accept the default (the same directory in which you placed the software during installation), or enter an alternate directory name.
Step 3 In response to the next prompt, enter snaview to specify that you want to configure the SNA View product.
Step 4 In response to the following prompt, enter the names of the SNA domains from which SNA View will collect information. Separate multiple names with spaces.
To specify a new domain name, you can enter any 1- to 8-character alphanumeric value. Choose a name that is meaningful in your environment. This domain name will be added as an extension to all PU and LU names to create the format PUNAME.DOMAIN, which is used in the SNA View database and on the Maps views. You must use all uppercase characters in domain names.
To reconfigure an existing domain, you can specify an existing domain name. The configuration program displays a message asking you to confirm the reconfiguration of the existing file. You might want to reconfigure an existing domain if you migrated configuration files from a previous release of SNA View, as mentioned earlier in the section "Upgrading to SNA View Version 1.2 on HPUX or Solaris."
Step 5 The configuration program reviews your responses to the previous questions and asks this question:
Press Enter to continue, or type n and press Enter to terminate configuration.
The svXconfig-win menu is then displayed.
Step 6 On the svXconfig-win menu, enter the configuration parameters for the domain.
For information about the domain-specific parameters, see the section "Configuring Domain-Specific Parameters" later in this chapter.
Return here when you finish configuring the domain-specific parameters for that domain.
Step 7 When you are finished with the parameters of one domain, click Save, then click Quit.
If you specified more than one domain in Step 4, the svXconfig-win menu is displayed for each domain.
Step 8 Repeat Step 6 and Step 7 for each SNA domain.
Control returns to the window in which you previously executed the configuration script.
Step 9 Unmount the CD-ROM by entering the following commands:
Step 10 Eject the CD-ROM.
Configuration is complete. If your SNA View workstation is connected to the mainframe using SNA LU 6.2, go to the section "Configuring LU 6.2 Connectivity for SNAplus2 on HP-UX." If your SNA View workstation is connected to the mainframe using TCP/IP, go to the section "Configuring TCP/IP Connectivity to the Mainframe."
This section describes how to configure domain-specific parameters for an SNA domain. For each SNA domain listed on the Domain Selection menu, you must configure a group of operational parameters. The parameters for a particular domain are stored in a file named /etc/svopen_config_DOMAINNAME, such as /etc/svopen_config_TEXAS. You can edit this file directly, if necessary.
Table 3-1 lists the parameters that must be set. Table 3-2 lists additional parameters that you may choose to customize. Table 3-3 lists additional parameters whose defaults you may choose to accept. Detailed descriptions of all parameters follow the tables.
| Parameter | Default Value | Valid Values |
|---|---|---|
| SVMF_AGENT_ADDR | mvs_host_name.name.com | Host name or IP address of the mainframe on which the mainframe component is installed. |
| SVMF_CONNECT | TCP | LU62 or TCP. Set this to LU62 if you will use an LU 6.2 connection. |
| Parameter | Default Value | Valid Values |
|---|---|---|
| SVPATH | SNA View installation directory 1 | SNA View home directory. |
| SVWORK_AREA | /usr/cw-blue/snaview/tmp | Any valid directory. |
| SVVTAM_AGENT_ADDR | machine.name.com 2 | Machine name running the VTAM Server. |
| SVMVS_AGENT_ADDR | machine.name.com 2 | Machine name running the MVS Server. |
| SVCMDS_AGENT_ADDR | machine.name.com 2 | Machine name running the Host Command Server. |
| SVHCI_AGENT_ADDR | machine.name.com 2 | Machine name running the Host Connection Interface. |
| SVSTATUS_AGENT_ADDR | machine.name.com 2 | Machine name running the Status/Discovery process. |
| SVSOCKET_MODE | TCP | TCP |
| SVVTAM_AGENT_PORT | 6100 | Any unused PORT value. |
| SVALERT_AGENT_PORT | 6101 | Any unused PORT value. |
| SVCMDS_AGENT_PORT | 6102 | Any unused PORT value. |
| SVHCI_VTAM_PORT | 6103 | Any unused PORT value. |
| SVHCI_ALERT_PORT | 6104 | Any unused PORT value. |
| SVHCI_STATUS_PORT | 6105 | Any unused PORT value. |
| SVMF_HCI_AGENT_PORT | 6106 | Any unused PORT value. Must match PORTs defined in SNA View mainframe PARM member. |
| SVMF_CMDS_AGENT_PORT | 6107 | Any unused PORT value. Must match PORTs defined in SNA View mainframe PARM member. |
| SVMVS_AGENT_PORT | 6108 | Any unused PORT value. |
| SVHCI_MVS_PORT | 6109 | Any unused PORT value. |
| SVACK_AGENT_PORT | 6110 | Any unused PORT value. |
| SVATATUS_AGENT_PORT | 6111 | Any unused PORT value. |
The following information describes each parameter in detail.
Set the following parameters, or accept the default values, for each domain:
These parameters have preset default values that will suit most users. Review the default setting for each parameter and decide whether it meets your requirements. You may want to change some of these parameter values.
These parameters have preset default values that will suit most users. Review the default setting for each parameter and decide whether it meets your requirements. Depending on how your workstation is configured, you may want to change some of these parameter values.
| SVMF_HCI_AGENT_PORT | |
| SVALERT_AGENT_PORT | SVMF_CMDS_AGENT_PORT |
| SVCMDS_AGENT_PORT | SVMVS_AGENT_PORT |
| SVHCI_VTAM_PORT | SVHCI_MVS_PORT |
| SVHCI_ALERT_PORT | SVACK_AGENT_PORT |
| SVHCI_STATUS_PORT | SVSTATUS_AGENT_PORT |
This section explains how to configure LU 6.2 connectivity between the SNA View workstation and the mainframe.
Before starting the steps to allow SNA View on the workstation to communicate with SNA View on the mainframe, you must first do all the necessary configuration to allow an LU 6.2 session to flow from the workstation to the mainframe. You may need to make changes to both VTAM and the workstation application that supports LU 6.2 sessions. The workstation LU 6.2 programs are HP-UX SNAplus2 (including SNAplus2 Link and SNAplus2 API) and IBM Communications Server for AIX. If the SNA View workstation will not be directly connected to the mainframe running SNA View, but the session will instead pass through one or more VTAMs before reaching the destination VTAM, then the correct configuration may require changes to all VTAMs (and possibly NCPs in the path). It is not the intent of this book to document all the steps necessary to set up the network. See the relevant IBM VTAM and NCP publications instead.
If this LU 6.2 configuration has not yet been done, the SNA View installation should be delayed until the LU 6.2 configuration is complete. One way to determine whether there is LU 6.2 connectivity between the SNA View workstation and the mainframe is to issue the VTAM command D net,aping,id=netid.resource. The netid.resource should be the fully qualified name of the SNA workstation. Until this returns a positive response, SNA View will not be able to connect to the workstation.
After the initial LU 6.2 configuration is complete, you can use the procedures in the following sections to complete the configuration for SNA View.
If the SNA View workstation will be connected to the mainframe using SNA LU 6.2, use this procedure to configure the LU 6.2 operating environment. This procedure configures transaction program profiles for the command server and the message server, and a logmode named PARALLEL.
Step 1 Log in as the root user. (For information about how to become the root user, see the section "Becoming the Root User" in the "Preparing to Install CiscoWorks Blue SNA View" chapter.)
Step 2 To start SMIT, enter the smit command at the system prompt:
smit
Step 3 On the System Management menu, click Communications Applications and Services.
Step 4 On the next menu, click Communications Server for AIX.
Step 5 On the next menu, click Configure SNA Profiles.
Step 6 On the next menu, click Advanced Configuration.
Step 7 On the next menu, click Sessions.
Step 8 On the next menu, click LU 6.2.
Step 9 On the next menu, click LU 6.2 Transaction Program Name (TPN).
Step 10 On the next menu, click Add a Profile.
Step 11 Use the Add a Profile menu to create a transaction program profile for the LU 6.2 session for the SNA View command server (NSPOPNCS).
(a) Set "Profile Name" to NSPOPNCS.
(b) Set "Conversation type" to basic.
(c) Set "Sync level" to none.
(d) Set "Full path to the TP executable" to /usr/cw-blue/snaview/bin/svcommand_server_DOMAIN.
(e) Set "Server synonym name" to nspopncs.
(f) Accept the default values for the remaining fields.
(g) Click OK.
Step 12 Use the Add a Profile menu to create a transaction program profile for the LU 6.2 session for the SNA View message server ( NSPOPNMS).
(a) Set "Profile Name" to NSPOPNMS.
(b) Set "Server synonym name" to nspopnms.
(c) Set "Conversation type" to basic.
(e) Set "Full path to the TP executable" to /usr/cw-blue/snaview/bin/svhci_server_DOMAIN.
(f) Accept the default values for the remaining fields.
(g) Click OK and return to the LU 6.2 menu.
Step 13 From the LU 6.2 menu, select LU 6.2 Mode.
Step 14 From the LU 6.2 Mode menu, select Add a Profile. The Add LU 6.2 Profile menu is displayed.
Step 15 Configure an LU 6.2 Session Mode profile set to PARALLEL by setting the following fields:
Step 16 Click OK.
Step 17 Exit SMIT.
This section describes how to configure SNAplus2 for LU 6.2 support on HP-UX. (LU 6.2 is not supported on Solaris.)
To configure HP-UX SNAplus2 for SNA View, you first create a file named sna_tps, and then you configure PARALLEL mode processing, as described in the following sections:
To configure the LU 6.2 transaction programs that SNA View uses to communicate between an HP-UX workstation and a mainframe, create a configuration file named sna_tps, as described in the SNAplus2 Administration Guide and SNAplus2 Installation Guide. Use the sna_tps file to define two transaction programs (TPs) named NSPOPNMS and NSPOPNCS. Figure 3-5 shows an example of the sna_tps file.
#SNA View Message Server
["NSPOPNMS"]

PATH          = /opt/CSCOcb/snaview/bin/svhci_server_CPACLU62
ARGUMENTS     = CPACLU62
TYPE          = QUEUED-BROADCAST
TIMEOUT       = 60
USERID        = cwblue
GROUP         = sys

#SNA View Command Server
["NSPOPNCS"]

PATH          = /opt/CSCOcb/snaview/bin/svcommand_server_CPACLU62
ARGUMENTS     = CPACLU62
TYPE          = QUEUED-BROADCAST
TIMEOUT       = 60
USERID        = username
GROUP         = sys
This sample sna_tps file defines two transaction programs:
NSPOPNMS--is for the message server.
NSPOPNCS--is for the command server.
In the file, each TP name is enclosed in quotation marks and then in brackets, as shown below:
For each TP, code the following entries:
PATH--specifies the path to the SNA View executable for the domain. Ensure that this is the correct path to where you installed the SNA View executables, and change CPACLU62 to the name of your SNA domain, in uppercase characters.
ARGUMENTS--specifies the name of the SNA domain. Replace CPACLU62 in the sample file with the name of your SNA domain, in uppercase characters.
TYPE--specifies the type QUEUED-BROADCAST as shown in the sample file.
TIMEOUT--specifies the timeout period; code 60 as shown in the sample file.
USERID--specifies the username under which SNA View launches the two TPs. Enter the username of any valid user that has a valid home directory.
GROUP--specifies the group for these TP programs. Code them both as sys, as shown in the sample.
After you create the sna_tps file, you then configure SNAplus2 for PARALLEL processing mode.
Step 1 At the command prompt, enter the xsnapadmin command, as shown below.
The xsnapadmin window is displayed.
Step 2 In the xsnapadmin window, select Services>APPC>Modes.
Step 3 If the PARALLEL mode is not in the list of defined modes, select Add. The Add Mode window is displayed.
If the PARALLEL mode is already in the list of defined modes, you can exit.
Step 4 In the Add Mode window, enter PARALLEL for the Mode Name, and either accept the defaults or customize the values for your operating environment.
This section explains how to configure TCP/IP connectivity between the SNA View workstation and the mainframe.
If you configure TCP/IP connectivity from the workstation to the mainframe, you must match the SVMF_HCI_AGENT_PORT and SVMF_CMDS_AGENT_PORT parameters of the domain to the TCP Parameter Cards used in the mainframe. (TCP Parameter Cards are documented in the CiscoWorks Blue SNA View Mainframe Installation and User Guide.) For example, the workstation parameters for domain "NORTH" should be set as follows in /etc/svopen_config_NORTH:
SVMF_HCI_AGENT_PORT 6106
SVMF_CMDS_AGENT_PORT 6107
The host configuration file for SNA View should have a TCP card containing the following:
TCP 6106 6107
The data that is transferred between the mainframe and workstation component of the SNA View application is not encrypted. This data transfer is secure if the data is transferred over a private intranet. If the workstation-to-host connection traverses the Internet, or if additional security is desired over the intranet, you can use the "Network Data Encryption with Router Authentication" feature provided with Cisco routers to encrypt the data that flows between the router nearest to the workstation and the router nearest to the host.
For more information on this topic, see the Cisco IOS Release 11.2 Security Configuration Guide.
If you configure TCP/IP connectivity to multiple mainframe domains, each set of SVMF_HCI_AGENT_PORT and SVMF_CMDS_AGENT_PORT parameters for each domain must have corresponding TCP parameter cards in the mainframe. (TCP Parameter Cards are documented in the CiscoWorks Blue SNA View Mainframe Installation and User Guide.)
For example, the workstation parameters for domain "NORTH" should be set as follows in /etc/svopen_config_NORTH:
SVMF_HCI_AGENT_PORT 6106
SVMF_CMDS_AGENT_PORT 6107
The workstation parameters for domain "SOUTH" should be set as follows in
/etc/svopen_config_SOUTH:
SVMF_HCI_AGENT_PORT 6126
SVMF_CMDS_AGENT_PORT 6127
The host configuration file for SNA View, at each domain's mainframe should have a TCP cards that contain the following line:
For domain NORTH:
TCP 6106 6107
For domain SOUTH:
TCP 6126 6127
During installation and configuration, messages are recorded in a log file to provide diagnostic information in case a problem arises. Use the following commands on an
HP-UX or Solaris system to remove the log files when you are satisfied that configuration of the software is complete.
On AIX, enter these commands:
# rm /tmp/cwb_snaview.log
# rm $CWBROOT/log/snaview.log
On HP-UX and Solaris, enter this command:
# rm $CWBROOT/log/snaview.log

Caution Do not use rm *.log to remove the log files because the directory might contain other application log files that you do not want to remove.
Deinstalling SNA View
This section describes how to deinstall SNA View from AIX, HP-UX, and Solaris workstations. You may want to deinstall SNA View after a failed installation or before you install a newer version of the software.
Deinstalling SNA View on AIX
To deinstall all files related to CiscoWorks Blue SNA View, perform these steps:
Step 1 Log in as the root user. (For information about how to become the root user, see the section "Becoming the Root User" in the "Preparing to Install CiscoWorks Blue SNA View" chapter.)
Step 2 Shut down all SNA View tasks.
Step 3 To start SMIT, enter the smit command at the system prompt:
# smit
Step 4 On the System Management menu, click Communications Applications and Services.
Step 5 On the next menu, click Cisco Network-Management Applications for AIX.
Step 6 On the next menu, click CiscoWorks Blue SNA View.
Step 7 On the next menu, click Deinstall CiscoWorks Blue SNA View.
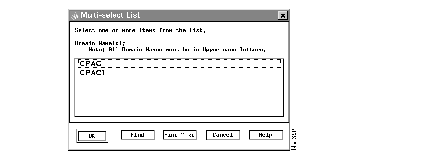
Step 8 On the Deinstall menu, click the "De-install" List button.
Step 9 From the Multi-select List dialog box, select all object names so that all are highlighted simultaneously, then click OK.
Step 10 In response to the "ARE YOU SURE?" prompt, click OK. An animated man appears on the screen.
While the animated man is running, SMIT deinstalls all files related to CiscoWorks Blue SNA View.
If the man raises his hands and SMIT displays OK, the deinstallation process has succeeded.
If the man falls down, deinstallation has failed. Contact a Cisco TAC representative.
Step 11 Terminate SMIT by pressing F12 or by selecting Exit SMIT from the Exit menu.
Deinstalling SNA View on HP-UX or Solaris
To deinstall all files related to CiscoWorks Blue SNA View, perform these steps:
Step 1 To shut down the SNA View application, first stop all SNA View tasks from the task manager.
Step 2 Click Quit in the Task Manager window.
Step 3 To start the interactive deinstallation script, log in as the root user and type the following commands:
The deinstallation script lists the Maps and SNA View filesets that are installed.
Step 4 To deinstall the SNA View application only, type the following and press Enter:
On Solaris:
CWBLUE-SNAVIEW
On HP-UX:
CWBLUE-SNA
Step 5 In response to the following prompt, press Enter to begin the deinstallation, or type n and press Enter to terminate deinstallation.
Do you wish to de-install? (y/n)[y]:
Step 6 When the system prompt returns, examine the deinstallation log files with the more command, as shown below. Unless you see an error message in the files, deinstallation is complete.
On HP-UX:
On Solaris:
Step 7 Remove the deinstallation log files with the rm command.
On HP-UX:
# rm /tmp/cwb_deinstall.log
On Solaris:
Customizing Window Preferences
You can change the appearance of SNA View windows by changing the default application settings that are stored in the application default files in the $SVHOME/app-defaults directory. There is an application default file for each SNA View Motif window. The default settings control the following:
SNA View Environment Variables
The environment variables shown in Table 3-4 are set automatically in the CiscoWorks Blue SNA View script (runsnaview) during configuration.
Table 3-4: SNA View Environment Variables
Variable
Default Value
CWBROOT
CiscoWorks Blue installation directory, set to the directory you specify during installation.
On AIX: /usr/cw-blue
On HP, Solaris: /opt/CSCOcb
DBNAME
SNA
DSQUERY
CW_SYBASE
HHHOME
$CWBROOT/hyperhelp
SVHOME
$CWBROOT/snaview
SYBASE
Directory where CiscoWorks installs Sybase, such as
/opt/CSCOcws/sybase or /usr/nms/sybase
TERM
xterm
XAPPLRESDIR
$CWBROOT/Xdefaults
Controlling PU and LU Activation and Deactivation
This section describes what you must do to allow users of CiscoWorks Blue Maps to activate and deactivate PUs and LU. The CiscoWorks Blue Maps user can activate PUs from the PU List window and activate LUs from the LU List window. But before that can happen, you must enable SNA activation and deactivation by having a special file called SnaActDeactOn in the $CWBROOT/etc directory. If the file is removed or owned by a user other than root, the Activate and Deactivate menu items will not work.
The following sections describe how to enable and disable SNA activation.
Enabling SNA Activation and Deactivation
To enable SNA activation and deactivation, use the following procedure to create the $CWBROOT/etc/SnaActDeactOn file.
Step 1 If you are already running a Maps application, exit the application by selecting File>Exit Program from the menu bar.
Step 2 Become the root user by entering the following command:
su root
Step 3 When prompted, enter the root user's password.
Step 4 Change to the $CWBROOT/etc directory by entering the following command.
cd install_directory/etc
where install_directory is usually /usr/cw-blue for AIX, or /opt/CSCOcb for HP-UX and Solaris.
Step 5 Create an SNA activation/deactivation file by entering the following command:
Step 6 Change back to your username by entering the following command:
exit
Step 7 Restart the Maps application, as described in the CiscoWorks Blue Maps Installation and User Guide.
Disabling SNA Activation and Deactivation
To disable SNA activation and deactivation, use the following procedure to remove the $CWBROOT/etc/SnaActDeactOn file.
Step 1 If you are already running a Maps application, exit the application by selecting File>Exit Program from the menu bar.
Step 2 Become the root user by entering the following command:
su root
Step 3 When prompted, enter the root user's password.
Step 4 Change the current directory to the $CWBROOT/etc directory.
cd install_directory/etc
Where install_directory is usually /usr/cw-blue for AIX, or /opt/CSCOcb for HP-UX and Solaris.
Step 5 Remove the SNA activation/deactivation file by entering the following command:
rm SnaActDeactOn
Step 6 Switch back to your username by entering the following command:
exit
Step 7 Restart the Maps application, as described in the CiscoWorks Blue Maps Installation and User Guide.
|
|