|
|

This chapter describes how to use the SNA View workstation application. It includes the following main topics:
You can start SNA View at the workstation in three ways: as an extension to the CiscoWorks Blue Maps application; from the command line; and from a network management system.
Before you start SNA View, start one of the CiscoWorks Blue Maps applications (DLSw, APPN, or RSRB) to display a graphical network map. (See the CiscoWorks Blue Maps Installation and User Guide for information about starting and using the
CiscoWorks Blue Maps applications.)
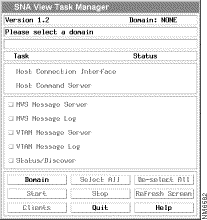
To start SNA View from the Maps application, select Tools>SNA View Task Mgr. from the Maps menu bar. The SNA View Task Manager window appears, as shown in Figure 4-1.
You can start the SNA View Task Manager from a UNIX command prompt by using the following procedure:
Step 1 Change to the $CWBROOT/snaview/bin directory:
% cd $CWBROOT/snaview/bin
where $CWBROOT is the Maps installation directory.
Step 2 Enter the following command:
% ./runsnaview
The SNA View Task Manager window appears, as shown in Figure 4-1.
The SNA View error messages are displayed in the window from which the runsnaview command was entered. So you might want to start the Task Manager from the command prompt to view the messages and diagnose problems with SNA View.
You can also start the SNA View application from a network management system such as NetView for AIX. To start SNA View from NetView for AIX, select Admin>CW Blue Maps>SNA View. The SNA View Task Manager window appears, as shown in Figure 4-1.
Before you can use the SNA View functions, connect SNA View to an SNA domain:
Step 1 On the SNA View Task Manager window, click Domain. The Available Domains window is displayed, as shown in Figure 4-2.

Step 2 Select a domain.
Step 3 Click Connect. The SNA View Task Manager connects to the SNA View mainframe application in the specified domain.
Step 4 Figure 4-3 shows the SNA View Task Manager window after connecting to domain RTP. Notice that the field at the top of the Task Manager window displays the current version of SNA View and the name of the connected domain. The next field displays the status of the connection to the SNA View mainframe task.
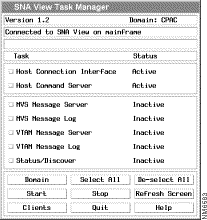
Step 5 Verify that the status of the Host Command Server and Host Connection Interface processes (near the top of the window) are active. If they are not active, you can activate these processes in the following ways:
If this is the first time that you are using SNA View with this domain, you can discover the network to construct the database of SNA data. If you suspect that some PUs have not been discovered, you can rediscover the network to reconstruct the database of SNA data for this domain. In either case, you can start the Status/Discovery process to discover and continually update the Maps database. To start the Status/Discovery process, perform the following steps:
Step 1 On the SNA View Task Manager window, click Status/Discover.
Step 2 Click Start to start the SNA View Status/Discovery process.
Step 3 The Task Manager displays the Query Discovery window (shown in Figure 4-4), which asks whether you want to run the discovery portion of the
Status/Discovery process.
 Discovery Window
Step 4 To run the discovery portion of the Status/Discovery process, click Yes. To omit the discovery portion, click No.
When you start discovery, the third field in the Task Manager window displays the status of the discovery. As discovery proceeds, you will see the following messages in this field.
Discovery StartingEstimated Time Remaining hh:mm:ssDiscovered X of total PUs (XX Percent)Domain Discovered: day month date hh:mm:ss.You can control some of the messages that are displayed during discovery. For more information about controlling these messages, see the SV_DISCOVER_DISPLAY discovery status message parameter in the section "Configuring Domain-Specific Parameters" in the chapter "Installing and Configuring CiscoWorks Blue SNA View."
The Status/Discovery process maintains the Maps database dynamically, updating the status of SNA resources. When the status of an PU or LU changes, the Status/Discovery process receives status from the mainframe.
The Status/Discovery process also finds and identifies PUs and LUs in the selected SNA domain. The Status/Discovery process may take some time to complete. When discovery is complete, the message "Domain Discovered" is displayed.
Figure 4-5 shows the Task Manager window after discovery completes.
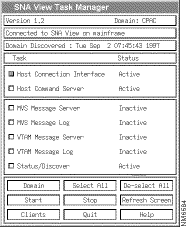
The top of the SNA View Task Manager contains three small message windows. Each message window displays different status information. Figure 4-6 shows the set of three Task Manager message windows.

The window at the top of the Task Manager, shown in Figure 4-7, displays the version of SNA View and the name of the connected domain.

The second window, shown in Figure 4-8, displays the status of the host connection. Table 4-1 lists the messages that can appear in this window.

| Message | Explanation |
|---|---|
Lost Connection — Killing Tasks | The SNA View workstation loses contact with the mainframe and stops the active SNA View tasks. |
Connecting to SNA View on mainframe | The SNA View workstation program is starting to connect to the SNA View mainframe program. |
Connected to SNA View on mainframe | The SNA View workstation program is connected to the SNA View mainframe program. |
Checking for mainframe connection | The SNA View workstation program is checking for a connection to the SNA View mainframe program. |
Reading configuration file | The SNA View workstation program is reading the NSPPARM configuration file. |
Checking SNA View version on mainframe | The SNA View workstation program is checking the version of the SNA View mainframe program for compatibility. |
Workstation/mainframe version not compatible | The SNA View workstation program and the SNA View mainframe program are at different version levels and are not compatible. |
No response from mainframe for version check | The SNA View workstation program did not receive a response from the mainframe for the version request, or the SNA View mainframe program is earlier than Software Release 1.1. |
Not connected to mainframe (Start HCI and HCS) | The SNA View workstation program is not connected to the SNA View mainframe program. Select the Host Connection Interface and the Host Command Server and click Start. If this fails, see the chapter "Troubleshooting SNA View on the Workstation." |
The third Task Manager window, shown in Figure 4-9, displays the status of the discovery process. Table 4-2 lists the messages displayed in this window.

From the SNA View Task Manager, after you have connected to a domain, you can view VTAM and MVS messages. To view these messages, follow this procedure:
Step 1 From the SNA View Task Manager, select MVS Message Server or VTAM Message Server.
Step 2 Click Start to activate the selected message servers.
Step 3 After the message servers have become active, as indicated on the Task Manager window, you can start the message clients. At the bottom of the Task Manager window, click Clients to activate the VTAM or MVS message clients.
The Clients window is displayed, as shown in Figure 4-10.

Step 4 From the Clients window, select VTAM Messages or MVS Messages.
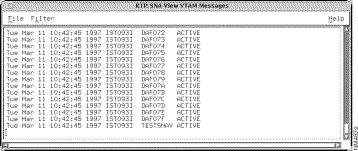
Step 5 Click Activate. The VTAM Messages or MVS Messages window is displayed. Figure 4-11 shows the VTAM Messages window. You should begin to see VTAM or MVS messages scrolling down your display.
If the flow of mainframe messages becomes overwhelming, you can filter out unwanted messages. To filter out unwanted messages, do the following steps:
Step 1 Select Filter from the menu bar in either the VTAM Messages or MVS Messages window.
Step 2 From the Filter menu, select Add Filter. The Filter Table window is displayed, as shown in Figure 4-12.
The Filter Table window has two fields:
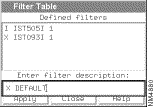
Step 3 Enter a filter statement in the "Enter filter description:" field and press the Enter key on your keyboard. Filter statements are explained in the chapter "Filtering Mainframe Messages."
After you press Enter, the filter statement moves from the "Enter filter description" field to the "Defined filters" field.
Step 4 When you have entered all your filter statements, and they appear in the "Defined filters" field, click Apply to activate the message filter.
Filter statements entered in the Filter Table window are temporary, and last only until you stop the active message server. If you want to create more permanent filters, or you just want to read a complete description of filters and filter statements, see the chapter "Filtering Mainframe Messages."
Table 4-3 shows some sample filter statements.
| Filter Statement | Purpose |
|---|---|
I IST105I 1 | Include all messages with the token IST105I in the first token position in the message. |
X IST093I 1 | Exclude all messages with the token IST093I in the first token position in the message. |
X DEFAULT | Exclude all other messages. |
This section briefly describes the format of message filter statements. For more complete information, see the chapter "Filtering Mainframe Messages."
Filter Statement Syntax: Action {DEFAULT | message_token token_position}
Action | The filtering action performed by this filter statement. An action can be one of the following:
|
DEFAULT | Specifies an action to be performed on all messages not filtered by the remaining filter statements. |
message_token | A character string contained in the message to be included or excluded. The token can be a message ID, or some other meaningful data from the message text. |
token_position | The relative position, in the message, where the message_token must be to satisfy the filter statement. |
Example: To display all occurrences of message IST051I and filter out all other messages, you would enter the following filter statements in the Filter Table window.
I IST051I 1
X DEFAULT
You can issue mainframe commands from the SNA View workstation using the Task Manager. You must be connected to a domain, and the Host Command Interface and Host Command Server must be active. To issue mainframe commands, perform the following steps:
Step 1 In the SNA View Task Manager window click Clients. The Clients window is displayed, as shown in Figure 4-13.

Step 2 From the Clients window, select Mainframe Commands and Click Activate.
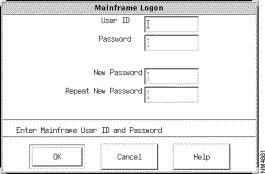
The Mainframe Logon window is displayed, as shown in Figure 4-14.
Step 3 In the Mainframe Logon window, you can do one of the following actions:
If your installation uses RACF or CA-ACF2 security, enter your authorized RACF or CA-ACF2 user ID and password, and click OK. If you want to change your password, enter the new password in the New Password field, then again in the Repeat New Password field, and click OK.
If your installation does not use RACF or CA-ACF2 security, just click OK.
You will see the command security message shown in Figure 4-15.

If the user ID and password are accepted, or if your installation does not use RACF or CA-ACF2 security to access the mainframe, the SNA View Mainframe Commands window is displayed, as shown in Figure 4-16.
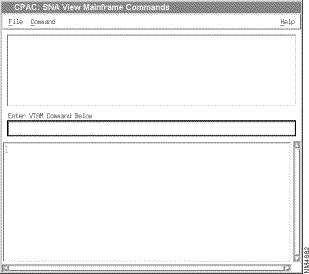
Step 4 From the menu bar, select Command and then select the kind of mainframe command that you will issue:
Step 5 Enter a mainframe command in the command field (the field in the middle of this window). The command you enter, whether an MVS, VTAM, NetView, or SOLVE:Netmaster command, must match the type of command you selected in Step 4, above.
Step 6 Press Enter to send the command to the mainframe.
You can use the SNA View Mainframe Commands window to issue a variety of mainframe commands, including the SNA View Mainframe commands that are described in the CiscoWorks Blue SNA View Mainframe Installation and User Guide.
For example, you can use the following MVS MODIFY command (abbreviated F) to add a filter statement to the mainframe message filter table:
F NSPOPEN,ADD FILTER IST999I
Then use the F NSPOPEN,SHOW FILTER command to see the current filter configuration:
F NSPOPEN,SHOW FILTER
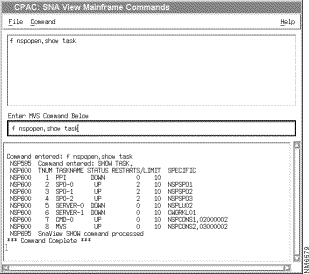
If you want to see what SNA View subtasks are running at the mainframe, issue the F NSPOPEN,SHOW TASK command, as shown in Figure 4-17. The Mainframe Commands window will display the output that shows which SNA View mainframe tasks are running.
![]()
![]()
![]()
![]()
![]()
![]()
![]()
![]()
Posted: Tue Dec 17 22:08:27 PST 2002
All contents are Copyright © 1992--2002 Cisco Systems, Inc. All rights reserved.
Important Notices and Privacy Statement.