|
|

Before you begin to define your QoS policies, you should set up your QoS policy system.
The following topics describe how to start working with QPM.
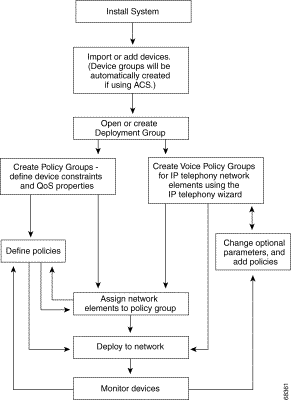
The QPM workflow is flexible and allows you to navigate between the QPM management applications. Figure 3-1 describes a common workflow for defining policies for data and IP telephony networks.

The main workflow tasks are:
 |
Note You can use QoS monitoring, as a starting point for defining QoS policies, to profile traffic by critical applications, or DiffServ classes. |
QoS Policy Manager is accessed from the CiscoWorks2000 desktop.
Step 1 In your web browser, start CiscoWorks. The default URL is http://< QPMinstall>:1741, where <QPMinstall> is the name of the computer with the QPM installation.
The CiscoWorks2000 desktop is displayed.
 |
Note The first time you start CiscoWorks2000 on a CiscoWorks2000 server or a client machine, the Java Runtime Environment is automatically installed. |
 |
Note Verify on the front page that Java, JavaScript, and cookies are enabled. If they are not enabled, change your browser preferences to enable them, then continue to the next step. |
Step 2 Log into CiscoWorks with your username and password.
The CiscoWorks navigation tree appears in the left pane.
Step 3 Click QoS Policy Manager in the navigation tree.
Step 4 Click QPM under the QoS Policy Manager drawer.
A Security Alert window opens. Click Yes to proceed.
QPM opens in a separate browser window.
The following topics familiarize you with the QPM user interface:
All the pages in the web-based QPM user interface have a consistent look and feel.
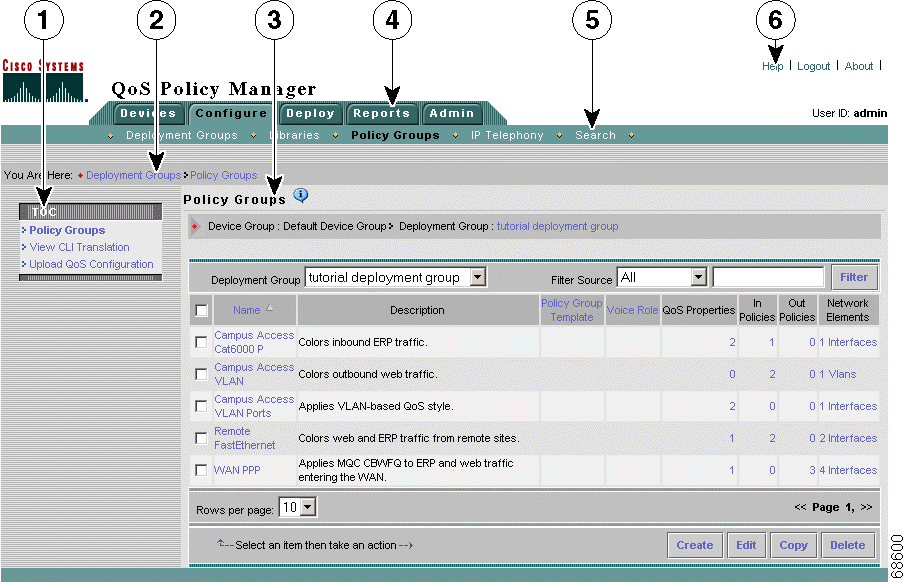
Figure 3-2 shows an example of a QPM page.

Table 3-1 describes the common elements in each page.
| Number | Area | Description |
|---|---|---|
1 | TOC | Provides up to two additional levels of navigation, if required:
|
2 | Path bar | Provides a context for the displayed page. Indicates from which tab and option the current page is derived. |
3 | Content area | Displays the pages in which you perform application tasks. |
4 | QPM tabs | Contains tabs that provide access to QPM functionality. Click a tab to access its options:
|
5 | Option bar | Displays the options available for the selected tab. |
6 | QPM banner | Contains the Help, Logout, and About buttons:
|
 |
Note It is not recommended to use the browser Back button to navigate in QPM. |
In QPM, lists of items are displayed in tables. A table consists of a table header with filtering criteria, column headers with the column titles, a table footer with the table action buttons, and one or more table pages containing the table contents.
In general, you must select a table item before you click an action button. (Some actions do not require any item selection, for example, creating a new item.)
When an action can apply to more than one item, for example, deleting items, you can select multiple items in a single page, and then click the action button. You can select all items in a table by selecting the check box in the column header row.
 |
Note If you select items in a table page, and then attempt to open another table page without clicking an action button, a warning message appears. |
You can change the table display in the following ways:
QPM wizards guide you through the steps required to complete configuration tasks in QPM.
Each step in a wizard can consist of one or more pages and dialog boxes. A step can also contain substeps. You can navigate through the wizard steps using either the Next and Back buttons, or the wizard navigation TOC in the left pane.
 |
Note It is recommended not to use the browser Refresh button when working in a wizard. Using the browser Refresh button might result in loss of data. |
When you open a wizard, some steps might be disabled depending on previous configurations you have made. As you progress through a wizard, some steps might become disabled depending on the choices you make in each step.
The configuration settings that you define in a wizard are saved only when you complete the wizard by clicking the Finish button. If you click the Cancel button in the wizard, or if you choose another QPM option while in the wizard, your wizard settings will not be saved.
 |
Note In the IP Telephony wizard, new policy groups are saved when you complete each step. |
Multiple users can work with QPM at the same time. Whenever you save changes, for example, when you complete a wizard, or edit an item, QPM checks whether you are modifying the latest version of that item. An item might be a policy group, policy, global library item, and so on.
If you are not editing the latest version, meaning another user has saved changes to the item since you accessed it for editing, QPM displays a message informing you that you are not working with the latest version of the item, and will not let you save the changes. This mechanism prevents a user from unintentionally overwriting changes made by another user working at the same time.
QPM can work with either Cisco Access Control Server (ACS) permissions or CiscoWorks permissions. QPM permissions for user authorization are mapped to CiscoWorks permission roles or ACS permissions as specified.
User permissions and authentications for QPM are handled by the Cisco Common Services application. Before you begin to work with QPM, you should ensure that you have the appropriate permissions. Verify your user permissions in the CiscoWorks2000 desktop (Server Configuration > Setup > Security), or in ACS (depending on the method you are using for user authentication).
See the Installation Guide for QoS Policy Manager 3.0 for more information about user permissions.
When you finish working with QPM, you must log out of CiscoWorks to close the application.
Step 1 Click Logout in any open QPM windows to close them.
Step 2 Click Logout in the CiscoWorks2000 desktop window.
The CiscoWorks session ends.
![]()
![]()
![]()
![]()
![]()
![]()
![]()
![]()
Posted: Tue Nov 12 12:38:10 PST 2002
All contents are Copyright © 1992--2002 Cisco Systems, Inc. All rights reserved.
Important Notices and Privacy Statement.