|
|

A major part of your Quality of Service (QoS) configuration is the definition of policy groups and policies. QoS policies define the QoS actions that will be applied to specific data packets. These policies are managed within policy groups, which are applied to a specified set of network elements.
The following topics provide information about creating and managing policy groups and policies:
The following topics describe how to create and work with policy groups in QPM:
Policy groups are constrained sets of QoS policies, and assigned network elements. A policy group consists of:
 |
Note Voice policy groups contain the QoS properties and policies for each relevant point in the IP telephony network. Each voice policy group contains a voice role attribute, which specifies the role of an interface, according to its type, function, and location on the network. For more information about voice policy groups, see "Configuring QoS for IP Telephony." |
Policy groups are managed within deployment groups. You can define shared policies across deployment groups by either copying policy group definitions, or by using a global policy group template. Policy group templates are policy group definitions without network element assignments.
Figure 6-1 shows the relationship between a deployment group, its policy groups, policy group templates, and assigned network elements.
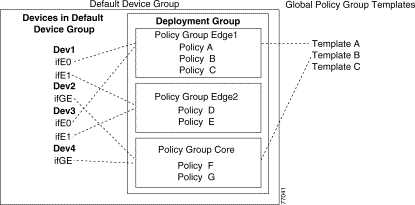
The example deployment group has been created in the San Jose device group. The deployment group contains three policy groups—Edge1, Edge2, and Core. Policy group Edge1 is linked to Policy Group Template A. This means that its policies and properties are inherited from Template A. Policy group Core is linked to Template B. Policy group Edge2 is not linked to a template.
Interfaces ifE0 on Dev1, and ifE0 on Dev3, are assigned to policy group Edge1. This means that the policies in policy group Edge1 will be deployed to those interfaces. Interfaces ifE1 on Dev1, and ifE1 on Dev3, are assigned to policy group Edge2. Different interfaces on a single device can be assigned to different policy groups. Interfaces ifGE on Dev2, and ifGE on Dev4 are assigned to policy group Core.
When working with a policy group, QPM presents you with only those QoS properties and policy actions, and network elements that are valid for the defined device constraints.
For information about the devices and QoS features supported by QPM, see the device support tables at:
http://www.cisco.com/univercd/cc/td/doc/product/rtrmgmt/qos/qpm3_0/
qpm30dev/index.htm
This topic describes how to use the Policy Group Definition wizard to create a new policy group in the following ways:
Step 1 Select Configure > Policy Groups. The Policy Groups page appears displaying the policy groups for the current deployment group.
To create a policy group in a different deployment group, select the required deployment group in the Deployment Group list box.
Step 2 Click Create. The Policy Group Definition wizard opens.
Step 3 In the General Definition page:
a. Enter the name of the new policy group.
b. Enter a description for the policy group (optional).
c. To define device constraints using the wizard, go to step e. To define the policy group using advanced options, click on the triangle next to Advanced. The Advanced field expands.
d. Select how you want to create the policy group, and fill in the appropriate fields.
For more information about the General Definition page fields, see Policy Group Definition Wizard: General Definition Page.
e. Click Next.
|
Note You can also navigate through the wizard using the wizard navigation TOC in the left pane. |
Step 4 In the Device Constraints page, define the policy group's device constraint definitions. This determines the QoS features you can use, and the type of network elements that can be assigned to the policy group:
|
Note The network element type is the same for all constraints in the policy group and cannot be changed. |
In the Device Constraints page, click Next. The Capabilities Report page appears.
Step 5 In the Capabilities Report page, you can view a summary of the QoS features that can be configured for the policy group, according to the device constraints.
For more information about this page, see Policy Group Definition Wizard: Capabilities Report Page.
A policy group's QoS properties and mappings apply to all flows passing through the interface. QoS properties include scheduling properties, traffic control features, and other QoS features, depending on the device constraints for the policy group. Mappings include NBAR port mappings, DSCP to CoS, CoS to DSCP, IP precedence to DSCP, DSCP to markdown, and excess markdown values.
The following topics describe how to configure QoS properties and mappings for a policy group or a policy group template:
This topic describes how to define QoS properties using the QoS Properties wizard.
After you create a policy group, or policy group template, and define its device constraints using the Policy Group Definition wizard, you can define its QoS properties using the QoS Properties wizard. The QoS Properties wizard lets you configure only those QoS properties that conform to the device constraints of the policy group. Some QoS properties are inter-dependent, therefore the selection of available QoS properties might change as you proceed through the wizard.
|
Note When you create a policy group, or policy group template, from another policy group, or policy group template, its QoS properties are defined automatically. |
|
Note The following procedure describes all the pages in the QoS Properties wizard. However, when you define QoS properties, some (or occasionally, all) of the pages or options might not appear, depending on the device constraints for the policy group, or policy group template. |
Step 1 Open the QoS Properties page in one of the following ways:
Step 2 In the QoS Properties page, click Edit in the QoS Properties table.
The Scheduling page of the QoS Properties wizard appears.
Step 3 In the Scheduling page:
a. Choose the scheduling type from the list box.
b. Configure the queuing properties, if required. If you do not fill in the queuing property fields, the defaults on the device will be used. For more information about the fields in this page, see QoS Properties Wizard: Congestion Management Page.
c. Click Next to proceed to the next available page.
|
Note You can also navigate through the wizard using the wizard navigation TOC in the left pane. |
Step 4 In the Shaping Settings page:
a. Configure the FRTS properties, or modular shaping properties. For more information about the fields in this page, see QoS Properties Wizard: Shaping Settings Page.
b. Click Next to proceed to the next available page.
Step 5 In the Traffic Control Settings page:
a. Configure the Traffic Control properties. For more information about the fields in this page, see QoS Properties Wizard: Traffic Control Settings Page.
b. Click Next to proceed to the next available page.
Step 6 In the Congestion Avoidance Settings page:
a. Configure the WRED properties. For more information about the fields in this page, see QoS Properties Wizard: Congestion Avoidance Page.
b. Click Next to proceed to the Summary page.
Step 7 Review the summary page. For more information about the fields in this page, see QoS Properties Wizard: Summary Page.
After you are satisfied with the configuration, click Finish. The QoS Properties page reappears, displaying the QoS properties you have configured.
You can now do one of the following:
Step 1 Open the QoS Properties page in one of the following ways:
The available mappings are displayed in the Mappings table.
Step 2 To configure mappings, or to change the mapping settings, click Edit by a mapping. The corresponding Mappings page appears.
If the mapping has been configured, the current mapping settings are displayed.
If the mapping has not been configured, default mapping values are displayed.
See the following topics for more information about these pages:
Step 3 To save the displayed default mappings, click Save Defaults. If the default mappings are not displayed, click Reset, then click Save Defaults.
Step 4 To configure or change a mapping, click Create (NBAR Port Mappings only), or select a mapping and click Edit. The corresponding Mapping dialog box opens.
Step 5 Set the mapping as required, and click OK.
See the following topics for more information about these dialog boxes:
The Mappings page reappears displaying the new mapping. Repeat Step 4 and Step 5 to create or edit additional mappings.
Step 6 To delete an entire mapping configuration, click Delete in the Mappings page. The QoS Properties page appears.
Step 7 After you have finished configuring mappings, click Done in the Mappings page. to return to the QoS Properties page.
You can change network element assignments. When you assign network elements that are already assigned to a different policy group, QPM automatically removes the previous assignment and saves the new assignment.
You can also remove network element assignments.
 |
Tip To delete the current QoS configuration on a network element, create a policy group with no configuration, and assign the network element to it. |
This topic describes how to set network element assignments for the current policy group. You can also set network element assignments from the Device Table. See Setting Device Policy Groups Assignments, and Setting Network Element Assignments for more information.
Step 1 Open the Assigned Network Elements page in one of the following ways:
The Assigned Network Elements page displays the network elements that have been assigned to the policy group.
Step 2 To assign network elements to the policy group:
a. Click Add. The Assignment window opens displaying the network elements in the current device group that match the policy group's device constraints.
b. Select the desired network elements, and click Assign. The Assigned Network Elements page reappears, displaying all the network elements assigned to the policy group.
Step 3 To remove network elements from the policy group assignment, select the assigned network elements in the Assigned Network Elements page, and click Remove.
See the following topics for more information about these pages:
You can create new policy groups by copying existing policy groups. The new policy group contains the source policy group's device constraint definitions, and QoS properties, and, optionally, its policies. If you are copying to a different deployment group within the current device group, you can also copy the source policy group's network element assignments.
The new policy group is given the default name, "Copy of <source policy group>." You should rename the policy group with a more meaningful name.
Step 1 Select Configure > Policy Groups. The Policy Groups page appears displaying the policy groups for the current deployment group.
To change deployment group, select the required deployment group in the Deployment Group list box.
Step 2 Select the check box next to the policy group you want to copy, and click Copy. The Copy Policy Group dialog box opens.
Step 3 Choose how to copy the policy group:
a. Select the device group and deployment group to which you want to copy the selected policy group.
b. To copy the properties and policies to the new policy group, select the Copy with policies and properties check box.
c. To copy the network element assignments to the new policy group, select the Copy with assignments check box. This check box is not available if you are copying within a deployment group, or to another device group.
d. Click OK. The Policy Groups page reappears.
See Copy Policy Group Dialog Box for more information about the fields in this dialog box.
Step 4 If you copied to a different deployment group, select the required deployment group in the Deployment Group list box, to view the new policy groups.
You can upload the existing QoS configurations on devices into QPM policy groups. This is useful if you install QPM in a network where you already have QoS-configured devices.
The upload process incorporates the following steps for each device:
|
Note On deployment, some uploaded QoS configurations might use a different CLI from the original, however the QoS capabilities remain unchanged. |
Step 1 Select Configure > Policy Groups. The Policy Groups page appears displaying the policy groups for the current deployment group.
To upload a device's configuration into a different deployment group, select the required deployment group in the Deployment Group list box.
Step 2 Select Upload QoS Configuration in the TOC. The Upload QoS Configuration page appears displaying the list of devices in the current device group.
Step 3 Select the check boxes next to the devices you want to upload, and click Upload.
A dialog box appears informing you that the upload process has started.
Step 4 In the Upload dialog box, do one of the following:
|
Note To view a report later, select Reports > Upload to display the Reports page. |
You can view information about the properties, policies, and network element assignments for a specific policy group. You can then modify the policy group as required.
Step 1 Select Configure > Policy Groups. The Policy Groups page appears displaying the policy groups for the current deployment group.
To modify a policy group in a different deployment group, select the required deployment group in the Deployment Group list box.
Step 2 To open policy group information pages from the Policy Groups page, do any of the following:
After you have opened a policy group information page, the TOC changes to the Policy Group TOC.
Step 3 Open any policy group information page from the Policy Group TOC. In addition to the pages referred to in the previous step, you can also open the Device Constraints page, which displays device constraint definitions for the selected policy group.
You can modify policy group details from these information pages.
See the following topics for more information about these pages:
Modify a policy group when you want to modify:
|
Note You cannot modify a policy group that is linked to a policy group template. You must disconnect the policy group from the template, or modify the template. See Disconnecting Policy Groups from Policy Group Templates. |
This topic describes how to change a policy group's general definitions, and device constraint definitions.
Step 1 Select Configure > Policy Groups. The Policy Groups page appears displaying the policy groups for the current deployment group.
To modify a policy group in a different deployment group, select the required deployment group in the Deployment Group list box.
The Policy Groups page displays for each policy group, the number of QoS properties, and the number of QoS policies it contains, and the number of assigned network elements.
For policy groups that are linked to templates, the linked template name is displayed, and the properties and policies are shown as "inherited." For more information about the Policy Groups page, see Policy Groups Page.
Step 2 To edit the general definitions for the policy group:
a. Click the required policy group name, or select the required policy group, and click Edit.
The General page appears for the selected policy group. The TOC changes to the Policy Group TOC.
b. Click Edit in the General page.
The Policy Group Definition wizard opens, displaying the General Definition page.
c. Edit the name and description in the General Definition page, as required.
Step 3 To add, edit, or remove device constraint definitions, open the Device Constraints page in the Policy Definition wizard in one of the following ways:
Modify device constraint definitions as required:
|
Note You cannot change the network element type after it has been defined for the first device constraint in the policy group. |
|
Note A policy group must contain at least one constraint definition. You cannot delete a constraint definition if it is the only constraint definition for the policy group. |
|
Note You cannot change the network element type after it has been defined for the first device constraint in the policy group. |
|
Note You cannot change the network element type after it has been defined for the first device constraint in the policy group. |
Step 4 After you have completed your policy group definitions, click Finish to exit the Policy Group Definition wizard.
Delete a policy group when you no longer want to apply its QoS properties and policies to any of the assigned devices.
|
Note When you delete a policy group, all its contents are deleted. |
Step 1 Select Configure > Policy Groups. The Policy Groups page appears displaying the policy groups for the current deployment group.
To delete a policy group in a different deployment group, select the required deployment group in the Deployment Group list box.
Step 2 Select the policy group you want to delete, and click Delete. A warning message appears.
Step 3 Click OK to confirm the deletion. The policy group and its contents are deleted.
You can view the CLI translations of the QoS configurations that will be deployed to devices assigned to policy groups in the current deployment group.
Step 1 Select Configure > Policy Groups. The Policy Groups page appears displaying the policy groups for the current deployment group.
To view policy translations for a different deployment group, select the required deployment group in the Deployment Group list box.
Step 2 In the TOC, select View CLI Translation. The Policy Translation page appears, displaying the list of devices that have assigned network elements to policy groups in the current deployment group. See Policy Translation Page for more information about this page.
Step 3 Select the check box(es) next to the device(s) whose policy translation you want to view. Click Translate. The Translate page appears, displaying the CLI translation for the device(s). See Translation Report Page for more information about this page.
Your policies define the QoS actions that are to be applied to specific traffic flows.
The following topics describe how to create and manage policies:
After you have defined a policy group or policy group template with device constraints and QoS property definitions, you can add policies to it.
Using QPM, you can create the following types of policies:
|
Note You cannot create access control policies on all Cisco devices. |
The filter you create for a policy can be broad, in which case the policy is applied to a high percentage of the traffic that travels through the device or interface, or it can be very narrow and selective. When the device determines that a packet satisfies the conditions of the policy, it applies the policy's action to it.
In general, if there is more than one policy defined on the interface or device, the device looks at the policies in order, top to bottom, until the first match is found, at which point it applies the policy and ignores remaining policies. (If you are creating an advanced policing policy, however, you can specify that additional policies be considered after the device applies a matching policy.)
When you define policies, QPM presents you with only actions and settings that are valid for the device constraints and QoS properties defined for the policy group.
You can enable and disable policies without deleting them, and you can change the order in which policies are checked on the interface.
Your starting point for working with policies, is the lists of policies in the policy group or policy group template. Inbound policies and outbound policies are displayed in separate pages.
The following topics describe how to display policies:
You access the policies for a policy group from the Policy Groups page.
Step 1 Select Configure > Policy Groups. The Policy Groups page appears displaying the policy groups for the current deployment group.
Step 2 To view policies in a different deployment group, select the required deployment group in the Deployment Group list box.
Step 3 In the Policy Groups page, click the number of In or Out policies for the required policy group.
The In Policies or Out Policies page appears, displaying the inbound or outbound policies in the current policy group.
|
Note If the Policy Group TOC is displayed, you can select In Policies, or Out Policies, as required. |
You access the policies for a policy group from the Policy Group Templates page.
Step 1 Select Configure > Libraries.
Step 2 In the Libraries TOC, select Templates. The Templates page appears displaying the policy group templates.
Step 3 In the Templates page, click the number of In or Out policies for the required template.
The In Policies or Out Policies page appears, displaying the inbound or outbound policies in the template.
|
Note If the Templates TOC is displayed, you can select In Policies, or Out Policies, as required. |
Create a QoS policy to apply specific QoS actions to selected traffic flows. Create an access control policy to permit or deny specific classes of traffic. Access control policies do not contain any associated actions.
You can create policies in a policy group, or in a policy group template.
The QPM Policy wizard guides you through the following steps required to define policies in the inbound or outbound direction:
The general policy definition for inbound or outbound policies includes the following:
Step 1 Open the In Policies or Out Policies page for the policy group or policy group template in which you want to create a new policy. See Displaying the Policies Pages.
Step 2 In the Policies page, click Create. The Policy wizard opens, displaying the Policy Wizard - General page.
Step 3 In the Policy Wizard - General page:
Step 4 Click Next to proceed to the Filter step in the wizard. See Defining a Policy Filter.
In addition, you might be able to filter using:
You can also define a class default filter for unclassified traffic that does not match any other filter condition.
The Policy wizard guides you through the process of defining filter conditions and rules for your policy.
Step 1 Open the Policy Wizard - Filter page:
Step 2 Enter a name for the filter, if desired. The filter name helps you identify the defined filter in the CLI translation.
Step 3 Select how to define the traffic type of the policy:
Step 4 Define a filter rule:
a. Click Create in the Filters table. The Rule Setting page appears, displaying the conditions you can define for each filter rule.
b. Click Edit next to the condition you want to define. A dialog box opens.
c. Define the condition as required.
See the following topics for information about these dialog boxes:
|
Note For IP and application conditions, you can choose a predefined alias. You can also save a defined condition as an alias in the QPM libraries for future use. |
d. Click OK in the Condition dialog box. The Rule Setting table reappears.
e. Repeat steps b through d to create additional conditions for the filter rule.
f. After you have defined all the rules in the filter condition, click Done. The Filter page reappears displaying the filter rule you have defined.
Step 5 Repeat Step 4 to create additional filter rules.
Step 6 To edit a filter rule, select the filter rule in the Filter page, and click Edit. The Rule Setting page appears. Edit the rule conditions as required, and click Done to return to the Filter page.
Step 7 To delete a filter rule, select the filter rule in the Filter page, and click Delete.
Step 8 After you have completed your filter definitions, click Next.
The following procedure describes all the available actions in the Policy Wizard - Actions step. However, when you define actions for a policy, some of the options might not appear, depending on the device constraints and QoS properties of the policy group.
Step 1 Open the Policy Wizard - Actions page:
Step 2 Use the Next button to navigate to the action pages you want to define, or select the actions in the wizard navigation TOC:
See the following topics for information about these dialog boxes:
Step 3 After you have completed defining the policy actions, click Next to proceed to the Summary step in the Wizard. See Viewing the Policy Summary.
After you have finished defining your policy, review the policy definitions in the Summary page. You can go back and revise definitions before completing the Policy Definition wizard.
Step 1 If the Policy Wizard - Summary page is not displayed, select Summary in the wizard navigation TOC.
Step 2 Review the policy definitions.
Step 3 To modify any of the settings, choose the relevant step in the wizard navigation TOC, or click the Back button.
Step 4 After you are satisfied with the policy definition, click Finish to complete the policy and exit the wizard.
You can modify a policy by changing its properties, filter, or actions. When you redeploy the policies, the modified policy replaces the old policy on the policy group's assigned network elements.
You cannot modify policies within a policy group that is linked to a policy group template. You must either disconnect the policy group template first, or modify the policy group template.
Step 1 Open the In Policies or Out Policies page for the policy group or policy group template in which you want to modify a policy. See Displaying the Policies Pages.
Step 2 In the Policies page, select the check box next to the policy you want to edit, and click Edit. The Policy wizard opens, displaying the Policy Wizard - General page. Change the name or description of the policy if required.
Step 3 Navigate to pages you want to edit using the wizard Next button, or by choosing a step in the wizard navigation TOC:
Step 4 After you have finished editing the policy click Finish. The Policy Wizard - Summary page appears. See Viewing the Policy Summary.
When you no longer want to use a policy, you can delete it from the policy group or policy group template. When you redeploy the policies, the deleted policy is removed from the policy group's assigned network elements.
You cannot delete a policy in a policy group that is linked to a policy group template. You must either first disconnect the policy group template, or delete the policy in the linked policy group template.
If you are not sure whether you will need a policy, consider disabling it instead of deleting it. See Enabling and Disabling Policies for information on disabling a policy.
Step 1 Open the In Policies or Out Policies page for the policy group or policy group template in which you want to delete a policy. See Displaying the Policies Pages.
Step 2 In the Policies page, select the check box(es) next to the policy or policies you want to delete. Click Delete.
When you create a policy, it is enabled by default, so that when you deploy to the devices, the policy is distributed and takes effect. However, you can disable a policy, so that it exists in the policy group, but is not deployed to the network. This allows you to define policies before you want to make them effective, or temporarily remove a policy from the network without erasing it completely. You can also enable policies that have been disabled.
Step 1 Open the In Policies or Out Policies page for the policy group or policy group template in which you want to work. See Displaying the Policies Pages.
Step 2 In the Policies page, select the check box(es) next to the policy or policies you want to enable or disable.
Step 3 Click Enable or Disable as required.
The device examines QoS policies in order until a match is found for the packet. Even if a packet satisfies more than one policy, it will be treated as satisfying only the first policy that the device encounters, unless you define your policy to include the Continue setting, in which case a subsequent match will be sought.
Policies on an interface are examined top-down according to the QPM display. Therefore the policies in a policy group should appear in order of importance, from top to bottom, to ensure that policies get the priority you require. If you are creating complex policy structures that include Continue settings (so that you can set multiple policies on a given packet), ensure that the statements with the Continue setting come before the subsequent policy statement you want applied.
Initially, policies are listed in the order in which they are defined. You can change the order of policies in the list.
Step 1 Open the In Policies or Out Policies page for the policy group or policy group template in which you want to reorder policies. See Displaying the Policies Pages.
Step 2 In the Policies page, click Reorder. The Reorder dialog box opens.
Step 3 Select the policy that you want to reorder. Click the Up or Down button to reorder the policy as required.
Step 4 Change the order of policies as required. After you have finished, click Reorder. The Policies page appears displaying the new order.
You can search for QoS properties and policies in policy groups or policy group templates. When searching for policy groups, you can search within a single deployment group, or across all deployment groups.
Step 1 Select Configure > Search. The Policy/Properties Search page appears.
Step 2 Select whether to search in policy groups, or in policy group templates. To search in policy groups, select the deployment group in which you want to search, or select Select All to search in all deployment groups.
Step 3 Select the type of search:
See Policy/Properties Search Page for more information about fields in this page.
Step 4 Click Search. After the search is complete, the Search Results page appears, displaying information for the policies or properties, that match the search criteria.
See Policy Search Results Page for information about fields in the Policy Search Results page.
See Properties Search Results Page for information about fields in the Properties Search Results page.
See Templates Policies Search Results Page for information about fields in the Templates Policies Search Results page.
See Templates Properties Search Results Page for information about fields in the Templates Properties Search Results page.
Definitions of IP aliases, and application aliases, can be stored in QPM libraries, and used in policy definitions across all your deployment groups. When you change the alias definition, all policies that reference the definition are affected.
When you deploy historical jobs with referenced alias definitions, QPM performs a validation check on the referenced definitions. See "Deploying QoS Policies".
The following topics describe how to work with alias definitions:
An IP alias is an alias for a named group of IP addresses (including masks) or hostnames. It can be used for both source IP and destination IP conditions within a filter. IP aliases are stored in the IP Aliases library.
Step 1 Select Configure > Libraries, or if you have been working with other library items, select IP Aliases in the Libraries TOC.
The IP Aliases page appears, displaying IP alias definitions in the IP Alias library.
Step 2 Click Create. The IP Alias dialog box opens.
Step 3 Enter the IP alias name in the Name field.
Step 4 For each IP address you want to add to the alias:
a. Enter the IP address and mask, or enter host name.
b. Click Add to add the IP address to the alias. The IP address and mask are displayed in the Alias list.
To remove an IP address that you added, select the IP address in the list, and click Remove.
For more details, see IP Alias Dialog Box.
Step 5 After you have added all the IP addresses to the alias, click OK. The IP Alias page displays the new alias.
An application alias is an alias for a defined protocol and port (or group of ports). It can be used in a filter definition for source and destination application conditions. Application aliases are stored in the Application Aliases library.
Step 1 Select Configure > Libraries.
Step 2 Select Applications in the Libraries TOC. The Applications page appears displaying application alias definitions in the Applications library.
Step 3 Click Create. The Application Alias dialog box opens.
Step 4 Enter the Application alias name in the Name field.
Step 5 Define the protocol, and TCP/UDP port or range, if appropriate.
For more details, see Application Alias Dialog Box.
Step 6 Click OK. The Applications page reappears displaying the application alias.
You can change IP aliases and application aliases. When you modify an alias, all policies that reference it, are modified.
Step 1 Select Configure > Libraries.
Step 2 In the Libraries TOC, select the library that contains the alias you want to modify.
Step 3 Select the check box next to the alias you want to modify, and click Edit. The Alias dialog box opens, displaying details for the alias.
Step 4 Modify fields as required.
For more details, see:
Step 5 Click OK in the dialog box. The Alias page displays the modified alias.
You can delete aliases if they are not currently being used in policies.
Step 1 Select Configure > Libraries.
Step 2 In the Libraries TOC, select the library that contains the aliases you want to delete.
Step 3 Select the check boxes next to the alias(es) you want to delete.
Step 4 Click Delete.
Policy group templates contain QoS properties and policies, but do not contain network element assignments. Policy group templates can be used to create policy groups in any deployment group. You can create global policy group templates and store them in the Policy Group Templates library.
The following topics describe how to work with policy group templates:
Policy group templates can be used to create and share policy groups across deployment groups and device groups. A policy group template contains a set of QoS properties and QoS policies for specified device constraints. It does not include any device assignments. Policy group templates are stored in the Policy Group Templates library.
You can create policy groups by copying policy group templates, or by attaching the policy group template to the policy group. When a policy group template is attached to policy groups, any change in the policy group template will affect the attached policy groups. You can disconnect policy groups from their attached policy group template at any time.
QPM generates voice policy group templates, which are used to create voice policy groups for IP telephony QoS configuration. You can edit the voice policy group templates created by QPM.
Create a policy group template when you want to share policies across deployment groups or device groups.
You create a new policy group template in the same way as you create a new policy group using the Policy Group Definition wizard. You can create a new template by copying another template or a policy group.
Step 1 Create a new policy group template and define its device constraints. See Creating a Policy Group.
Step 2 Define the policy group template's QoS properties and mappings. See Defining QoS Properties and Mappings.
Step 3 Define policies for the policy group template. See Creating a Policy.
You can view information about the QoS properties and policies for a specific policy group template. You can then modify the policy group template as required.
You can also view the policy groups that are attached to a policy group template, and you can then disconnect a policy group from its template.
Step 1 Select Configure > Libraries.
Step 2 Select Templates in the Libraries TOC. The Templates page appears displaying the global policy group templates.
Step 3 To open policy group template information pages from the Templates page, do any of the following:
After you have opened a policy group template information page, the TOC changes to the Template TOC.
Step 4 Open any policy group template information page from the Template TOC. In addition to the pages referred to in the previous step, you can also open the Device Constraints page, which displays device constraint definitions for the selected policy group template.
You can modify policy group template details from these information pages.
Step 5 To view a template's attached policy groups, click the number of attached policy groups for the required policy group template. The Attached Policy Groups page appears, displaying the list of attached policy groups.
You can disconnect a policy group from its template in this page.
Modify a policy group template when you want to modify:
|
Note If a policy group template is attached to policy groups, any change in the policy group template will affect the attached policy groups. For information on disconnecting a policy group from its attached template, see Disconnecting Policy Groups from Policy Group Templates. |
This topic describes how to change a policy group template's general definitions, and device constraint definitions.
Step 1 Select Configure > Libraries.
Step 2 Select Templates in the Libraries TOC. The Templates page appears displaying the global policy group templates.
Step 3 To edit the general definitions for the policy group template:
a. Open the Policy Group Definition wizard in one of the following ways:
The Policy Group Definition wizard opens, displaying the General Definition page.
b. Edit the name and description in the General Definition page, as required.
Step 4 To add, edit, or remove device constraint definitions, open the Device Constraints page in the Policy Definition wizard in one of the following ways:
Modify device constraint definitions as required:
|
Note You cannot change the network element type after it has been defined for the first device constraint in the policy group. |
|
Note A policy group must contain at least one constraint definition. You cannot delete a constraint definition if it is the only constraint definition for the policy group. |
|
Note You cannot change the network element type after it has been defined for the first device constraint in the policy group. |
|
Note You cannot change the network element type after it has been defined for the first device constraint in the policy group. |
Step 5 After you have completed modifying your policy group template definitions, click Finish to exit the Policy Group Definition wizard.
You can disconnect an individual policy group from its template, and you can disconnect several policy groups from a policy group template.
The following topics describe how to disconnect policy groups from templates:
This topic describes how to disconnect an individual policy group from its policy groups template.
Step 1 Select Configure > Policy Groups. The Policy Groups page appears displaying the policy groups for the current deployment group.
Step 2 Click the policy group name, or select the required policy group, and click Edit.
The General page appears for the selected policy group. The TOC changes to the Policy Group TOC.
Step 3 In the Attached to Template field, click Disconnect.
This topic describes how to disconnect one or more policy groups from the Policy Groups Templates page.
Step 1 Select Configure > Libraries.
Step 2 Select Templates in the Libraries TOC. The Templates page appears displaying the global policy group templates.
Step 3 To view a template's attached policy groups, click the number of attached policy groups for the required policy group template. The Attached Policy Groups page appears, displaying the list of attached policy groups.
Step 4 Select the policy group to disconnect, and click Disconnect.
You can delete policy group templates that are not attached to any policy groups.
Step 1 Select Configure > Libraries.
Step 2 In the Libraries TOC, select the Policy Group Templates. The Templates page appears.
Step 3 Select the check boxes next to the template or templates you want to delete.
Step 4 Click Delete.
This section provides additional information about configuring QoS on different types of interfaces and devices:
Policy groups can be assigned to only one type of network element. For some devices, you will need to define several policy groups to consolidate the QoS configuration on the device.
To create a complete QoS configuration for a single type of network element, you might need to define more than one policy group. For example, when configuring FRTS policies, and when configuring VLAN policies.
There are other cases, where you might need two policy groups. For example, you configure markdown in policing policies on Catalyst ports at the port level, but to change the default markdown mapping values, you must define an additional policy group at the device level.
This section provides tables listing the types of QoS configurations that can be configured for each network element type, for different device models:
| Device Model | Network Element Type | ||||
|---|---|---|---|---|---|
| Device | Interface | VC | DLCI | VLAN | |
1600 | No QoS configuration at device level. | Scheduling Properties Actions | Not available | Scheduling Properties Actions | Not available |
1720 | No QoS configuration at device level. | Scheduling Properties, Actions | Not available | Scheduling Properties Actions | Not available |
1750 | No QoS configuration at device level. | Scheduling Properties Actions | Not available | Scheduling Properties: Actions | Not available |
2500 | No QoS configuration at device level. | Scheduling Properties Actions | Not available | Scheduling Properties Actions | Not available |
2600 | NBAR Port Mapping | Scheduling Properties Actions | Scheduling Properties Actions | Scheduling Properties: Actions | Not available |
3600 | NBAR Port Mapping | Scheduling Properties Actions | Scheduling Properties: Actions | Scheduling Properties Actions | Not available |
3800 | No QoS configuration at device level. | Scheduling Properties Actions | Not available | Scheduling Properties Actions: | Not available |
4000 | No QoS configuration at device level. | Scheduling Properties Actions | Not available | Scheduling Properties Actions | Not available |
4500 | No QoS configuration at device level. | Scheduling Properties Actions | Not available | Scheduling Properties Actions | Not available |
4700 | No QoS configuration at device level. | Scheduling Properties Actions | Not available | Scheduling Properties Actions | Not available |
7100 | NBAR Port Mapping | Scheduling Properties Actions | Scheduling Properties Actions | Scheduling: Properties Actions | Not available |
7200 | NBAR Port Mapping | Scheduling Properties Actions | Scheduling Properties Actions | Scheduling Properties: Actions | Not available |
7400 | NBAR Port Mapping | Scheduling Properties Actions | Scheduling Properties Actions | Scheduling: Properties Actions | Not available |
7500 | NBAR Port Mapping | Scheduling Properties Actions | Scheduling Properties Actions | Scheduling Properties Actions | Not available |
7600 | DSCP Mappings NBAR Port Mapping | Scheduling Properties Actions | Scheduling Properties Actions | Scheduling Properties Actions | Actions Note: VLAN scheduling is inherited from its ports. |
7700 | No QoS configuration at device level. | Scheduling Properties Actions | Scheduling Properties Actions | Scheduling: Properties Actions | Not available |
AS5300 | No QoS configuration at device level. | Scheduling Properties Actions | Not available | Scheduling Properties Actions | Not available |
AS5800 | No QoS configuration at device level. | Scheduling Properties Actions | Not available | Scheduling Properties Actions | Not available |
C4GWY | No QoS configuration at device level. | Scheduling Properties Actions | Scheduling Properties Actions | Scheduling Properties Actions | Not available |
Cat3550 | DSCP Mappings | Scheduling Properties Actions | Not available | Not available | DSCP Mappings Actions Note: VLAN scheduling is inherited from its ports. |
Cat4200 | NBAR Port Mapping | Scheduling Properties Actions | Scheduling Properties Actions | Scheduling Properties Actions | Not available |
Cat6000_PFC1(IOS) | DSCP Mappings NBAR Port Mapping | Scheduling Properties Actions | Scheduling Properties Actions | Scheduling Properties Actions | Actions Note: VLAN scheduling is inherited from its ports. |
Cat6000_PFC2(IOS) | DSCP Mappings NBAR Port Mapping | Scheduling Properties Actions | Scheduling Properties Actions | Scheduling Properties Actions | Actions Note: VLAN scheduling is inherited from its ports. |
MSFC (QoS is supported on the FlexWan module only) | NBAR Port Mapping | Scheduling Properties Actions | Scheduling Properties Actions | Scheduling Properties Actions | Not available |
RSM | No QoS configuration at device level. | Scheduling Properties Actions | Not available | Scheduling Properties Actions | Not available |
VG200 | No QoS configuration at device level. | Scheduling Properties Actions | Scheduling Properties Actions: | Scheduling Properties Actions: | Not available |
| Device Model | Network Element Type | ||
|---|---|---|---|
| Device | Interface | VLAN | |
Cat4000 | Scheduling Actions | Properties | Not available |
Cat5000 | Actions | Not available | Not available |
Cat6000_NO_PFC | Scheduling | Properties | Not available |
Cat6000_PFC1 | Scheduling DSCP Mappings Actions | Properties Actions | Actions Note: VLAN scheduling is inherited from its ports. |
Cat6000_PFC2 | Scheduling DSCP Mappings Actions | Properties Actions | Actions Note: VLAN scheduling is inherited from its ports. |
| Devices / NEs | Device | Interface |
|---|---|---|
Cat2900 | Not available | Actions |
Cat2950 | Scheduling | Actions |
Cat3500 | Not available | Properties Actions |
| Devices / NEs | Device | Interface | POI |
|---|---|---|---|
Cat2948_L3 | Scheduling | Scheduling Actions | Not available |
Cat4232_L3 | Scheduling | Scheduling Actions | Not available |
Cat4908_L3 | Scheduling | Scheduling Actions | Not available |
Cat8500 | Not available | Not available | Scheduling |
This section describes how to configure Frame Relay Traffic Shaping (FRTS) on a frame relay main interface, and how to configure FRTS for frame relay subinterfaces and DLCIs.
To configure FRTS for frame relay main interfaces:
1. Use the Policy Definition wizard to create a new policy group with the following constraint definition:
2. In the QoS Properties wizard, define the following:
3. Use the Policy wizard to configure policies if required.
4. Assign frame relay main interfaces to the policy group.
To configure FRTS for frame relay subinterfaces or DLCIs, you must create two policy groups:
To configure FRTS for frame relay subinterfaces or DLCIs:
1. Create a policy group for the frame relay main interface:
a. Use the Policy Definition wizard to create a new policy group as described in Step 1 in Configuring FRTS for Frame Relay Main Interfaces.
b. In the QoS Properties wizard, select the Enable FRTS in the Shaping Settings page. Do not set FRTS parameters.
c. Assign the main interface of the frame relay subinterfaces or DLCIs to this policy group.
2. Create a policy group for the frame relay subinterfaces or DLCIs:
a. Use the Policy Definition wizard to create a new policy group as described in Step 1 in Configuring FRTS for Frame Relay Main Interfaces. For DLCIs, select FR DLCI as the network element in the Constraints Definition page.
b. Define FRTS properties and other policies as described in steps 2 and 3 in Configuring FRTS for Frame Relay Main Interfaces.
c. Assign frame relay subinterfaces or DLCIs to the policy group.
|
Note |
To configure policies on a VLAN, you must create two policy groups:
|
Note When configuring VLAN-based policies for devices with Native IOS, the switch port CLI command must be configured on the device. |
![]()
![]()
![]()
![]()
![]()
![]()
![]()
![]()
Posted: Tue Nov 12 12:37:43 PST 2002
All contents are Copyright © 1992--2002 Cisco Systems, Inc. All rights reserved.
Important Notices and Privacy Statement.