|
|

These topics describe tasks for working with devices and their interfaces.
The devices managed by QPM can be routers, switches, layer 3 switches, and LocalDirector. These devices must run a software version that supports QoS capabilities.
In order to manage QoS on your devices, you must add the devices to a QoS database in QPM. QPM enables you to create multiple databases, each of which manages a different sub-set of devices. When deciding how many devices to manage in a single database, keep in mind that there is a relationship between the number of devices in the database and response time for policy editing and deployment.
These topics describe the QPM tasks for devices:
You must add a device to the QoS database before you can configure the QoS settings for the device or its interfaces. You can add a device manually, or you can have QPM automatically detect and import the device's information.
QPM uses the device IOS version number to load device capabilities to the database. All sub-versions of a certain version are translated to the major version, unless QPM explicitly supports the minor version. In QPM, new minor versions are mapped to the last supported minor version and not to the major version.
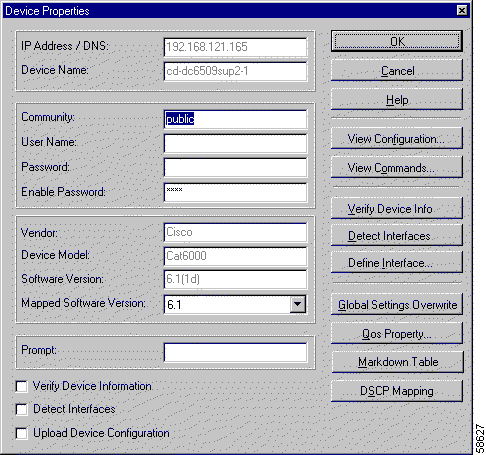
Both the device software version and the mapped software version are displayed in the Device Properties dialog box:
If the device system name is defined in the device configuration, it can be used instead of the device's IP address, when adding a device to the database. The device system name is detected when QPM automatically verifies device information for adding a device to the database. The device system name is added to the Device Properties dialog box.
You can define your tree view by IP address/DNS name or by device system name (if it is configured).
Obtain the following information for each device you are adding:
If the device is offline, you also need this information:
Step 1 From the Policy Manager, select Devices>Device>New, or right-click in the tree view and select New Device. QPM opens the New Device dialog box.
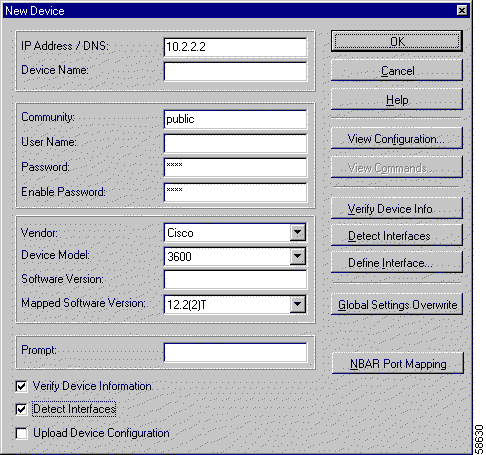
Step 2 Fill in the New Device dialog box fields. If the device is online, you only need to provide the IP Address, Community, User Name and Passwords, for access to the device. The rest of the fields are filled in automatically when the device is detected.
See the "New Device and Device Properties Dialog Boxes" section for more information.
Step 3 If the device is online, ensure that Verify Device Information and Detect Interfaces are selected and click OK. (Alternatively, you can click the Verify Device Info button, and then the Detect Interfaces button, to accomplish the same thing).
QPM queries the device for its software version and model information, then queries the device for a list of interfaces and their configuration information. When the device has returned the interface information, QPM opens the Detect Interfaces dialog box, if appropriate. The Detect Interfaces dialog box shows a list of the device's interfaces, from which you can choose which interfaces you want to manage using QPM. For some devices, you cannot configure specific interfaces, so QPM does not show you the list of device interfaces.
Step 4 In the Detect Interfaces dialog box (if QPM opens it), ensure that the interfaces you want to manage are in the list of selected interfaces, and remove any interfaces that you do not want to manage from the list. Click OK when finished.
QPM creates a folder for the device in the tree view. The device interfaces are included as members of this folder. The interface description, if it exists in the CLI, is retrieved in the Detect Interface operation. All interface information, including interface description, is shown in the interface preview in the lower right part of the screen when the interface is selected in the tree view.
You can view a device's properties and change them if required. If you upgrade the device's software, or replace the device with a new model (while retaining the device's IP addresses), you must update the device properties to ensure that the policies and configurations you create in QPM are usable on the device.
Step 1 Select the device in the tree view and select Devices>Device>Properties, or right-click the device and choose Device Properties.
QPM opens the Device Properties dialog box. Figure 6-2 shows the Device Properties dialog box for a Catalyst 6000 device.
Step 2 Optionally, you can do the following:
 |
Note For Catalyst 6000 devices with Supervisor IOS, queuing is defined on the interface level, not on the device level. You can access the queuing values from the Interface Properties dialog box. |
Step 3 To update the device's properties and its list of interfaces, select the Verify Device Information and Detect Interfaces check boxes and click OK.
QPM queries the device for its software version and device model information and then obtains a list of interface information, which it displays in the Detect Interfaces dialog box. Select the interfaces you want to manage, deselect those you do not want to manage, and click OK.
Using QPM, you can upload the existing QoS configurations on devices when you add them to the policy database or before you make a QoS configuration change. This is useful if you install QPM on a system where you already have devices defined. Instead of redefining the device characteristics, you can use the upload feature to automatically update the QPM database with device information when you add the device.
|
Note You can upload device configuration one time only. The Upload Device Configuration check box is disabled in the Device Properties dialog box after you make QoS configuration changes to the device. |
The upload process incorporates the following steps:
In the case of defining exactly the same policy on several interfaces, a duplicate resource is created.
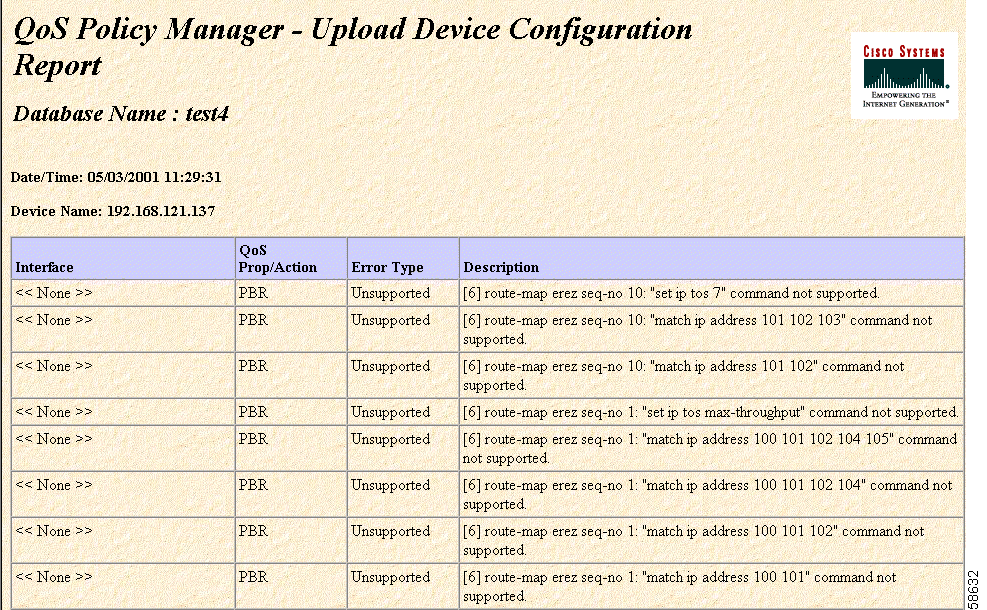
The column headings are as follows:
The following is a list of error messages that you may see in the Upload Device Configuration Report:
[1] "<parameter string>:" Unsupported fair-queue parameter(s).
Explanation QPM ignores parameter(s) and treats command as WFQ.
Action None.
[2] Unsupported device model <model> and QoS technique for IOS software release <release number>.
Explanation QPM does not support this particular model/IOS software release combination.
Action None.
[3] "<command string>:" Command not supported.
Explanation Unsupported command
Example (Under class_map)
match mpls experimental
Action None.
[4] "<command string>:" ToS-Based WFQ not supported. Flow-Based WFQ configured.
Explanation QPM supports flow-based WFQ, not ToS-based WFQ.
Action None.
[5] map-class frame-relay <command string>: "<command string>" command not supported.
Explanation This particular frame relay command is not supported by QPM.
Example map-class frame-relay fecn-adapt
Action None.
[6] route-map <route-map command> seq-no <sequence number>: "<command string>" command not supported.
Explanation QPM does not support this route-map command.
Example route-map QPM_Serial8 permit 1
match ip address 144
match length 2000 3000 <== Unsupported command
set ip precedence critical
Action None.
[7] class-map <class-map command>: "<command string>" command not supported.
Explanation QPM does not support this class-map command
Action None.
[8] Cannot assign rule to default queue <queue number> in custom-queue-list <custom-queue-list name>. "<command string>" command ignored.
Explanation QPM does not support a filter on the default queue.
Example access-list 101 permit tcp any any
access-list 102 permit udp any any
access-list 103 permit ip any any
queue-list 4 protocol ip 1 list 103
queue-list 4 protocol ip 2 list 102
queue-list 4 protocol ip 3 list 101 <== Ignored command
queue-list 4 default 3
queue-list 4 queue 1 byte-count 9000
queue-list 4 queue 2 byte-count 12000
queue-list 4 queue 3 byte-count 39000
Action None.
[9] Multiple rules found in queue <queue number> in custom-queue-list <custom-queue-list>. "<command string>" command ignored.
Explanation Same queue with multiple rule listings. QPM ignores duplicate filters.
Action None.
Example access-list 101 permit tcp any any
access-list 102 permit udp any any
access-list 102 permit ipany any
queue-list 4 protocol ip 1 list 103
queue-list 4 protocol ip 2 list 101
queue-list 4 protocol ip 2 list 102 <== Ignored command
queue-list 4 default 3
queue-list 4 queue 1 byte-count 9000
queue-list 4 queue 2 byte-count 12000
queue-list 4 queue 3 byte-count 39000
[10] "<command string>:" ACL command for the corresponding number <number> not found.
Explanation Specified access list is not defined.
Action Redefine this policy in the database.
[11] "<command string>:" Unsupported buffer-limit=[<number>], default value: 1000.
Explanation Parameter buffer limit ignored. The default of 1000 is applied.
Action None.
[12] class-map <command string>: ACL command for the corresponding number <number> not found.
Explanation Specified access list is not defined.
Action If you require this policy, redefine it in the database.
[13] priority-list <number> queue <number>: ACL number missing.
Explanation ACL number for the priority list is missing.
Action If you require this policy, redefine it in the database.
Example priority-list 1 protocol ip high list 102 <== Missing number
[14] priority-list <number> queue <number>: ACL command for the corresponding number <number> not found.
Explanation Specified access list is not defined.
Action If you require this policy, redefine it in the database.
[15] Cannot locate priority-queue-list <command string>. Priority queuing ignored.
Explanation There is no definition for the priority list that corresponds to the group number under the device.
Action Define the priority list.
[16] custom-queue-list <command string> queue <number>: Missing filter for the corresponding queue number.
Explanation Missing filter for the queue.
Action Define a custom queue list.
Example queue-list 1 protocol IP 1 list 114 <== Missing number
[17] custom-queue-list <command string> queue <number>: Protocol <protocol> not supported.
Explanation QPM only supports IP protocol type.
Action None.
[18] custom-queue-list <command string> queue <number>: ACL number not defined.
Explanation No filter found for the corresponding queue number.
Action Define a filter with the corresponding queue-list and queue number or re-assign with an previously-defined access list.
[19] custom-queue-list <command string> queue <number>: ACL command for the corresponding number <number> not found.
Explanation No filter is defined for the specified access list.
Action Define an access-list with this number or re-assign with an previously-defined access-list.
[20] Cannot locate custom-queue-list <queue-list definition>. Custom queuing ignored.
Explanation There is no definition for the queue-list that corresponds to the group number under the device.
Action None.
[21] route-map <command string> seq-no <number>: ACL command for the corresponding number <number> not found.
Explanation Specified access list is not defined.
Action Define an access list with this number or re-assign with an previously-defined access list.
[22] frame-relay class <class name>: Class name not found. Command ignored.
Explanation Specified class name is not defined.
Action Define a class name.
[23] "<command string>:" ACL command for the corresponding number <number> not found.
Explanation Specified access list is not defined.
Action Define an access list with this number or re-assign with an previously-defined access list.
[24] map-class frame-relay <string>: custom-queue-list <string> not found. Custom queuing ignored.
Explanation Specified custom queue list is not defined.
Action Define a custom queue list with this number or re-assign with an previously-defined custom queue list.
[25] map class frame-relay <command string>: priority-queue-list <command string> not found. Priority queuing ignored.
Explanation Specified priority queue list is not defined.
Action Define a priority queue list with this number or re-assign with an previously-defined priority queue list.
[26] Undefined fragment-delay value or interleave setup. LFI command ignored.
Explanation LFI cannot be uploaded because one of the following commands is missing:
ppp multilink interleave
ppp multilink fragment-delay delay-value
Action Add command.
[27] Cannot calculate CQ Packet Size for custom-queue-list <string>. Custom queueing ignored.
Explanation Unable to calculate the interface packet size. Custom queuing ignored.
Action Check custom queue list for errors and retry upload.
[28] Cannot upload service-policy <string> <string> because one or more errors detected in class-map and/or policy-map.
Explanation During uploading, QPM found an error in either class map or policy map. Entire service policy is ignored by QPM.
Action Fix error and retry upload function.
[29] policy-map <string>: "<command string>" command not supported.
Explanation Unsupported command under policy map.
Action None.
[30] Missing random-detect parameter exponential-weighting-constant. WRED ignored.
Explanation WRED weight is missing.
Action Add the following command:
random-detect expon-weighting-constant WT
[31] custom-queue-list <string>: One or more errors detected while uploading custom-queue.
Explanation During uploading, QPM found general error(s).
Action Verify the QPM custom-queue definition and fix if necessary.
[32] map-class frame-relay <string>: Unable to calculate CQ Packet Size. Custom queueing ignored.
Explanation Unable to calculate the interface packet size. Custom queuing ignored.
Action Check the custom queue list for errors and retry the upload operation.
[33] Cannot enable frame-relay traffic shaping because map-class frame-relay not defined.
Explanation The command <map-class frame-relay name> is not defined on the interface. FRTS cannot be configured.
Action Define a FRTS map-class and assign it to the interface.
[34] "<command string>:" command not supported for device model <string> and IOS software release <number>.
Explanation This command is not supported and cannot be defined in QPM.
Action None.
[35] custom-queue-list <string> queue <number>: Queue number 0 is a system queue and cannot be configured.
Explanation QPM supports only queue numbers 1 through 16. Queue 0 is a system queue.
Action None.
[36] Model <string> does not support interface command.
Explanation On the specified model, only commands on the device are supported, not commands on the interface.
Action None.
[37] Catalyst 6000 <string> queueing cannot be configured.
Explanation This error occurs for 1P2Q2T when the bandwidth for either one of the queues is not configured. Another reason for this error is that a threshold was not configured for one of the queues.
Action Verify that all information is fully defined on the device.
Example set qos txq-ratio 1p2q2t 70 15 15
set qos wred 1p2q2t tx queue 1 80 100
[38] <string> queuing: Queue number <string> weight is empty.
Explanation This error occurs for both 2Q2T and 1P2Q2T when a weight for either one of the queues is not configured.
Action None.
[39] Frame-relay traffic-shaping not configured on interface for Frame-relay class <string> command.
Explanation Frame Relay traffic shaping is not configured for the interface (or parent interface if it is a subinterface) of the frame-relay class command.
Action Add the frame relay traffic shaping command to the interface for the particular frame-relay class command.
[40] FRTS is not supported on both sub-interface and DLCI.<string> command ignored.
Explanation QPM does not support Frame Relay traffic shaping on both the Frame Relay subinterface and the DLCI.
Action Use the CLI to remove FRTS from either the subinterface or the DLCI, if it is configured on both.
[41] FRTS is not supported on a DLCI other than the first per sub-interface.<string> command ignored.
Explanation FRTS is only supported on the first DLCI per Frame Relay subinterface.
Action Using the CLI, remove the FRTS configuration from the DLCIs on the subinterface, other than the first one.
[42] FRTS is not supported on a DLCI configured on an interface. <string> command ignored.
Explanation QPM only supports FRTS on one DLCI per point-to-point Frame Relay subinterface.
Action None.
[43] Service-policy is not supported on both sub-interface and PVC. <string> command ignored.
Explanation QPM does not support Class Based QoS configuration on both the ATM subinterface and the PVC.
Action Use the CLI to remove CBWFQ configuration from either the subinterface or the PVC, if it is configured on both.
[44] Service-policy is not supported on a PVC other than the first per sub-interface.<string> command ignored.
Explanation Class Based QoS is only supported on the first PVC per ATM subinterface.
Action Using the CLI, remove the CBWFQ configuration from the PVCs other than the first one.
[45] Service-policy is not supported on a PVC configured on an interface. <string> command ignored.
Explanation QPM only supports Class Based QoS on one PVC per point-to-point ATM subinterface.
Action None.
[46] Service-policy is not supported on a PVC for this interface type. <string> command ignored.
Explanation Class Based QoS is not supported on PVCs on this type of interface.
Action None.
[47] Cross-aggregate policer is not valid for upload. <police aggregate string> command ignored.
Explanation QPM does not support upload of limiting policies with cross-interface aggregation.
Action None.
[48] Cross-aggregate policer is not valid for upload. <mls qos aggregate-policer string> command ignored.
Explanation QPM does not support upload of limiting policies with cross-interface aggregation.
Action None.
You can add many devices simultaneously to the QoS database by importing them from a device inventory created using CiscoWorks2000 Resource Manager Essentials (RME). Similarly, you can update devices that already exist in the QoS database by re-importing an RME file that contains the updated information.
When adding devices to the database, keep in mind that there is a relationship between the number of devices in the database and the response time for policy editing and deployment.
Export a device inventory using CiscoWorks2000 Resource Manager Essentials.
Step 1 From the Policy Manager, select Devices>Import.
QPM opens the Select RME File to Import dialog box.
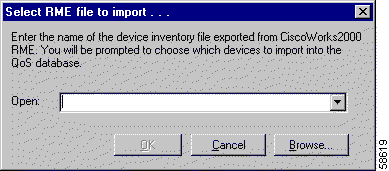
Step 2 Enter the full path and name of the inventory file, or click Browse and select it. Click OK when the correct file is entered.
QPM opens the Import Devices dialog box and begins querying the devices in the inventory.
While QPM is querying the devices, you can click Stop to make QPM stop the query. If you stop the query, QPM only lets you select from the devices already queried.
You can make other changes in Policy Manager while QPM queries the devices. When QPM completes the query, you are returned to the Import Devices dialog box to continue the import process.
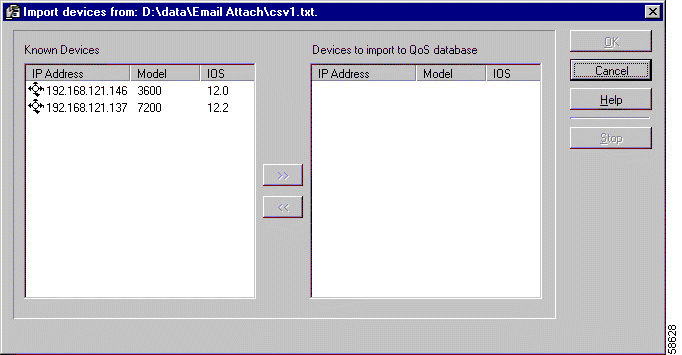
Step 3 When QPM has finished querying the devices, select the devices you want to add to the QoS database in the Known Devices list and click >> to add them to the import list. If QPM could not query a device, do not add the device to the database until you can determine why the query failed.
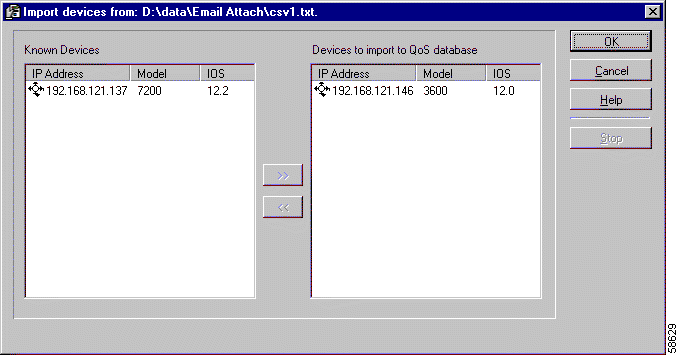
When you are satisfied with the list of devices to import, click OK.
Step 4 QPM gives you to option to detect interfaces on the devices. The interface detection process might take several minutes depending on the number of devices, interfaces, and speed of the network connection.
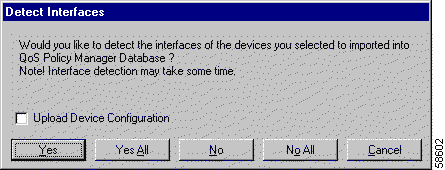
Select one of the following:
You can also upload the device configuration at this time by checking the Upload Device Configuration check box. See Uploading Device QoS Configurations for more information.
When QPM is finished detecting interfaces, QPM adds the devices and their interfaces to the tree view and closes the Import Devices dialog box.
If you no longer want to manage QoS on a device, you can remove it from the QoS database.
Step 1 Right-click the device in the tree view and select Delete Device, or select the device and select Devices>Device>Delete.
If any of the device's interfaces belong to a device group, a warning message appears and prompts you to confirm the deletion.
If you confirm the deletion, QPM deletes the device, its interfaces, all associated policy statements, and device group memberships for the device.
You can view a device's software configuration from within QPM. This is useful if you are deciding whether or not to upload the device's configuration into the QoS database.
Step 1 Select the device in the tree view.
Step 2 Select Devices>Device>View Configuration, or right-click and select View Device Configuration.
QPM opens a window with the software configuration as defined on the device. See the device's software documentation for information on how to read the configuration.
You can start the Microsoft Telnet program from within QPM's Policy Manager.
Step 1  Select the device to which you want to connect in the tree view and click the Telnet button, or select Tools>Telnet.
QPM starts the Microsoft Telnet program to connect to the device. See the Telnet online help for information on how to use the program.
The interfaces on a device carry the network traffic. In QPM, the term interfaces refers to router interfaces and subinterfaces, and switch ports and VLANs (Virtual Local Area Networks).
You must add the interfaces on which you want to define QoS policies to the QoS database. QPM can detect all the device's interfaces automatically and then you can decide which interfaces to add to the database. Alternatively, you can add interfaces manually.
QPM allows you to configure QoS on subinterfaces, as long as you add both the subinterface and its associated parent interface to the database.
QPM detects VLANs configured on Catalyst 6000 family switches as interfaces, meaning that the VLANs appear in the list of detected interfaces. If you choose to add a VLAN to the QoS database, it is added to the tree view under the device. You can then define QoS policies on the VLAN. In order for these policies to be deployed to the ports in the VLAN, you must add the ports to the database and specify that you want the VLAN's policy to be deployed to the ports (as opposed to any policies that you may have defined on the ports themselves). You do this by specifying the QoS style as VLAN-based in the Interface Properties dialog box. If you have defined a policy on one of ports in the VLAN and you want this policy to be implemented, you must define the QoS style for this port as port-based.
The following topics describe QPM tasks for interfaces:
You can add a device's interfaces to the database when you add the device, or at a later stage (for example, if you install a new card). You do not need to add all the interfaces, only those on which you want to configure QoS.
If the device is not yet defined in the QoS database, see the "Adding a Device" section. That procedure includes information on adding the device's interfaces while you add the device.
The following procedures assume that the device is already defined in the database, and that you want to add more of its interfaces to the database. If the device is online, it is easiest to add interfaces by having QPM query the device. This is the automated procedure.
However, if the device is not online, you can manually add the interfaces. To manually add the interfaces, you must first determine the names of the interfaces and their characteristics.
Step 1 Right-click the device in the tree view and select Device Properties.
QPM opens the Device Properties dialog box.
Step 2 Click Detect Interfaces.
QPM obtains interface information from the device and opens the Detect Interfaces dialog box.
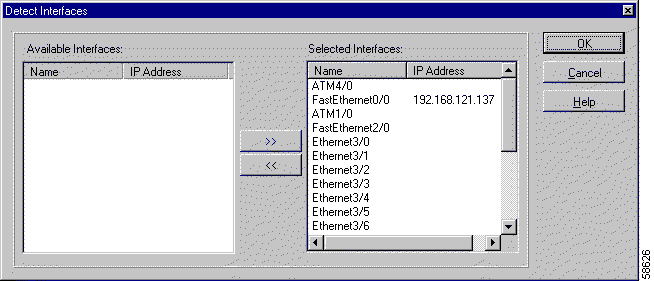
Step 3 In the Detect Interfaces dialog box, select the devices you want to manage and click >> to move them to the selected devices list. If you do not want to manage a selected interface, select it and click << to remove it from the selected list. When finished, click OK.
QPM adds the interfaces to the tree view as items in the device's folder. You can now configure QoS on the interface.
Step 1 Select the device whose interface you want to add in the tree view.
Step 2 Select Devices>Interface>New, or right-click and select New Interface.
QPM opens the New Interface dialog box.
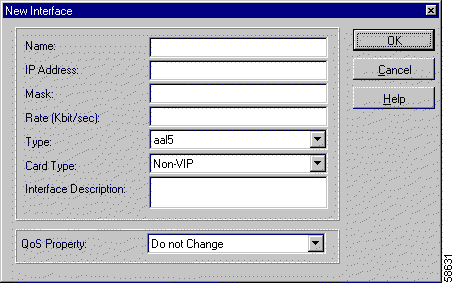
Step 3 Enter the interface properties and click OK. See the "New Interface and Properties of Interface Dialog Boxes" section for more information.
You can view the properties of an interface and change them if required. When you select an interface in the tree view, a summary of its properties is shown in the lower right pane of the Policy Manager window.
Step 1 Right-click the interface in the tree view and select Interface Properties, or select the interface and select Devices>Interface>Properties.
QPM opens the Properties of Interface dialog box.
Note that the fields in this dialog box differ depending on the type of device and the IOS/CatOS software it is running. QPM only provides the options that are supported by the selected device and its software. See the "New Interface and Properties of Interface Dialog Boxes" section for detailed information.
Step 2 If you want to change the interface properties, make your changes in the dialog box and click OK.
If you do not want to manage QoS on an interface, but you still want to manage QoS on other interfaces on the device, you can remove the interface from the QoS database without removing the device. If you remove a card from a device, ensure that you remove the card's interfaces from the QoS database.
Step 1 Right-click the interface in the tree view and select Delete Interface, or select it and select Devices>Interface>Delete.
If the interface belongs to a device group, you are prompted to confirm the deletion.
If you confirm the deletion, QPM deletes the interfaces, all associated policy statements, and device group memberships for the interface.
A device group is a group of interfaces that reside on one or more device. You can use device groups to simplify the deployment of your policies, because you can write a policy for the group instead of for each interface separately.
There are two main reasons to group interfaces.
These topics describe device groups in more detail:
You can combine interfaces in a group only if the interfaces use the same or a compatible software version. This ensures that you do not create a policy on the device group that is not supported on one or more interfaces in the group.
When you create a device group, you must state the minimum software version that should be allowed in the device group. QPM only lets you add interfaces with compatible software versions to the device group (in general, only later software versions are compatible). In addition, QPM only lets you use QoS properties and policies that are supported on all interfaces in the group.
You can include more restrictive characteristics if you desire. For example, you can create a device group that only contains Frame Relay interfaces running IOS software release 12.0.
On Catalyst 6000 switches with Supervisor IOS, interfaces are grouped on ASICs. When you add an interface to a device group, all the interfaces in the same ASIC will also be added to the device group. This means that all interfaces on the same ASIC will have the same QoS configurations and policies unless you define policies on the individual interfaces and not on the device group.
In addition, if you select a queuing mechanism (QoS property) for the device group (2Q2T or 1P2Q2T), only interfaces that support that QoS property can be added to the group. In order to have a heterogeneous device group, you need to select Defined by Interface as the QoS property.
Create a device group when you want to use identical policies for more than one interface.
Identify the interfaces that you want to treat as a group.
Step 1 From the Policy Manager, select Devices>Device Group>New, or right-click on the Device Groups folder and select New Device Group. QPM opens the Device Group dialog box.
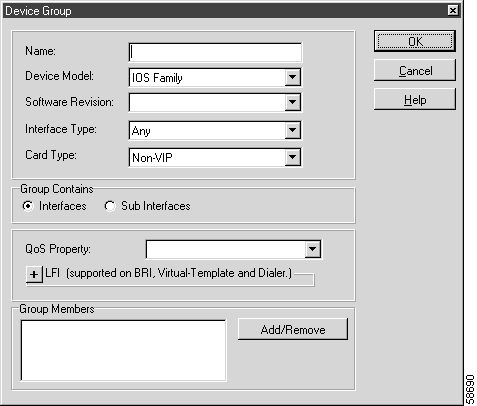
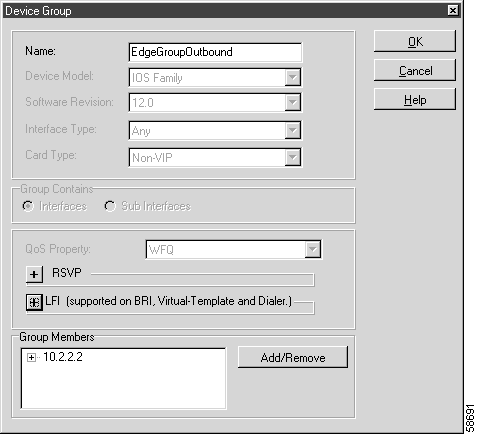
Step 2 Fill in the fields in the Device Group dialog box (see the "Device Group Dialog Box" section for more information).
If you are creating a device group to define a common QoS property, set the desired property in the QoS property field. Otherwise, set the QoS property to Defined by interface.
Step 3 In the Device Group dialog box, click Add/Remove in the Group Members group.
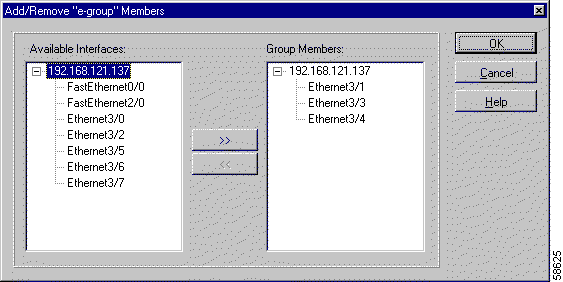
QPM opens the Add/Remove Group Members dialog box.
Step 4 In the Add/Remove Group Members dialog box, select the desired interfaces in the Available Interfaces list and click >>.
The Available Interfaces list includes only interfaces that:
Click OK when you finish adding interfaces. QPM returns you to the Device Groups dialog box.
Step 5 Click OK in the Device Groups dialog box.
QPM adds the device group to the Device Groups folder in the tree view. You can now select the group and add policies to it.
After you define a device group, you can add members to the group or remove them from the group.
If you want to add an interface to a device group, and the interface is currently running a software version that is incompatible with the one defined for the group, you must upgrade the software on the device before you can add the interface to the group.
Step 1 From the Policy Manager, select the device group in the tree view and select Devices>Device Group>Add/Remove Members, or right-click the group and select Add/Remove Members.QPM opens the Add/Remove Group Members dialog box.
Step 2 To add members, select the required interfaces in the Available Interfaces list and click >>. This list contains only interfaces that satisfy the device group characteristics and that do not already belong to a group.
To remove members, select the required interfaces in the Group Members list and click <<.
Modify a device group when you want to add or remove interfaces, or change other properties for the group.
You can only change these properties of a device group:
If you want to change the Software Version or Device Model properties, you must create a new device group. Changing these properties might invalidate policies that you have defined and distributed to the members of the group.
Step 1 From the Policy Manager, select the device group in the tree view and select Devices>Device Group>Properties. QPM opens the Device Group dialog box.
Step 2 Make the desired changes to the device group properties and click OK (see Device Group Dialog Box for more information).
Delete a device group when you no longer want to treat the group of interfaces as a group. However, if you only want to remove some of the members of the group, you do not need to delete the group. See the "Adding or Removing Device Group Members" section for more information.
Step 1 From the Policy Manager, select the device group in the tree view.
Step 2 Select Devices>Device Group>Delete, or right-click and select Delete Device Group.
QPM asks you to confirm the deletion.
When you delete a device group, the group's QoS property and associated policies (for example, policies that create priority or custom queues) are copied to the interfaces that were members of the device group. You are asked whether other policies defined on the group, such as coloring or shaping policies, should be copied to interfaces that you are removing. If you click Yes or Yes to All, the policies are copied, meaning there is no change to the services provided by the interface. If you click No, the policies are not copied to the interface, changing the services provided by the interface.
When you create a device group, you specify the minimum software version allowed for members of the group. Because you specify a minimum version level, you can upgrade your devices without affecting QPM's deployment of policies to the devices.
However, if you downgrade the software version on a member of a group to a version incompatible with the minimum version, you may encounter problems. If your policies, or QoS property, for the interface is incompatible with the QoS capabilities of the software version, you will see errors in Policy Manager when you try to reverify the device information for the device. At that time, you will have to remove the interface from the group; otherwise, you will see errors in Distribution Manager when you try to deploy policies to the device group.
If you need to downgrade the software version on a device, make sure you remove the device's interfaces from the device groups in which the minimum software version is higher than the your device's downgraded software version.
![]()
![]()
![]()
![]()
![]()
![]()
![]()
![]()
Posted: Tue Nov 12 12:20:41 PST 2002
All contents are Copyright © 1992--2002 Cisco Systems, Inc. All rights reserved.
Important Notices and Privacy Statement.