|
|

Use the Distribution Manager application to distribute policies to network devices. These sections describe the use of Distribution Manager, and other tasks associated with distribution policies.
These sections describe the basics for how to use the Distribution Manager interface, and how to configure its operational settings.
Start Distribution Manager whenever you want to distribute new or changed policies to selected devices.
Determine the policy changes you wish to make. Use the Policy Manager to create new policies or change existing policies.
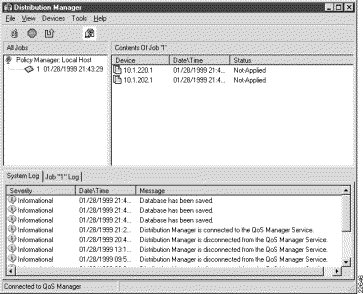
The Distribution Manager main window (Figure 7-1) is divided into three panes.

The tree view pane contains a folder for each job to be distributed. The job folder contains a list of the devices for which you have added or changed policies in the Policy Manager. When the job is selected, the devices are displayed in the list view pane.
The list view pane displays two different views, Jobs Summary or Contents of a selected Job. Select the Root of the Tree view to see Jobs Summary in the List View pane. When jobs are viewed, the information displayed is Job Name, Database Name, Total (number of) Devices, Written Devices, Date/Time and (Job) Status. To see the devices of a certain Job, select a job in the tree view or double click the job in the summary view. In this view you can see all the devices (routers) that are contained in the selected job folder. These are the devices to which the new or changed policy will be distributed.

The status of each job or device is displayed in the column next to the device. Table 7-1 explains the status of jobs and Table 7-2 explains the status of devices.
Table 7-1 Description of Job Status
Table 7-2 Description of Device Status
|
The log message pane displays event messages. Messages have four levels of severity; Informational, Warning, Error and Fatal Error. The log message window has two tabs to display two types of log messages, System Logging messages and Job/Device Logging messages.
System log messages describe events occurring on the network. An example is "Database has been saved" for a specific job.
The second tab alternates between Job and Device messages depending upon which is selected. Select a job in the tree view to display Job log messages or select a device in the list view to display log messages for that device only. The Job log displays messages for all the devices in the job.
You can change the main Distribution Manager window to display information according to your preferences. Table 7-3 lists the available commands for changing the main Distribution Manager window.
Table 7-3 Commands for Changing the Distribution Manager Main Window
|
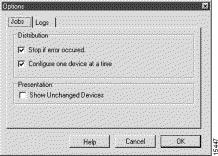
You can use the Distribution Manager's Option window to change the Distribution Manager window appearance, logging display, and operation.

Step 2 Select the desired options. Table 7-4 describes the settings you can configure for Distribution Manager.
Table 7-4 Device Options Dialog Box
|
If Policy Manager is not running, you can start it from the Distribution Manager interface.
The Policy Manager application starts.
From the Distribution Manager interface, you can close just Distribution Manager, or exit both Distribution Manager and Policy Manager.
Make sure that all distribution activities are complete, or have been stopped. Also, ensure that all new policies have been saved in Policy Manager.
You can write policy changes or new policies to the network devices. You can write new policies to devices in a job sequentially, simultaneously, or individually. You can also view the status of each device as the distribution occurs.
Ensure that all the policy changes required have been made in the Policy Manager application.
 Select a job in the tree view pane. This displays all the devices affected by the new policies.
Step 2 Select Devices>Apply, or click the Apply button in the tool bar.
You can view policy distribution actions in the Status column of the list view pane.
The Status column entry changes as the distribution actions occur.
Table 7-5 Description of Device Status
|
Devices carry a "Not-Applied" or "Unchanged" status until the distribution process starts.
The entry in the Status column changes to "In-Progress." When the process is complete, the status changes to "Completed." If there was an error, the status is "Failed."
You can stop the distribution process at any time. The stop takes effect at the end of writing the new policy to the current device.
The system remembers the devices that have not been completed so that you can resume at a later time. If you do not wish to complete the job you must remove the policy changes to the devices from the database in Policy Manager.
 Select the job you want to stop from the tree view window.
Step 2 Select Devices>Stop or click the Stop button.
When a policy distribution has been stopped before completion, you may resume the distribution of that policy from where it was stopped.
The incomplete jobs will still be present even if you exited and re-started the Distribution Manager. The system remembers the policies for each device and if the policies have been distributed.
 Select the job you want to restart.
Step 2 Select Devices>Resume, or click the Resume button on the tool bar.
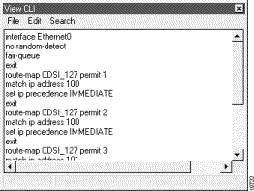
You can view the IOS commands for each device in a job that is being modified by a policy change. Only the Incremental change that are applied to the device in that Job are shown.

Step 2 Select Device>View Device Commands.
Log messages of Distribution Manager actions are available in the log message pane. Log messages are divided between system messages, job and device messages. Job and device messages occupy the same tab, and one or the other is displayed depending upon which is highlighted in the tree or view panes.
System messages are specifically about the system operation and actions.
Job/device messages describe actions related to the writing of new policies to a device. Job messages are the accumulation of messages for all the devices in the job. Device messages pertain to the specific device selected in the list view pane.
If the message log pane is not visible, select View>Logging.
Step 2 Select a job in the tree view pane and select the Job Logging tab to see all the log messages for the job.
Step 3 Select a device in the list view pane and select the Device Logging tab to see all the log messages for the selected device.
There are four types of log messages that may appear, informational messages, warning messages, error messages, and fatal error messages. The messages and explanations appear below.
Message Connected to Master Policy Server at address.
Explanation System status message.
Message Policy Manager is connected to the QoS Manager Service.
Explanation System status message.
Message Policy Manager is disconnected from the QoS Manager Service.
Explanation System status message.
Message Distribution Manager is connected to the QoS Manager
Service.
Explanation System status message.
Message Distribution Manager is disconnected from the QoS Manager
Service.
Explanation System status message.
Message Configured successfully.
Explanation The device has been successfully configured with the new policy.
Message Database has been saved.
Explanation Status message.
Message Job number has started.
Explanation The indicated job is now running.
Message Job numbers cancelled by user.
Explanation The user cancelled the indicated jobs.
Message Job number ended with status name.
Explanation The indicated job has ended as described by the status.
Message New database has been saved.
Explanation A new database was saved.
Currently there are no warning messages.
Message No SNMP connection to device.
Explanation The system was unable to make a SNMP connection.
Message Error in building the configuration.
Explanation The system was unable to build the configuration.
Message Incomplete xxxxx policy statement in database.
Explanation Information is missing from the policy in the database.
Message Missing parameter in name policy.
Explanation The designated policy is missing one or more parameters
Message Out of ACL resources for name policy.
Explanation There are insufficient resources for the indicated policy.
Message Out of custom queue-list resources.
Explanation There are insufficient resources for custom queue-list.
Message Out of priority-list resources.
Explanation There are insufficient resources for the priority-list
Message Configuration error, interface does not exist on the device.
Explanation The indicated interface does not exist on the specified device.
Message Configuration error, missing device name.
Explanation The device name was lost while building the configuration.
Message device name is not a Cisco device.
Explanation The indicated device is not supported by QoS.
Message Can not identify policy action.
Explanation The policy action is not within the range of commands for this device
Message Failed to calculate ratio in custom queuing policy.
Explanation The ratio used in custom queuing was not calculated or was not calculated properly.
Message Telnet error: device, host.
Explanation A Telnet communications error occurred.
Message Telnet communication initialization failed: device, host.
Explanation Telnet could not make contact with the device or host.
Message Invalid precedence value: value.
Explanation This is not an acceptable value.
Message Invalid priority queue level: number.
Explanation The priority queue number does not fit within the priority queueing range.
Message Job ID number is invalid.
Explanation This Job ID number does not fit within Job ID parameters
Message Failed to find message ID number in message.ini.
Explanation The system could not find this message in the message file.
Currently there are no fatal error messages.
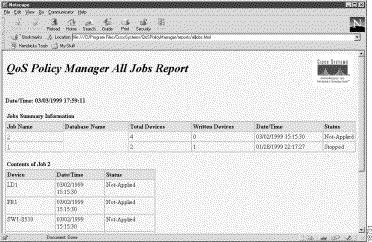
You can print Distribution Manager activity logs for the system, all jobs, individual jobs, or individual devices.
This opens a menu allowing you to choose from All Jobs, System Logs, Job Logs or Device Logs. (See Figure 7-5.)
Step 2 Select a report type.
Step 3 Select File>Print, to print the report. This opens the MS Windows print command window.
Step 4 Select File>Save, to save the report in another directory.


Table 7-6 Distribution Manager Reports
|
If you want to print the log messages for a specific job or device, you must have previously select it in the tree view or list view.
Step 5 Select File>Print. This opens the MS Windows printer command window.
Step 6 Select the Print button.
![]()
![]()
![]()
![]()
![]()
![]()
![]()
![]()
Posted: Mon Aug 18 10:18:12 PDT 2003
All contents are Copyright © 1992--2003 Cisco Systems, Inc. All rights reserved.
Important Notices and Privacy Statement.