|
|

These release notes are for use with Provisioned QoS Policy Manager (QPM-PRO) version 2.0.
These release notes provide:
The following documents are provided with QPM-PRO 2.0:
 |
Note Adobe Acrobat Reader 4.0 is required. |
In addition, you can use the following to learn how to install and use QPM-PRO 2.0:
Before you install Provisioned QoS Policy Manager (QPM-PRO), ensure that your system meets the requirements for running QPM-PRO. These sections describe the requirements and procedures for installing QPM-PRO:
 |
Note If you have the beta version of QPM-PRO 2.0 installed, please uninstall it before starting the current QPM-PRO 2.0 installation. |
 |
Note For optimal display of QPM-PRO windows, it is recommended that you set your system to use small fonts. |
Table 1 shows the hardware and software requirements for installing QPM-PRO.
| Complete QoS Policy Manager | Remote QoS Policy Manager |
|---|---|
Pentium 266 MHz processor or better. Works on single or multiple processor machines. | Pentium 266 MHz processor or better. Works on single or multiple processor machines. |
64MB RAM or more. | |
50MB or more of free hard disk space. | |
Any of these operating systems running TCP/IP and Microsoft Networking:
| Any of these operating systems running TCP/IP and Microsoft Networking:
|
Microsoft Internet Explorer 5.01 or higher, or Netscape Navigator 4.5 or higher. Needed to view the online help or QPM-PRO reports. | Microsoft Internet Explorer 5.01 or higher, or Netscape Navigator 4.5 or higher. Needed to view the online help or QPM-PRO reports. |
 |
Note Partial upgrades are not supported. You cannot upgrade the remote
installations and use them with a former complete installation
version. Similarly, you cannot upgrade the complete installation and
use it with previous versions of remote installations. All QPM-PRO systems that interact must be upgraded together. Databases that were created with previous versions of QPM-PRO can be read by QPM-PRO 2.0 without any special conversion program. Refer to the chapter Working with QoS Databases in the user guide, for more information. |
You can upgrade a QPM-PRO 1.1 installation without first uninstalling it. Simply follow the instructions in the "Installing the Complete QPM-PRO" section (or the "Installing the Remote QPM-PRO" section for remote installations).
However, before you upgrade your QPM-PRO installations, consider these changes in QPM-PRO 2.0:
The complete Provisioned QoS Policy Manager includes the management interfaces that you use to create and distribute your QoS policies to network devices, and the QoS Manager service used to manage and process the QoS database.
If you are upgrading from a previous version of QPM-PRO, exit Policy Manager and Distribution Manager if you are currently running either program. The installation program automatically stops the QoS Manager service.
Step 1 Insert the Provisioned QoS Policy Manager CD-ROM into the CD-ROM drive on your computer.
 |
Note We do not recommend that you install QPM-PRO from a network CD-ROM drive. |
Step 2 The installation process should start automatically. If it does not, select Start>Run, and enter d:\qpmpro.exe, where d: is the drive letter for your CD-ROM drive. The initial installation screen appears (Figure 1).
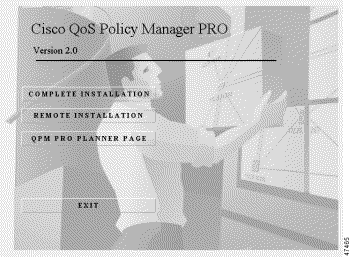
Step 3 Select Complete Installation.
If you are upgrading from a previous version of QPM-PRO, the following screen appears:
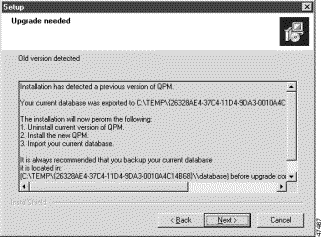
Click Next to uninstall the old version of QPM-PRO. Your existing databases will be saved and restored at the end of the installation process.
Step 4 Read the Welcome screen and click Next.
Step 5 Choose a destination folder (one is selected by default) and click Next.
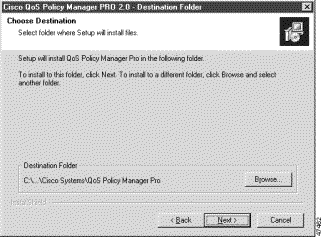
Step 6 Select Complete QoS Policy Manager in the Setup Type window and click Next.
Step 7 Enter a Windows NT or Windows 2000 local group name in the Users Group Creation window, or use the default name shown, and click Next.
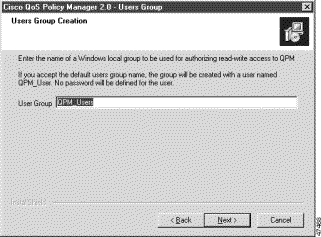
The QPM-PRO user group is used for authenticating QPM-PRO read-write users. Members of this group can save changes to the QoS database. You can enter the name of an existing group, or have QPM-PRO create a new group. The default user group is QPM_Users.
Step 8 Enter a Windows NT or Windows 2000 local group name in the Guest Group Creation window, or use the default name shown, and click Next. If the group does not exist, you are prompted to create it.
The QPM-PRO guest group is used for authenticating QPM-PRO read-only users. Members of this group can view the QoS database, but they cannot save changes. You can enter the name of an existing group, or have QPM-PRO create a new group. The default guest group is QPM_Guests.
Step 9 Specify or select a program group, if you do not want to use the default name, and click Next.
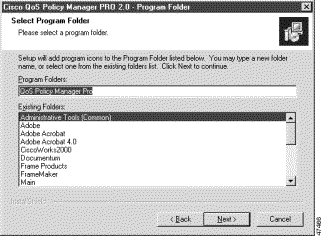
Step 10 Review your selections on the Start Copying Files screen. If you are satisfied, click Next. If you are not satisfied, click Back until you come to the screen that has selections you want to change.
After you click Next, QPM-PRO is installed on your system. If you are upgrading from a previous version of QPM-PRO, the following screen appears:

Step 11 Click OK.
Step 12 Click Finish to complete the setup.
You can install the remote Provisioned QoS Policy Manager on any machine that has access to QoS Manager (the Windows NT or Windows 2000 service installed with the complete QPM-PRO). This allows you to manage the QoS policies from remote locations, for example, from a laptop.
Determine the host name of the workstation where you installed, or intend to install, the complete QPM-PRO.
If you are upgrading from a previous version of QPM-PRO, exit Policy Manager and Distribution Manager if you are currently running either program.
Step 1 Insert the Provisioned QoS Policy Manager CD-ROM into the CD-ROM drive on your computer.
 |
Note We do not recommend that you install QPM-PRO from a network CD-ROM drive. |
Step 2 The installation process should start automatically. If it does not, select Start>Run, and enter d:\qpmpro.exe, where d: is the drive letter for your CD-ROM drive. The screen in Figure 1 appears.
Step 3 Select Remote Installation.
If you are upgrading from a previous version of QPM-PRO, the screen in Figure 2 appears. Click Next to uninstall the previous version. Your existing databases will be saved and restored at the end of the installation process.
Step 4 Read the Welcome screen and click Next.
Step 5 Choose a destination folder (one is selected by default) and click Next. The following screen appears:
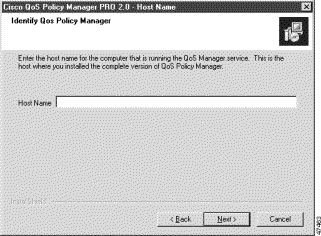
Step 6 Enter the host name of the machine that is running the QoS Policy Manager service. This is the machine where you installed, or intend to install, the complete QPM-PRO.
Step 7 Specify or select a program group, if you do not want to use the default name, and click Next.
Step 8 Review your selections on the Start Copying Files screen. If you are satisfied, click Next. If you are not satisfied, click Back until you come to the screen that has selections you want to change.
After you click Next, QPM-PRO is installed on your system. If you are upgrading from a previous version of QPM-PRO, the screen in Figure 6 appears. Click OK.
Step 9 Click Finish to complete the setup.
This section contains the following information that is not included in the user guide or online help:
QPM-PRO provides users with the option to use its blind login feature if problems are encountered when logging into a device for detection, verification, validation or deployment. During blind login, debug and other data generated by the device are disregarded, thus avoiding possible interference with the login process.
By default, blind login is not used. However, you can set blind login in the QoS Manager.ini file, located in the AppData directory under the root QPM-PRO installation directory. Follow the procedure provided below.
Step 1 Open the QoS Manager.ini file, located in the AppData directory under the root directory.
Step 2 In the Device Mode section, set BlindLogin to 1.
Step 3 Change the BlindLoginDelay value as required. This determines the number of milliseconds to wait between each command sent during the login process.
Step 4 Save the QoS Manager.ini file.
QPM-PRO provides a debug facility which can be used if communication problems are encountered during the validation process or during deployment of policies and QoS features to a device. The debug facility helps to identify the source of the problem by logging the function call trace for QPM-PRO operations, and/or logging sessions. This information can then be used for troubleshooting.
The following logging functions can be enabled in the cqpm.ini file, located in your Windows installation directory (usually c:/Winnt):
Support for Cisco MC3810 multiservice access concentrator has been partially tested. There is a possibility that QoS configurations that are supported on the device may not be updated in the QPM knowledge database.
It is not recommended to cut and paste policies from one Cisco 8500 family device to another, since on these devices, the policy filter contains the names of the device's interfaces. Therefore, either create a new policy on the second device or, if you have copied a policy, adjust the filter accordingly.
The Device Explorer utility is provided with the QPM-PRO 2.0 installation. This utility can be used to read the properties of a device (such as device model, IOS version and interface details), and output this information so that it can be used for troubleshooting purposes.
The Device Explorer utility is located in the bin directory under the root QPM-PRO installation directory. It can be activated from the command line interface, by entering the following information:
DeviceExplorer <device IP> [community string]
In Access Control policies, the mask in the filter can be any valid IP address. This is an exception to the rule that a valid mask must be a valid IP address, with a binary translation format of a sequence of one or more '1' digits followed by a sequence of '0' digits.
The QPM Planner Page provides information about QPM, including product announcements, upgrades and related information. It can be accessed from:
http://www.cisco.com/kobayashi/sw-center/sw-cw2000.shtml
This section includes troubleshooting information that was not included in the user guide.
You can search for known problems on the Cisco bug tracking system tool, called Bug Navigator II. To access Bug Navigator II, do the following:
Step 1 Enter http://www.cisco.com/support/bugtools in your web browser.
Step 2 Log into CCO and select Bug Navigator II.
Problem Your QPM-PRO 2.0 login user name is not recognized.
Explanation The QPM-PRO 2.0 login user name is case sensitive—you may not be using the correct case.
Action Reenter your user name with the correct case.
Problem Deployment of class-based QoS policies created on a device group that includes ATM interfaces fails.
Explanation QPM-PRO allows the definition of unsupported policies on ATM interfaces in device groups.
Action Avoid including ATM interfaces in a device group with Class Based QoS as the QoS property.
Problem Deployment of a class-based QoS policy fails and you receive a message indicating that the requested bandwidth is not available.
Explanation If you configured the maximum bandwidth allocation for an interface with Class Based QoS, QPM-PRO may actually deploy a slightly higher bandwidth allocation, for example, 76% instead of 75%.
Action Do not configure the maximum bandwidth allocation for a device. For example, configure an overall bandwidth allocation of 74% instead of the maximum 75%.
Problem You are unable to connect to a Catalyst 6000 device via Telnet, for deployment or device verification.
Explanation The device may not have an associated login password. This occasionally causes login problems.
Action Keep trying until a successful connection is established, or define a password for the device.
Problem Limiting policies on device groups created using QPM-PRO 1.1 are not converted correctly for QPM-PRO 2.0.
Explanation If both directions have been specified in the policy, problems may be encountered with the conversion to QPM-PRO 2.0.
Action Delete the policies from the database and recreate them using QPM-PRO 2.0.
Problem Deployment of a shaping (GTS) policy fails and you receive a message instructing you to remove the FRTS configuration from the device.
Explanation If FRTS is configured on an interface that is detected by QPM-PRO and the QoS property for the device is Do not Change, QPM-PRO does not remove FRTS from the device.
Action Either change the QoS property in the Interface Properties window, manually remove the FRTS configuration from the device using the CLI, or perform the Upload operation for the device.
Problem The results of validation or deployment of databases that contain Frame Relay interfaces are inaccurate.
Explanation If an interface is configured with more than one Frame Relay command that is not supported by QPM-PRO, the device's configuration is not fully read, and a job may not be correctly validated/deployed.
Action Manually delete the unsupported Frame Relay configuration.
Problem After deployment of class-based QOS policies or FRTS on a device group that contains several interfaces with different rates from the same device, you see that the same rate was configured for all the interfaces.
Explanation When interfaces with different rates on the same device are grouped into one device group, which is configured with Class Based Qos or FRTS, QPM-PRO does not create separate policy maps or frame relay map classes for the interfaces. One policy map or map class is created and it is based on the rate of the last interface in the group.
Action For class-based QoS, FRTS or queuing policies, only group interfaces from the same device that have identical rates.
You can access the most current Cisco documentation on the World Wide Web at http://www.cisco.com, http://www-china.cisco.com, or http://www-europe.cisco.com.
Cisco documentation and additional literature are available in a CD-ROM package, which ships with your product. The Documentation CD-ROM is updated monthly. Therefore, it is probably more current than printed documentation. The CD-ROM package is available as a single unit or as an annual subscription.
Registered CCO users can order the Documentation CD-ROM and other Cisco Product documentation through our online Subscription Services at http://www.cisco.com/cgi-bin/subcat/kaojump.cgi.
Nonregistered CCO users can order documentation through a local account representative by calling Cisco's corporate headquarters (California, USA) at 408 526-4000 or, in North America, call 800 553-NETS (6387).
Cisco provides Cisco Connection Online (CCO) as a starting point for all technical assistance. Warranty or maintenance contract customers can use the Technical Assistance Center. All customers can submit technical feedback on Cisco documentation using the web, e-mail, a self-addressed stamped response card included in many printed docs, or by sending mail to Cisco.
Cisco continues to revolutionize how business is done on the Internet. Cisco Connection Online is the foundation of a suite of interactive, networked services that provides immediate, open access to Cisco information and resources at any time, from anywhere in the world. This highly integrated Internet application is a powerful, easy-to-use tool for doing business with Cisco.
CCO's broad range of features and services helps customers and partners to streamline business processes and improve productivity. Through CCO, you will find information about Cisco and our networking solutions, services, and programs. In addition, you can resolve technical issues with online support services, download and test software packages, and order Cisco learning materials and merchandise. Valuable online skill assessment, training, and certification programs are also available.
Customers and partners can self-register on CCO to obtain additional personalized information and services. Registered users may order products, check on the status of an order and view benefits specific to their relationships with Cisco.
You can access CCO in the following ways:
You can e-mail questions about using CCO to cco-team@cisco.com.
The Cisco Technical Assistance Center (TAC) is available to warranty or maintenance contract customers who need technical assistance with a Cisco product that is under warranty or covered by a maintenance contract.
To display the TAC web site that includes links to technical support information and software upgrades and for requesting TAC support, use www.cisco.com/techsupport.
To contact the TAC by e-mail, use one of the following:
| Language | E-mail Address |
|---|---|
English | tac@cisco.com |
Hanzi (Chinese) | chinese-tac@cisco.com |
Kanji (Japanese) | japan-tac@cisco.com |
Hangul (Korean) | korea-tac@cisco.com |
Spanish | tac@cisco.com |
Thai | thai-tac@cisco.com |
In North America, the TAC can be reached at 800 553-2447 or 408 526-7209. For other telephone numbers and TAC e-mail addresses worldwide, consult the following web site: http://www.cisco.com/warp/public/687/Directory/DirTAC.shtml.
If you are reading Cisco product documentation on the World Wide Web, you can submit technical comments electronically. Click Feedback in the toolbar and select Documentation. After you complete the form, click Submit to send it to Cisco.
You can e-mail your comments to bug-doc@cisco.com.
To submit your comments by mail, for your convenience many documents contain a response card behind the front cover. Otherwise, you can mail your comments to the following address:
Cisco Systems, Inc.
Document Resource Connection
170 West Tasman Drive
San Jose, CA 95134-9883
We appreciate and value your comments.
Access Registrar, AccessPath, Are You Ready, ATM Director, Browse with Me, CCDA, CCDE, CCDP, CCIE, CCNA, CCNP, CCSI, CD-PAC, CiscoLink, the Cisco NetWorks logo, the Cisco Powered Network logo, Cisco Systems Networking Academy, Fast Step, FireRunner, Follow Me Browsing, FormShare, GigaStack, IGX, Intelligence in the Optical Core, Internet Quotient, IP/VC, iQ Breakthrough, iQ Expertise, iQ FastTrack, iQuick Study, iQ Readiness Scorecard, The iQ Logo, Kernel Proxy, MGX, Natural Network Viewer, Network Registrar, the Networkers logo, Packet, PIX, Point and Click Internetworking, Policy Builder, RateMUX, ReyMaster, ReyView, ScriptShare, Secure Script, Shop with Me, SlideCast, SMARTnet, SVX, TrafficDirector, TransPath, VlanDirector, Voice LAN, Wavelength Router, Workgroup Director, and Workgroup Stack are trademarks of Cisco Systems, Inc.; Changing the Way We Work, Live, Play, and Learn, Empowering the Internet Generation, are service marks of Cisco Systems, Inc.; and Aironet, ASIST, BPX, Catalyst, Cisco, the Cisco Certified Internetwork Expert Logo, Cisco IOS, the Cisco IOS logo, Cisco Press, Cisco Systems, Cisco Systems Capital, the Cisco Systems logo, Collision Free, Enterprise/Solver, EtherChannel, EtherSwitch, FastHub, FastLink, FastPAD, IOS, IP/TV, IPX, LightStream, LightSwitch, MICA, NetRanger, Post-Routing, Pre-Routing, Registrar, StrataView Plus, Stratm, SwitchProbe, TeleRouter, are registered trademarks of Cisco Systems, Inc. or its affiliates in the U.S. and certain other countries.
All other brands, names, or trademarks mentioned in this document/website are the property of their respective owners. The use of the word partner does not imply a partnership relationship between Cisco and any of its resellers. (0008R)
![]()
![]()
![]()
![]()
![]()
![]()
![]()
![]()
Posted: Tue Oct 1 14:37:19 PDT 2002
All contents are Copyright © 1992--2002 Cisco Systems, Inc. All rights reserved.
Important Notices and Privacy Statement.