|
|

This chapter describes how to start ISM and configure the setup options for the ISM application, which is stage four of the ISM installation process. It provides information on the following topics:
For the MVS systems programmer responsible for installing ISM Release 3.0 on the mainframe, complete the following tasks before you configure the ISM software:
If you have converted your configuration data from NSP Release 2.0, then your NSP Release 2.0 data will appear in the ISM Release 3.0 setup panels. However, the setup options that are new to ISM Release 3.0 still need to be defined. For more information about converting your NSP Release 2.0 data, see the chapter "Migrating from NSP Release 2.0". If you want to convert your existing router configurations and ISM configuration information, then you should convert your NSP Release 2.0 data before continuing with this chapter to configure ISM.
If you are a new ISM Release 3.0 site, you must configure the ISM setup options and user profiles.
Configuring ISM includes specifying the following options:
Configuring ISM for the first time involves the following tasks:
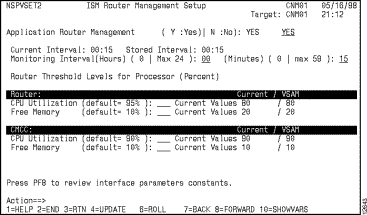
The ISM router management setup options consist of a group of four panels. To move forward and backward between this group of management setup panels when you are specifying options, use the F7 and F8 keys. When you have finished selecting the options, specify how you want the options for all four panels to be implemented by selecting Change Type and Action Type on the first ISM Router Management Setup panel (Figure 5-1) and then press F4 to build the setup records.
 Tips
Tips
If you need more information about using an ISM panel, access online Help by pressing F1.
To start the ISM setup for the first time, perform the following tasks:
Step 2 From a NetView command prompt, type the ismsetup command and press Enter. The ISM Router Management Setup panel (Figure 5-1) is displayed.
Step 4 To display the second ISM Router Management Setup panel (Figure 5-2), press F8.
Step 5 To reduce the processing overhead for ISM, type 12 for the Monitoring Interval (Hours) option, and 0 for the (Minutes) option.
Shorter monitoring intervals might result in degraded performance.
To stop measuring the threshold, type 00 for the CPU Utilization or Free Memory option.
Step 7 To display the third ISM Router Management Setup panel (Figure 5-3), press F8. Use this panel to enable interface monitoring and to specify the types of interfaces that you want ISM to monitor.
Step 8 To enable interface monitoring, type Y for the Application: Interface Monitoring option. For the Interfaces to be Monitored option, type Y for each interface you want ISM to monitor.

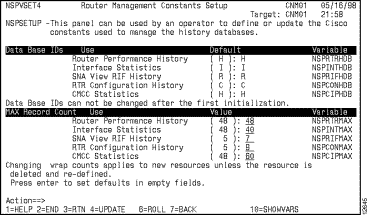
Step 9 To view ISM defaults for database constants, variables, and wrap counts, press F8. The Router Management Constants Setup panel (Figure 5-4) is displayed.
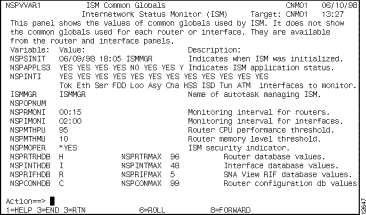
Step 10 To display the common globals used by ISM, press F10. The ISM Common Globals panel (Figure 5-5) is displayed.
 Caution The database IDs on this panel can only be modified before initializing ISM for the first time. If the ISM autotask is not running, you can update this panel.
Step 11 To return to the ISM Management Constants Setup panel from the ISM Common Globals panel, press F3.
Step 12 To specify when you want the setup options to be implemented, on the first ISM Router Management Setup panel type 2 for the Change Type and 1 for the Action Type.
Step 13 To save the management record and exit the ISM Router Management Setup panel, press F4.
If the ISM autotask is not started by NetView, you can perform one of the following tasks to start ISM:
autotask opid=ismmgr
autotask opid=ismmgra
autotask opid=ismmgrb
After you start the ISM autotasks, you can run either the NSP user interface or the ISM user interface. Separate database files are maintained for each version of the user interface that you run. When you use the NSP user interface, you will see only the data for the features that are supported in that release. So, if you begin to use any of the new features of ISM Release 3.0, you can only view that data when you are running ISM. You cannot migrate NSP data that you gather after the initial migration from NSP Release 2.0.
To run NSP Release 2.0, complete the following tasks:
Step 1 Log in to NetView.
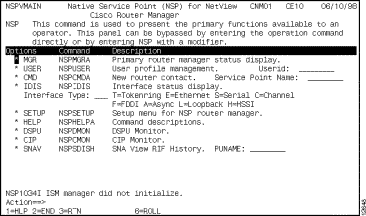
Step 2 At the command line on the NetView main menu panel, type nsp and press Enter.
The Native Service Point (NSP) for Netview panel (Figure 5-6) is displayed.
To run ISM Release 3.0, complete the following tasks:
Step 1 Log in to NetView.
Step 2 At the command line on the NetView main menu panel, type ism and press Enter.
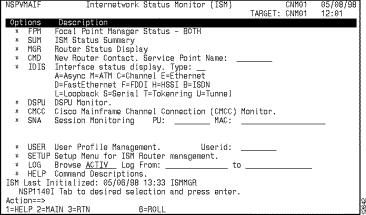
The Internetwork Status Monitor (ISM) main menu panel (Figure 5-7) is displayed.
For existing NSP Release 2.0 sites that have converted the ISM configuration data by running the CLIST NSPCONVR, the existing NSP Release 2.0 user profile records are available from ISM Release 3.0. You only need to define the user profiles if you want to add new operators.
The two types of ISM operators are:
A disabled ISM administrator can perform the following operations:
An enabled ISM administrator can perform the following operations:
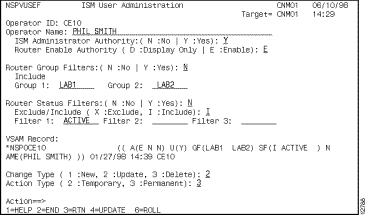
An enabled user is defined by an E in the Router Enable Authority option on the ISM User Administration panel (Figure 5-8). A disabled user is defined by a D in the Router Enable Authority option on the ISM User Administration panel.
ISM operators can create their own profiles for userid purposes and for filtering purposes.
A disabled ISM operator can:
An enabled ISM operator can:
An enabled user is defined by an E in the Router Enable Authority option on the ISM User Administration panel (Figure 5-8). A disabled user is defined by a D in the Router Enable Authority option on the ISM User Administration panel.
To create or change an operator profile, perform the following tasks:
Step 1 Start ISM. The Internetwork Status Monitor (ISM) main menu panel (Figure 5-7) is displayed.
Step 2 Access the Cisco Router User Administration panel using one of the following methods:
Step 3 To set up the operator authority (if you are an ISM administrator), complete one of the following tasks:
For a description of the operator capabilities by authority, see the "Overview of the Operator Types" section in this chapter.
Step 4 To enable group filters, type Y and perform the following task:
Step 5 To enable status filters, type Y and perform the following tasks:
Step 6 To save the user profile, perform the following tasks:
Now that you have installed and configured ISM on your mainframe, the next step is to add your router definitions and begin monitoring them using ISM. For detailed information about adding router definitions and using ISM to manage your Cisco routers, see the CiscoWorks Blue Internetwork Status Monitor User Guide.
If you have NSP Release 2.0 site installed at your site and you have converted your router definitions using the CLIST NSPCONVR, then your current router definitions are available in ISM Release 3.0. You can access your existing router resource definitions and update them from ISM Release 3.0.
|
|