cc/td/doc/product/rtrmgmt/ism/ism-v2r1
hometocprevnextglossaryfeedbacksearchhelp
PDF

Table Of Contents

Configuring ISM

Enabling the ISM Management Environment

Starting ISM

Running ISM

Defining ISM User Profiles

Overview of Operator Types

Creating, Changing, or Deleting User Profiles

Adding Router Definitions

Configuring ISM


This chapter describes how to start ISM and configure its setup options. If you are responsible for installing ISM on the mainframe, complete the following tasks before configuring ISM:


Step 1 Read "Preparing to Install ISM," to verify the system requirements.

Step 2 Perform the tasks described in "Configuring the Mainframe-to-Router Link"

Step 3 Perform the tasks described in Chapter 3, "Installing ISM."

Step 4 Optional step for existing ISM sites: Perform the tasks described in "Migrating from ISM V1R3.0"


Note If you want to convert your existing ISM router configurations and user profiles, you should convert your ISM V1R3.0 data before configuring ISM.


This chapter describes how to enable an ISM management environment and administrator profile.

If you are a new ISM site, you must configure the following ISM setup options and user profiles:

ISM applications, or features to use

Types of router interfaces to monitor

Monitoring interval for ISM to check routers and interfaces

CPU and memory performance thresholds that you want to define

User profiles for those operating ISM

After you have installed and verified the ISM installation, you must enable the ISM management environment. Then you can start ISM to configure its administrator and user profiles and add its router definitions.

Configuring ISM for the first time includes the following tasks:

Enabling the ISM Management Environment

Starting ISM

Running ISM

Defining ISM User Profiles

Creating, Changing, or Deleting User Profiles

Adding Router Definitions

Enabling the ISM Management Environment

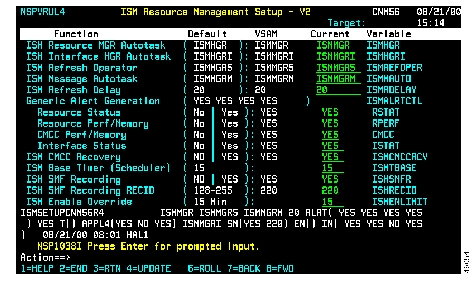
The ISM resource management setup options comprise four panels. To move back and forth among the panels when specifying options, use the F7 and F8 keys. When you have finished selecting the options, specify how you want the options to be implemented by selecting Change Type and Action Type on the first ISM Resource Management Setup panel ( Figure 5-1) and then press F4 to build the setup records.


Tips If you need more information about using an ISM panel, access online Help by pressing F1.


To start the ISM setup for the first time, complete the following steps:


Step 1 From a NetView command prompt, type the ismsetup command and press Enter. The "ISM Resource Management Setup—First Panel" ( Figure 5-1) is displayed.


Note The first user to run the ismsetup command is automatically defined as an ISM administrator.


Figure 5-1 ISM Resource Management Setup—First Panel

Step 2 In the Applications section, type Y under the Update column to enable the ISM features you want to use.


Note If you are going to use the SNA Session Monitoring application, the ISM VTAM exit must be installed to support this function. For more information about installing this exit, see "Installing the VTAM XID Exit Routine" section in Chapter 3, "Installing ISM."


Step 3 To display the "ISM Resource Management Setup—Second Panel (ISM Rules)"( Figure 5-2), press F8.


Note For more information on enabling SNMP and TN3270, see the CiscoWorks Blue Internetwork Status Monitor User Guide.


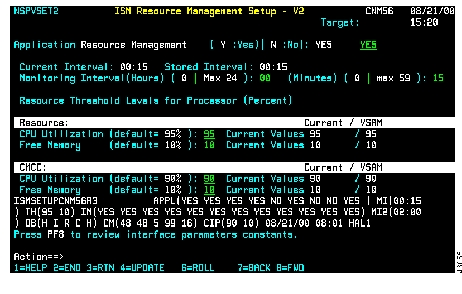
Figure 5-2 ISM Resource Management Setup—Second Panel (ISM Rules)

Use the second ISM Resource Management Setup panel to enable the rules and change the ISM defaults.

Press Enter to set the default values.

Step 4 To display the "ISM Resource Management Setup—Third Panel" ( Figure 5-3), press F8.

Figure 5-3 ISM Resource Management Setup—Third Panel

Use the "ISM Resource Management Setup—Third Panel" ( Figure 5-3) to enable the monitoring intervals and specify the router and CMCC thresholds to be monitored:

To specify a monitoring threshold, type a 2-digit numeric value for the percentage of the CPU and memory that ISM monitors. If a threshold is exceeded, ISM flags the router with an alert status on the router Status panel.

To stop measuring the threshold, type 00 for the CPU Utilization or Free Memory option.

Step 5 Press F8 to display the ISM Interface Management Setup—Fourth Panel ( Figure 5-4).

Figure 5-4 ISM Interface Management Setup—Fourth Panel

To reduce the processing overhead for ISM, type 12 for the Monitoring Interval (Hours) option, and 0 for the (Minutes) option.

The ISM Interface Management Setup—Fourth Panel enables interface monitoring. You can select the specific types of interfaces ISM monitors.

To enable interface monitoring, type Y for the Application: Interface Monitoring option. For the Interfaces to be monitored option, type Y for each interface you want ISM to monitor.


Note Shorter monitoring intervals might result in degraded performance.


Step 6 Press F8 to display the "ISM Resource Management Constants Setup—Fifth Panel" ( Figure 5-5). Here you can view the ISM defaults for database constants, variables, and wrap counts.

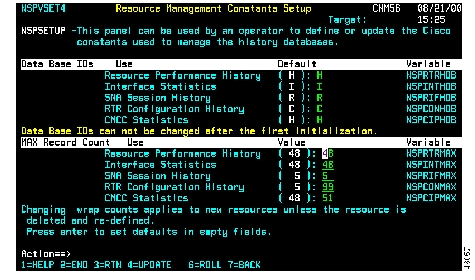
Figure 5-5 ISM Resource Management Constants Setup—Fifth Panel


Caution The database IDs on this panel can be modified only prior to initializing ISM for the first time.

Step 7 Press F4 to save the management record and exit the ISM Resource Management Setup panel.


Starting ISM

Once you have installed and configured ISM V2 (and converted the ISM V1R3.0 data files, if applicable), you can start ISM and enable the user profiles and router definitions. If ISMMGR is already active, enter the following:

Stop Tasks=ismmgr

If the ISM autotask is not started by NetView, you can perform one of the following tasks to start ISM:

To start the autotask, type the following command from a NetView command prompt:

autotask opid=ismmgr

Restart NetView to automatically start the autotask that you specified in the production NetView CLIST.

Running ISM

To run ISM complete the following steps:


Step 1 Log in to NetView.

Step 2 At the command line on the NetView main menu panel, type ism and press Enter. The ISM main menu panel (Figure 5-6) is displayed.

Figure 5-6 Internetwork Status Monitor (ISM) Main Menu Panel


Note The contents of the ISM main menu panel depend on which applications you select when performing ISMSETUP.


Defining ISM User Profiles

ISM user profiles provide the following functions:

AdministrationSpecifies the operator ID and authority to perform ISM and router functions.

Enabled UserPermits modification to the rules used to monitor routers.

Disabled UserPermits operation of ISM in a "read-only"mode.

For existing ISM V1R3.0 sites that have converted the ISM configuration data by running the CLIST NSPCONVU, the existing ISM V1R3.0 user profile records are available from ISM V2. You must define the user profiles if you want to add new operators.

For new ISM V2 sites, the ISM user profiles must be defined by an ISM administrator. By default, the first user to run ismsetup is automatically defined as an administrator by ISM.

In order to use ISM, the operator must have an ISM profile.

Overview of Operator Types

The ISM user profile management function provides four operator types. Each type dictates the actions an operator can perform using ISM.

When using the WEB interface, all operators are disabled users.

ISM operator types are:

Enabled ISM Administrator

Disabled ISM Administrator

ISM Enabled User

ISM Disabled User

ISM administrators maintain the ISM management environment. They assign the "authority levels" to ISM users. An ISM administrator can be an ISM Enabled User as well.

An ISM Enabled User may issue Cisco IOS software enable commands—an ISM Disabled User may not.

A disabled ISM administrator may perform the following operations:

Create operator profiles and assign user authority

Configure and change the ISM management environment

Set group filters

An enabled ISM administrator can perform the following operations:

Issue the Cisco IOS software enable command and issue commands that control and configure Cisco routers

Add, modify, or delete router and DSPU router definitions

Modify interface settings

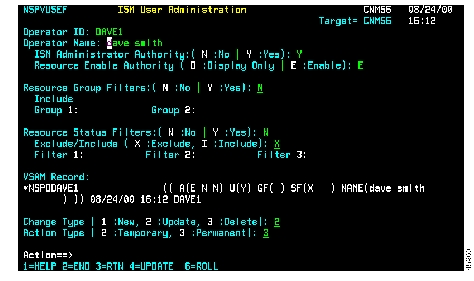
An ISM Enabled User is defined by an E in the router Enable Authority option on the ISM User Administration panel (Figure 5-8). An ISM Disabled User is defined by a D in the router Enable Authority option on the ISM User Administration panel.


Note You must know the password to a router to issue the enable command. If the router supports TACACS, you must know the userid and password as well.


An ISM Disabled User may do the following:

Collect and display data with which to monitor the status of the Cisco routers, interfaces, and other routers in their network

Set status filters

An ISM Enabled User may do the following (in addition to the above tasks):

Issue the Cisco IOS software enable command and issue commands that control and configure Cisco routers

Add, modify, or delete router and DSPU router definitions

Modify interface settings

Creating, Changing, or Deleting User Profiles

All ISM users should have an operator profile for identification and status filtering purposes. Only an ISM administrator can create or change an authority level of another operator's profile.

To create or change an operator profile, complete the following steps:


Step 1 To access the Cisco router User Administration panel, use one of the following methods:

Type ism and press PF 8.

Position the cursor on the USER line and press Enter.

If you are an ISM administrator and are creating or changing an operator's profile, position the cursor in the ID field on the ISM Administration menu panel, enter the operator's name, and press Enter.

The ISM User Administration panel ( Figure 5-7) is displayed.

Figure 5-7 ISM User Administration Panel

Step 2 To use the ISM User Administration panel to enable the operator authority (if you are an ISM administrator), complete one of the following tasks:

To define a Disabled ISM Administrator, type Y for ISM Administrator Authority and D for Router Disable Authority.

To define an Enabled ISM Administrator, type Y for ISM Administrator Authority and E for Router Enable Authority.

To define an ISM Disabled User, type N for ISM Administrator Authority and D for Router Enable Authority.

To define an ISM Enabled User, type N for ISM Administrator Authority and E for Router Enable Authority.

Step 3 To use the ISM User Administration panel to enable group filters, type Y. To view a set of routers assigned to a group name, type the name of the router group (up to two) that you want to view.

The routers defined to the specified group name will be the only routers to appear on the ISM Router Status and Status Summary panels.

Step 4 To use the ISM User Administration panel to enable status filters, type Y and perform the following tasks:

To view routers with a certain status, type I in the Exclude/Include option and specify the status type (up to three) to view.

The routers with the specified status will be the only routers to appear on the ISM Router Status Panel.

To disable viewing of routers with a certain status, type X in the Exclude/Include option and specify the type of status (up to three) that you want to exclude.

The routers with the specified status will not appear on the ISM Router Status Panel.

Step 5 To save the user profile, perform the following tasks:

a. Specify a value for the record Change Type (1 for new or 2 for update).

b. Type 3 for the record Action Type to permanently update the record.

c. Press F4 to update the record.


Adding Router Definitions

Now that you have installed and configured ISM on your mainframe, the next step is to add your router definitions and begin monitoring them using ISM. For detailed information about adding router definitions and using ISM to manage your Cisco routers, see the CiscoWorks Blue Internetwork Status Monitor User Guide.

If you have ISM V1R3.0 installed at your site and have converted your router definitions using the CLIST NSPCONVR, you can access these definitions and update them from ISM V2.


hometocprevnextglossaryfeedbacksearchhelp

Posted: Fri Aug 6 09:41:57 PDT 2004
All contents are Copyright © 1992--2004 Cisco Systems, Inc. All rights reserved.
Important Notices and Privacy Statement.