|
|

Table Of Contents
Searching for VRF Objects in the ISC Repository
Modifying Non-Deployed VRF Objects
Modifying Deployed VRF Objects
Working with VRF Service Requests
Overview of VRF Service Requests
Deploying VRF Service Requests
Modifying VRF Service Requests
Decommissioning and Deleting VRF Service Requests
Searching for VRF Service Requests by VRF Object Name
Viewing the Configlet Generated by a Deployed VRF Service Request
Using VRFs with MPLS VPN Service Requests and Policies
Relationship of VRF Object and Service Requests and PE Device
Specifying VRF Objects within MPLS VPN Service Requests
Notes On Using a VRF Object in an MPLS Service Request
Searching for MPLS VPN Service Requests by VRF Object Name
Specifying VRF Objects within MPLS VPN Service Policies
Migrating Existing MPLS VPN Service Requests to the VRF Object Model
Independent VRF Management
This chapter describes independent VRF management, which provides a means to create, deploy and manage VRF objects independent of MPLS VPN links and service requests. Deployed VRF objects can also be used with MPLS VPN links. It contains the following sections:
•
Overview
•
•
•
Overview
In the traditional VRF (VPN routing and forwarding) model available in previous releases of ISC, the operator first creates a VPN object and then associates it to an MPLS VPN link. The necessary VRF information is generated and deployed at the time the MPLS VPN link is provisioned. The VRF information is removed only when the last link associated with the VRF is decommissioned. However, in certain cases, it might be desirable to have the VRF information provisioned independent of the physical link. ISC now supports this scenario through the independent VRF management feature described in this chapter. This lets you create, modify, and delete VRF objects independently of MPLS VPN links. This provides several advantages:
•
•
•
•
Managing VRFs independently of physical links involves the following tasks, which are covered in detail in the rest of this chapter:
•
•
•
•
Note
Working with VRF Objects
This section describes how to create, modify, and delete VRF objects. Subsequent sections in this chapter cover how the VRF objects are used in service requests. This section covers the following topics:
•
•
•
Creating a New VRF Object
Creating a VRF object is similar to creating a VPN. However, there are some extra attributes involved, such as Import RT List and Export RT List. After the VRF object is created, you will later provision it using a VRF service request, as covered in later sections of this chapter.
To create a VRF object, perform the following steps:
Step 1
The Inventory and Connection Manager window appears.
Step 2
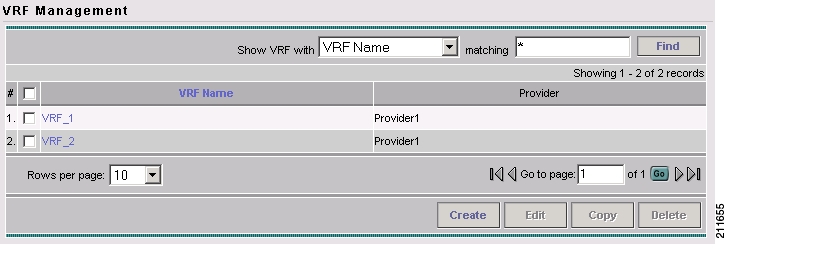
The VRF Management window appears, as shown in Figure 3-1.
Figure 3-1 VRF Management Window
Step 3
The Create VRF window appears, as shown in Figure 3-2.
Figure 3-2 Create VRF Window
Step 4
This is a simple text field. Enter any name of your choice. This name will be directly deployed on the PE device. All the validations applicable for a VPN name while creating a VPN object in ISC are applicable for a VRF name. This attribute is required.
Step 5
a.
The Select Provider dialog box appears.
b.
The Create VRF window reappears.
This attribute is required.
Step 6
No validation is done on the description entered.
Step 7
a.
The Select CE Routing Communities dialog box appears.
b.
Only one CERC is allowed per VRF. The Create VRF window reappears.
This attribute is required.
Step 8
For multiple RTs, use a comma (,) separated list. An example RT list is 100:120,100:130,100:140.
Step 9
For multiple RTs, use a comma (,) separated list.
Step 10
ISC will validate this name while provisioning the VRF. If the route map is not defined, ISC will generate an error.
Step 11
ISC will validate this name while provisioning the VRF. If the route map is not defined, ISC will generate an error.
Step 12
This is an integer value from 1 to 4294967295 for IOS devices and from 32 to 2000000 for IOS XR devices.
Step 13
This is an integer value from 1 to 100. This attribute is mandatory for IOS devices and optional for IOS XR devices. Validations for specific device type will be done during service request creation.
Step 14
This attribute is required.
Step 15
The multicast attributes below this check box are enabled for use. For details on how to set the multicast attributes, see Creating an IP Multicast VPN, starting with Step 2 in the procedure.
Note
Note
Step 16
ISC creates a new VRF object based the attributes selected. The VRF Management window appears. The new VRF is listed in the VRF Name column of the window.
Copying a VRF Object
You can use an existing VRF object as the basis for a new one. You do this by copying a VRF object, renaming the copy, and (optionally) modifying its attributes.
To copy an existing VRF object, perform the following steps:
Step 1
The VRF Management window appears, as shown in Figure 3-3.
Figure 3-3 VRF Management Window
Note
Step 2
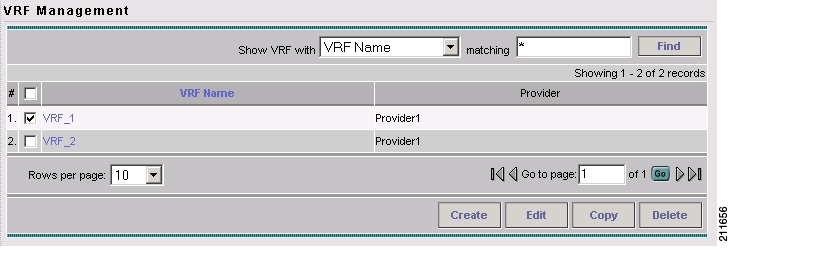
When you select a VRF object, the Edit, Copy, and Delete buttons become active, as shown in Figure 3-4.
Figure 3-4 VRF Object Selected in the VRF Management Window
Step 3
The Create VRF window appears. The attribute fields are populated with values from the VRF object being copied.
Step 4
Step 5
Note
Step 6
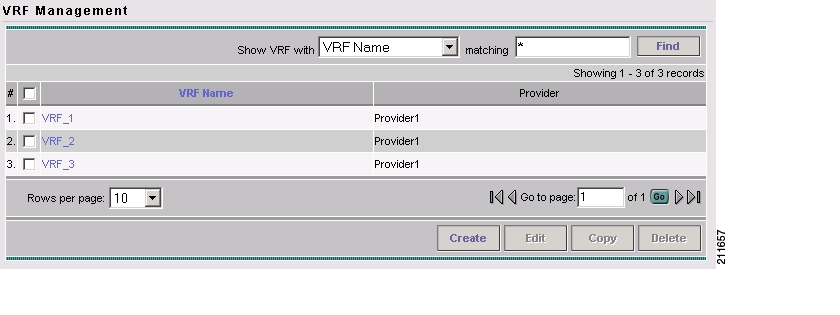
The VRF Management window appears, with the new VRF object (VRF_3) displayed, as shown in Figure 3-5.
Figure 3-5 New VRF Object Displayed in the VRF Management Window
Step 7
Searching for VRF Objects in the ISC Repository
All VRF objects are stored in the ISC repository. You can display these by accessing the VRF Management window at Service Inventory > Inventory and Connection Manager > VRFs in the ISC GUI. You can search for VRF objects using the Show VRF with drop-down list together with the matching field. The Show VRF with drop-down list enables you to display VRF objects by searching for these attributes:
•
•
•
•
•
Note
Modifying Non-Deployed VRF Objects
VRF objects can be modified individually (single VRF edit) or in batch mode (multi-VRF edit). This section covers the basic steps for modifying VRF objects which have not yet been deployed via a VRF service request or associated with MPLS VPN links. There are some special considerations when modifying VRFs which have been deployed, as described in Modifying Deployed VRF Objects.
Single-VRF Edit Mode
To edit one VRF object, perform the following steps:
Step 1
The VRF Management window appears.
Step 2
The VRF Edit window appears. This window is similar to the Create VRF window shown in Figure 3-2.
Step 3
Step 4
Multi-VRF Edit Mode
The multi-VRF edit feature allows you to modify common attributes on more than one VRF. For example, multi-VRF edit is useful for adding and/or removing route targets on multiple VRFs.
To edit multiple VRF objects simultaneously, perform the following steps:
Step 1
The VRF Management window appears.
Step 2
The Edit VRFs window appears, as shown in Figure 3-6.
Figure 3-6 Edit VRFs
The Edit VRFs window is similar to the Create VRF and Edit VRF windows. However, there is an additional field, VRF Details, and the format of the RT import/export fields are laid out differently. Also, some attributes are not available for editing in multi-VRF edit mode.
Step 3
The VRF Details window appears. This lists the VRFs being edited and displays the following attributes for each VRF:
•
•
•
•
•
•
•
•
Step 4
You can enter more than one RT in each field. For multiple RTs, use a comma (,) separated list.
Step 5
Note
Step 6
Modifying Deployed VRF Objects
After a VRF object is deployed on a PE device through a VRF service request (see Deploying VRF Service Requests), there are some special considerations to be aware of when modifying the VRF object.
•
•
•
Note
To modify a deployed VRF object, perform the following steps:
Step 1
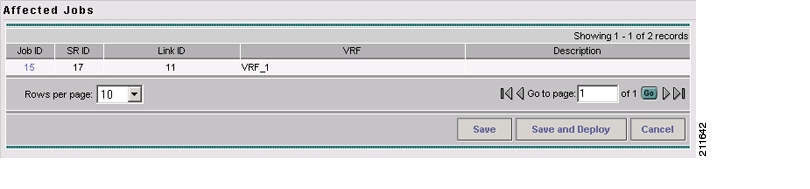
Figure 3-7 Affected Jobs Window
The window displays the affected VRF service requests associated with the VRF object being modified. The Job ID, SR ID, Link ID, VRF Name, and Description information for each VRF service request are listed.
Step 2
The Service Request Details window appears.
Step 3
Step 4
a.
b.
c.
Deleting VRF Objects
To delete VRF objects from the ISC repository, perform the following steps:
Note
Step 1
Step 2
The Inventory and Connection Manager window appears.
Step 3
The VRF Management window appears.
Step 4
The Delete VRF confirmation window appears.
Step 5
If the VRF objects are not in use, the selected VRF objects are deleted.
Deleting VRF Objects Associated with VRF Service Requests
A VRF object cannot be deleted if it is still associated with any VRF service request. If you attempt to do so, you receive a Delete VRF Failed message in the Status window. In this case you must first decommission, deploy, and purge all of the related VRF service requests before you can delete the VRFs object. Use the information provided in the error message to identify the VRF services requests and links related to the VRF object you are attempting to delete.
Working with VRF Service Requests
Saved VRF objects are deployed on a Provider Edge (PE) device through a special type of service request called a VRF service request. This section covers the following topics:
•
•
•
•
•
•
•
Overview of VRF Service Requests
The VRF service request allows the VRF object to be configured on a router without having to select a physical interface. Each VRF service request consists of one or more links. Each link consists of the following elements:
•
•
•
In addition, VRF service requests are associated to a customer.
Note
The VRF service request states follow the normal ISC service request state transitions, as described in the Service Request Transition States.
Defining VRF Service Requests
To define a VRF service request, perform the following steps:
Step 1
Step 2
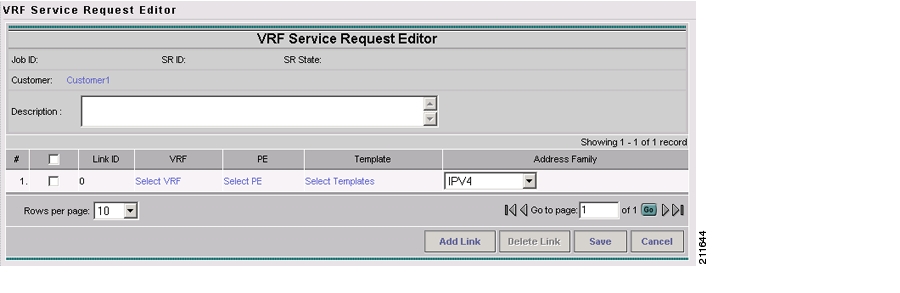
The Service Request Editor window appears, like the one shown in Figure 3-8.
Figure 3-8 Service Request Editor Window
Note
This window allows you to define the VRF service request by setting up one or more links, each consisting of a VRF object, PE device, and an optional template. You also specify the address scheme for each link (only if the PE is running IOS XR). You can deploy any number of links with any combination of PE devices and VRF objects. An important point to note is that no physical interface on the router needs to be selected.
To set up a link, continue with the steps in the procedure, as follows:
Step 3
The Select Customer window appears. Choose the desired customer and click the Select button. This attribute is optional.
Step 4
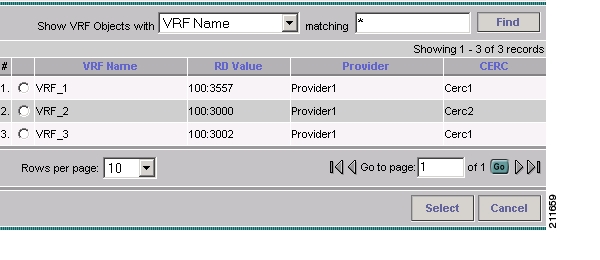
This brings up the Select Independent VRF window, like the one shown in Figure 3-9.
Figure 3-9 Select Independent VRF Window
Step 5
If desired, you can limit the VRF objects displayed by searching by VRF Name, Provider, Route Distinguisher, Route Target, or CERC using the Show VRFs with and matching fields.
Note
Step 6
The Select PE Device window appears.
Step 7
If desired, you can limit the PE devices displayed by using the Show PEs with and matching fields.
This step specifies the PE device on which to deploy the VRF object selected in Steps 4 and 5.
Note
Step 8
The Add/Remove Templates window appears. This is the standard ISC window for selecting a data file and specifying operations such as append and prepend. For more information on working with templates in ISC, see the Cisco IP Solution Center Infrastructure Reference, 5.0.1.
Step 9
The choices are:
•
•
•
The IPv4 and IPv6 option causes the VRF object to be deployed with both IPv4 and IPv6 configurations.
Note
Step 10
Step 11
The Service Requests window appears and you see the VRF service request displayed with Job ID, State, Type and other attributes. The VRF service request is initially in the Requested state.
Step 12
Deploying VRF Service Requests
To deploy a VRF service request, perform the following steps:
Step 1
Step 2
The Deploy Service Request task window appears.
Step 3
To immediately start the deploy task, keep the defaults and click Save. The Service Request window reappears and the VRF Service Request moves to the Deployed state.
Step 4
Modifying VRF Service Requests
To add links or modify existing link attributes for a VRF service request, perform the following steps:
Step 1
Step 2
The VRF Service Request Editor window appears.
Step 3
Note
Step 4
Decommissioning and Deleting VRF Service Requests
VRF service requests are decommissioned and deleted like other ISC service requests.
Note
To decommission a VRF service request, perform the following steps:
Step 1
Step 2
The Confirm Request window appears.
Step 3
The Service Request window appears, showing the VRF service request with a DELETE operation type.
Searching for VRF Service Requests by VRF Object Name
To search for and display VRF service requests in the ISC repository by VRF object name, perform the following steps:
Step 1
Step 2
Step 3
To search only VRF service requests, choose VRF in the of Type field.
Step 4
Viewing the Configlet Generated by a Deployed VRF Service Request
To view the configlet generated by a deployed VRF service request, perform the following steps:
Step 1
Step 2
Step 3
The Service Request Details window appears.
Step 4
The Service Request Configlets window appears. This window displays a list of devices for which configlets have been generated.
Step 5
By default, the latest generated configlet is displayed.
Note
Step 6
Step 7
Using VRFs with MPLS VPN Service Requests and Policies
VRF objects which have been deployed can be used within MPLS VPN service requests and service policies. This section covers the following topics:
•
•
•
•
•
Relationship of VRF Object and Service Requests and PE Device
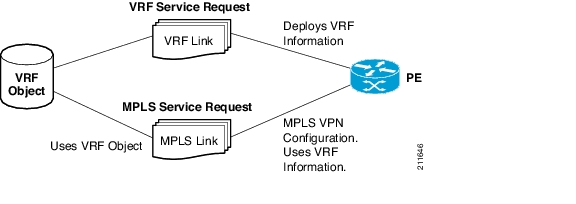
Figure 3-10 shows the relationships between the VRF object, MPLS service request, VRF service request, and the PE device. Refer to this figure to understand concepts discussed in the procedures that follow.
Figure 3-10 VRF Object, VRF Service Request, MPLS VPN Service Request, and PE
Specifying VRF Objects within MPLS VPN Service Requests
VRF objects can be selected during the creation of the MPLS VPN service request at the time when the VRF and VPN attributes are set. At that stage, you can either set the VPN attributes individually (as in previous releases of ISC) or else use an existing VRF object. In the latter case, the MPLS VPN link "inherits" the VPN and VRF data from the VRF object. The VRF object might be either undeployed or deployed. If the VRF object is not deployed, ISC will deploy it automatically. For additional information about the function of VRF objects with MPLS VPN service requests, see Notes On Using a VRF Object in an MPLS Service Request.
To create an MPLS VPN service request using a VRF object, perform the following steps:
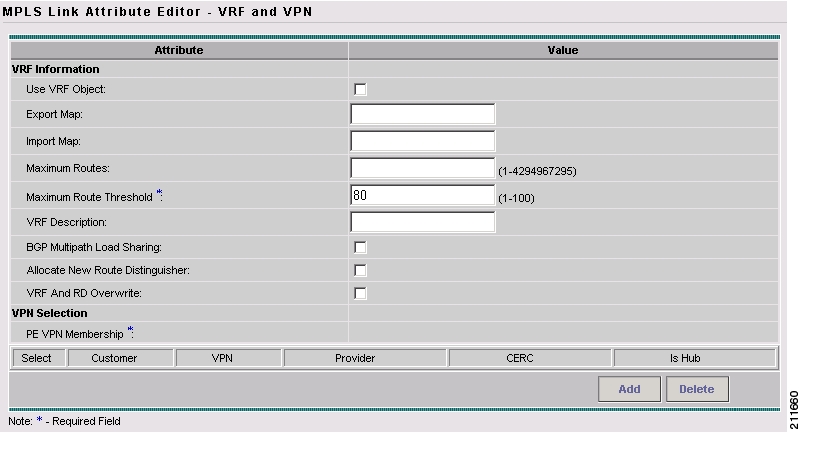
Step 1
Figure 3-11 MPLS Link Attribute Editor - VRF and VPN Window
Note
Step 2
In this case, set the attributes for the VPN, as normally done with MPLS service requests. These steps are covered in other sections of this guide.
Step 3
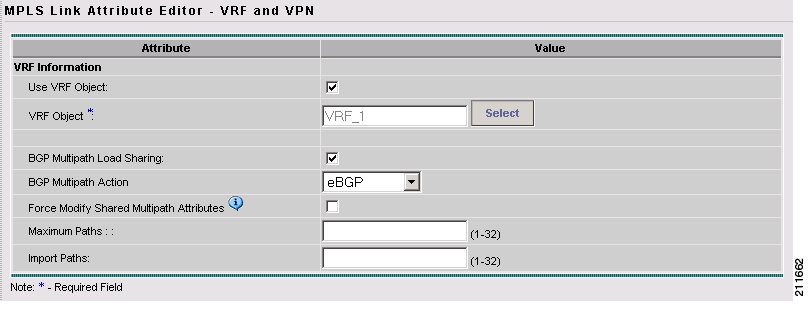
All of the standard VPN and VRF attributes, except BGP Multipath Load Sharing, are hidden, and the VRF Object attribute appears, as shown in Figure 3-12.
Figure 3-12 MPLS Link Attribute Editor - VRF and VPN Window (Use VRF Object Selected)
Step 4
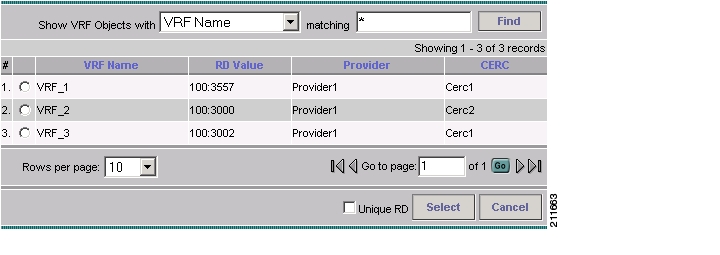
The Select Independent VRF window appears, as shown in Figure 3-12.
Figure 3-13 Select Independent VRF Window
This Select Independent VRF window lists all of the VRF objects deployed on the PE, along with their RD value, provider and CERC information.
Step 5
Note
Be aware of the following use case scenarios when enabling the Unique RD feature:
•
•
•
•
•
Step 6
Note
Step 7
Step 8
This activates additional attributes as shown in Figure 3-14.
Figure 3-14 MPLS Link Attribute Editor - VRF and VPN Window (Multipath Attribute Selected)
For information on setting these attributes, see BGP Multipath Load Sharing and Maximum Path Configuration, page 5-32.
Note
Step 9
The MPLS Service Request window appears showing that the service request is in the Requested state and ready to deploy.
Notes On Using a VRF Object in an MPLS Service Request
Be aware of the following considerations when using VRF objects with MPLS VPN service requests:
•
•
•
•
Searching for MPLS VPN Service Requests by VRF Object Name
To search for and display VRF service requests in the ISC repository by VRF object name, perform the following steps:
Step 1
Step 2
Step 3
To search only MPLS VPN service requests, choose MPLS VPN in the of Type field.
Step 4
Specifying VRF Objects within MPLS VPN Service Policies
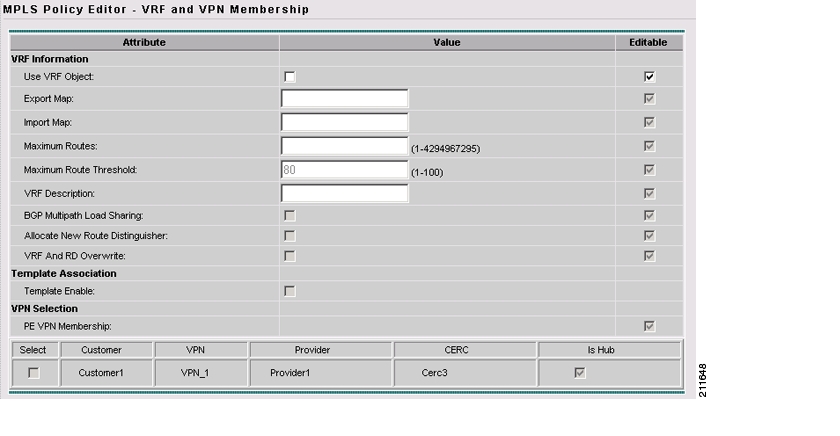
VRF object selection is supported while defining MPLS VPN policies. This is done during the MPLS VPN policy workflow in the MPLS Policy Editor - VRF and VPN Membership window, as shown in Figure 3-15.
Figure 3-15 MPLS Policy Editor - VRF and VPN Window
The procedure for using the VRF Object attribute is similar to what is covered in Specifying VRF Objects within MPLS VPN Service Requests. See that section for details on using these attributes.
If you select a VRF object for the MPLS policy, it will subsequently be used by MPLS VPN service requests that use that policy. As per standard ISC policy usage, you can check the Editable check box next to the VRF Object attribute to ensure that service requests based on the policy use the same VRF object specified in the policy.
Note
Migrating Existing MPLS VPN Service Requests to the VRF Object Model
ISC provides a migration script to migrate traditional MPLS VPN service requests to the independent VRF model. The script takes as input one or more MPLS VPN service request ID numbers and creates appropriate VRF objects and VRF service requests for each service request. The script is located in the $ISC_HOME/bin directory. The script and its syntax is as follows:
runMplsSRMigration <srid1> [srid2] [srid3] ...
Where <srid1> is the first MPLS VPN service request ID, [srid2] is the second service request, and so on.
ISC performs the following tasks for each MPLS VPN service request passed to the script:
•
•
•
•
•
![]()
![]()
![]()
![]()
![]()
![]()
![]()
![]()
Posted: Mon Feb 18 15:22:15 PST 2008
All contents are Copyright © 1992--2008 Cisco Systems, Inc. All rights reserved.
Important Notices and Privacy Statement.