|
|

This chapter describes how to physically install your IE2100 Series system.
Follow these guidelines when installing and servicing the system.
 |
Warning Before working on a system that has an on/off switch, turn OFF the power and unplug the power cord. |
|
Warning Do not touch the power supply when the power cord is connected. For systems with a power switch, line voltages are present within the power supply even when the power switch is off and the power cord is connected. For systems without a power switch, line voltages are present within the power supply when the power cord is connected. |
Follow these guidelines to ensure proper airflow:
Follow these guidelines to stabilize the equipment rack:
Follow these guidelines when lifting the system:
Review the documentation that comes with your rack cabinet for safety and cabling information. When installing your system in a rack, consider the following:
|
Warning Do not place any object weighing more than 50 kg (110 lbs) on top of rack-mounted devices. >50 kg (110 lbs) |
You will need the following items to complete the system installation:
To install the mounting rails, complete the following steps:

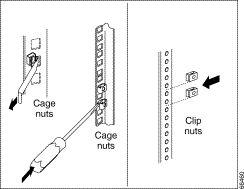
Step 2 Select a one-U location in the rack, then install a cage nut or clip nut (see Figure 2-2) in the top and bottom position of the one-U location you selected (both sides, front and rear of the rack).
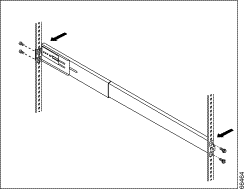
Step 3 Insert the bracket tab through the center hole between the two clip nuts on the rear rail (see Figure 2-3). (The right and left rails are labeled.)

Step 4 Loosely install two mounting screws through the back end of the bracket (see Figure 2-4).
a. Position the mounting bracket so that it lines up with the clip nuts.
b. Install the remaining mounting screws, then tighten all the screws with a screwdriver.
c. Repeat these steps for each mounting bracket.
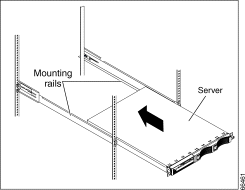
Step 5 Place the system on the mounting brackets and slide it in as far as it will go (see Figure 2-5).
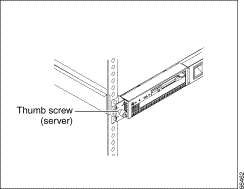
Step 6 Tighten the thumb screws on the front of the system to secure it to the rack (see Figure 2-6).
Step 7 If you want to ship your rack with the system installed, you must install the shipping brackets on each side of the system.
This is done by inserting the shipping bracket tab into the slot on the back of the system. Then use the blue thumb screw to secure the back of the system and the shipping bracket to the mounting bracket (see Figure 2-7).

Step 8 Repeat these steps for each system to be installed in the rack.
For information about I/O ports and connecting your system, see "Connecting Cables" section.
|
Warning Do not work on the system or connect or disconnect cables during periods of lightning activity. |
Your system has two different cabling options, the Advanced System Management (ASM) bus and the Cable Chain Technology (C2T). The following sections discuss each of these options. While reading about these options, keep in mind that they are independent of each other.
To connect the ASM bus, complete the following steps:

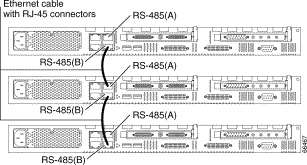
The ASM ports on the back of the system are referred to in this book as RS-485 (A) and RS-485 (B).
Step 2 Connect the power cords and all external cables to the system; then, plug the power cords into properly grounded electrical outlets.
Step 3 Continue with "Cabling the RS-485 Ports" and "Connecting the Systems with a C2T Chain" section.
You can use the RS-485 connectors to create an ASM bus between several IE2100 Series systems.
Before you begin, review the following:
For more information about the Remote Supervisor adapter, see the documentation that comes with the adapter.
The systems in the ASM bus are referred to by their assigned addresses and not their position in the rack.
After you install the system in the rack, complete the following steps to connect the ASM bus:
Step 2 Locate the RS-485 connectors on the rear of the systems and several unshielded twisted pair (UTP) cables with RJ-45 connectors.
Step 3 Starting at the topmost system to be included in the ASM bus, plug one end of the cable into the RS-485 (B) connector and the other end of the cable into the RS-485 (A) connector of the next system.
Step 4 Continue connecting the systems together in this manner until you reach the second-to-last system in the ASM bus.
Step 5 Connect a cable from the RS-485 (B) connector of the second-to-last system to the RS-485 (B) connector of the last system. Refer to Figure 2-9 to see how to connect the ASM bus.
Step 6 Turn on the systems. See "Turning on the System" section.
To share the same monitor, keyboard, and pointing device with several systems, you must connect the systems together with Cable Chain Technology (C2T) chaining cables through the C2T (In) and C2T (Out) connectors.
Before you begin, review the following:
 |
Note Only one 2-m (6.5-ft.) cable can be used in the C2T chain. |
Operational notes:
Complete the following steps to connect the systems:
Your system comes with a short C2T chaining cable that can span approximately 3 U, if needed. A longer C2T cable is available in the C2T cable kit.
Step 2 Connect the systems together:
a. Connect one end of the C2T chaining cable to the C2T (Out) connector of the top system.
b. Connect the opposite end of the C2T chaining cable to the C2T (In) connector of the system below it.
c. Repeat these steps until all of the systems are connected together.
d. Connect the C2T breakout cable to the system 1 C2T (Out) connector (see Figure 2-10).
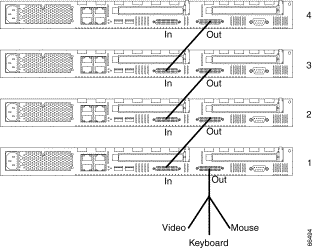
System 1 (usually the system at the bottom of the rack) is the system to which you connect the C2T break out cable.
Step 3 Turn the systems on and check the operation of the monitor, pointing device, and keyboard with each system. See "Turning on the System" section for instructions to turn on the system. See "Testing the C2T Chain" for testing instructions.
 |
TimeSaver Write-on adhesive labels have been provided so that you can label the system position in the rack. |
After connecting the C2T chain, you will need to test the monitor, keyboard, and pointing device to be sure that they work with each of the systems.
Follow these steps to test the C2T cabling:
Step 2 Check the monitor to see if it is working.
Step 3 Use the mouse or pointing device to open an application.
Step 4 Test your keyboard by typing a few words within an application.
Step 5 Repeat steps 1 through 4 for each of the systems in the chain.
|
Note If you cannot use the devices, check your cable connections and retry the test. If the problem persists, turn off the systems and connect the C2T breakout cable directly to the C2T (Out) connector of the system. Turn on (power up) the system and retry the devices. If the devices work, you probably have a bad C2T chaining cable. Replace the cable and retry the devices in the C2T chain configuration. |
Use the cable ties and hook-and-loop straps that are supplied with your system to secure the cables.
|
Note Do not secure cables too tightly. Over tightening can cause internal damage to cables. |
Connect the AC power receptacle to the AC power source with the provided power cable.
|
Warning Never defeat the ground conductor or operate the equipment in the absence of a suitably installed ground conductor. Contact the appropriate electrical inspection authority or an electrician if you are uncertain that suitable grounding is available. |
|
Warning Do not touch the power supply when the power cord is connected. For systems with a power switch, line voltages are present within the power supply even when the power switch is off and the power cord is connected. For systems without a power switch, line voltages are present within the power supply when the power cord is connected. |
|
Warning Before working on equipment that is connected to power lines, remove jewelry (including rings, necklaces, and watches). Metal objects will heat up when connected to power and ground and can cause serious burns or weld the metal object to the terminals. |
![]()
![]()
![]()
![]()
![]()
![]()
![]()
![]()
Posted: Wed Jun 19 10:18:17 PDT 2002
All contents are Copyright © 1992--2002 Cisco Systems, Inc. All rights reserved.
Important Notices and Privacy Statement.