cc/td/doc/product/rtrmgmt/cwfw
hometocprevnextglossaryfeedbacksearchhelp
PDF

Table of Contents

Using CiscoWorks Windows Applications

Using CiscoWorks Windows Applications

CiscoWorks Windows is a suite of integrated PC-based network configuration and diagnostic tools for small to medium-sized networks or remote workgroups.

This chapter contains the following sections on CiscoWorks Windows applications and features:

The CiscoWorks Windows Show Commands and Health Monitor applications can only run under CastleRock SNMPc. Configuration Builder and CiscoView can run as standalone applications or within the SNMPc platform.


Note For detailed information on all CiscoWorks Windows applications, see the context-sensitive online help system. This comprehensive online help system provides procedures, overview material, and links to related information.

Starting Applications

To start an application in CiscoWorks Windows, go to the Toolbar and double click on the icon for the application. If the icon is grayed out, or if the icon is not displayed, the application is not supported on this device.

Configuration Builder

With Configuration Builder, you can create configuration files for multiple Cisco routers, access servers, hubs and devices without having to remember complicated command-line syntax for the devices. Using Configuration Builder, you can configure Cisco devices with the most common Cisco IOS features. See Table 3-1 through Table 3-9 for a brief overview of supported Configuration Builder features. You can launch Configuration Builder or from auxiliary and console ports.


Note Advanced features or features added in Cisco IOS releases later than those listed in the online help or "Supported Cisco Internetworking Operating System Versions and Devices" section of the Cisco Connection Documentation, are supported through the Configuration Builder Add Commands window—see the online help system for more details.

Configuration Builder provides the following features:

  You can configure multiple devices simultaneously for remote source-route bridging and Synchronous Data Link Control (SDLC) Transport. For example, when you configure a new router into an existing remote source-route bridging (SRB) virtual ring group, configuration files of all devices in the same virtual ring group are automatically updated.
  You can quickly import predefined priority queuing lists, Internet Protocol (IP) or Internetwork Packet Exchange (IPX) access lists, IPX Service Advertisement Protocol (SAP) filters, and AppleTalk filters into multiple configuration files. This ensures consistency among devices that share common configuration parameters.
  You can check for duplicate IP, IPX, and AppleTalk addresses in all open configuration files. You can also check for valid entries for common configuration parameters such as addresses, costs for DECnet and Open Shortest Path First (OSPF), and AppleTalk cable ranges.
  You can automatically move through the sequence of dialog boxes that need to be filled out to create a configuration file. To do so, complete the initial configuration dialog box and then do one of the following after you complete each configuration dialog box:
  You can detect the model, software version and image type, and the number and type of installed interfaces on the router you are configuring. You can also learn the number of lines on an access server, and whether or not a hub is connected to a device. This information is automatically placed in the configuration file.
  You can configure remote devices if the PC is running a TCP/IP stack that is WINSOCK-compliant and has access via TCP/IP to the router you are configuring. The router must have the following minimum configuration:
  You can perform the following configuration tasks for Cisco hubs and access servers:

Note For detailed information on all Configuration Builder features, see the context-sensitive online help system. This comprehensive online help system provides procedures, overview material, and links to related information. Open Configuration Builder and select Help.

Configuration Builder Files

Configuration Builder generates and stores the following files in the \data directory:

*.cdf

configuration files (binary)

*.cfg

configuration files (text)

*.cbk

configuration backup files

snmphost.chl

SNMP host names file

zones.apt

AppleTalk zones file

Configuration Builder generates and stores the following files in the \data\snapin directory:

*.aal

AppleTalk access lists

*.ial

IP access lists

*.nal

IPX access lists

*.nsl

IPX SAP filter lists

*.pql

Priority queuing lists

The \data\srb directory contains files with the extension *.srb. These files define remote source-route bridging (SRB) groups.

The \data\sdlc directory contains files with the extension *.s. These files define SDLC tunnel groups.


Note If you create additional Configuration Builder icons through the Windows Program Manager, be sure to include the directory name in which you installed Configuration Builder and the ciscocb.exe command. The working directory must specify the \data subdirectory.

Configuration Builder Main Window

The Configuration Builder main window is illustrated in Figure 3-1. The number and types of network icons displayed in the main window vary according to your network configuration.


Figure 3-1: Configuration Builder Main Window

The Configuration Builder main window consists of the following elements:


Table 3-1: Configuration Builder File Menu Items
Items Explanation

New

Create a new configuration file.

Open

Open an existing file.

Close

Close an existing file.

Save

Save changes to a file.

Save Backup

Create a backup of a configuration file.

Save As Text

Save a configuration file as a text file so it can be edited with a word processor or stored on a network server.

Delete

Delete a configuration file.

Communication Timeouts

Specify the timeouts to be used for data transfer from the Configuration Builder to the router.

Send

Send a configuration file to a local or remote router.

Print

Print a configuration file.

Print Setup

Set up printer parameters.

Exit

Exit Configuration Builder.


Table 3-2: Configuration Builder Global Menu Items
Item Explanation

Guided Configuration

Step through the guided configuration.

Basic

Set basic system parameters, including host names, passwords, and banner.

SNMP

Specify SNMP parameters for network management data, set community strings, and restrict SNMP access to the device.

Priority Queuing

Create new priority output queuing lists or import snap-in lists.

Modify Interfaces

Add or delete device interfaces and specify device type, software version, and image type. Specify device interfaces and lines. Change the sequence of the guided configuration.

Add Commands

Configure advanced features and features added in later Cisco IOS releases.

Hub

Enable hub configuration features.


Table 3-3: Configuration Builder Routing Menu Options
Item Explanation

IP:
Configuration Routing Protocols

Access Lists


Configure primary and secondary IP addresses.
Configure Routing Information Protocol (RIP), Interior Gateway Routing Protocol (IGRP), and/or OSPF.
Create new access lists or import snap-in lists.

AppleTalk:
Configuration Distribute-Out Filters


Configure AppleTalk addresses, cable ranges, and zones.
Create access lists for filtering AppleTalk packets.

IPX:
Configuration
Access Lists
SAP Filters


Configure IPX addresses.
Create new access lists or import snap-in lists.
Create new SAP filters or import snap-in lists.


Table 3-4: Configuration Builder Access Server Menu Options
Item Explanation

Line Characteristics:
Chat Script Manager
Line Configuration


Configure modem or login chat scripts.
Configure line characteristics for TTY and auxiliary lines.

Remote Node:
Extended BootP Manager


ARA
Line Configuration


Configure an access server for BootP to allow Serial Line Internet Protocol (SLIP) and Point-to-Point Protocol (PPP) requests from clients.
Configure AppleTalk Remote Access (ARA).
Configure remote nodes for TTY and auxiliary lines.

Terminal Services:
LAT Manager
XRemote Manager
Line Configuration


Configure Local Area Transport (LAT).
Configure XRemote protocol.
Configure terminal services for console, TTY, auxiliary, and virtual terminal lines.

Security:
Local User Name Manager
TACACS Manager

Line Configuration


Assign usernames and passwords.
Configure login method, line passwords, Point-to-Point PPP authentication, and assign IP access lists.
Configure security for console, TTY, auxiliary, and virtual terminal lines.

Dial-on-Demand:
Dialer Rotary Group
IP
IPX


Configure the dialer rotary group.
Configure DDR for IP.
Configure DDR for IPX.

Protocol Translation

View configuration protocol translation features.


Table 3-5: Configuration Builder Bridging Menu Items
Item Explanation

Transparent Bridging:
Configuration
Bridge Groups


Configure transparent bridging.
Create bridge groups and set spanning-tree and circuit options.

Source-Route:
Simple
Remote


Configure simple SRB options.
Configure remote SRB options. Remote source-route bridging provides multiple router configuration capability. That is, equivalent statements in the configuration files of devices in the same virtual ring are automatically updated.

SR/TLB

Configure source-route translational bridging (SR/TLB).


Table 3-6: Configuration Builder WAN Menu Items
Item Explanation

Wide-Area Protocols

Configure wide-area network (WAN) protocols, including High-Level Data Link Control (HDLC), PPP, X.25, Frame Relay, and Switched Multimegabit Data Service (SMDS).

Dial-on-Demand

Configure DDR destination subnet, subnet mask, telephone numbers, destination router IP address, and timers.

Dial Backup

Configure dial backup interfaces and delay options.

SDLC Transport

Configure devices for SDLC transport, a subset of serial tunneling (STUN). Provides multiple router configuration capability. That is, equivalent statements in the configuration files of other SDLC devices are automatically updated.


Table 3-7: Configuration Builder View Menu Items
Item Explanation

By Protocol

Display configuration commands grouped by protocol type.

By Interface

Display configuration commands grouped by interface.

Configuration

Display the configuration as a text file.

Toolbar

Display or hide the toolbar.

Status Bar

Display or hide the status bar.

Expert Mode

Select expert mode to enable an additional path for configuring global access server features.


Table 3-8: Configuration Builder Window Menu Items
Item Explanation

Cascade

Resize and layer windows so that each title bar is visible.

Tile

Resize and arrange windows side by side.

Arrange Icons

Arrange icons evenly.

File selection

Select a previously opened configuration file.


Table 3-9:
Configuration Builder Help Menu Items
Item Explanation

Contents

Open the Configuration Builder help system table of contents.

Cisco Support Information

Find out how to contact Cisco Systems for product support and how to obtain additional documentation.

Using Help

Learn how to use the online help system.

About Configuration Builder

Display Configuration Builder software release and copyright information.

Show Commands

With Show Commands, you can quickly display detailed system and protocol information for routers without having to remember complicated command-line syntax for each device. Launch Show Commands by clicking on the Show icon in the CiscoView toolbar.

What's in This Release

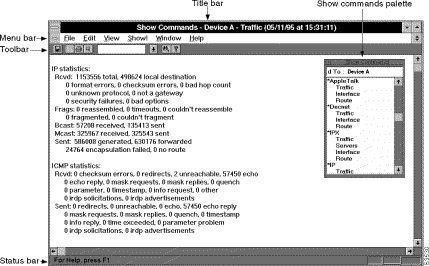
You can display the following system information for devices:

  Shows which version of the device you are using.
  Shows the configuration information of the device, card or port.

Note For detailed information on all Show Commands features, see the context-sensitive online help system. This comprehensive online help system provides procedures, overview material, and links to related information. Open Show Commands and select Help.

Show Commands Main Window

The Show Commands main window is illustrated in Figure 3-2.


Figure 3-2: Show Commands Main Window

The Show Commands main window consists of the following elements:


Table 3-10: Show Commands File Menu Items
Item Explanation

Close

Closes the Show Commands window.

Save

Save changes to a file.

Save As

Save Show Commands output to a new filename.

Connect

Connect to a specific device.

Print

Send a Show Commands screen display to a printer.

Print Preview

View the file before printing. Zoom in or out and scan pages.

Print Setup

Set printing options.

Exit

Exit the Show Commands application.


Table 3-11: Show Commands Edit Menu Items
Item Explanation

Copy

Copy text from an active window.

Select All

Select all text within an active window.

Find

Find a keyword within an active window.


Table 3-12: Show Commands View Menu Items
Item Explanation

Toolbar

Display or hide the toolbar.

Status Bar

Display or hide the status bar.

Show Command Palette

Display the Show Commands Palette floating window.


Table 3-13: Show Commands Show Menu Items
Item Explanation

Show!

Display the Show Commands window from which you can execute and display output from a specific show command.


Table 3-14: Show Commands Window Menu Items
Item Explanation

Cascade

Resize and layer windows so that each title bar is visible.

Tile

Resize and arrange windows side by side.

Arrange Icons

Arrange icons evenly.

Close All

Close all open Show Commands windows.

Refresh

Refresh the active Show Commands window. The time and date are updated.

window selection

Select a previously opened Show Commands window.


Table 3-15:
Show Commands Help Menu Items
Item Explanation

Contents

Open the Show Commands help system table of contents.

Help for Current Show Command

Open the help window specific to the active show command window.

Cisco Support Information

Find out how to contact Cisco Systems for product support and how to obtain additional documentation.

Using Help

Learn how to use the online help system.

About Show Commands

Display Show Commands software release and copyright information.

Health Monitor

Health Monitor is a dynamic fault and performance management tool that provides real-time statistics on device characteristics, interface status and utilization, and protocol utilization. Launch Health Monitor by clicking on the Health Monitor icon in the CiscoView toolbar.

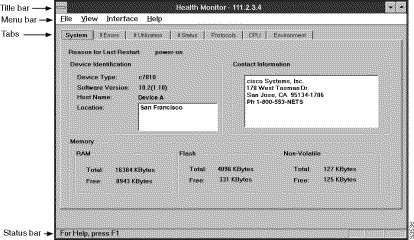
With Health Monitor, you can customize feedback on device and interface status with settings in the Preferences dialog box:

  Fatal and warning indications are provided by color changes. Color indications include:
  Color indications are provided within the IfErrors, IfUtilization, IfStatus, and Environment tabs. For the overall health of a device, color indication is also provided within the Health Monitor application icon.

What's in This Release

Health Monitor provides the following device and interface information:

  Provides device name, type, Cisco IOS version, location, and device contact information. Lists total and available RAM, flash memory, and NVRAM. Also provides a reason for the last restart of the device.
  Graphs interface error rates and provides color warning and fatal threshold indications for interface error rates.
  Graphs interface utilization and provides color warning and fatal threshold indications for interface utilization.
  Graphs the number of bytes per protocol that an interface has sent or received. Provides interface status by color indication: up (green), test (magenta), dormant or waiting for an external event (cyan), administratively down (brown), and operational failure (red).
  Graphs the number of packets per protocol that the device has forwarded.
  Graphs the device CPU utilization in 5-second, 1-minute, and 5-minute intervals.
  Depicts air temperature and power supply voltage readings for a device. Provides color warning and fatal threshold indications for these readings.

Note For detailed information on all Health Monitor features, see the context-sensitive online help system. The comprehensive online help system provides procedures, overview material, and links to related information. Open Health Monitor and select Help.

Health Monitor Main Window

The Health Monitor main window is illustrated in Figure 3-3.


Figure 3-3: Health Monitor Main Window

The Health Monitor main window consists of the following elements:


Table 3-16: Health Monitor File Menu Items
Item Explanation

Connect

Connect to a specific device.

Preferences

Set the threshold value, interface sorting, polling frequency, and timeout preferences.

Exit

Exit the Health Monitor application.


Table 3-17: Health Monitor View Menu Items
Item Explanation

Status Bar

Display or hide the status bar.


Table 3-18: Health Monitor Interface Menu Items
Item Explanation

Utilization

View interface utilization.

Protocols

Determine interface protocol usage.

Errors

View interface error rates.

Show

View show interface command statistics for an interface.


Table 3-19:
Health Monitor Help Menu Items
Item Explanation

Contents

Open the Health Monitor help system table of contents.

Help on Current Tab

Open the help window specific to the active Health Monitor tab.

Cisco Support Information

Find out how to contact Cisco Systems for product support and how to obtain additional documentation.

Using Help

Learn how to use the online help system.

About Health Monitor

Display Health Monitor software release and copyright information.


Table 3-20:
Health Monitor Tabs
Tab Explanation

System

View information on restarts, device identification, contact information, and memory usage.

IfErrors

View interface error rates.

IfUtilization

View interface utilization.

IfStatus

Determine interface status (up, down, dormant, failure, or test). Determine interface protocol usage.

Protocols

View traffic forwarded per protocol for a device.

CPU

Measure the device CPU load.

Environment

Check the device temperature and power supply voltage.

Using Online Help

Context-sensitive online help provides you with step-by-step instructions on how to use CiscoWorks Windows applications. The online help system also provides a glossary and keyword search capability. The following table provides a quick guideline to access help from a number of vantage points:

For Information About Do This

The help system for specific products

Select Help>Contents

How to use the help system

Select Help>Using Help

How to use CiscoWorks Windows applications

Open the CiscoWorks Windows application and select Help

Current CiscoWorks Windows versions

Select Help>About CiscoWorks Windows

The current device package version

Select Help>About Cisco Works Windows

How to view configuration and performance, dashboard windows and field descriptions

Click the Help button in the dialog window

How to change a component value

Press the Help button over the field

How to use help view

Select Help>On Help


Note Report any online help or documentation bugs to cs-ciscoworks@cisco.com or bug-doc@cisco.com

Jumps and Popups

Two key concepts in using the help system are jumps and popups. Click on a highlighted underlined topic to jump to a help window specific to that topic. When you jump to another topic, you have to click Back on the Menu Bar to go back to the previous help topic. Click on a dotted underlined term to open a popup help window, which provides a definition of that term. When you go to a popup, hit return to return to your previous help topic.

Help Contents Tab

The Help Contents Tab has three functional tabs:

  For information on how to use this table select Help>On Help.

Help Window Menu and Button Bars

Each help window has a menu bar and a button bar. The menu bar provides standard help functions for printing help topics, copying and pasting text from help topics, making online notes about particular help topics, and placing bookmarks.

The button bar provides the following buttons:

OverView and See Also Links

Many help windows have Overview and See Also links in the help window topics. You can select the Overview link to obtain background information for the procedure described in the current help window. Select the See Also link to view a list of related topics and go directly to those topics from the current help window.

Exit Help

Select File>Exit on the Menu Bar in the Help window to exit Help.


hometocprevnextglossaryfeedbacksearchhelp
Posted: Wed Sep 25 21:26:57 PDT 2002
All contents are Copyright © 1992--2002 Cisco Systems, Inc. All rights reserved.
Important Notices and Privacy Statement.