|
|

StackMaker is an application that works with the CiscoView software to provide enhanced manageability for devices. StackMaker enables you to display a set of individual, stackable devices and create a stack containing these devices. When you use StackMaker, CiscoView retrieves the stack name for the devices and displays the individual devices in the StackMaker window. Devices supported by StackMaker include (but are not limited to) the Catalyst 1900, Catalyst 2800, and Catalyst 2820.
StackMaker enables you to do the following:
This appendix contains the following sections:
To access StackMaker from CiscoView, complete the following steps:
Step 2 Display a stackable device.
A stackable device is a device containing the StackMaker MIB. However, a device cannot be a member of more than one stack at the same time. Each device you want to add to the stack must have an IP address, and you must preset the SNMP community strings by using the command line interface (CLI) for the device.
Step 3 From the stackable display, select View>Stack.
A small CiscoView dialog box appears that contains the following buttons:
Step 4 Click StackMaker to access, create, or change stack information.
The StackMaker window appears, displaying all devices in the stack in the order listed in the StackMaker MIB. StackMaker also displays every device and hardware platform for the device. The seed device is highlighted in the list by default.
The StackMaker Main window is illustrated in Figure A-1. The buttons available in the StackMaker Main window are described in Table A-1 and fields are described in Table A-2.
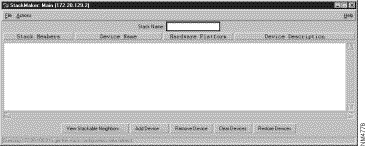
The StackMaker Main window elements include the following areas:
Title Bar | Provides the StackMaker application name and the IP address for the seed device in the stack. The seed device is the starting point of the stack and is used to locate the stack and all members within the stack. By default, the seed device is highlighted with an asterisk by the IP address. |
Menu Bar | Provides access to all StackMaker dialog boxes. Table A-3 through Table A-5 lists and explains the items under each menu. |
Status Bar | Provides a brief description of the currently selected device, and provides an ongoing operational status. |
| Button | Description |
|---|---|
Lists devices that can be added to the stack. | |
Adds a device to a stack. | |
Removes a device from a stack. | |
Clears all devices from a stack. | |
Restores all devices if you do not apply changes. This button undoes the Remove or Clear function. |
Names stacks containing individual devices. | |
Lists individual devices that are in a stack. | |
Provides the host name for the device. | |
Displays the Cisco model name and number. | |
Describes the device. |
| Menu Item | Description |
|---|---|
Prints the stack configuration. The printout is a text list showing the stack name, the stack name, list of inconsistencies, and time and date of printing. | |
Print Setup | Enables you to select a printer and set printing options. |
Exits the StackMaker application. If you change the stack definition but do not update the device information, StackMaker prompts you to apply the new stack configuration to the stack members. If you do not want to apply the update, click No or Cancel. No closes the StackMaker without applying the changes. Cancel returns you to the StackMaker window. |
| Actions | Description |
|---|---|
Lists details for each member in the stack. | |
Verify Stack Configuration | Checks that each member of the stack meets the criteria for a stack member. |
Updates the stack configuration information. | |
Displays the log file that StackMaker maintains for MIB updates. | |
Enables you to set properties such as Polling Frequency, Retries, Timeouts, Read Community, Write Community, Debug and Debug SNMP. |
| Help Name | Description |
|---|---|
Contents | Displays the help contents. |
Using Help | Displays information about how to use online help viewer. |
Using StackMaker | Displays a topic about how to use the StackMaker software. |
About StackMaker | Displays version information about the product and software. |
When you perform certain tasks, StackMaker appends a region at the bottom of the main window. For example, when you select Actions>View Stack Member Details, StackMaker appends details for each member in the stack. Table A-6 describes the buttons and fields in this region.
| Button/Field | Description |
|---|---|
Removes the appended list of stackable neighbors. | |
SubMember Address Field | Lists individual devices (by IP address) that are in the stack. |
SubMember Name Field | Shows the name of the stack. |
SubMember Platform Field | Shows the type of hardware platform that is configured for the device. This information reflects the Cisco model name and number. |
SubMember Description Field | Describes the device. |
When you click View Stackable Neighbors, StackMaker appends a region to the bottom of the StackMaker window, listing stackable neighbors for the device you select. A stackable neighbor is a device that can be reached using the Cisco Discovery Protocol (CDP) and can be stacked using SNMP. Stackable Neighbor buttons are described in Table A-7.
| Button | Description |
|---|---|
Removes the appended list of stackable neighbors. | |
Up Arrow | Enables you to add a device to the stack. |
The viewable neighbors are displayed in a list that contains the following information (Table A-8).
| Field | Description |
|---|---|
Lists the individual devices (by IP address) that are in a stack. | |
Neighbor Name | Displays the name of the stack. |
Neighbor Platform | Displays the type of hardware platform for the device. This information reflects the Cisco model name and number. |
Neighbor Description | Displays a comment that describes the device. |
Two additional windows (Table A-9 and Table A-10) allow you to use the log file associated with StackMaker and change the management properties.
| Button | Description |
|---|---|
Enables you to print the contents of the log file. | |
Clear Log | Clears the contents of the log file. |
Close | Closes the StackMaker Log window. |
Help | Displays the Help topic. |
| Field | Description |
|---|---|
Retries | The retries value indicates how many times CiscoView attempts to reach an unresponsive device. In busy networks, SNMP datagrams can get discarded. The Retries value allows the application to continue operation during network problems. A setting of 5 is considered reasonable. The value can be increased if the device is not being responsive. The default is 3. |
Timeout | The interval value is specified in seconds that CiscoView attempts to reach a device. The default is 3. As a guideline, the timeout value should be set to twice the average end-to-end delay in your network. If you have a network with several slow links, you may need to set the timeout to a higher value. If you have only LAN links in your network, a value of 2 seconds is reasonable to account for processing delays and timer accuracy. |
Read Community | The read community string allows you to view device status. You cannot change device parameters without the write community string. |
Write Community | The write community string allows you to change device parameters. This option allows you to enter the write community string for a device after you display the device. This is useful, for example, if you want to make changes to a device or port setting but did not specify the write community string when you first opened the device display. You can enter the write community string in the Write Community field without exiting and reopening the window. |
Debug | The Debug option prints debug messages to the StackMaker Debug Log file when the option is set to On. The default is Off. |
Debug SNMP | The Debug SNMP option prints SNMP debug messages to the console when the option is set to On. The messages show the SNMP packets that have been sent and received. The default is Off. |
Each device you want to add to the stack must have an IP address, and you must preset the SNMP community strings by using the command line interface (CLI) for the device. When you use Actions>Apply Stack Configuration, StackMaker looks for each stack member. If StackMaker cannot find one of the stack members, the MIB information in that stack member does not change when you use Actions>Apply Stack Configuration. StackMaker updates all other stack members it finds.
| Caution Make sure that all other stack members are updated. If one member in the stack is not updated, conflicts within the stack can occur. |
If CiscoView is not integrated with an SNMP Manager platform, all members of a stack must share the same community strings and timeout and retry values specified in the StackMaker Properties dialog box. Because StackMaker accepts the data you supply, you must ensure that stack members meet the requirements to be included in the stack. For example, you must ensure that devices have not been added to multiple stacks. StackMaker only checks whether a device can belong to a stack. It does not check the StackMaker MIB table to determine if the device has already been added to another stack.
If an SNMP Manager platform is not available, all members of a stack must share the same community strings and timeouts and retry values.
Because StackMaker accepts the data you supply, you must manually maintain data integrity across devices. You must ensure that the data is consistent and that devices have not been added to multiple stacks. It does not process the information stored in the MIB table.
To add a device to a stack, do the following:
The Add Device dialog box appears.
Step 2 Enter the IP address for the device you want to add.
Step 3 Click OK.
Step 4 Restart CiscoView.
Or
StackMaker lists all stackable neighbors at the bottom of the window.
Step 2 Select a device from the stackable neighbors list.
Step 3 Click the Up arrow.
Step 4 Restart CiscoView.
To remove a device from a stack, do the following:
Step 2 Click Remove Device.
StackMaker displays a confirmation dialog box.
Step 3 Click Yes to remove the device.
The Remove Device confirmation dialog box appears. To remove the device from the stack, click Yes. To cancel the command, click No.
Step 4 Apply changes by using Actions>Apply Stack Configuration.
To clear device information, do the following:
Step 2 The Clear Stack confirmation dialog box appears. To remove the device from the stack, click Yes. To cancel the command, click No.
Step 3 Apply changes by using Actions>Apply Stack Configuration.
To restore device information, do the following:
Step 2 To restore devices to the stack, click Yes. To cancel the command, click No.
Step 3 Apply changes by using Actions>Apply Stack Configuration.
Error Message Could not reach device <devicename>; SNMP request timed out.
Explanation The device is not reachable via SNMP with the configured Read Community string. This error occurs when you try to launch StackMaker by clicking the Stack icon from a device display in CiscoView.
Recommended Action Ensure that the device is in operation and reachable by SNMP. Then launch StackMaker again.
Error Message This device is not stackable and doesn't support StackMaker.
Explanation StackMaker finds the device via SNMP but the device is not stackable because it does not contain the StackMaker MIB. This error occurs when you attempt to stack a device (such as Catalyst 2820) that does not have the latest firmware containing the StackMaker MIB.
Recommended Action Upgrade your firmware to a compatible version. To do this, go to Cisco Connection Online (CCO) and download the firmware. For more information on downloading from CCO, see the "Downloading Device Packages" chapter.
![]()
![]()
![]()
![]()
![]()
![]()
![]()
![]()
Posted: Wed Jul 24 08:12:45 PDT 2002
All contents are Copyright © 1992--2002 Cisco Systems, Inc. All rights reserved.
Important Notices and Privacy Statement.
