|
|

This chapter provides information on how to use CiscoView. It is divided into the following sections:
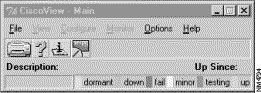
When you first open CiscoView, a small window appears, as shown in Figure 3-1.
Many of the menu items are grayed out because you have not opened a device. Once a device is open, a larger window appears showing the front or rear panel of the device. Figure 3-2 shows the main CiscoView window displaying a Cisco 4000 device.
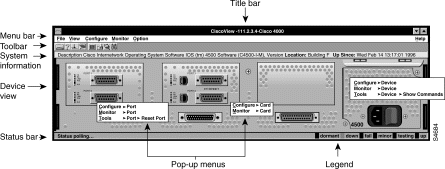
Title bar—provides the CiscoView application name and the name of the currently connected device.
Menu bar—enables you to perform CiscoView tasks, including displaying configuration and performance information for devices, cards, and ports; displaying different device representations; and controlling some of the operating characteristics of CiscoView.
Toolbar—provides a shortcut for entering important CiscoView commands such as Print, Help, Configure, or Monitor, and for launching applications, when available, such as Telnet.
System information—displays information about the type of device, the Cisco device software that is running, and additional system information. For some devices, CPU use is displayed.
Device view—displays a graphical representation of the back or front panel of the device. Click on this area to display information about different parts of the device. For example, to display information regarding the configuration of an Ethernet port on a Cisco AS5200 device rear panel, double-click the port or do the following:
Status bar—provides a brief description of the currently selected device, interface, or port, and provides an ongoing operational status, including polling and error message information. For port status details, refer to Table 3-1.
Legend—provides information about port status (see Table 3-1).
Popup menus—go to the configuration and monitor information for the device, a card, or a port. For more information on popup menus, see "Starting CiscoView and Displaying a Device" later in this chapter.
Menus can vary, depending on the device you are using. If an option is grayed out, it is not applicable to that device. Table 3-2 and Table 3-3 describe menu items found in the CiscoView File menu and the View menu.
| Item | Explanation |
|---|---|
Displays the back panel of a new device | |
Open Previous | Reviews a list of devices that you have already displayed |
Prints the physical view of the device | |
Displays and allows you to change printer parameters | |
Exit | Exits CiscoView |
The Configure menu depends on the device you are using and what you have selected on the device to configure: the device itself, a card, or a port. For example, port configuration menu items might be Configure>basePort, or Configure>TTY_port. For more information on displaying a device, see "Starting CiscoView and Displaying a Device" later in this chapter. Table 3-4 describes typical Configure menu items.
| Item | Explanation |
|---|---|
Displays device configuration information. If nothing is selected, the device configuration is displayed. | |
Displays card configuration information for a selected card. To view the card information, select a specific card first, then select Configure>Card. | |
Displays port configuration information for a selected port. To view the port information, select a specific port first, then select Configure>Port. The types of ports that can be selected are modem port, port_tty, or port_con, depending on the type of device you are using. |
The Monitor menu depends on the device you are using and what you have selected on the device to monitor: the device itself, a card, or a port. For more information on displaying a device, see "Starting CiscoView and Displaying a Device" later in this chapter. Table 3-5 describes the Monitor menu items.
| Item | Explanation |
|---|---|
Displays the monitoring information for a selected device. The monitoring information describes the various performance aspects of a device, card, or port. The monitor window is a collection of graphical displays presented as dials or stripcharts, known as a dashboard. For more information on monitoring information, see "Using the Dashboard Monitor." | |
Displays the monitoring information for a selected card. | |
Displays the monitoring information for a selected port. |
The Options menu allows you to change the presentation and the operating characteristics of CiscoView. For example, if you wanted to display the Toolbar or change the polling frequency, you do it through the Options menu. Table 3-6 describes the Options menu items.
The Admin menu appears on specific devices that have administrative option features. Refer to the online help for more information.
Configuration is a process that establishes the characteristics of the devices and services on the network and records this information in the appropriate files. Configuring a device for management means supplying information about the specific device. After the specific aspects of the device are entered into the system, the system can identify the device and monitor its performance, and you can manage the device using CiscoView.
You configure devices through CiscoView. See the online help for details on configuring specific devices.
There are several ways to display a CiscoView device, including
The CiscoView Open Device dialog box allows you to display a device in CiscoView or to change the currently displayed device. To display information, you need to know the Read Community Name and the Write Community Name. The community string is a Simple Network Management Protocol (SNMP) security feature that requires a password to access SNMP features on a host, such as a Cisco router. Community strings used in CiscoView must match the device strings and the strings for the network management platform, otherwise permission will be denied. To display the device, do the following:
Step 1 Select File>Open Device...
Step 2 Enter the name or IP address of the device that you want to view in the Host field.
Step 3 Enter the Read Community string in the Read Community field.
Step 4 Enter the Write Community string in the Write Community field.
Step 5 Click OK.
CiscoView displays a front or rear panel of the device. To display information, change configurations, and change community string information at the management window, you need to enter the Read/Write All password in the Read Community and Write Community fields in this dialog box. If you open the device without a Write Community string, and need to change device information, you can use the Option>Properties dialog box to reset the community string information.
The display you see when you first enter CiscoView is of the front or rear panel of the device. Click on various parts of the graphic to see what it contains.
After you have made a selection from the panel, select Configure or Monitor to configure or monitor the device, card, or port.
You can also use the right mouse button to get to a popup menu that allows you to configure or monitor a device, card, or port. For example, if you are using a Cisco AS5200 card and need port information, select a port on the display and click the right mouse button. The following popup menu appears: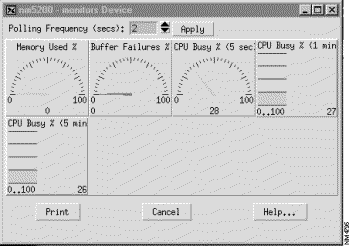
Select one of the options, Configure, Monitor, or Reset.
You can print the CiscoView Main window and specify certain printing options. To print the main window, select File>Print.
To print the main window, and specify printing options, do the following:
Step 1 Select File>Print Setup.
The CiscoView Print Setup window is displayed.
Step 2 In the Printer Name field, select a printer from the scrolling list, or enter the name of a printer.
Step 3 In the Copies field, enter the number of copies you want to print.
Step 4 In the Orientation field, select the paper orientation for printing by clicking on the radio button next to the appropriate orientation format: portrait or landscape.
Step 5 In the Format field, select your printer format type by clicking on the radio button next to the appropriate option: Ljet or PostScript. Ljet (LaserJet) prints the CiscoView Main window in PCL. PostScript prints the window in PostScript. For most low-end printers, use the Ljet option.
Step 6 Click OK to close this window.
Step 7 Select File>Print to print the window display.
You can change some CiscoView operating characteristics, such as the polling frequency or the number of retries, from within the CiscoView application. To change the operating characteristics, do the following:
Step 1 Select Options>Properties.
The CiscoView Properties dialog box appears.
Step 2 Enter a value in the Polling Frequency field to change the polling frequency. The default varies by device. A typical value is every 60 seconds. To disable polling frequency, set the value to zero. If you set the polling frequency below 60 seconds for a number of devices, it might slow down your network. It is advisable to use low polling frequencies in specific testing situations and change them back when done. Do not poll faster than every 5 seconds.
Step 3 Enter a new value in the Retries field to change the number of retries. The default is 3. The retries value indicates how many times CiscoView retries an unresponsive device. In busy networks, SNMP datagrams can get discarded. The Retries value allows the application to continue operation during network problems. A value of 3 is considered reasonable. You can increase the value if the network is slow.
Step 4 Enter a new value in the Timeout field to change the timeout interval. A timeout is the amount of time it takes to reach a device. If it takes longer than the time specified, the device is considered either unreachable or down. The interval value is specified in seconds. The default is 3.
As a guideline, the timeout value should be set to twice the average end-to-end delay in your network. If you have a network with several slow links, you might need to set the timeout to a higher value. If you have only LAN links in your network, a value of 2 seconds is reasonable to account for processing delays and timer accuracy.
In high traffic situations, you might experience timeouts. You should not reduce the polling frequency since this can cause a general error. Increase the timeout interval if you consistently experience timeouts.
Step 5 Click the radio button next to the MIB Label translation field to display MIB descriptors instead of textual labels. Textual labels are the default. MIB descriptors are actual variable names used to manage devices, for example, locIfOutBitsSec and MIB textual labels are aliases of the MIB descriptor. The MIB textual label for locIfOutBitsSec is Output BPS.
Step 6 Enter the string in the appropriate field to enter the Read or Write Community string. This option allows you to enter the write community string for a device after you display the device.
This is useful, for example, if you want to make changes to a device or port setting but did not specify the write community string when you first opened the device display. You can enter the write community string in the Write Community field without exiting and reopening the dialog box.
Step 7 Select the window from which you want to launch CiscoView, from the same window or from a separate window. The default is Separate.
This option allows you to keep the desktop from being cluttered by reusing the existing CiscoView window to display devices.
Step 8 Click OK to have the changes you made take effect.
Sometimes finding a device on a large network can pose a problem, but you can find devices in CiscoView easily once you understand how the information is organized. Topics covered are:
CiscoView displays two primary types of information. Configuration information includes data such as information about a device chassis. Performance information includes data such as the number of Ethernet errors during a given period.
Configuration information is displayed in CiscoView Configuration windows. Performance information is displayed in CiscoView Monitor windows, which are sometimes referred to as dashboards.
Configuration and performance information is displayed for devices, cards, and ports.
CiscoView displays different categories of information for each device, card, and port. To see the categories of information that can be displayed for each component type, look at the CATEGORY popup menu on the Configuration or Monitor windows. To display a particular type of information, select the category type.
CiscoView displays configuration information through the Configuration menu on the CiscoView main window or by selecting Configure from a component popup menu. CiscoView displays configuration information in the Configuration window that includes either a list of fields for a single port or a table that includes fields for multiple ports.
CiscoView displays performance information through the Monitor menu on the main window or by selecting Monitor from a component popup menu. Performance information is displayed in a dashboard made up of a collection of small graphical displays in one window. For more information on the dashboard monitor, see "Using the Dashboard Monitor" section.
The dashboard monitor displays various types of network performance information, such as poll utilization errors. The display depends on the type of type of device and whether it is a device or a port. A typical dashboard monitor consists of dials or stripcharts, as shown in Figure 3-3.
Each display represents information provided by a MIB variable, with the common meaning indicated above the display.
Within the dashboard monitor is a grapher tool that you can use to depict performance in graph form. To start the grapher tool for the network management platform, you select a graphical display in the dashboard and click the Grapher button. You can use all of the features of the grapher tool when you are troubleshooting performance problems. The network management platform grapher tool cannot support the graphing of multiple MIB variables in one data set. If the selected graphical display is composed of such formulas, the following error message appears:
Sorry, can't graph formulas.
For some devices, CiscoView allows you to select multiple ports. You can display configuration or performance information for multiple ports or port groups in a single window. The entries that can be modified are displayed in pink on a color monitor. Figure 3-4 shows the table for three of the ports for a Cisco AS5200 card.
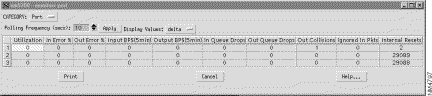
To create a CiscoView table:
Step 1 Select multiple ports by clicking on them as you hold down the Shift key.
Step 2 Click Configure or Monitor.
A CiscoView Table appears, displaying information about all the selected ports.
You can add, delete, or modify table entries. Table 3-7 describes how to edit CiscoView Tables.h
Context-sensitive online help provides you with step-by-step instructions on how to use CiscoWorks Windows applications. The help system also provides a glossary and keyword search capability. The following table provides a quick guideline to access help from a number of vantage points:
| For Information about | Do This |
|---|---|
The help system for specific products | Select Help>Contents |
How to use the help system | Select Help>Using Help |
How to use CiscoView features | Select Help>Using CiscoView |
Current CiscoView versions | Select Help>About CiscoView |
The current device package version | Select Help>About CiscoView |
How to view configuration and performance, dashboard windows, and field descriptions | Click Help in the dialog box |
How to change a component value | Click Help with the cursor over the field |
How to use help view | Select Help>On Help |
Because CiscoView device packages are independent, the help system for each package might vary slightly.
Two key concepts in using the help system are jumps and popup windows. Click on a highlighted underlined topic to jump to a help window specific to that topic. When you jump to another topic, you need to click Back on the Menu bar to go back to the previous help topic. Click on a dotted underlined term to open a popup help window, which defines that term. When you go to a popup window, press Return to return to your previous help topic.
You open the Help Topics window by selecting Help>Contents or by clicking Help Topics in an open CiscoView help window. The Help Topics window has three functional tabs:
Each help window has a menu bar and a button bar. The menu bar provides standard help functions for printing help topics, copying and pasting text from help topics, making online notes about particular help topics, and placing bookmarks.
The button bar contains the following buttons:
Many help windows have Overview and See Also links in the help window topics. You can select the Overview link to obtain background information for the procedure described in the current help window. Select the See Also link to view a list of related topics and go directly to those topics from the current help window.
Select File>Exit from Help window menu bar to exit Help.
![]()
![]()
![]()
![]()
![]()
![]()
![]()
![]()
Posted: Tue Dec 17 22:07:18 PST 2002
All contents are Copyright © 1992--2002 Cisco Systems, Inc. All rights reserved.
Important Notices and Privacy Statement.