|
|

Show Commands is a WhatsUp Gold-launched application that allows you to display detailed system and protocol information about devices, without having to remember complicated command-line syntax for each device.
This chapter contains the following sections:
The Show Commands application provides access to the EXEC commands of a Cisco device (routers, hubs, access servers, and switches) through a Java-based GUI. The application hides the process of establishing a telnet session, where you must remember complicated command-line syntax for each device.
The Show Commands application provides you with a simple way of displaying detailed system and protocol information about Cisco devices. All you do is select the EXEC command from the tree-view dialog box in the Show Commands window.
After you select the EXEC command, Show Commands performs the following functions:
You can then save the collected information into a file, or send it to a printer.
Show Commands provides these features:
To start Show Commands from WhatsUp Gold:
Step 1 Click the task bar Start menu.
Step 2 Select Programs > CiscoWorks Windows 5.0 > WhatsUp Gold.
The WhatsUp Gold main window appears.
Step 3 Open a topology map.
A topology map with icons of all the devices in your network appears.
Step 4 Right-click on a Cisco device icon.
A popup menu appears and displays several options.
Step 5 Select Show Commands.
Show Commands determines if user authentication (TACACS, RADIUS) is configured on the selected device. If user authentication is configured on the device, a Username for <device name> dialog box appears.
Step 6 Enter the username in the field provided.
A Password dialog box appears.
Step 7 Enter the Telnet password in the field provided.
Step 8 Enter the Enable password in the field provided.
Step 9 Select the Save Passwords check box if you choose to save the passwords.
The save password option enables you to store the passwords for a particular device in an encrypted format. Therefore, the next time you launch Show Commands for that particular device, Show Commands will use the stored passwords to login. If this is successful, you will not be prompted to enter the passwords.
Step 10 Click OK to start Show Commands.
The Show Commands main window appears.
When you launch Show Commands you are prompted for your Login and Enable passwords. After you enter these passwords Show Commands can connect to the device.
If User Authentication (TACACS or RADIUS) is configured in the device for login mode only, you will be first prompted to enter your user name. Then, the Password dialog box will appear, prompting you to enter the Login and Enable passwords. After you enter these passwords, Show Commands will connect to the device.
Show Commands will not connect to the device in the following circumstances:
Table 4-1 summarizes Show Commands support.
| Show Commands will support devices where... | Show Commands will not support devices where... |
|---|---|
Enable and Login passwords have been configured. | Enable or Login passwords have not been configured. |
User authentication is configured for login mode only. | User authentication is configured for enable mode. |
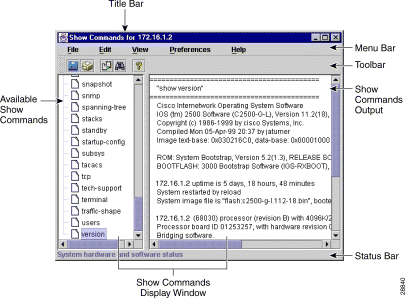
When you start the Show Commands application, the Show Commands window appears (Figure 4-1).
Show Commands main window components are:
Figure 4-1 shows the Show Commands main window.
The title bar displays the Show Commands application name and the active device name (Figure 4-1).
The menu bar provides access to all Show Commands dialog boxes (Figure 4-1).
Table 4-2 describes the commands under each menu option.
| Menu | Commands | What it Does |
|---|---|---|
File | Displays a Save Output dialog box. Specify the path and the name of the file where you want to store the command output, then click OK to save the data. | |
| Displays a Print dialog box. Click OK to send the command output to a printer. | |
| Exit | Exits the Show Commands application. |
Edit | Select All | Selects all the text within an active window. |
| Copy | Copies selected text from the command output window to a clipboad. |
| Clear All | Clears the text in the command output window after displaying a warning message. |
| Find | Displays the Find dialog box. Enter keywords in the field provided to locate text in the command output window. |
View | Show Status Bar/Hide Status Bar | Displays or hides the status bar. |
| Displays or hides the toolbar. | |
Preferences | Collapse Tree | Collapses the entire tree on the left side of the frame to only one level of indentation. |
| Sets Metal, Motif, or Windows look and feel of the GUI. | |
| Command Output | Replaces the existing contents with the output of the current command, or appends the output of the current command with the existing contents. The default is append. |
Help | Using Show Commands | Opens the online help table of contents. |
| About | Displays Show Commands release version and copyright information. |
The toolbar provides icons to access Save Output, Print, Copy, Find, and Help options (Figure 4-1).
The Show Commands Display Window comprises two frames (Figure 4-1):
The left frame lists the available Show Commands. You can expand and collapse this list to view additional options. Some Show Commands have parameters, which require your input. Enter the appropriate string in the field provided to display output (system and protocol information) from the device.
The right frame displays the Show Commands output (system and protocol information). You can append the output of subsequent Show Commands or replace the current contents.
The status bar displays the description of the selected EXEC commands (Figure 4-1).
You can access online help in Show Commands as follows:
![]()
![]()
![]()
![]()
![]()
![]()
![]()
![]()
Posted: Fri Nov 15 05:07:03 PST 2002
All contents are Copyright © 1992--2002 Cisco Systems, Inc. All rights reserved.
Important Notices and Privacy Statement.