|
|

Now that you have installed the Y2K Compliance Assessment Tool, you need to perform some required administrator setup tasks. This chapter consists of the following sections:
Table 3-1 provides an overview of setting up the Y2K Compliance Assessment Tool and references to more detailed information about each task. The information in the rest of this chapter follows the same order as the quick reference.
| Task | Steps | References | ||
|---|---|---|---|---|
| Step 1 Log on to the Y2K Compliance Assessment Tool server. | "Accessing the Server" section | ||
Step 2 Familiarize yourself with the desktop interface. | "Accessing the Server" section | |||
| Step 1 Log on to the server as administrator. | "Logging In As Administrator" section | ||
Step 2 Secure the server. | "Securing the Y2K Compliance Assessment Tool Server" section | |||
Step 3 Configure the server. | ||||
Step 4 Log out of the server. | "Logging Out As Administrator" section |
To access the Y2K Compliance Assessment Tool, enter the URL of the server in your web browser, as follows:
http://server_name:1741
where server_name is the name of the server. 1741 is the port on which the Y2K Compliance Assessment Tool was installed.
The main Y2K Compliance Assessment Tool screen appears. (See Figure 3-1.)
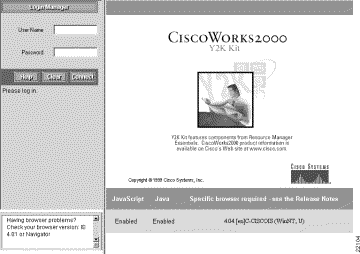
If you cannot access the Y2K Compliance Assessment Tool server or the desktop is not displayed correctly, refer to the "Troubleshooting" chapter.
Now that you have accessed the Y2K Compliance Assessment Tool server, you need to log in as the administrator and set up the server for other users. The following sections explain how to perform these administrator tasks.
To perform administrator setup tasks you must log in as administrator. First, it is helpful to understand Y2K Compliance Assessment Tool logins and roles, which control user access to the system.
To use the Y2K Compliance Assessment Tool, you must have a valid login---a combination of a username and password. There are five groups of access privileges, called roles. The five roles are as follows:
Your access to application options is determined by the roles assigned to your login.
The access privileges assigned to the roles are not cumulative. That is, there is not a hierarchy of roles, with each role including all of the privileges of the role "below" it. Instead, each role is associated with a number of tasks the user can perform. The roles and their tasks are static; however, administrators can assign users to more than one role. For a full list of the roles and their corresponding access privileges, refer to the online help.
The Y2K Compliance Assessment Tool ships with several default logins already created. These default logins are shown in Table 3-2.
| Username | Login Name | Password |
|---|---|---|
admin | Admin | admin |
guest | Guest | --- |
To log in as administrator, follow these steps:
Step 1 Enter the default administrator username and password in the Login Manager dialog box (see Figure 3-2), as follows:
User Name: admin
Password: admin
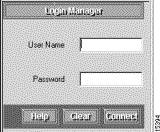
Step 2 Click Connect.
The Login Manager dialog box is replaced by the navigation tree.
Step 3 Select Admin on the navigation tree to open the Admin drawer.
The administrator folders appear. These folders contain the administrator options.
To secure the Y2K Compliance Assessment Tool server, change the passwords for the default logins as soon as possible. Changing the administrator login password is particularly important because the administrator login provides access to all application options.
To maintain ongoing security for your server, be careful when creating new logins. Assign roles to user logins so that users can access only those application options that you want them to access.
The Y2K Compliance Assessment Tool also provides built-in security using the features of the Windows NT operating system. for more information about the security features, refer to the "Security" appendix.
To change the admin login password, follow these steps:
Step 1 Select Admin > User Accounts > Modify My Profile. The Modify My Profile dialog box appears (see Figure 3-3).
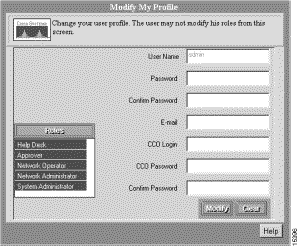
Step 2 Enter a password in the Password field.
Step 3 Confirm the password by entering it in the Confirm Password field. This field is required.
Step 4 Optionally, enter values for any of the other fields in the dialog box.
Step 5 Click Modify.
The dialog box is displayed until you select another option from the navigation tree.
To change the guest login password, follow these steps:
Step 1 Select Admin > User Accounts > Modify/Delete Users. The Modify/Delete User dialog box appears (See Figure 3-4.).
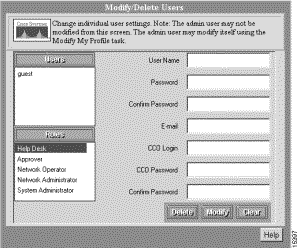
Step 2 Select the guest login from the Users list.
Step 3 Enter the new password in the Password field.
Step 4 Confirm the new password by entering it in the Confirm Password field. This field is required.
Step 5 Optionally, enter values for any of the other fields in the dialog box.
Step 6 Click Modify. The message "User modified" appears in the lower left corner of the dialog box.
The dialog box is displayed until you select another option from the navigation tree.
To configure the system, follow these steps:
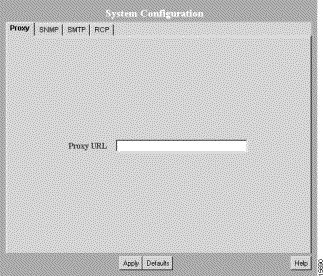
Step 1 Select Admin > System Administration > System Configuration. The System Configuration dialog box appears (see Figure 3-5).
Step 2 Select one of the following tabs to enter information or to verify that the configured information is correct:
Refer to Table 3-2 for descriptions of the information that appears in each dialog box tab.
| Tab Name | Description | Fields---Values to Enter |
|---|---|---|
Proxy | Used by the Y2K Compliance Assessment Tool applications to connect to CCO. If the server access to the outside world is controlled through a proxy server, this setting must be configured. | Proxy URL---Enter the system-wide proxy URL. There is no default. |
SNMP | Used by applications to query devices for inventory collection, which includes importing and adding devices, and collecting inventory data. | Fast SNMP Timeout---Enter the amount of time, from 5 to 90 seconds, the system should wait for a a device to respond before it tries to access it again. The default is 5. Fast SNMP Retry---Enter the number of times, from 2 to 6, the system should try to access devices with fast SNMP options. The default Slow SNMP Timeout---Enter the amount of time, from 10 to 90 seconds, the system should wait for a device to respond before it tries to access it again. The default is 20. Slow SNMP Retry---Enter the number of times, from 2 to 6, the system should try to access a device with slow SNMP options. The default |
SMTP | Used by the applications to send e-mail. | SMTP Server---Enter name of the server. The default is localhost. |
RCP | Used to specify the user when remote operations from devices are performed. It is used to authenticate any RCP transfers between the devices and the server. The user account must exist on UNIX systems, and should also be configured on devices as local user.
| User Name---Enter the name used by a network device when it connects to the server to run RCP. |
Step 3 Click Apply to apply changed information.
Step 4 Click Defaults to apply the defaults already configured in the system.
Step 5 Repeat Step 2 through Step 4 until you have verified or corrected all the information displayed in the System Configuration dialog box.
The dialog box is displayed until you select another option from the navigation tree.
To end your administrator tasks, you must log out of the Y2K Compliance Assessment Tool. Follow these steps to log out:
Step 1 Close all secondary browser windows that are open. You should have only one browser window opened displaying the interface.
Step 2 Click Logout. The Login Manager dialog box replaces the navigation tree.
Now that you have performed the necessary administrator tasks, continue installation with the "Using Y2K Compliance Assessment Tool Applications" chapter.
![]()
![]()
![]()
![]()
![]()
![]()
![]()
![]()
Posted: Thu Sep 30 16:11:29 PDT 1999
Copyright 1989-1999©Cisco Systems Inc.