|
|

This chapter describes the safety instructions and site requirements needed for installing the Management Engine 1100 Series (ME1100 Series) and guides you through installation preparation. It contains:
This section provides safety information for installing this product.
 |
Note Read the installation instructions in "Installing and Configuring the Management Engine 1100 Series" before you connect the system to its power source because you must be extremely careful when installing electrical devices. Failure to read and follow these guidelines could lead to an unsuccessful installation and possible damage to the system and components. |
You should observe the following safety guidelines when working with any equipment that connects to electrical power or telephone wiring. They can help you avoid injuring yourself and damaging the ME1100 Series.
The following warnings and cautions are provided to help you prevent damage to the devices or injury to yourself:
 |
Warning Before working on a chassis or working near power supplies, unplug the power cord on AC units; disconnect the power at the circuit breaker on DC units. |
|
Warning Only trained and qualified personnel should be allowed to install, replace, or service this equipment. |
|
Warning This equipment is intended to be grounded. Ensure that the host is connected to earth ground during normal use. |
|
Warning Do not work on the system or connect or disconnect cables during periods of lightning activity. |
|
Warning Ultimate disposal of this product should be handled according to all national laws and regulations. |
|
Warning Before working on a system that has an On/Off switch, turn OFF the power and unplug the power cord. |
|
Warning Read the installation instructions before you connect the system to its power source. |
|
Warning The device is designed to work with TN power systems. |
Follow these guidelines when working on electrical equipment:
Electrostatic discharge (ESD) can damage equipment and impair electrical circuitry. ESD damage occurs when electronic components are handled improperly and can result in complete or intermittent failures.
When you run wires for any significant distance in an electromagnetic field, electromagnetic interference (EMI) can occur between the field and the signals on the wires.
Note that:
To predict and remedy strong EMI, consult RFI experts.
Ensure that all cards, faceplates, and covers are in place. Blank faceplates and cover panels are used to:
Make sure your site is prepared properly before beginning installation.
When planning your site layout and equipment locations, keep in mind the precautions described in this section to help avoid equipment failures and reduce the possibility of environmentally caused shutdowns. If you are currently experiencing shutdowns or unusually high errors with your existing equipment, these precautions will help you isolate the cause of failures and prevent future problems.
Use the following precautions when planning the operating environment for your ME1100 Series.
Follow these guidelines to create a safe operating environment:
The ME1100 Series has the following power requirements:
|
Warning This product relies on the building's installation for short-circuit (overcurrent) protection. Make sure that a fuse or circuit breaker no larger than 120 VAC, 15A U.S. and 240 VAC, 10A international are used on the phase conductors (all current-carrying conductors). |
|
Warning The device is designed to work with TN power systems. |
Use the cables in the accessory kit to connect the ME1100 Series console port to a console or computer that is running a console program. In addition to the console cable, you must supply your own standard Ethernet cable to connect the ME1100 Series to your network. This section details the pinout information for these cables, so that you can purchase the correct cable for your network connection, and replace the console cable and adapters if that becomes necessary.
A structured wiring system provides a standardized way to wire a building for all types of networks for the ME1100 Series appliance to be installed. The main distribution frame links all the building's interior wiring and provides an interface connection to circuits coming from outside sources such as the local telephone company. Wiring hubs (peripherals for cabling installations) provide the connection logic unique to Fast Ethernet cables that the ME1100 Series uses. Unshielded twisted pair (UTP) copper wire is used to connect the ME1100 Series and distributes the network connections to wall jacks near each piece of network equipment.
|
Warning The ports labeled "10BaseT", "100BaseTX", and "10/100" are safety extra-low voltage (SELV) circuits. SELV circuits should only be connected to other SELV circuits. Avoid connecting these circuits to telephone network voltage (TNV) circuits. |
To connect the ME1100 Series to your network, you must use one of the following Fast Ethernet cables:
The Ethernet configuration using unshielded twisted pair (UTP) wire is known as 10BaseT because it uses 10 megabit per second (Mbps) signaling speed, direct current, or baseband, signaling, and twisted pair wire.This configuration includes a central wiring hub with special circuitry to isolate malfunctioning segments of the network. UTP wire uses an RJ-45 connector at each end of the wire. New signaling schemes such as 100BaseT and gigabit Ethernet use the same UTP cabling with upgraded hubs and adapters.
Use a CAT 5 UTP cable at minimum to connect to a 100BaseT network. Use a CAT 3 UTP cable at minimum to connect to a 10BaseT network.
Table 2-1 shows the pinouts for a straight-through 100BaseT cable.
| RJ-45 Pin | Signal | Direction | RJ-45 Pin |
|---|---|---|---|
1 | TX+ | ---> | 1 |
2 | TX- | ---> | 2 |
3 | RX+ | <--- | 3 |
4 | --- | --- | 4 |
5 | --- | --- | 5 |
6 | RX- | <--- | 6 |
7 | --- | --- | 7 |
8 | --- | --- | 8 |
Table 2-2 shows the pinouts for a crossover 100BaseT cable.
| RJ-45 Pin | Signal | Direction | RJ-45 Pin |
|---|---|---|---|
1 | TX+ | ---> | 3 |
2 | TX- | ---> | 6 |
3 | RX+ | <--- | 1 |
4 | --- | --- | 4 |
5 | --- | --- | 5 |
6 | RX- | <--- | 2 |
7 | --- | --- | 7 |
8 | --- | --- |
You can attach the two RJ-45 to DB-9 adapters to the RJ-45 to RJ-45 rollover to create a DB-9 to DB-9 null-modem cable.
Table 2-3 shows the pinouts for this configuration.
| ME1100 Series Console Port (DB9) | DB-9 | Signal |
|---|---|---|
1 | --- | DTR |
2 | 3 | TD |
3 | 2 | RD |
4 | 6 | DCD |
5 | 5 | SG |
6 | 4 | DSR |
7 | 8 | CTS |
8 | 7 | RTS |
9 | --- |
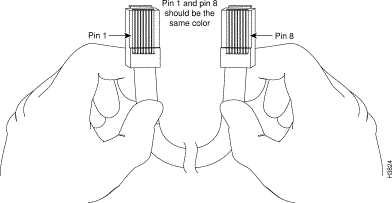
You can identify a rollover cable by comparing the two modular ends of the cable (Figure 2-1). Holding the cables in your hand, side-by-side, with the tab at the back, the wire connected to the pin on the outside of the left connector (pin 1) should be the same color as the pin on the outside of the right connector (pin 8).
A rack-mount kit is included for mounting the ME1100 Series in a standard 19-inch equipment rack with two unobstructed outer posts. This kit cannot be used with other racks, such as a telco-type equipment rack, or those with obstructions (such as a power strip) that could impair access to the hard disk and power supplies. Allow sufficient clearance around the rack for system maintenance.
Follow these guidelines to ensure proper airflow:
Follow these guidelines to stabilize the equipment rack:
Follow these guidelines when lifting the system:
You need the following tools and equipment to install the system:
![]()
![]()
![]()
![]()
![]()
![]()
![]()
![]()
Posted: Mon Jun 19 00:20:31 PDT 2000
Copyright 1989 - 2000©Cisco Systems Inc.