|
|

Before you install URT, review the planning information in Chapter 1, "Planning for User Registration." Because URT is integral to the overall functioning of your network, careful planning prior to installation is essential to successful URT deployment.
If you are already using URT, and are upgrading to a new release, follow the upgrade instructions in Appendix B, "Upgrading from URT 1.1."
To install URT, complete these tasks:
1. Install the CWSI Upgrade and User Registration Tool (URT) Management Interface.
3. Create the Initial URT Configuration. See "Detailed Example of Network Configuration for URT" for an example of configuring URT on a Cisco test network.
The URT management interface installation includes modules that upgrade CWSI, and integrate URT into CWSI.
Before you can install URT, you must ensure that CWSI is installed on the machine. The machine must be running Windows NT 4.0.
You must log into the machine with an account that has Administrator privileges.
Step 2 Select Start>Run and enter:
Replace d: with the drive letter for your CD-ROM.
You are asked whether the installation program can stop the ANI process. You must stop the ANI process for the installation to continue.
Once the installation program starts, follow the on-screen instructions.
The CWSI Campus upgrade modules and the URT management interface are installed, and URT is added to the CWSI program group on the Start menu, and the ANI process is restarted.
The URT server maintains user-to-VLAN mappings for the logon process. It also acts as a VLAN Membership Policy Server (VMPS) for the switches on the network.
Read the planning information in Chapter 1, "Planning for User Registration" before you install the URT servers. This will help you effectively deploy URT in your network.
Because the URT service is central to user logons, install it on dedicated machines to ensure satisfactory network performance.
You must gather this information to successfully complete the installation of the URT servers:
To determine if a port is available, enter the netstat -a -n command at a DOS prompt. Used port numbers are shown after the colon (:) in the Local Address column.
You should only install the URT servers on machines that have fixed IP addresses (that is, you should not install them on a server that dynamically obtains an IP address from a DHCP server, unless the machine has an unlimited lease on a particular IP address). If the IP address of a URT server changes, you must reconfigure VMPS on every switch that uses the URT server.
You must log into the machine with an account that has Administrator privileges.
Step 2 Select Start>Run and enter:
Replace d: with the drive letter for your CD-ROM.
Once the installation program starts, follow the on-screen instructions. Enter the information you gathered before starting the installation.
After you finish the URT installation, you must configure URT in order for URT to be active and working correctly on the network. You must know how to use the URT management interface in order to complete these tasks; see Chapter 3, "Getting Started with User Registration" for information on using the interface.
Note See "Detailed Example of Network Configuration for URT" for an example of completing these steps, including the relationship between subnets defined in the DHCP server, VLANs defined in VlanDirector, and URT settings.
These steps are explained in subsections following this procedure:
Step 2 Add NT and NDS Domains to the URT Domain List.
Step 3 (Optional) Associate Users, Groups, or Organizational Units to VLANs.
You do not have to create any (or all) of these associations to have a valid URT configuration. Any users, groups, or organizational units not associated with a specific VLAN use the logon VLANs defined in Step 1.
Step 4  Click the Save to Database button, or select File>Save to Database to save the URT configuration.
The configuration becomes active on your network. However, users are not affected until you configure the switches to use the URT servers in Step 6.
Step 5 (Optional) Coordinate User-to-VLAN and MAC-to-VLAN Mappings by updating the URT server with VMPS tables created in UserTracking.
This is only necessary if you have created MAC-to-VLAN mappings for non-Windows machines, and you want to continue to use these mappings.
Step 6 Configure the Switches to Use the URT Server as the VMPS Server.
At this point, MAC-based dynamic VLANs use the URT servers to determine VLAN membership, but no user-, group-, or organizational unit-based VLANs work until you install the URT client and script in Step 8 and Step 9.
Step 7 Change Switch Port State to Dynamic.
URT can only switch users on dynamic ports to an associated VLAN. URT does not affect users on static ports.
Step 8 Install the URT Client Service on Windows NT Clients.
Windows 95 and Windows 98 machines install the URT client automatically when the user logs into the network.
Step 9 Install the URT Script on the Domain Controller in all domains you want URT to manage.
After you update the logon script on the domain controller or NetWare server, user logons are processed by URT, and your user-, group-, and organizational unit-based VLANs become active.
The URT logon VLAN is assigned to users during the initial stages of logon, before URT can determine the correct VLAN. If you do not associate a user to a specific VLAN, the user remains in the URT logon VLAN.
Also, when a user logs off, they are switched to the logon VLAN.
This logon VLAN is used for the entire VTP domain.
Step 2 Select Edit>Assign Logon VLAN.
Step 3 In the VTP Domain Configuration Dialog window, select the appropriate settings, as described in Table 2-1.
Table 2-1 VTP Domain Configuration Dialog
Step 4 Click OK.
You must add the NT domains and NDS directory trees you want URT to manage to the NT/NDS Domains folder in URT.
 Click the Add Domain button, or select Edit>Add Domain.
Step 2 In the Domain Name window, select the name of the NT domain or NDS directory that you want to add. If the domain or directory is not in the drop-down list, enter it into the field.
Step 3 Click OK.
URT creates a folder for the domain or directory, and all users defined on the NT domain controller or NetWare directory are listed in the new folder.
By associating a user, group, or organizational unit to a VLAN, you ensure that the user connects to the network in the appropriate VLAN, even if the user logs in on different machines or through different switch ports (for example, if the user's machine is a laptop). Because the user always connects to the network in the same VLAN, you can create security policies based on VLANs and avoid MAC-address-based VLAN mappings.
If you do not create a VLAN association for a user, but you create one for a group or organizational unit to which the user belongs, the user uses the VLAN associated to the group or organizational unit.
Determine how you want to map users, groups, and organizational units to VLANs. Although you can change VLAN mappings later, if you develop a plan for user-to-VLAN mappings now, you can simplify your network management tasks.
If a user is likely to connect to the network from different locations, consider creating a VLAN mapping for every VTP domain the user is likely to access. To simplify VLAN associations, you can associate groups or organizational units to VLANs instead of users.
You must add the NT domain or NDS directory that the user resides in before you can assign the user to a VLAN. See "Add NT and NDS Domains to the URT Domain List."
If you are adding more than one user, group, or organizational unit, you must use the button or the menu command.
Step 2 In the Associate VLAN window, select the appropriate settings as described in Table 2-2.
Table 2-2 Associate VLAN Window
Step 3 Click OK.
For Microsoft Networking, if there is no user VLAN association, and the user belongs to multiple groups, the VLAN association for the user's primary group takes precedence. If there is no primary group or no association for the primary group, URT selects the VLAN association for the first group in the groups list, scanning from top to bottom, to which the user belongs.
For NetWare, if there is no user VLAN association, the VLAN association for the organizational unit that directly contains the user takes precedence. If there is no association for that organizational unit, URT goes up the NDS tree until an organizational unit is encountered that has a VLAN mapping.
You can use the CWSI Campus UserTracking application to map MAC addresses (the address on the network interface card in a machine) to VLANs. However, in general, you should not create MAC-based mappings for machines normally used by a user associated to a VLAN in URT. If a user mapped in URT logs in on a machine mapped in UserTracking, the URT VLAN association always takes precedence.
If you are combining MAC-based mappings with user-based ones, you must use URT to update the VMPS tables with the information from UserTracking. You cannot use UserTracking to update these tables for switches that are using the URT servers.
Step 2 In URT, select Configure>Update MAC to VLAN Mappings.
URT updates the URT servers with information from UserTracking.
In order for URT to put a user into the VLAN you designate, the switch to which the user's machine is attached must be configured to use the URT server as a VMPS server. Switches use the VLAN Membership Policy Server (VMPS) to obtain information about VLANs and the users and machines assigned to the VLANs.
Configuring the switches to use the URT server is a one-time event. However, you must configure a switch whenever:
Do an ANI discovery in CWSI Campus. This discovery ensures that all switches in your network are reflected in ANI, which is required for them to appear in URT.
Step 2 Select the switch that you want to configure.
Step 3  Click the Configure VMPS on Switch button, or select Configure>Configure VMPS.
Step 4 In the VMPS Configuration Dialog, enter IP addresses for the first, second, and third VMPS server, and select whether the switch should use the server as a Primary or Secondary server.
Step 5 Click Set VMPS on Switches in the VMPS Configuration Dialog window.
You can verify that URT configured the switch by connecting to the switch and using the switches commands. For example, for Catalyst 5000 switches, open a connection to the switch's console (for example, using Telnet), and enter the show vmps command. The command should show that VMPS is disabled (this only indicates that there is not a VMPS server on the switch). If VMPS is not disabled, use the set vmps state disable command to disable it. The show vmps command should also show the URT server's IP address being used for the VMPS domain server.
See the documentation for your switch for the required commands.
URT can only change the VLAN for users attached to a dynamic switch port. If the user's switch port is static, URT only updates the UserTracking database with the user's name: the VLAN is not changed.
If you want URT to dynamically change the VLAN for a user, you must change the port state for the switch port to dynamic. Use the CWSI Campus UserTracking application, CiscoView 4.2, or the switch's commands to change the port state for a switch. CiscoView can change the state on any switch port, but UserTracking can only change ports that have been discovered by the application.
Procedures for using CiscoView and UserTracking are described here separately.
Step 2 Double-click the port whose state you want to change.
CiscoView displays the attributes for the port.
Step 3 Select dynamic for VLAN Port Admin Status.
Step 2 Obtain a list of ports on a switch:
(a). Select Action>Discover>subnet.
(b). Enter the IP address of the switch whose ports you want to change in the Host Name or IP Address Field.
(c). Enter the subnet mask for the switch's IP address in the Subnet Mask field.
You can also get a list of switch ports by selecting Action>Discover>End User Nodes.
Step 3 Select Action>Display>All Entries to display the list.
Step 4 For each port whose status you want to change, click the Port State column, and select dynamic. The port number is shown in the Port column.
Step 5 Select Action>Update Port States to change the port states on the switch.
Step 6 Any users active on ports whose status you changed must either reboot their workstations, or enter ipconfig /release and ipconfig /renew to update their IP address. On Windows NT machines, you must have Administrator authority to use the ipconfig command. On Windows 95 or Windows 98 machines, the command is winipcfg, and anyone can use it.
You must install the URT client service on Windows NT clients (workstations or servers) for the machine to be managed by URT. The installation procedure is different for Microsoft Networking and NetWare clients, and they are described here separately.
If a Windows NT workstation is running Microsoft Networking, use this procedure to install the URT client. If the workstation is running both Microsoft Networking and NetWare networking, follow this procedure and the procedure in "Installing the URT Client on NetWare Windows NT Clients."
Choose a time of day when most of the Windows NT machines should be up and running on the network (even if users are not logged onto the machine). You can only install the service on Windows NT machines that are running and connected to the network. Windows 95 and Windows 98 machines install the client service from the NT domain controller, so these machines do not need to be running when you install the client service. (Windows NT machines use a more restrictive security method, which prevents the client service from installing from the NT domain controller.)
For Microsoft Networking, you must have NT Administrator authority in an NT domain to install the URT client service on computers in that domain. If you are not logged in with an account with Administrator authority on the target NT domain, you are prompted for the user name and password. Enter the user name in the NT_domain\username format.
A list of Windows NT clients is shown in the right-hand pane. The attributes are described in Table 2-3.
Table 2-3 NT Hosts: Right-Hand Pane (List Pane)
Step 2 If you want to install the URT client service on all listed NT hosts, then do not select any hosts in the list. Otherwise, select the host on which you want to install the URT client service.
Step 3  Click the Install Client Service button, or select Configure>Install Client Service.
URT installs the service on the selected clients, and opens a message window so that you can follow the status of the installation.
If a Windows NT workstation is running NetWare networking, use this procedure to install the URT client. If the workstation is running both Microsoft Networking and NetWare networking, follow this procedure and the procedure in "Installing the Client Service on Microsoft Networking Windows NT Clients."
For NetWare, you must have administrator or admin-equivalent authority to install the URT client service on computers defined in the NDS directory tree.
You must also have installed the Z.E.N. Works Starter Pack, and created the WINNT User Package and WINNT Workstation Package policy objects. These policy objects must be associated with the organizational object that contains the users and groups on whose workstations you will install the URT client. See the Novell documentation at http://www.novell.com for more information.
Step 2 In NAL, double-click the NWAdmin32 application.
The NDS directory tree is displayed in the NWAdmin32 application.
Step 3 Double-click the WINNT Workstation Package in the NDS directory tree.
Step 4 In the WINNT Workstation Package, click Add Action.
NAL opens the Create Scheduled Action window.
Step 5 In Create Schedule Action in the Create Scheduled Action window, enter a meaningful name for the action (for example, "Install URT") and click Create.
NAL creates the action and opens the Scheduled Action window.
Step 6 Select the newly-created action in the Scheduled Action window and click Details:
NAL opens the Action Properties window.
(b). Select the General tab in the Action Properties window, and select these characteristics (allowing the others to default):
Enter the file name of the URT client installation program in this format:
\\Novellserver\sys\public\urt\UrtClientInstall.bat
Novellserver is the name of the server where you install the URT logon script. URT installs the client installation and uninstallation program on the server when the script is installed.
(d). Select the Schedule tab in the Action Properties window, and select User Login for Event.
(e). Select the Advanced tab in the Action Properties window, and check Disable action after completion.
These settings will result in the URT client being installed the first time the user logs into the NetWare domain.
You must install the URT script on the domain controller or NetWare server, and update the domain controller's or NetWare server's logon script, in order for URT to intercept and handle user logons. You only need to do this once for each NT domain or NDS directory.
When installing the script on Windows NT domain controllers, you must have NT Administrator authority in an NT domain to install the URT logon script on the domain controllers in that domain. If you are not logged in with an account with Administrator authority on the target NT domain, you are prompted for the user name and password. Enter the user name in the NT_domain\username format.
When installing the script on NetWare servers, you must have administrator or admin-equivalent authority.
Step 2  Select Configure>Install URT Script.
URT displays a list of NT domain controllers or NetWare servers found in the selected domain.
Step 3 Click Yes.
URT installs the URT script (urt.bat) on the domain controllers and NetWare servers, and displays a message dialog showing the status of the installation.
Step 4 Edit the logon script file to make these changes:
(a). For Microsoft Networking, add this line to the logon script on the NT primary domain controller:
(b). For NetWare, add this line to the Login properties for the Organization object that contains the users, groups, and other organizations whose logons you want to manage with URT, using the Novell Application Launcher (NAL) program:
These commands run the urt.bat file on the during user logons.
(a). Select Start>Programs>Administrative Tools>User Manager to start the Windows NT User Manager.
(b). Double-click on a user name.
(c). Click Profile in the User Properties window.
(d). In the User Environment Profile, enter urt.bat in the Logon Script Name field and click OK.
This is an example of how you would set up the DHCP server, Windows NT and Novell NetWare domain controllers, routers, switches, and URT for a small network. This example will help you understand the interrelationship between these network elements. This example is taken from a working Cisco development network.
Step 2 If you have not already done so, install a DHCP server following the instructions in the documentation for the product. When the DHCP server is installed, define the subnets required in your network, and assign an IP address pool for each subnet. In our test network, we have four subnets:
Figure 2-1 shows how this would look in Cisco Network Registrar.
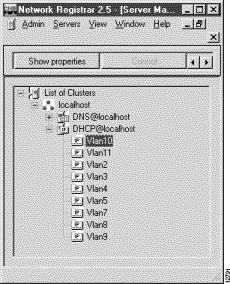
Figure 2-2 shows the properties of one of these subnets, Vlan2. This shows the range of addresses included in the scope of the subnet. The scope is called Vlan2 for convenience—there is no direct relationship between the VLANs defined on the switches and the DHCP scopes.
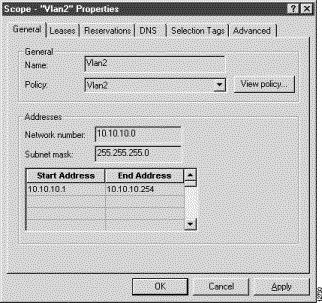
Figure 2-3 shows the Vlan2 scope policies, which define the router interface. In Vlan2, the router interface is 10.10.10.1.
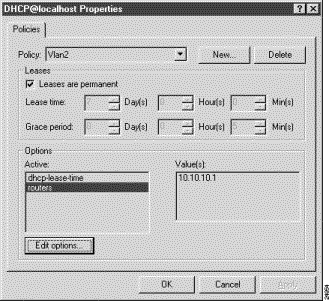
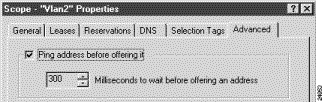
Figure 2-4 shows how addresses are reserved in Vlan2. Instead of defining all reserved addresses, with Cisco Network Registrar, you can have the DHCP server ping an address before leasing it. If an address is already being used, as is the case with static addresses, Cisco Network Registrar does not try to assign the address to another user.
In the Vlan2 subnet, there are these static IP addresses:
The other subnets use these router interfaces:
Step 3 If you have not already done so, create the required interfaces on the router. Here is the interface output from the show config command for the router on this sample network, with the first interface omitted:
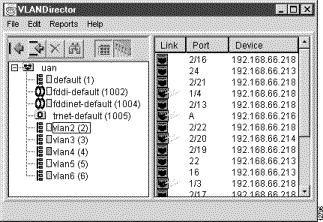
Step 4 If you have not already done so, create VLANs on the switches using the CWSI Campus VlanDirector application (or the switch's command line). In this sample network, there are four VLANs:
Figure 2-5 shows how this looks in VlanDirector, with a few extra VLANs defined but not used on the example network.
Step 5 Install URT as described in "Install the CWSI Upgrade and User Registration Tool (URT) Management Interface" and "Install the URT Server."
Step 6 Complete the configuration steps described in "Create the Initial URT Configuration." These steps show the specific entries for this sample network:
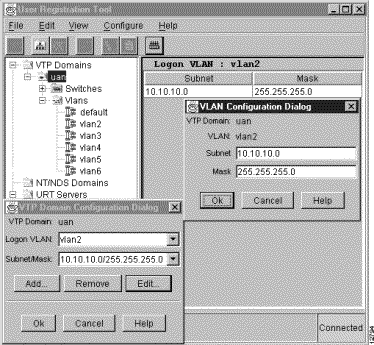
(a). For the logon VLAN, use vlan2. The VTP domain in this network is uan. Select uan, and select Edit>Assign Logon VLAN, then select vlan2 in the VTP Domain Configuration Dialog window.
Figure 2-6 shows the results of assigning vlan2 as the logon VLAN for the uan VTP domain. In the Subnet/Mask field of the VTP Domain Configuration Dialog window, you can see the subnet used by vlan2. This subnet was defined in DHCP in Step 2. If you click Add or Edit in this window, you can see the VLAN Configuration Dialog window (also shown in the figure) with the subnet and mask. You can add or change the subnet/mask pair if URT discovers the incorrect addresses.
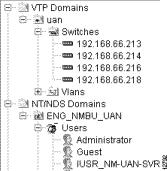
(b). Add your NT domains and NDS directories, following the instructions in "Add NT and NDS Domains to the URT Domain List." Figure 2-7 shows how URT would look after adding the ENG_NMBU_UAN domain.
(c). Assign the users in the NT domains and NDS directories to appropriate VLANs, following the instructions in "Associate Users, Groups, or Organizational Units to VLANs."
(d). Select File>Save to Database to save your changes and make them active on the network.
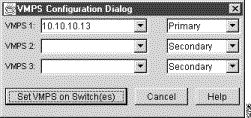
(e). Configure VMPS on the switch to use the URT server as the VMPS server. In our example network, the URT server is on 10.10.10.13. Select the switch in the URT left-hand pane, and select Configure>Configure VMPS. In the VMPS Configuration Dialog window, select the URT server in the VMPS 1 field. Figure 2-8 shows how this would look in URT. If you have more than one URT server (Cisco recommends at least two URT servers), select the second server in VMPS 2. For more information on setting VMPS on the switch, see "Configure the Switches to Use the URT Server as the VMPS Server."
(f). Change the port state on the switches to dynamic following the instructions in "Change Switch Port State to Dynamic."
(g). Install the URT client service following the instructions in "Install the URT Client Service on Windows NT Clients."
(h). Install the URT logon script following the instructions in "Install the URT Script on the Domain Controller."
After these steps are complete, user logons are directed through the URT servers during the Windows NT network logon. URT then resets the switch port to the VLAN you assigned the user.
![]()
![]()
![]()
![]()
![]()
![]()
![]()
![]()
Posted: Wed May 14 10:43:04 PDT 2003
All contents are Copyright © 1992--2003 Cisco Systems, Inc. All rights reserved.
Important Notices and Privacy Statement.
 Select the user, group, or organizational unit name in the list and click the Associate VLAN with Users/Groups button.