|
|

Table Of Contents
Configuring a Certificate Trustpoint Using the Wizard
Setting up a Proxy Service Trustpoint
Configuring a Trustpoint and RSA Key Pair
Configuring SSL Certificate Attributes
Configuring Enrollment Parameters
Selecting a CA Certificate Source
Importing a CA Certificate Chain
Delivering Configuration to an SSL Module
Viewing Trustpoint Configuration Status
Viewing Certificate Signing Request (CSR)
Importing and Exporting Certificates
Importing Certificates from an External PKI System
Exporting Certificates Using the Wizard
Viewing Certificate Export Wizard Summary
Viewing the Certificate Export Status
Exporting Certificates in Bulk Using the Certificate Export Wizard
Selecting Certificates and Format (PEM, PKCS#12)
Specifying the Destination (PEM)
Specifying the Destination (PKCS#12)
Viewing Certificate Trustpoints
Certificate Trustpoint Grouper
Certificate Trustpoint Details
Authenticating and Enrolling Trustpoints
Importing SSL Certificate Trustpoints
Editing Trustpoint Configuration
How Do I Import an SSL Certificate and Private Key to SSLSM?
How do I Import a CA Certificate Chain on the SSLSM?
How do I generate a Certificate Signing Request (CSR)?
How do I import the SSL certificate obtained using CSR?
How Do I Export Certificates and Private Keys from SSLSM?
How Do I Renew an SSL Certificate?
Managing Certificates
A Trustpoint is an association of a CA Certificate, an RSA Key pair, and the corresponding SSL Client and Server Certificate.
The following topics are described in this section:
•
Getting started with Wizards
•
•
•
•
•
Getting started with Wizards
The details below help you navigate as per the menu.
For more information on Wizards, see Understanding Wizards
Certificate Wizards
The certificate wizards helps you to configure a certificate trustpoint using a wizard, Importing certificates and private keys, and export certificates and private keys.
Configuring a Certificate Trustpoint Using the Wizard
This wizard helps you to configure a certificate Trustpoint, generate the Certificate Signing Request (CSR), and install the SSL certificate obtained using the CSR.
The wizard also helps you to configure certificate authority (CA) Trustpoints and install a CA certificate or a CA certificate chain.
Note
Importing CA Certificate or CA certificate chain
Step 1
Step 2
Step 3
•
•
•
•
Step 4
•
•
•
Generating Certificate Signing Request (CSR)
Step 1
Step 2
•
Step 3
•
Step 4
•
Step 5
•
•
•
Importing the SSL certificate
For more details, see How do I import the SSL certificate obtained using CSR?.
Import Certificates and Private Key
This wizard lets you to import certificates and private key to SSLSM from an external public key infrastructure (PKI). You can import certificates in X.509 PEM, X.509 DER, PKCS#7, or PKCS#12 format. The instructions below guides you through the steps based on the format and source of the certificates.
Importing CA Certificate, SSL Certificate and Private Key.
To launch the task, see Importing Certificates from an External PKI System
Importing in PEM format- Local Hard Disk
Step 1
Step 2
•
•
Importing in PEM format- Copy-and-paste
Step 1
Step 2
Step 3
Step 4
•
•
Importing in PEM format- Remote system
Step 1
•
Step 2
•
•
Importing in DER, PKCS#12, or PKCS#7
See the following sections:
•
•
Importing CA Certificate chain, SSL Certificate and Private Key
To launch the task, see Importing Certificates from an External PKI System
Importing in PEM - Local Hard Disk
Step 1
Step 2
•
•
Importing in PEM- Copy- and- paste
Step 1
Step 2
Step 3
Step 4
•
•
Importing in PKCS#12, or PKCS#7
See the following sections:
•
•
Export Certificates and Private Keys
This wizard lets you to export certificates and private keys from the SSLSM in PKCS#12 or PEM format. You can export certificates and private keys to an external system (local hard disk or remote server) or to another SSLSM. When exporting the certificates in PEM format, you can optionally choose to export the CA certificates in the certificate chain.
The instructions below guides you through the steps based on the format and source of the certificates.
To launch the task, do the following:
Step 1
Step 2
Step 3
Exporting in PEM format- Local Hard Disk
Step 1
Step 2
Step 3
•
•
•
Exporting using Copy and Paste method
Step 1
•
Step 2
•
•
•
Exporting to Remote system
Step 1
Step 2
Step 3
•
•
•
Exporting to Redundant SSLSM
Step 1
Step 2
Step 3
•
•
•
PKCS#12
Step 1
Step 2
Exporting to Remote system
Step 1
Step 2
Step 3
•
•
•
Exporting to Redundant SSLSM
Step 1
Step 2
Step 3
•
•
•
Understanding Wizards
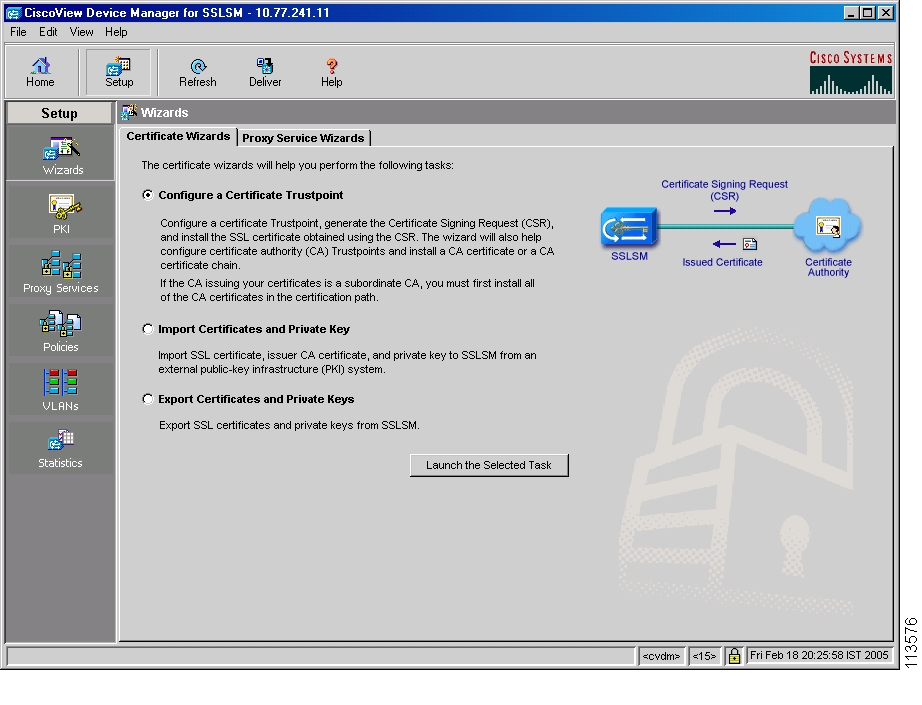
Wizards helps you to configure keys, certificates, and proxy services. You can access Certificate Wizards and Proxy Service Wizards from this page.
Figure 3-1 Wizards page
The following topics are included in this section:
Certificate Wizards
The Certificate Wizards helps you to configure keys and certificates. You can either create certificates and enroll them to the CA or import the certificates and the associated keys from an external PKI system. You can export the certificates and private keys using wizards.
•
•
•
•
Proxy Service Wizards
The Certificate Wizards helps you to configure Proxy Services.
•
•
Launching Certificate Wizards
To launch certificate wizards, do one of the following:
Step 1
Step 2
Step 3
You can select either of the following tasks:
–
–
–
Step 4
Or:
Step 1
Step 2
–
–
–
Configuring a Certificate Trustpoint Using the Wizard
You can use the wizard to configure a certificate Trustpoint, authenticate, and enroll with a CA using the wizard.
To configure a certificate trustpoint:
Step 1
Step 2
Step 3
Step 4
You can use the wizard to configure either of the following Trustpoints:
•
•
Step 5
Setting up a Proxy Service Trustpoint
You can use any one of the following options to set up a proxy service trustpoint:
•
•
To create a new Proxy Service Trustpoint:
Step 1
Step 2
Step 3
Step 4
Step 5
Step 6
Step 7
Step 8
Step 9
To configure a Proxy Service Trustpoint using the copy-and-paste method:
Step 1
Step 2
Step 3
Step 4
Step 5
Step 6
Setting up a CA Trustpoint
To configure a CA Trustpoint:
Step 1
Step 2
To configure a CA Trustpoint using the copy-and-paste method:
Step 1
Step 2
Step 3
Configuring a Trustpoint and RSA Key Pair
The Configure Trustpoint and RSA Key Pair page helps you set up a proxy service Trustpoint or a CA Trustpoint. You can either use an existing key pair for the Trustpoint or generate a new key pair.
Note
The following fields appear:
Configuring SSL Certificate Attributes
The SSL Certificate Attributes wizard page allows you to enter the SSL certificate attributes for the certificate Trustpoint. Even though it is not mandatory to fill any of these fields, we recommend you to fill the common name (CN) field.
The following fields appear on the SSL certificate attributes dialog box:
Configuring Enrollment Parameters
The Configure Enrollment Parameters page of the wizard allows you to specify the enrollment parameters for your certificate authority.
The following field appears in the configure enrollment parameters page:
CA
The name of the certificate authority.
•
•
Simple Certificate Enrollment Protocol (SCEP)
Select this to use the SCEP.
CA Server URL
URL of the CA server.
Challenge Password
Enter a Challenge Password.
Confirm the Password
Confirm the challenge password.
Retry Count
Number of retries.
Enable Auto-Enrollment
Select to enable auto-enrollment.
Retry Period (Minutes)
Time to wait for the next retry.
HTTP Proxy
URL of the HTTP proxy to be used for the enrollment.
Port
The port to be used for the enrollment.
TFTP
Select this if you are using TFTP.
CA Server URL
URL of the CA server.
Example: tftp://ipaddress/Certificates/filename
The suffix.ca is appended to the file name.
Copy and Paste / Local Hard Disk
Select this option to Copy-and-Paste the Certificate or specify Certificate from the local Hard Disk.
The TFTP and cut-and-paste feature allows you to generate a certificate request and accept certification authority certificates as well as router certificates. These tasks are accomplished with a TFTP server or manual cut-and-past operations.
You may want to use TFTP or manual cut-and-paste enrollment in the following situations:
•
•
Selecting a CA Certificate Source
The CA Certificate Source page of the wizard allows you to specify the source of the CA certificate. You can import a CA certificate or a CA certificate chain. You can import a certificate chain using X.509 PEM or PKCS#7 format.You can select any of the following formats:
•
•
•
Note
If you have selected X.509PEM, the following options appear:
•
•
•
•
If you have selected X.509 DER, you need to select the CA Certificate File. Click Browse and browse to the directory where you have the certificate file, then select the file.
If you have selected PKCS#7, the following fields appear:
Click Next to continue.
Importing a CA Certificate Chain
You can specify all the certificates in a certificate chain and the wizard will create CA Trustpoints for each of the CA certificate.
A suffix is added to Trustpoint name based on whether the CA certificate is a root or sub-ordinate CA certificate. You can edit the default Trustpoint name by using the CA Trustpoints tab. As the certificates are added, the status of the certificate and certificate chain is displayed.
To import a CA certificate chain:
Step 1
Step 2
Step 3
Step 4
•
•
•
Importing a CA Certificate Chain from a Local Hard Disk
Step 1
Step 2
Step 3
Step 4
Step 5
Step 6
To specify the certificates in the certificate chain:
Step 1
Step 2
Step 3
Note
Importing a CA Certificate Chain using Copy and Paste
Step 1
Step 2
Step 3
Step 4
Step 5
Step 6
To specify the certificates in the certificate chain:
Step 1
Step 2
Click Clear to remove the content or click View Details to view the details of the certificate.
Step 3
Note
Importing a CA Certificate Chain from a TFTP Server
To import a CA certificate chain from a TFTP server:
Step 1
Step 2
Step 3
Step 4
Specify the CA certificate in the certificate chain. You must specify all certificates in the chain from root CA.
The following fields appear:
CA Level
Level of CA in the certificate chain.
CA Certificate File
URL (TFTP) of the CA certificate.
Trustpoint Name
Name of the Trustpoint to which the CA certificate is imported.
You can add certificates to the list. To add a CA certificate:
Step 1
Step 2
Step 3
Note
Note
Configuring Trustpoint Tasks
The Trustpoint Setup Tasks wizard page allows you to select a Trustpoint configuration task that you want to perform on the certificate Trustpoint.
You can select one of the following tasks:
Viewing Wizard Summary
When you use a wizard to perform a configuration, the wizard's Summary page displays the values that you have configured. You can examine those values and click the wizard's Back button to return to a screen on which you need to make a change. When you have made the changes, click the Finish button to save your changes and leave the wizard.
Delivering Configuration to an SSL Module
This page provides information on the CLI commands you have configured.
Click Deliver to deliver the commands to the module
Click Save to File to save the commands to a file.
Click Deliver Later to deliver the commands at a later point of time.
For more information on delivering CLI commands, see Delivering CLI Commands to the Device, page 1-22
Viewing Trustpoint Configuration Status
The Trustpoint Configuration Status dialog box provides the status details of the Trustpoint configuration tasks. The details displayed vary according to the task you selected. The dialog box displays the status against each task. The configuration performed on the module is displayed in the content area. If any task fails, you can review the task details and take necessary action.
Click OK to view the Certificate Signing Request (CSR). For more information on Certificate Signing Request (CSR), see Viewing Certificate Signing Request (CSR)
For authentication, after displaying the status, the finger print information appears. Verify the finger print displayed and accept the certificate to complete the authentication.
Viewing Certificate Signing Request (CSR)
The Certificate Request dialog box provides information on the certificate requested.
Click Save to File to save the certificate request. The file is saved with the default extension.csr.
Click Cancel to close the dialog box.
Importing and Exporting Certificates
You can use wizards to import and export certificates. This section contains the following information:
•
•
•
Importing Certificates from an External PKI System
The Certificate Wizard allows you to import Certificates and Private Keys from an external PKI. You can import certificates in X.509 PEM, X.509 DER, PKCS#7, or PKCS#12 format.
To import certificates using Trustpoint Wizard:
Step 1
Step 2
Step 3
You can import files in either of the following formats:
•
•
•
•
Importing PKCS#12 File
You can use an external PKI system to generate a PKCS#12 file and then import this file to the module.
When creating a PKCS#12 file, include the entire certificate chain, from server certificate to root certificate, and public and private keys. You can also generate a PKCS#12 file from the module and export it.
Note
If you are using SSH, we recommend using SCP when importing or exporting a PKCS#12 file. SCP authenticates the host and encrypts the transfer session.
To import a PKCS#12 File:
Step 1
Step 2
Importing PEM File
To import a PEM File:
Step 1
Step 2
Step 3
Step 4
Step 5
Step 6
You can copy and paste the CA Certificate in PEM format.
To import a PEM File using the copy-and-paste method:
Step 1
Step 2
Step 3
Step 4
Configuring Certificate Source and Format
The Certificate Source and Format page of the wizard allows you to enter the Trustpoint name, format and source.
You can select any of the following formats and select the source of the certificates and private key:
•
•
•
•
X.509 PEM
Step 1
•
•
•
Step 2
Step 3
•
•
PKCS#12
Step 1
X.509 DER
PKCS#7
The wizard will use the following suffixes when creating the CA Trustpoints:
•
•
A passphrase protects a PEM file that contains a private key. The PEM file is encrypted by DES or 3DES.
Enter the details, then click Next.
Specifying Certificates and Private Key
If you have selected to import a certificate chain in X.509 PEM format from the local hard disk you need to specify the CA certificates, SSL (Server/Client) certificate and private key.
You must specify all CA certificates in the chain from the root CA to the issuer of the SSL certificate.
The following fields appear:
Specifying CA Certificates
If you have selected to import a certificate chain in X.509 PEM format using the copy and paste method, you need to specify the CA certificates from the root CA to the issuer of the SSL certificate. The following fields appear:
Click Next to continue.
Configuring Certificates and Key Files (PEM - Local Hard Disk)
The Certificates and Key Files dialog box allows you to specify the location of the certificates and key files.
The following fields are displayed:
Note
Configuring Certificates and Key Files (PEM - Remote System)
The Certificates and Key Files dialog box allows you to specify the location of the certificates and key files.
The following fields appear:
Note
Specifying a CA Certificate (PEM)
This page of the wizard allows you to copy-and-paste the CA certificate in PEM format.
In Certificate Trustpoint Setup Wizard you can browse and specify the CA certificate file.
In Certificate Import Wizard you can select the CA certificate from the CA (Certificate Issuer) drop-down list. If you select any of the CA, the certificate details are displayed.
Click Next to continue.
Specifying Private Key (PEM Format)
Copy and paste the RSA private key in PEM format and enter the passphrase used to protect the key.
Click Next to continue.
Specifying SSL Certificate (PEM Format)
Copy and paste the SSL Certificate in PEM format.
Click Next to continue.
Viewing the Summary
When you use a wizard to perform a configuration, the wizard's Summary screen displays the summary of the certificate you are about to import.
You can examine the values and click the Back button to return to a screen on which you need to make a change. When you have made the changes, click the Finish button to import the certificate and leave the wizard.
Delivering Configuration to SSL Module
This page provides information on the CLI commands you have configured.
Click Deliver to deliver the commands to the module
Click Save to File to save the commands to a file.
Click Deliver Later to deliver the commands at a later point of time.
For more information on delivering CLI commands, see Delivering CLI Commands to the Device, page 1-22
Viewing the Certificate Import Status
The certificate import status dialog box dialog box provides the status details of the Trustpoint configuration tasks. The details displayed vary according to the task you selected. The dialog box displays the status against each task.
The configuration performed on the module is displayed in the content area. If any task fails, you can review the task details and take necessary action.
Exporting Certificates Using the Wizard
You can export certificates using either PKCS#12 file format or privacy-enhanced mail (PEM) file format.
Exporting certificates of more than one Trustpoint
To export certificates of more than one Trustpoint, see Export Certificates and Private Keys.
Exporting certificates of a selected Trustpoint
Step 1
Step 2
Step 3
Step 4
Step 5
You can export Trustpoints in using PKCS#12 or PEM format.
For more information on exporting Trustpoints in PKCS#12 file format, see Exporting PEM Files.
For more information on exporting Trustpoints in PKCS#12 file format, see Exporting PKCS#12 Files.
Exporting PKCS#12 Files
To export a PKCS#12 File:
Step 1
Step 2
Exporting PEM Files
To export a PEM File:
Step 1
You can select any of the following:
•
•
•
Step 2
Step 3
Certificate Format and Destination
The Certificate Format and Destination page of the wizard allows you to specify the Trustpoint name and then select the format and destination.
The dialog box displays following fields:
If you select PEM, the following fields appear:
If you select PKCS#12, the following fields appear:
Certificate and Key Pair Files (PEM - Local Hard Disk)
The Certificate and Key Pair Files (PEM Local Hard Disk) page of the wizard allows you to export PEM files from your local hard disk.
The following fields appear:
Certificate and Key Pair Files (PEM - Remote File System)
The Certificate and Key Pair File (PEM Remote File System) page of the wizard allows you to export a PEM file from a remote file system.
This page allows you to protocol, certificate and private key file destination details.
The following fields appear:
Viewing Certificate Export Wizard Summary
When you use a wizard to perform a configuration, the wizard's Summary page displays the values that you have configured. You can examine those values and click the wizard's Back button to return to a screen on which you need to make a change. When you have made the changes, click the Finish button to save your changes and leave the wizard.
Viewing the Certificate Export Status
The certificate export status dialog box dialog box provides the status details of the certificate export tasks. If the task fails, you can review the task details and take necessary action.
Exporting Certificates in Bulk Using the Certificate Export Wizard
The Certificate Export Wizard allows you to select multiple Certificates and Private Keys and export them.
To export certificates using Certificate Export Wizard:
Step 1
Step 2
Step 3
You can export the certificates in either of the following formats:
•
•
To export certificates and private keys in X.509 PEM format:
Step 1
Step 2
Step 3
To export certificates and private keys in PKCS#12 format:
Step 1
Step 2
Step 3
Selecting Certificates and Format (PEM, PKCS#12)
This page of the wizard helps you to specify the certificates to be exported and the format in which you want them to be exported.
The certificates are listed in the Certificates table. The following fields are displayed:
SSL Certificate Subject
The subject of the SSL certificate.
Certificate TrustPoint
The Trustpoint name of the certificate.
Select Export CA Certificate in the Chain to export the CA Certificates in the certificate chain of the selected certificates.
You can add and remove Certificates from the list:
•
•
Select the Format in which you want to export the certificate. You can export the certificates in X.509 PEM format or PKCS#12 format.
If you have selected X.509 PEM format, specify the following:
Encryption
The following are the encryption options:
3DES
Passphrase
Enter the passphrase.
Confirm Passphrase
Re-enter the passphrase to confirm.
Select the check box against Export CA Certificates in certificate chains to enable the export of the CA certificates in certificate chains.
If you have selected PKCS#12, specify the following:
Passphrase
Enter the passphrase.
Confirm Passphrase
Re-enter the passphrase to confirm.
Adding Certificates and Trustpoints for exporting
To add certificates and trustpoints to the export list:
Step 1
Step 2
Step 3
Step 4
Step 5
Step 6
Step 7
Trustpoint Name
The name of the Trustpoint.
Subject Name
The name of the subject.
Issuer Name (CA)
The name of the issuer.
Step 8
Step 9
Proxy Service Name
The name of the proxy service.
Subject Name
The name of the subject.
Issuer name (CA)
The name of the issuer.
Step 10
Specifying the Destination (PEM)
You can select any one of the following destination for theX.509 Format:
•
•
•
•
Note
Specify Destination Details (PEM - Local Hard Disk)
You can specify the destination details using this page.
The following fields are displayed:
If you have selected the Export CA Certificate in Certificate Chains in the step 1 then the CA Certificates in Certificate Chains table with the following details are displayed.
Displays the chain of certificate authority names.
Displays the chain of CA certificate file names.
Click Next to continue.
Specify Destination Details (Copy and Paste)
This page is enabled only when exporting a single Trustpoint. Once the export is completed, exported certificates and privates keys are displayed. You can copy and paste the certificate and save the file.
Specify Destination Details (PEM - Remote System)
Specify the details of the Remote system where you want the certificates and private keys to be exported.
The following fields are displayed:
To edit the CA certificate, SSL certificate, and, Private Key, select the Trustpoint name in the table and click Edit.
Click Next to continue.
Specify Destination Details (PEM - Redundant SSLSM)
You can export certificates to a redundant SSLSM. The Wizards will use the same Trustpoint name as the selected Trustpoint on the redundant SSLSM. You can edit the names if required.
Note
The following fields are displayed:
To edit the redundant SSLSM Trustpoint Name select the row in the table and click Edit.
If you have selected the Export CA Certificate in Certificate Chains in the step 1 then the CA Certificates in Certificate Chains table with the following details are displayed.
To edit the redundant SSLSM Trustpoint Name select the row in the table and click Edit.
Click Next to continue.
Specifying the Destination (PKCS#12)
You can select any one of the following destination for theX.509 Format:
•
•
Specify Destination Details (PKCS#12 - Remote System)
Specify the details of the Remote system where you want the certificates and private keys to be exported.
The following fields are displayed:
To edit the PKCS#12 files, select the row in the table and click Edit.
Click Next to continue.
Specify Destination Details (PKCS#12 - Redundant SSLSM)
You can export certificates to a redundant SSLSM. The Wizards will use the same Trustpoint name as the selected Trustpoint on the redundant SSLSM. You can edit the names if required.
You need to specify a staging area. The certificates are exported to the staging area and then imported to the redundant SSLSM from the staging area.
Note
To edit the PKCS#12 files and Redundant SSLSM Trustpoints, select the SSL Certificate Subject in the table and click Edit.
Click Next to continue.
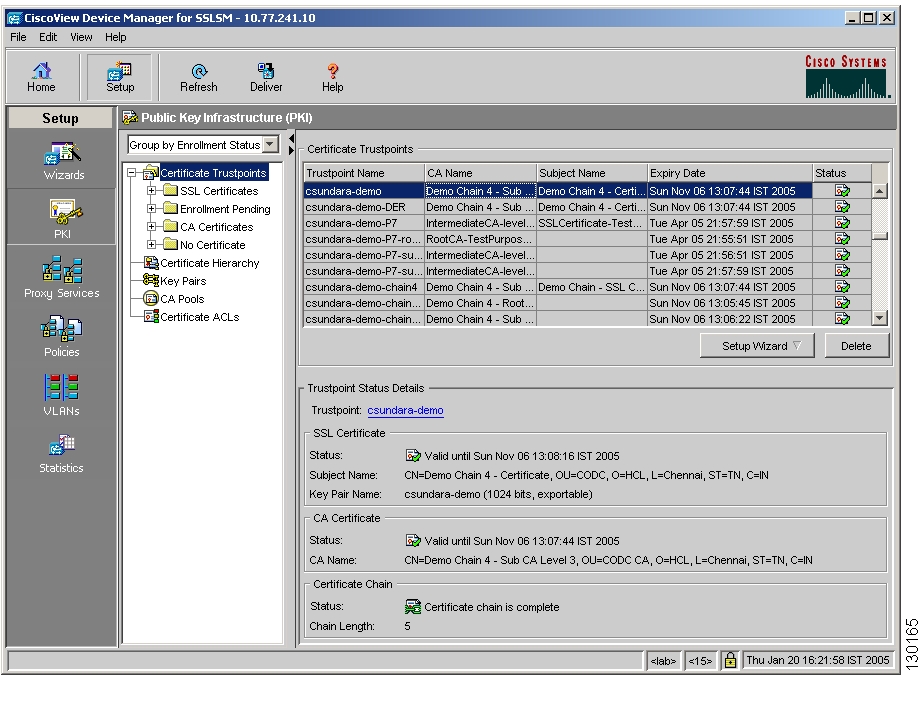
Viewing Certificate Trustpoints
The Certificate Trustpoint page shows all certificate Trustpoints configured on the SSL Services Module.
Figure 3-2 Public Key Infrastructure Page
To view all Trustpoints:
Step 1
The following information is displayed for Trustpoints:
Select a Trustpoint name from the table to view the following Trustpoint status details.
You can launch wizards to configure a Trustpoint. To launch the wizard, click Setup Wizard, then select one of the following options:
•
•
Select a Trustpoint, then click Delete to delete a trustpoint.
Certificate Trustpoint Grouper
You can group Trustpoints based on different common parameters.
To group the Trustpoints:
Step 1
•
–
–
–
–
•
•
•
Based on your selection, Trustpoints are grouped under the Trustpoints node in the object Selector.
Certificate Trustpoint Details
You can view the configuration and certificate details of a selected Trustpoint.
Figure 3-3 Public Key Infrastructure Details
Step 1
Step 2
Step 3
The following fields are displayed:
To view SSL certificate details, click SSL Certificate Tab.
To view CA Certificate details, click CA Certificate Tab.
To view Certificate chain details, click Certificate Chain Tab. The certificate chain is displayed in tree format. Each node displays the subject of the certificate.
You can view the details of each certificate on the chain. The following fields are displayed:
Click Operations and select any one of the following Trustpoint operations:
Authenticate
Select this option to authenticate a CA certificate.You must configure the enrollment method for the Trustpoint to perform this operation.
For more information on authenticating a Trustpoint, see Authenticating Trustpoints
Enroll
Select this option to create a certificate request. You must configure the enrollment method and key pair to perform this operation.
For manual enrollment methods (Copy and Paste/TFTP) a certificate request will be created. For SCEP enrollment, the certificate request will be sent to the CA server.
For SCEP enrollment, you must configure a Challenge Password. If password is not configured, a challenge password dialog box will appear.
For more information on authenticating a Trustpoint, see Enrolling Trustpoints
Authenticate and Enroll
Select this option to authenticate a CA certificate and create a certificate request. For manual enrollment (Copy and Paste/TFTP) a certificate request will be created. For SCEP enrollment, the certificate request will be sent to the CA server.
You must configure enrollment method and key pair for the Trustpoint to perform this operation.
For SCEP enrollment, you must configure a Challenge Password. If password is not configured, a challenge password dialog box will appear.
For more information on authenticating a Trustpoint, see Authenticating and Enrolling Trustpoints
Import SSL Certificate
Select this option to import an SSL certificate issued by the CA for manual enrollment (Copy and Paste/TFTP).
For more information on authenticating a Trustpoint, see Importing SSL Certificate Trustpoints
Renew
Select this option to create a new certificate request. You can optionally regenerate the keys when creating the certificate request.
For manual enrollment methods, a certificate request will be created. For SCEP enrollment, the certificate request will be sent to the CA server.
This option is enabled only for Trustpoints with SSL certificate.
For more information on authenticating a Trustpoint, see Renewing Trustpoints
Export
Select this option to export the certificate and private key associated with the Trustpoint. You can export the certificate only if the private key is exportable.
For more information on authenticating a Trustpoint, see Exporting Trustpoints
To edit the Trustpoint configuration, click Edit. For more information on editing Trustpoints, see Editing Trustpoint Configuration
Authenticating Trustpoints
The Trustpoint Authentication dialog box provides the authentication details and the status.
To authenticate a truspoint, do the following:
Step 1
Step 2
Step 3
Enrolling Trustpoints
To enroll a certificate truspoint, do the following:
Step 1
Step 2
Step 3
Authenticating and Enrolling Trustpoints
To authenticate and enroll a certificate truspoint, do the following:
Step 1
Step 2
Step 3
Importing SSL Certificate Trustpoints
To import a SSL Certificate, do the following:
Step 1
Step 2
Step 3
Renewing Trustpoints
To renew a certificate trustpoint, do the following:
Step 1
Step 2
Step 3
Step 4
Exporting Trustpoints
To export a SSL Certificate, do the following:
Step 1
Step 2
Step 3
Editing Trustpoint Configuration
Step 1
Step 2
Trustpoint Name
Name of the Trustpoint.
Key Pair Name
Name of the key pair associated with the Trustpoint.
Click
and select one of the following:
•
•
•
•
Certificate Purpose
Select the purpose of the certificate from the list:
•
•
Enrollment Method
Select one of the following certificate enrollment method:
•
•
•
CA Server URL
Enter the enrollment URL of the certification authority server.
Retry Count
Enter the number of retries.
Retry Period
Enter the interval between the retries.
HTTP Proxy
Enter the IP address of the HTTP proxy.
Port
Enter the port number for the HTTP proxy.
Auto Renewal and Enrollment
Select the checkbox to enable auto renewal and enrollment.
Renewal Percentage (%)
Enter the percentage of renewal. Default is 100%.
Challenge Password
Enter the Challenge Password.
Click
and select one of the following options:
•
•
Regenerate Keys on Re-enrollment
Select this checkbox to regenerate key on re-enrollment.
x.500 CDP Information
Enter the X.500 CDP information.
You can enter the hostname and port if the CDP is in X.500 DN format. The query takes the information in the following form: ldap://hostname:[port]
For example, if a certificate being validated has the following:
•
•
then the two parts are combined to form the complete URL as follows:
ldap://10.1.1.1/CN=CRL,O=Cisco,C=US.
Note
CRL Validation
Select the type of CRL validation to be used for the certificate:
•
•
•
Certificate ACL
Enter the Certificate ACL information.
Step 3
Selecting Available ACLs
The following information appears:
Select ACLs from the table, then click OK.
Selecting Available Key Pairs
The following information appears:
Select key pairs from the table, then click OK.
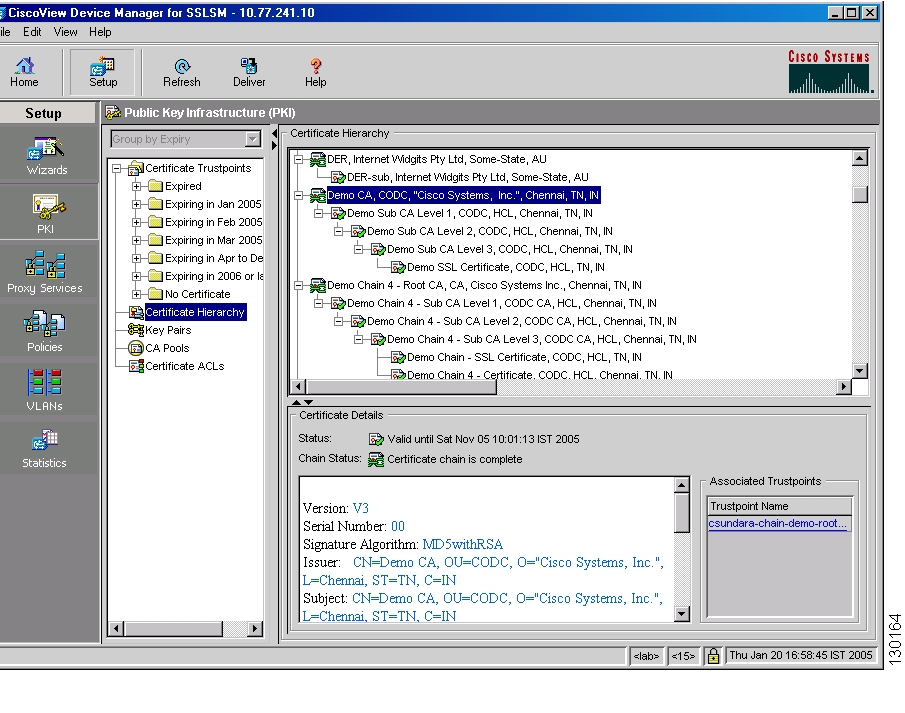
Certificate Hierarchy
Certificate Hierarchy helps you to browse through the certificates imported on the SSLSM and visualize the certificate hierarchy. You can also see the validity status and the certificate chain status in the certificate tree.
In the Associated Trustpoints table, you have the hyperlinks to the associated Trustpoints. You can view and configure the trustpoints by clicking the hyperlink.
To view the Certificate Hierarchy:
Step 1
Step 2
Figure 3-4 PKI > Certificate Hierarchy Page
Deleting Certificates
Step 1
Step 2
Step 3
Challenge Password
Challenge password is required for SCEP enrollment. If you have not configured a challenge password, challenge password dialog will be prompted.
This password is necessary in the event that you ever need to revoke your certificate(s). When you ask the CA administrator to revoke your certificate, you must supply this challenge password as a protection against fraudulent or mistaken revocation requests.
The Challenge Password dialog box has got two fields. Challenge Password and Confirm Password. Enter the password and confirm it. Click OK to continue.
How Do I...
This section describes on how to achieve a task. The following questions are answered:
•
•
•
•
•
•
How Do I Import an SSL Certificate and Private Key to SSLSM?
The Certificate Import Wizard helps you to import the SSL certificate and the private key on the SSLSM. If you are importing the SSL certificate and private key from your client machine, you could also import the associated CA certificate chain.
Step 1
Step 2
Step 3
You can import files in any of the following format:
•
•
•
•
Note
Note
For details on Certificate Import Wizard, see Import Certificates and Private Key.
How do I Import a CA Certificate Chain on the SSLSM?
The Certificate Trustpoint Setup Wizard helps you to Import a CA certificate chain.
To configure a certificate Trustpoint:
Step 1
Step 2
Step 3
Step 4
You could Import a CA certificate chain using CA certificates in X.509 Privacy Enhanced Mail (PEM) format or PKCS#7 format.
Importing a CA certificate chain in PEM format
To import a CA certificate chain using CA certificates in PEM format, you need to perform the following tasks:
Step 1
Step 2
Step 3
Review the summary and click Finish. A status dialog will be launched displaying the status of the certificate Trustpoint setup.
To import a CA certificate chain in PKCS#7 format, perform the following tasks:
Step 1
Step 2
Step 3
Review the summary and click Finish. A status dialog will be launched displaying the status of the certificate Trustpoint setup.
How do I generate a Certificate Signing Request (CSR)?
To generate a Certificate Signing Request (CSR), do the following tasks:
•
•
The Certificate Trustpoint Setup Wizard helps you perform the above tasks.
Importing a CA certificate chain
Note
For more details, see How do I Import a CA Certificate Chain on the SSLSM?
Configuring a Certificate Trustpoint
To configure a certificate Trustpoint:
Step 1
Step 2
Step 3
Step 4
Step 5
Step 6
Step 7
•
If SCEP is used, SSLSM sends the certificate request (CSR) to the specified SCEP server. The SSL certificate issued by the CA is automatically imported.
•
In this method, you must specify a filename on your TFTP server.
For example,tftp://10.77.241.10/certs/mycertSSLSM adds file extensions to the filename as follows:
–
For example mycert.ca–
For example mycert.req–
For example mycert.crt•
In this method, the CSR is displayed to you. You can copy the CSR and submit it to your CA.
If certificate Trustpoints exists on the SSLSM, and are enrolled with CAs, the CA field lists the corresponding CA names. If you select a CA, the corresponding enrollment configuration is applied to the new Trustpoint.
Step 8
This step applies only to Copy-and-Paste method. When using the copy-and-paste method, you must specify the certificate of your CA issuing the SSL certificate.
For TFTP method, the SSLSM will download the CA certificate from the TFTP server.
Step 9
Review the summary and click Finish. A status dialog will be launched displaying the status of the certificate Trustpoint setup.
When authenticating the CA certificate, the MD5 fingerprint of the CA certificate will be displayed. You need to manually verify the fingerprint and accept the certificate. For copy-and-paste method, the CSR will be displayed. For TFTP method, the CSR will be copied to the TFTP server.
How do I import the SSL certificate obtained using CSR?
Importing SSL Certificate using Certificate Trustpoint Setup Wizard
If you are using TFTP enrollment method, copy the SSL certificate obtained using the CSR to the TFTP server. You must use the filename configured in the Trustpoint with a.crt file extension.
Step 1
Step 2
Step 3
Step 4
Step 5
Review the summary and click Finish. A wizard status dialog will be launched displaying the status of the SSL certificate import.
Importing SSL Certificate from Trustpoint Details Screen
To import a SSL Certificate, do the following:
Step 1
Step 2
Step 3
Review the summary and click Finish. A wizard status dialog will be launched displaying the status of the SSL certificate import.
How Do I Export Certificates and Private Keys from SSLSM?
The Certificate Export Wizard helps you to export the SSL certificate and the private key from the SSLSM. If you are exporting the SSL certificate and private key to your client machine, you could also export the associated CA certificate chain.
For details of Certificate Export Wizard, see Export Certificates and Private Keys.
How Do I Renew an SSL Certificate?
You can renew Certificates and Key pairs.
Step 1
Step 2
Step 3
Step 4
Review the summary and click Finish. A status dialog will be launched displaying the status of the certificate Trustpoint setup.
![]()
![]()
![]()
![]()
![]()
![]()
![]()
![]()
Posted: Fri Apr 15 04:10:59 PDT 2005
All contents are Copyright © 1992--2005 Cisco Systems, Inc. All rights reserved.
Important Notices and Privacy Statement.