|
|

Table Of Contents
Assigning Policies to Proxy Services
Viewing HTTP Header Insertion Policy
Adding HTTP Header Insertion Policy
Editing HTTP Header Insertion Policy
Deleting HTTP Header Insertion Policy
Managing Policies
The CVDM-SSLSM supports defining policies for Proxy Services. The policy templates help the Administrator customize the attributes associated with SSL and TCP stack to suit the needs.
The following policies are supported by the SSLSM:
•
HTTP Header Insertion Policy
Policies are grouped by their type and are displayed as a tree node in the object selector. All configured policies of a type are listed as child nodes under the policy node.
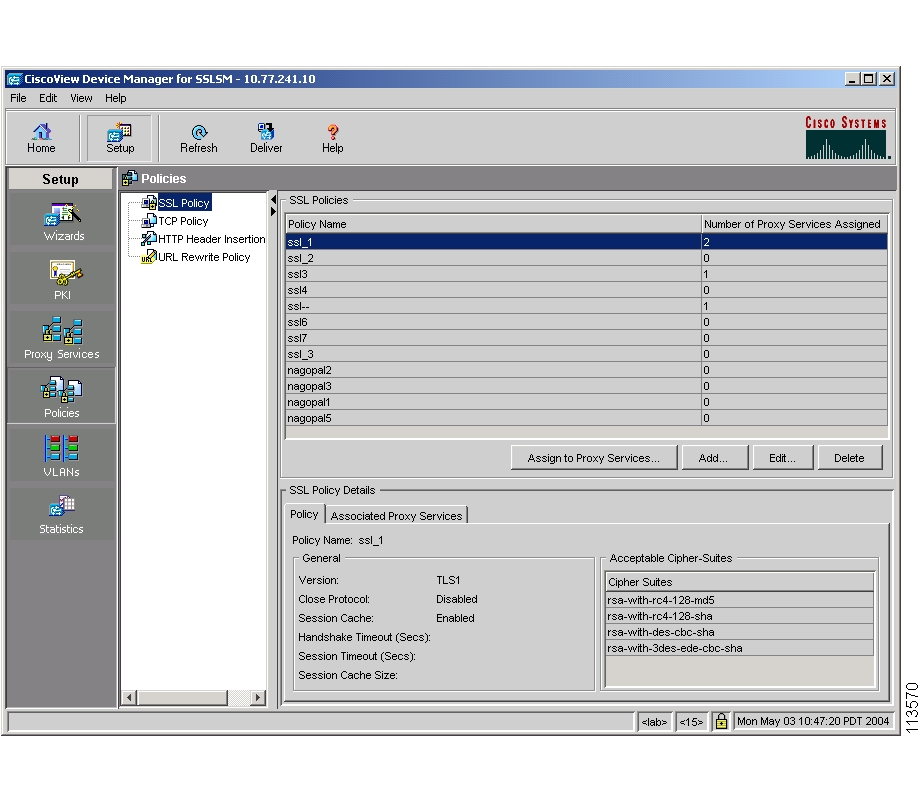
Figure 8-1 Policies Page
TCP Policy
The TCP commands for the SSL Services Module apply either globally or to a particular proxy server.
The TCP policy template allows you to define parameters associated with the TCP stack.
Viewing TCP Policies
To view the TCP Polices:
Step 1
Step 2
The following fields appear:
TCP Policies
Policy Name
Name of the TCP Policy
Number of Proxy Services (Use Count)
Number of proxy services using the TCP Policy.
Select a policy, then click Assign to Proxy Services to assign a policy to the proxy services.
Click Add to add a new TCP policy. The Add TCP Policy dialog box appears.
Select a policy, then click Edit to edit a TCP policy. The Edit TCP Policy dialog box appears.
Select a policy, then click Delete to delete the policy.
Step 3
TCP Policy Details
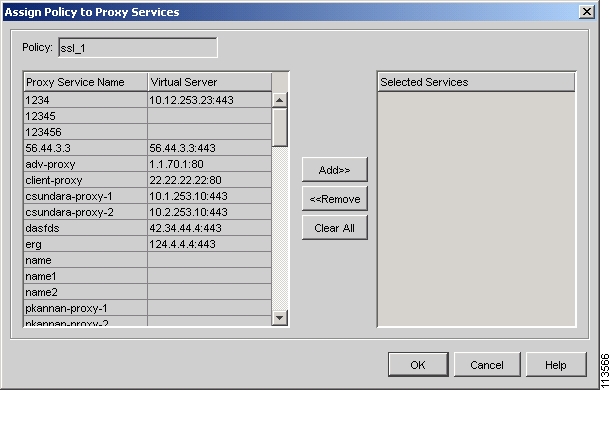
Assigning Policies to Proxy Services
Step 1
Step 2
Step 3
The Assign Policy to Proxy Services dialog box appears with the following details:
Figure 8-2 Assigning Policies to Proxy Service
Step 4
You can remove the a proxy service from the list. Select a service from the list, then click << Remove.
You can clear all the services selected for assigning to a policy. Select a service from the list, then click Clear All.
Step 5
Adding TCP Policy
Step 1
Step 2
Step 3
Step 4
Editing TCP Policy
Step 1
Step 2
Step 3
Step 4
Deleting TCP Policy
Step 1
Step 2
Step 3
SSL Policy
The SSL policy option allows you to define parameters associated with the SSL stack.
If you do not associate an SSL policy with a particular proxy server, the proxy server enables all the supported cipher suites and protocol versions by default.
Viewing SSL Policy
Step 1
Step 2
Policy Name
The name of the SSL policy.
Number of Proxy Services (Use Count)
Number of proxy services using the SSL Policy.
Select a policy from the SSL Policies table, then Click Policy Tab to view the policy details or click Associated Proxy Services tab to view the proxy services associated with the policies
Select a policy, then click Assign to Proxy Services to assign a policy to the proxy services.
Click Add to add a TCP policy. The Add TCP Policy dialog box appears.
Select a policy, then click Edit to edit a TCP policy. The Edit TCP Policy dialog box appears.
Select a policy, then click Delete to delete the policy.
SSL Policy Details
Adding SSL Policies
Step 1
Step 2
Step 3
Step 4
Editing SSL Policies
Step 1
Step 2
Step 3
Step 4
Deleting SSL Policy
Step 1
Step 2
Step 3
HTTP Header Insertion Policy
HTTP header insertion is performed for the following methods: GET, HEAD, PUT, TRACE, POST, DELETE. HTTP header insertion is not performed for the CONNECT method.
Note
You can insert the following header types:
•
If the client does not send a certificate, the SSL handshake fails. There is no data phase or header insertion.
–
Network address translation (NAT) changes the client IP address and destination TCP port number information. When you specify Client IP Port, the SSL module inserts the client IP address and TCP destination port information in the HTTP header, allowing the server to see the client IP address and destination port number.
–
When you specify a custom string, the SSL module inserts the user-defined header verbatim in the HTTP header. You can configure up to 16 custom headers per HTTP header policy. The custom string can include up to 240 characters.
–
The SSL module adds the specified prefix to every inserted HTTP header. Adding a prefix enables the server to identify connections as coming from the SSL module, and not from other appliances. A prefix is not added to standard HTTP headers from the client. The prefix_string can be up to 240 characters.
•
When you configure the SSL module as a client, the SSL module inserts the session ID of the connection between the module and the backend SSL server.
Viewing HTTP Header Insertion Policy
Step 1
Step 2
The following fields appear:
Policy Name
Name of the policy.
Use Count
Number of proxy services using the policy.
Select a policy from the HTTP Header Insertion Policy table, then click Policy Tab to view the policy details or click Associated Proxy Services tab to view the proxy services associated with the policies
Select a policy, then click Assign to Proxy Services to assign a policy to the proxy services.
Click Add to add a new TCP policy. The Add TCP Policy dialog box appears.
Select a policy, then click Edit to edit a TCP policy. The Edit TCP Policy dialog box appears.
Select a policy, then click Delete to delete the policy.
Adding HTTP Header Insertion Policy
Step 1
Step 2
Step 3
Step 4
Editing HTTP Header Insertion Policy
Step 1
Step 2
Step 3
Step 4
Deleting HTTP Header Insertion Policy
Step 1
Step 2
Step 3
URL Rewrite Policy
The URL rewrite feature supports the rewriting of redirection links. The system scans only the Location: HTTP header field in the response from the server and rewrites the rules accordingly. The URL rewrite feature does not support embedded links.
The URL rewrite feature rewrites the protocol and the non-default port (default ports are port 80 for cleartext and port 443 for SSL).
Note
Follow these guidelines for URL rewrite:
•
For example, www.cisco.com takes precedence, then www.cisco.*, then *.cisco.com.
•
•
•
Viewing URL Rewrite Policy
Step 1
Step 2
The following fields appear:
Policy Name
The name of the URL-Rewrite policy.
Number of Proxy Services (Use Count)
Number of proxy services using the SSL Policy.
Select a policy from the URL Rewrite Policy table, then Click Policy Tab to view the policy details or click Associated Proxy Services tab to view the proxy services associated with the policies
Select a policy, then click Assign to Proxy Services to assign a policy to the proxy services.
Click Add to add a URL Rewrite Policy. The Add URL Rewrite Policy dialog box appears.
Select a policy, then click Edit to edit a URL Rewrite Policy. The Edit URL Rewrite Policy dialog box appears.
Select a policy, then click Delete to delete the policy.
Following are the URL Rewrite Policy details:
Adding URL Rewrite Policy
Step 1
Step 2
Step 3
You can specify URL alone. But you cannot add clear port and SSL port without entering a URL value.
Note
To remove a URL Rewrite Rule, select the rule from the table, then click Remove.
Step 4
Editing URL Rewrite Policy
Step 1
Step 2
Step 3
The following fields appear:
You can specify URL alone. But you cannot add Clear Port and SSL Port without entering a URL value.
Note
To remove a URL Rewrite Rule, select the rule from the table, then click Remove.
Step 4
Viewing URL Rules and Outcome
The URL Rules and Outcome dialog box helps you view the URL rules you have set and the outcome of the rules.
To view URL Rules and Outcome:
Step 1
Step 2
Step 3
Step 4
To view rules and outcome for server proxy, Click Rules and Outcome for Client Proxy tab. The following fields appear:
To view rules and outcome for server proxy, Click Rules and Outcome for Server Proxy tab. The following fields appear:
Deleting URL Rewrite Policy
To delete a policy:
Step 1
Step 2
Step 3
![]()
![]()
![]()
![]()
![]()
![]()
![]()
![]()
Posted: Fri Apr 15 04:00:48 PDT 2005
All contents are Copyright © 1992--2005 Cisco Systems, Inc. All rights reserved.
Important Notices and Privacy Statement.