|
|

Table Of Contents
Understanding Workspaces
Workspaces contain multiple views that let you organize workspace content by the type of information they display. When you begin customizing your workspace views, you should consider the types of information you need to view most often, the devices to which you need to pay closest attention, and the level of detail you want to monitor through a particular workspace view. You should also take into consideration the type of workspace, and the types of workspace content you can add. For more information on workspace content, see Chapter 16, "Workspace Content."
About Workspaces
Cisco netManager comes with two workspaces:
•
Home workspace. This is the first screen you see after you log in to the web interface. This universal workspace is designed to house the network information that you typically need. The default Home workspace view cannot be customized, but you can make a copy of it and then add different types of workspace content. For more information on workspace content, see Chapter 16, "Workspace Content."
•
To access the Device Status workspace, select the Device Tab and double-click on a device.
Note
Home Workspace
The Cisco netManager Home workspace is the first screen that you see after you log in to the web interface. This universal workspace is designed to display the network information that you typically need.
The Home Workspace contains three pre-configured views:
•
•
•
Home Page View
The Home Page view cannot be customized, but you can make a copy of it and then add different types of workspace content. It displays typical information about the monitored devices in your network. Specific to the Home Workspace and also on the Home Page view are the following workspace contents:
•
•
Devices
–
–
–
Phones
–
–
Note
•
Problem Areas 1 and Problem Areas 2
Problem Areas 1 and Problem Areas 2 are views that you can decide to keep, alter, expand, or remove. Each page has default workspace content that provides you with troubleshooting information.
For more information on workspace content, see Chapter 16, "Workspace Content." You can also create your own workspace views for the Home Workspace through the Manage Workspace Views dialog box. For more information, see "Managing Workspace Views" section.
Device Status Workspace
The Device Status workspace displays device details for a network device. To access the Device Status workspace, select the Device Tab and double-click on a device. You can change the device-in-context, but the workspace content in each workspace view remain the same. Only workspace content specific to a single device can be placed on a device status workspace. For more information on what types of device workspace content are available, see Device Workspace Content, page 16-4.
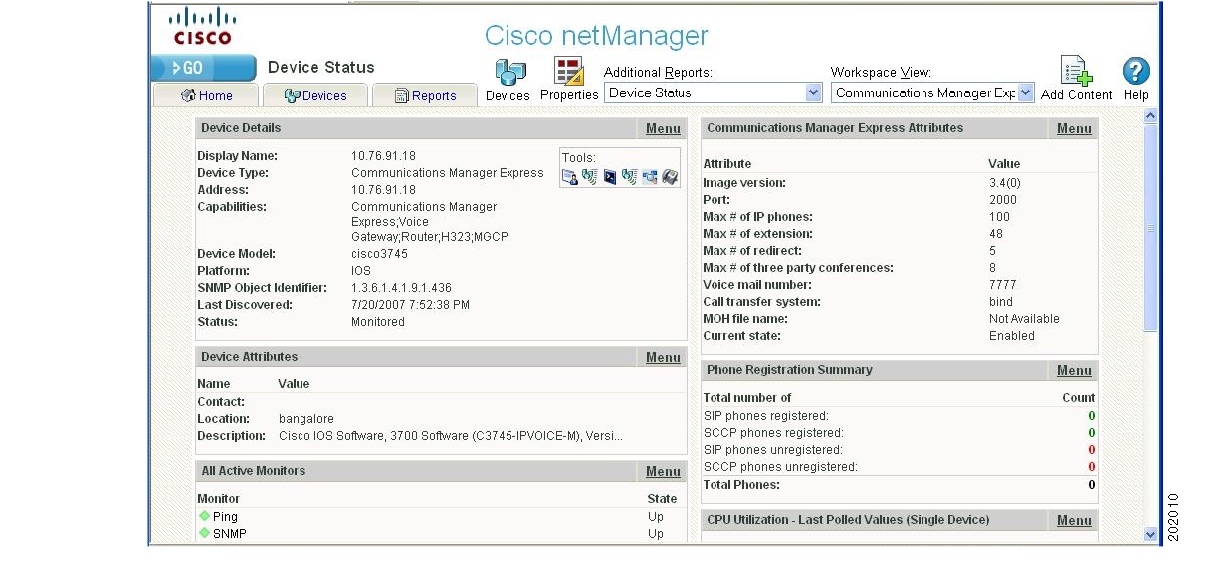
Figure 15-1 Device Status Workspace
Figure 15-1 shows an example of a Device Status workspace. The Devices icon opens the Devices Tab and the Properties icon opens the property attributes for the selected device.
The Device Status workspace has several pre-configured workspace views:
•
•
•
•
You can view full device reports by selecting a report from the More Device Reports drop-down list. For more information on Device Reports, see About Device Reports, page 14-3.
Managing Workspace Views
You can create more of your own workspace views to use along with the pre-configured views. You can create as many as you feel are necessary to organize your system for efficient reporting. You can also edit these views as needed.
From the Workspace View drop-down menu, select Manage Workspace Views.
In the Manage Workspace Views dialog, you can create new workspace views, and edit, copy, or delete an existing workspace view.
•
•
•
•
•
•
Creating a New Workspace View
Step 1
Enter the appropriate information in the following fields:
•
•
•
•
Step 2
Editing a Workspace View
To edit a workspace view:
Step 1
Step 2
•
•
Note
•
•
Step 3
To copy an existing workspace view:
Step 1
Enter the appropriate information in the following fields:
•
•
•
Step 2
To copy a workspace view to another Cisco netManager user:
Step 1
Enter the appropriate information into the following fields:
•
•
Step 2
Deleting a Workspace View
To delete a workspace view:
Step 1
Step 2
Navigating Through Workspaces
The main way to navigate from one workspace view to another is through the Workspace toolbar. From here you can add content to a workspace, manage your workspace and workspace views, and access the Cisco netManager help system.
Workspace Toolbar
•
•
•
About Workspace Content
Workspace content is a quick view of a report. You can customize a workspace by adding additional workspace contents to a workspace view. For more information about workspace content, see Chapter 16, "Workspace Content."
To add workspace content to a workspace view:
Step 1
Step 2
Step 3
![]()
![]()
![]()
![]()
![]()
![]()
![]()
![]()
Posted: Fri Dec 21 13:24:33 PST 2007
All contents are Copyright © 1992--2007 Cisco Systems, Inc. All rights reserved.
Important Notices and Privacy Statement.