Cisco 7200/7400 Series Manager has two performance options: Performance Menus and the Performance Manager. The difference between these two options is that the Performance Manager displays historical data as well as current data in the form of a line chart, bar chart, or table; performance menus display only current data in a raw numerical format.
Interfaces and Related Technology-Specific Windows
Interfaces on port adapters can support multiple technologies. Performance windows are technology-specific. For example, a POS interface supports two technologies:
Generic
SONET
Therefore, to view the performance of a POS interface, you need to view two windows:
Generic Interface Performance
SONET Interface Performance
This applies to all types of interfaces: POS, DS-3, ATM, and Ethernet. The following table lists the technology-specific performance windows that apply to each interface type.
Table 9-1 Interface Types and Performance Windows
Interface Type
Technology-Specific Performance Window
DS-3
Generic DS-3
ATM
Generic SONET
Ethernet
Generic Ethernet
POS
Generic SONET
Starting or Stopping Global Performance Logging
You can enable global performance logging on a chassis object, which puts every object in the chassis into performance logging mode. Any objects in the chassis that are capable of collecting performance data (such as interfaces) are enabled.
To start global performance logging on a chassis:
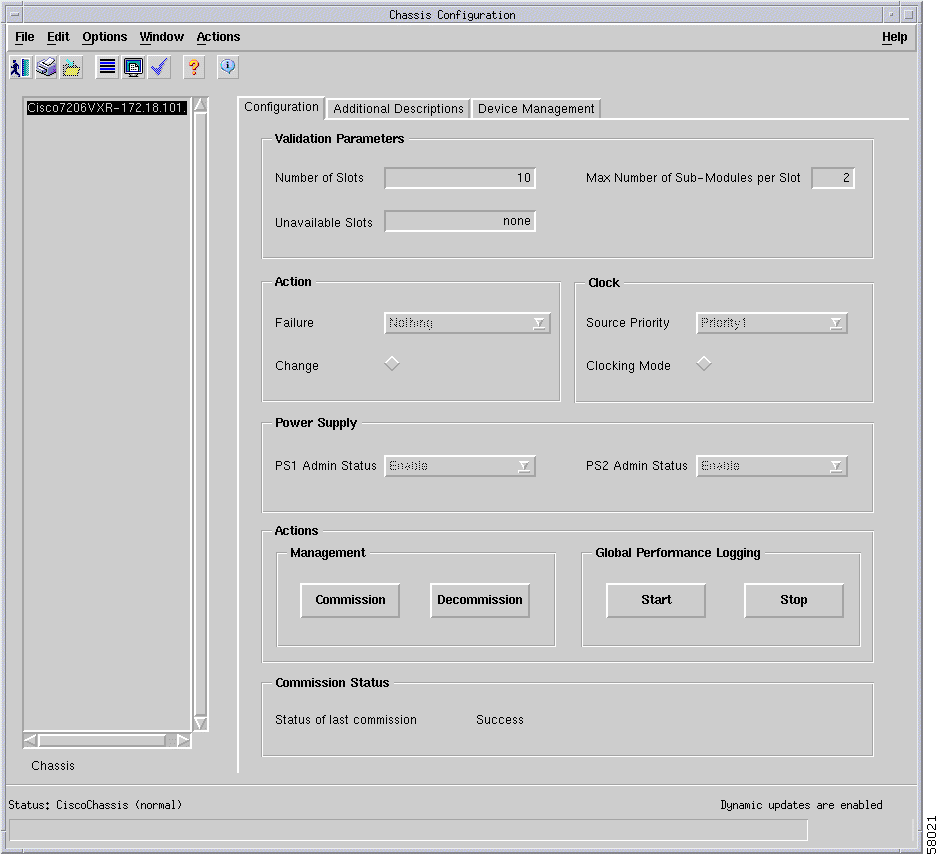
Step 1 Right-click a chassis object, then choose CERM Management > Physical > Chassis > Configuration. The Chassis Configuration window appears, with the Configuration tab displayed (Figure 9-1).
Figure 9-1 Chassis Configuration Window—Configuration Tab
Step 2 Choose the relevant chassis from the list displayed on the left side of the window.
Step 3 Click the Start button in the Global Performance Logging area.
Performance data can now be viewed through performance menus or through the Performance Manager.
Tip Performance logging can also be started or stopped on a per module or physical interface basis. For details on how to start performance logging for a selected module, see the "Module Performance" section. For details on how to start performance logging for a selected physical interface (such as POS, Ethernet, ATM, or DS-3), see the "Stopping or Starting Performance Logging" section.
Generic Interface Performance
The Generic Interface Performance section covers the following topics:
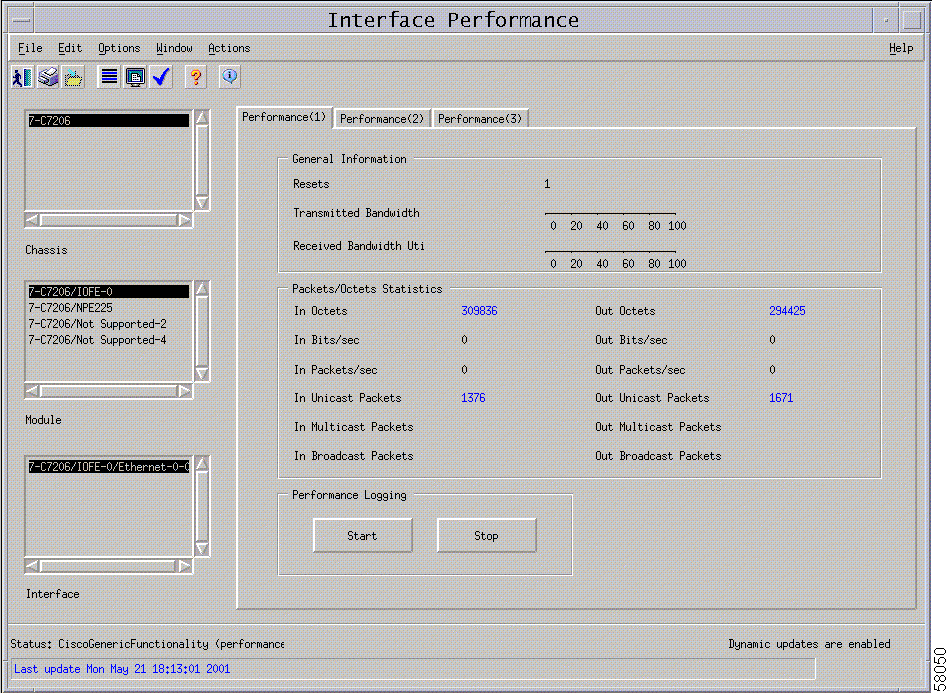
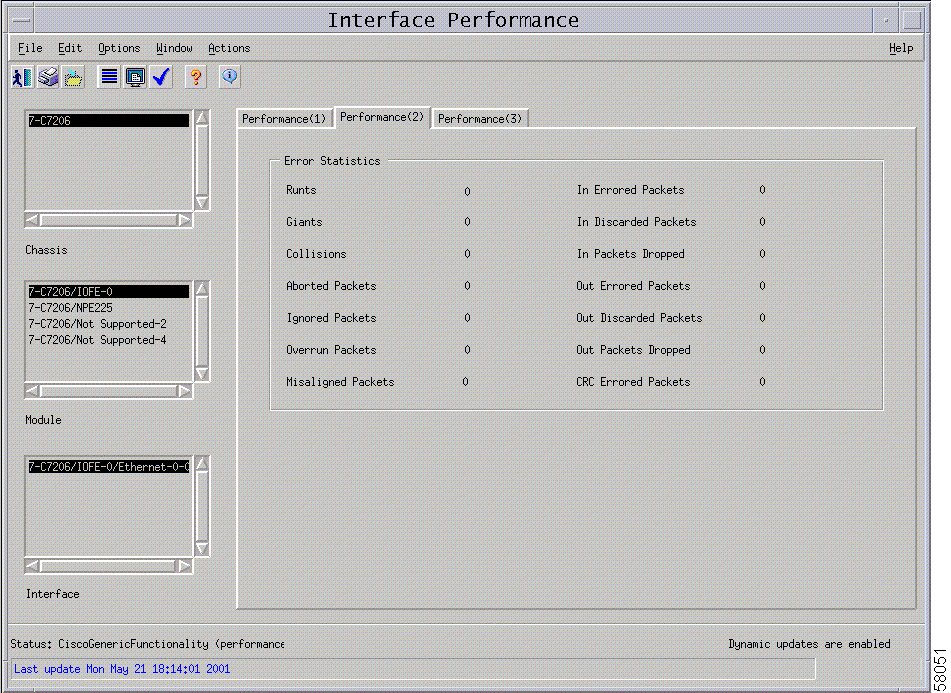
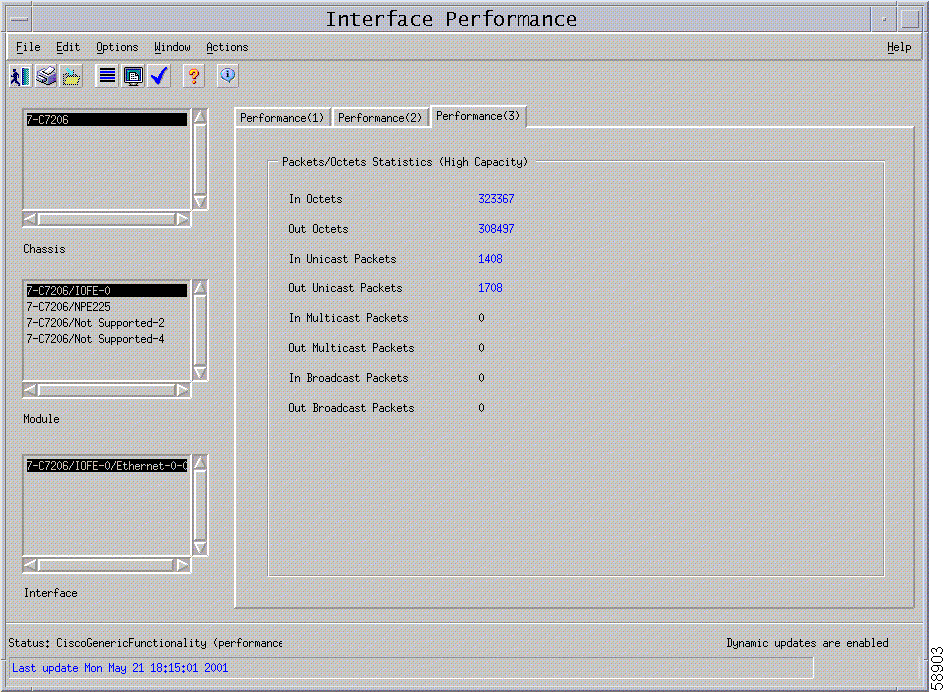
Step 1 Right-click a selected interface, then choose CERM Management > Physical > Interface > Generic > Performance. The Performance (1) tab appears. See Figure 9-2.
Figure 9-2 Interface Performance Window—Performance (1) Tab
Step 2 Choose the relevant chassis, module, and interface from the list boxes on the left side of the window. The interface performance information for the selected interface appears on tabs on the right side.
Stopping or Starting Performance Logging
You can start or stop performance logging on a selected interface by clicking the appropriate button. Starting performance logging allows performance data to be gathered for the selected module.
Performance polling occurs every 15 minutes. Performance data is then gathered and stored for historical review. You can view current performance data in the performance windows, or you can view historical performance data in Performance Manager.
Tip The Start or Stop button will not be available if it has already been selected. You must start performance logging if you want to view historical data in the Performance Manager or if you want to view current data in the performance menus.
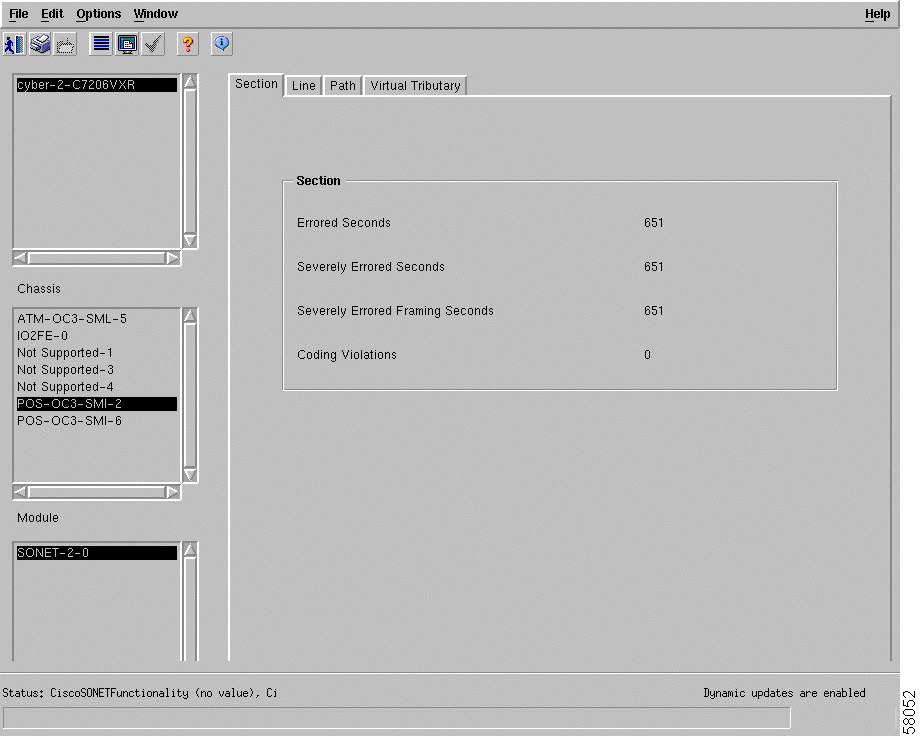
Step 1 Right-click a selected interface, then choose CERM Management > Physical > Interface > SONET > Performance. The SONET Interface Performance window appears with the Section tab displayed as shown inFigure 9-5.
Figure 9-5 SONET Interface Performance—Section Tab
Step 2 Choose the relevant chassis, module, and SONET interface from the list boxes on the left side of the window. The interface performance information for the selected interface appears on tabs on the right side of the window.
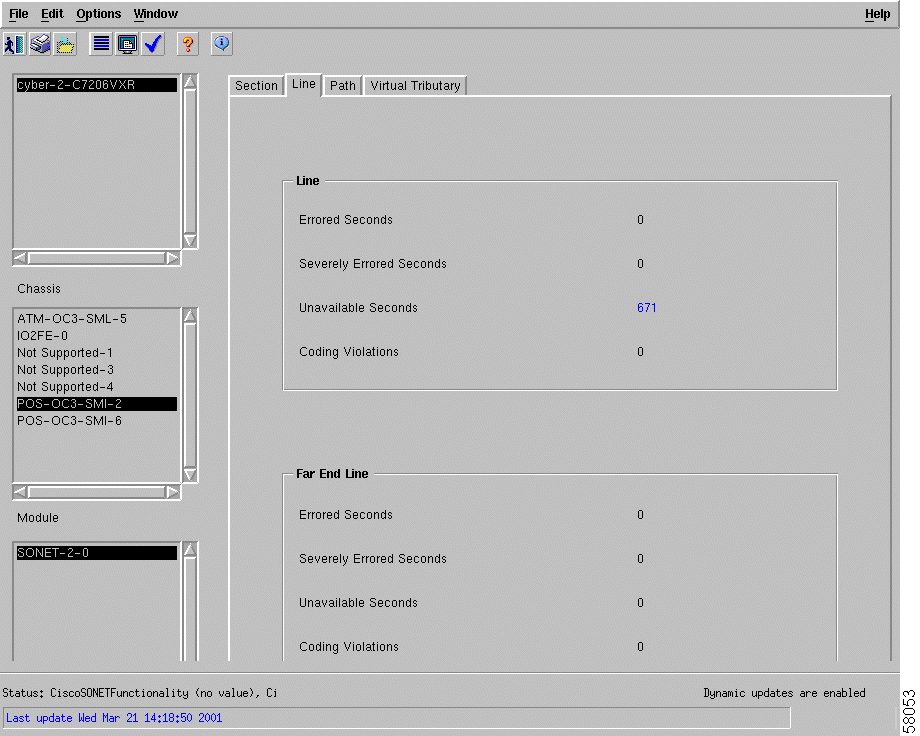
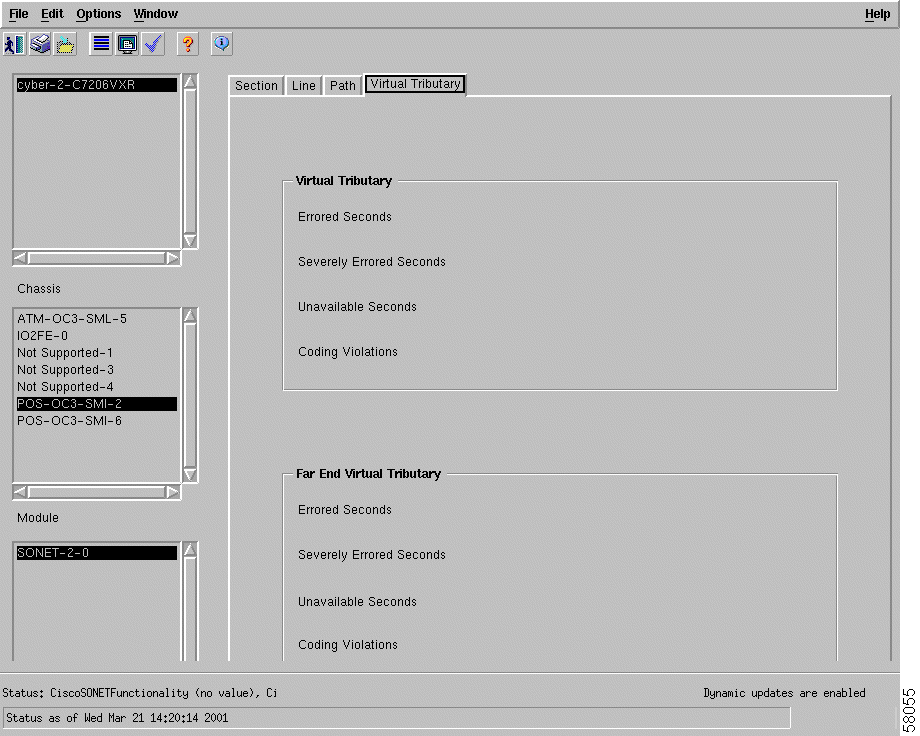
SONET Performance Window—Detailed Description
The SONET Performance window contains four tabs:
Section
Line
Path
Virtual Tributary (not applicable to Cisco 7200/7400 Series Manager)
Section Tab
The Section tab displays the following fields:
Errored Seconds—Number of errored seconds encountered by SONET interface.
Severely Errored Seconds—Number of severely errored seconds encountered by the SONET interface.
Severely Errored Framing Seconds—Number of severely errored framing seconds encountered by the SONET interface.
Coding Violations—Number of coding violations encountered by the SONET interface.
Step 2 Choose the relevant chassis, module, and DS-3/E3 interface from the list boxes on the left side of the window. The interface performance information for the selected interface appears on the tab on the right side of the window.
DS-3/E3 Performance Window—Detailed Description
The DS-3/E3 Performance tab contains two tabs: DS-3 Performance and E3 performance.
DS3 Performance Tab
The DS3 Performance tab contains two areas: DS3 Statistics and far-end DS-3 Statistics.
DS3 Statistics
The DS3 Statistics frame on the DS3 Performance tab displays the errors encountered by the interface:
C-bit Coding Violations—Number of C-bit coding violations encountered by the interface.
C-bit Errored Seconds—Number of C-bit errored seconds detected by the interface.
C-bit Severely Errored Seconds—Number of times C-bit severely errored seconds detected by the interface.
P-bit Coding Violations—Number of P-bit coding violations detected by the interface.
P-bit Errored seconds—Number of times P-bit errored seconds detected by the interface.
P-bit Severely Errored Seconds—Number of P-bit severely errored seconds encountered by the interface.
Unavailable Seconds—Count of the unavailable seconds encountered by the interface.
Far-End DS-3 Statistics
The Far End DS-3 Statistics frame on the DS3 Performance tab displays the following errors:
C-bit Coding Violations—Number of far-end C-bit coding violations encountered by the interface.
C-bit Errored Seconds—Number of far-end C-bit errored seconds detected by the interface.
C-bit Severely Errored Seconds—Number of times far-end C-bit severely errored seconds detect by the interface.
Unavailable Seconds—Count of the far-end unavailable seconds encountered by the interface.
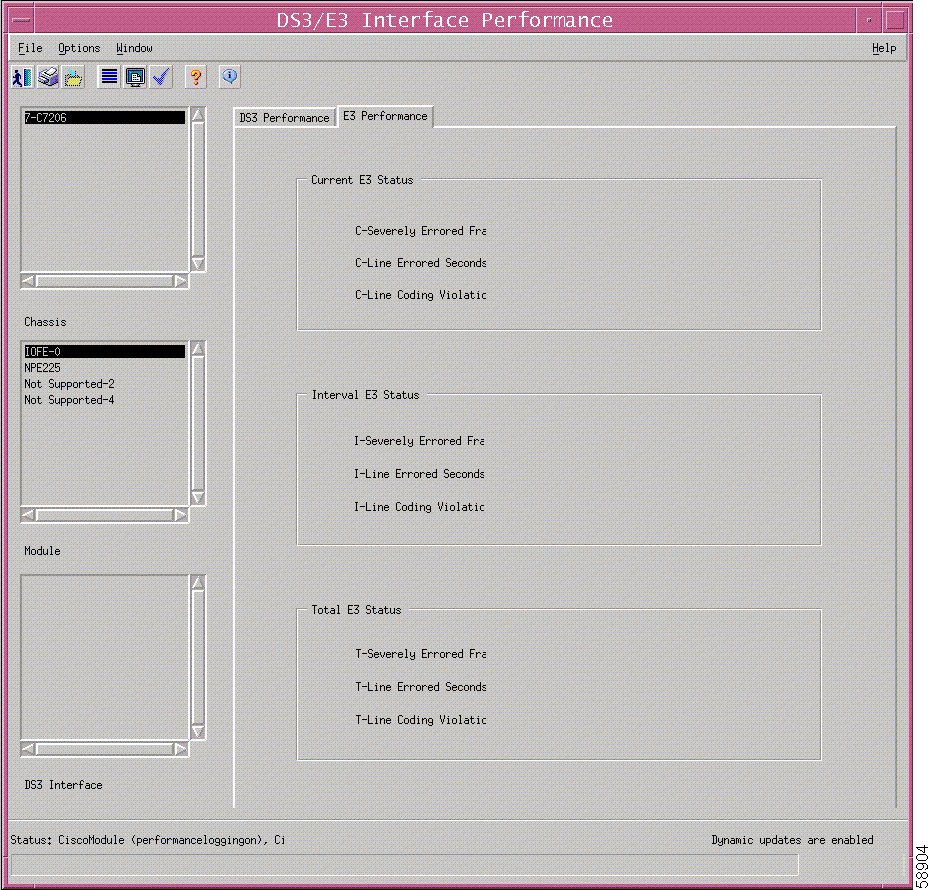
E3 Performance Tab
The E3 Performance tab contains three areas: Current E3 Status, Interval Status, and Total E3 Status (see Figure 9-10).
Step 2 Choose the relevant chassis, module, and interface from the list boxes on the left side of the window. The Ethernet interface performance information for the selected interface appears on the tab on the right side of the window.
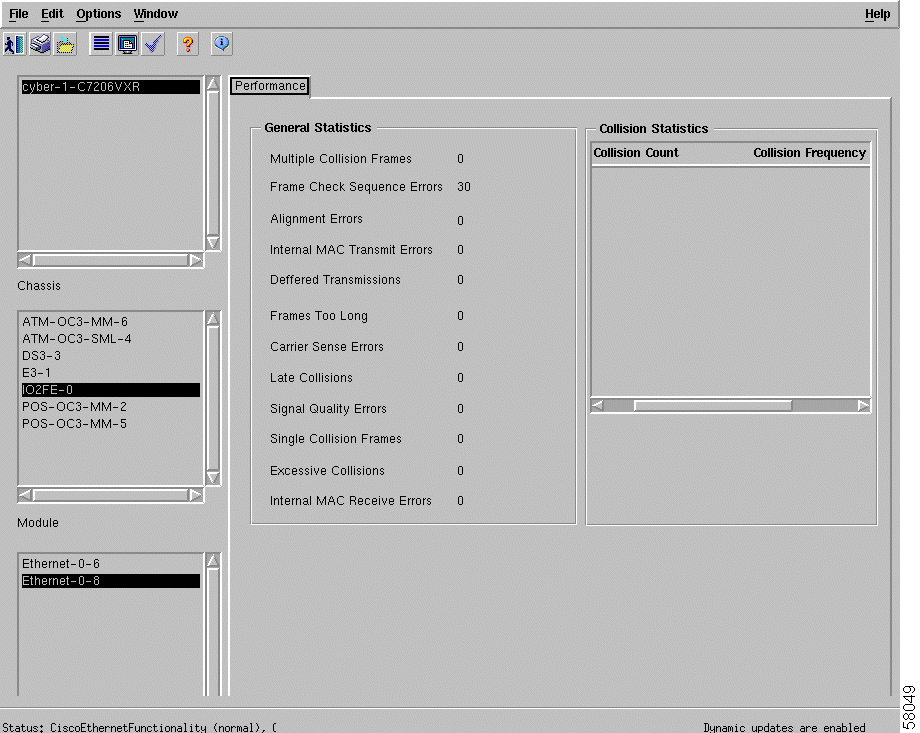
Ethernet Performance Window—Detailed Description
The Ethernet Interface Performance tab contains two areas: General Statistics and Collision Statistics.
General Statistics
The General Statistics frame on the Performance-Ethernet tab displays the following statistics:
Alignment Error—Number of frames received with alignment error status.
Frame Check Sequence Errors—Number of frames received with frame check sequence error status.
Multiple Collision Frames—Number of frames transmitted across an interface where more than one collision exists.
Single Collision Frames—Number of frames transmitted across an interface with one collision.
Single Quality Errors—Number of Single Quality Errors (SQE) generated by the interface.
Deferred Transmissions—Number of first transmission attempts delayed because the medium was busy.
Late Collisions—Number of times a collision is detected in the interface.
Excessive Collisions—Number of times transmission failed due to excessive collisions.
Internal MAC Transmit Errors—Number of frames transmitted that failed due to an external transmit error.
Internal MAC Receive Errors—Number of frames transmitted that failed due to internal receive error.
Frames Too Long—Number of frames transmitted where the size of the frames was larger than the permissible frame size.
Carrier Sense Errors—Number of times the carrier sense was lost while transferring frames.
Collision Statistics
The Collision Statistics area displays the number of collisions and how often the collisions are occurring.
Performance Manager
The Performance Manager collects historical performance data for interfaces. You can view performance information in Performance Manager only if you have enabled performance logging. You can do this either globally or individually on interfaces.
The Performance Manager collects data for all technologies on an interface. For example, if you want to view Performance Manager data for an ATM interface, performance attributes are listed for Generic and SONET technologies, because both apply to ATM interfaces.
The Performance Manager section covers the following topics:
You can open the Performance Manager window for a selected interface within the Map Viewer (Viewer) application. Open the Map Viewer application, then open the Performance Manager window:
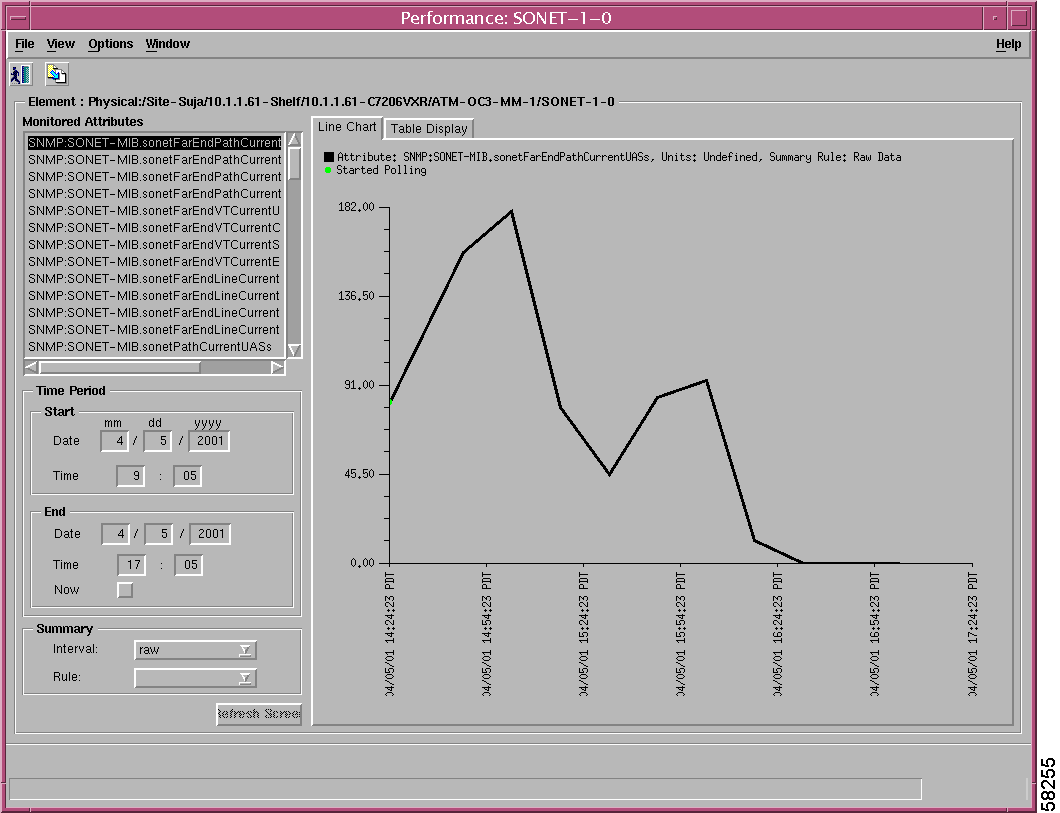
Step 1 Right-click a selected interface, then choose Tools > Performance Manager. The Performance Manager window appears, with the Line Chart tab displayed by default (see Figure 9-12).
Figure 9-12 Performance Manager Window (Line Chart Tab)
The Performance Manager window consists of four panes on the left side of the window, and two tabbed sections on the right side.
First, choose the fields you want from the panes on the left side of the window. The data is displayed on the tabs on the right side of the window.
Step 2 Choose the attribute you want to monitor from the Monitored Attributes pane (for details on this pane, see the "Performance Manager WindowDetailed Description" section.) You can choose multiple contiguous attributes in a list by holding down the Shift key and then selecting the first and last attributes in the list.
You can choose multiple individual attributes by holding down the Ctrl key and clicking individual items. Only the first selected attribute is shown in the line chart or bar chart. The Table Display tab shows all selected attributes.
Step 3 Choose the time fields in the Time Period area.
Step 4 In the Start Date entry boxes, enter the date on which you want to begin viewing performance data. The format must be mm/dd/yyyy.
Step 5 In the Start Time data entry boxes, enter the time at which you want the performance data to start, using 24-hour clock notation. The times are inclusive.
Step 6 Choose one of the following options to set the end date:
Enter the date on which you want to stop viewing performance data in the End Date entry boxes. The format must be mm/dd/yyyy.
Select the Now check box to view the data from the selected start date to the current time. If you select this option, you do not have to update the end date and time fields.
Step 7 Choose one of the following options to set the end time:
Enter the end time on which you want to stop viewing performance data in the End Time entry boxes. The format must be 24-hour clock notation.
Select the Now check box to view the data from the selected start date to the current time. If you select this option, you do not have to update the end date and time fields.
Step 8 Choose the summary interval from the drop-down list box. The summary interval is the period of time over which the rule is applied. This interval varies according to the attribute selected. You can choose the Raw option, which displays performance data in its most detailed format (not summarized).
Note When you choose Raw, the bar chart view is not available, and the
Summary Rule option is grayed out.
Step 9 Click Refresh Screen to initiate your request for data. Refresh Screen is blue when it is available for selection and grayed out when not available. Refresh Screen is available for selection when Now is selected or when any criterion has changed and you have moved the cursor away from the changed value (for example, by pressing the Tab key or by using the mouse).
Step 10 A line chart of the performance information you requested is displayed at the right side of the window. You can click any of the three tabs to display your data differently.
Note The performance information corresponds to the attributes' raw
values. If you choose a summary period, the information is displayed
according to the summary rule. No summary period is associated with
raw data.
Performance Manager Window—Detailed Description
The Performance Manager window contains a primary pane on the left side of the window: Monitored Attributes. The Performance Manager window also contains three tabs: Line Chart, Bar Chart, and Table Display.
Monitored Attributes Pane
The monitored attributes list on the left side of the window allows you to select which specific attribute you want to view performance information for. The fields in this list change, depending upon which type of interface you have selected. For example, if your selected interface is an ATM port adapter, you can select all the performance fields on the SONET Performance window and the Generic Performance window. Both of these technologies apply to ATM port adapters; therefore, all performance information for both technologies is listed in the Performance Manager. This list can be rather extensive.
Line Chart Tab
The Line Chart tab displays the retrieved data in graphical format. The X-axis depicts the time at which the polling was done, and the Y-axis depicts the value retrieved or the value when the equipment did not respond properly.
Additional information regarding the element, units, and missed polls is provided, using the color coding displayed at the top of the chart. Blue represents the values retrieved and red identifies any polled values missed.
Bar Chart Tab
The information on this tab is shown as a bar chart with the retrieved data. Blue represents the values retrieved and red identifies any polled values missed.
Table Display Tab
This tab displays the data retrieved in a tabular format. The first column shows the time of polling, and the second column shows the retrieved values. Blue represents the values retrieved and red identifies any polled values missed.
Missed Polls
In some circumstances, an object might fail to be monitored. This might be due to CEMF being shut down or to heavy network loads, and is known as a missed poll. All missed polls are indicated by a yellow point on Performance Manager graphs and charts. The last valid value collected is shown. A missed poll affects the summary data, and you should not rely upon such data.
Performance Manager graphs and charts also indicate when polling on an attribute started and stopped due to history storage criteria being added, edited, or removed. Start and stop polling events are shown in charts and tables. The start polling events point is shown in green, and the stop polling events point is shown in red. A polling events key is displayed for selection.