Viewing Status, Configuration, and Performance Data
This chapter describes how to view status, configuration, and performance data about chassis, modules, and ports on the Cisco 6100 Series system DSLAM chassis. You can retrieve status, configuration, and performance information for objects by opening the associated windows.
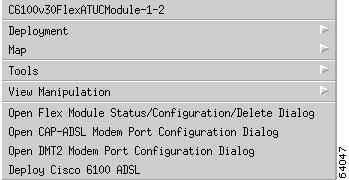
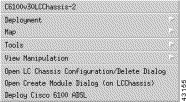
To view the status, configuration, and performance data about specific objects on the Cisco 6100 Series system DSLAM, you can open the associated windows in two ways. The first way is to right-click over the module type on the left side of the Map Viewer window to access the object menu for that managed object. An example object menu is shown in Figure 5-1.
Figure 5-1 Example Object Menu
For this example, you would click Open Flex Module Status/Configuration Dialog to open the associated window. The object menus for other modules have similar choices.
From the object menu, you choose the option to open the appropriate status and configuration window. This method is the one used in this chapter.
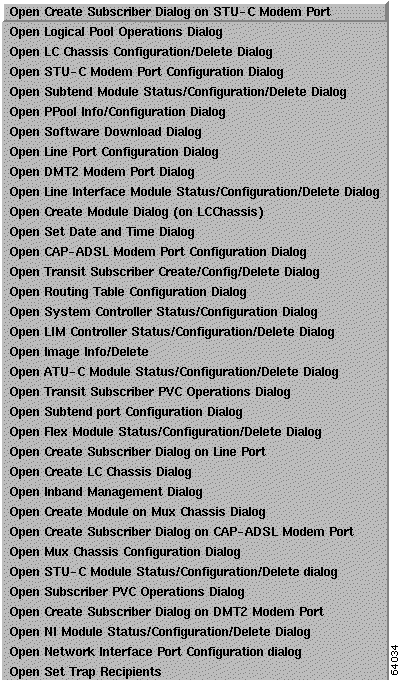
The other way to access the status and configuration windows is from the Navigation menu, which you can open from the System Dialog window. The Navigation menu is shown in Figure 5-2.
Figure 5-2 Navigation Menu
You can choose from the following Navigation menu items to open status and configuration windows:
Open LC Chassis Configuration/Delete Dialog
Open STU-C Modem Port Configuration Dialog
Open Subtend Module Status/Configuration/Delete Dialog
Open PPool Info/Configuration Dialog
Open Line Port Configuration Dialog
Open DMT 2 Modem Port Dialog
Open Line Interface Module Status/Configuration/Delete Dialog
Open CAP-ADSL Modem Port Status/Configuration/Delete Dialog
Open Transit Subscriber Create/Config/Delete Dialog
Open System Controller Status/Configuration Dialog
Open LIM Controller Status/Configuration/Delete Dialog
Open ATU-C Module Status/Configuration/Delete Dialog
Open Subtend Port Configuration Dialog
Open Flex Module Status/Configuration/Delete Dialog
Open STU-C Module Status/Configuration/Delete dialog
Open NI Module Status/Configuration/Delete Dialog
Open Network Interface Port Configuration dialog
Viewing Status, Configuration, and Performance Information about DSLAM Chassis
To view the status, configuration, and performance information about a Cisco 6100 Series system DSLAM chassis, complete the following steps:
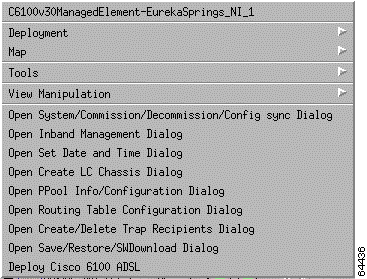
Step 1 From the left side of the Map Viewer window, right-click over the chassis name (C6100v30Managed Element—[Name of chassis]) whose status, configuration, and performance you want to view.
The object menu for the managed element, which is shown in Figure 5-3, opens.
Figure 5-3 C6100v30ManagedElement Object Menu
Step 2 Choose OpenSystem Commission/Decommission/Config sync Dialog from the object menu.
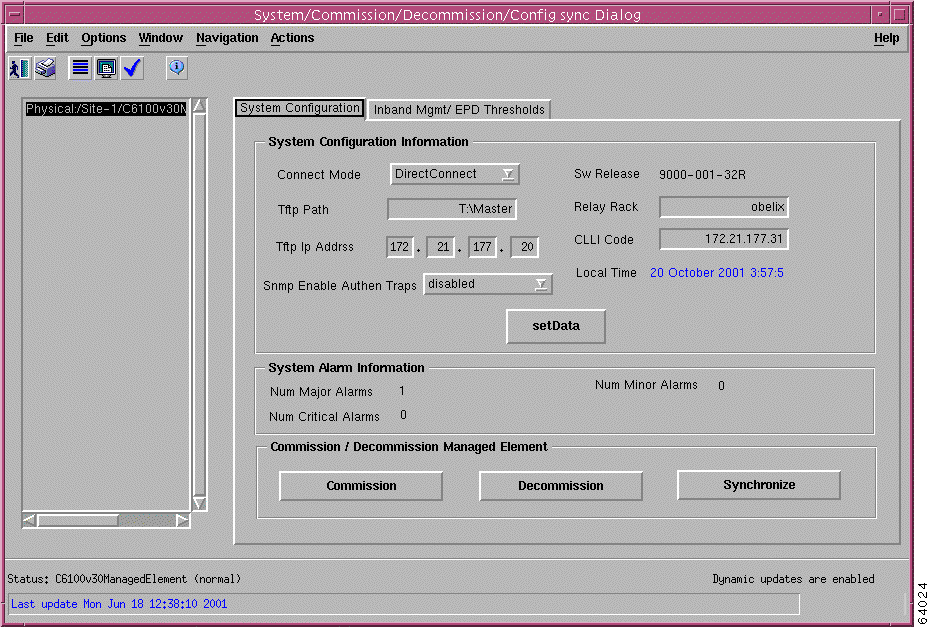
The System Commission/Decommission/Config sync Dialog window, which is shown in Figure 5-4, opens.
Figure 5-4 System Commission/Decommission/Config Sync Dialog
This window opens to the System Configuration tab on which you can view the following System Alarm Information:
Num Major Alarms
Num Critical Alarms
Num Minor Alarms
Viewing Status, Configuration, and Performance Information about Modules and Ports
To view the status, configuration, or performance information for a specific module, you must open the associated window for that module. This section includes instructions for opening status, configuration, and performance windows for each managed object within the C6100v30Managed Element hierarchy view.
Note Every module whose status you can view includes the same basic information about the type of
module and its status. The illustrations in this section may show one particular type of module;
however, the information is the same for all modules unless otherwise noted.
The type of module whose status and configuration information you can view can include any one of the following types:
CAP ATU-C module
DMT-2 ATU-C module
STU-C module
Flexi module
LIM controller module
LIM module
Subtend module
Network Interface module
System Controller module
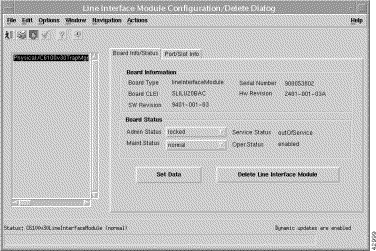
Each status/configuration/delete or status/configuration dialog window contains a Board Info/Status tab and a Slot Info tab.
Viewing the Module Status/Configuration/Delete Dialog Window
To view status and configuration information about a specific type of module, complete the following steps:
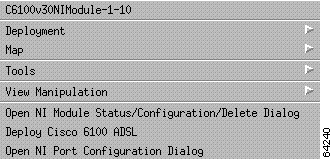
Step 1 From the left side of the Map Viewer window under the Physical hierarchy view, right-click C6100v30[Name of Module] to access the object menu.
The object menu shown in Figure 5-5, is for a network interface module.
Figure 5-5 Module Object Menu
Step 2 Choose Open [Name]Module Status/Configuration Dialog from the object menu.
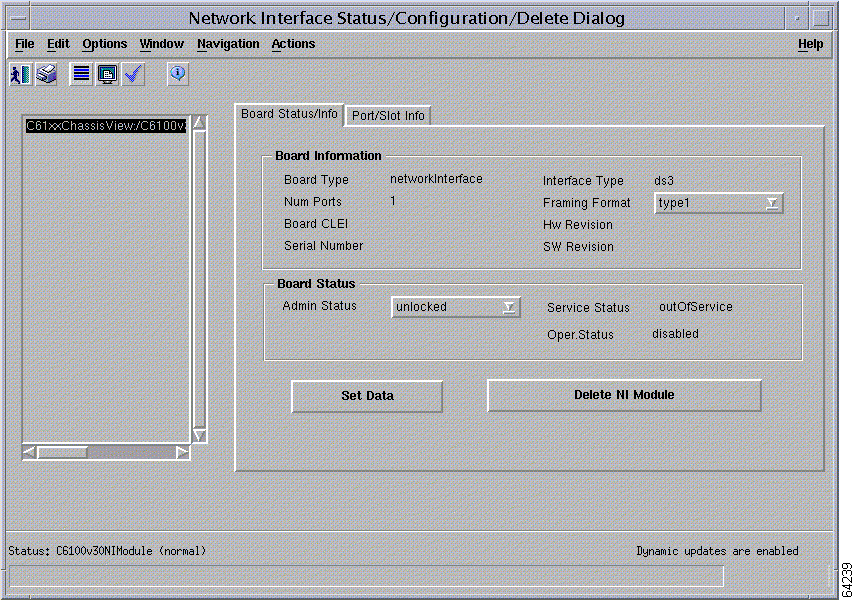
The associated Module Status/Configuration/Delete Dialog window opens. The example shown in Figure 5-6 is a Network Interface Status/Configuration/Delete Dialog window.
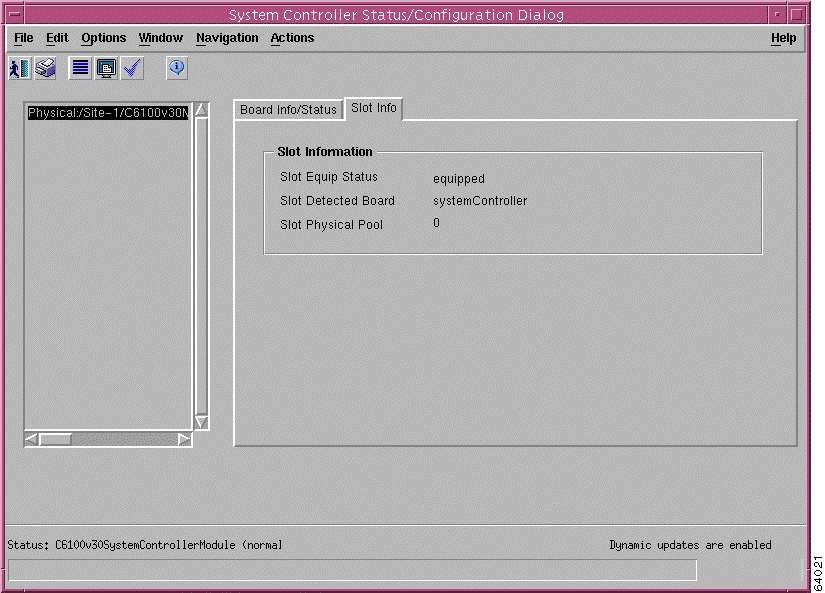
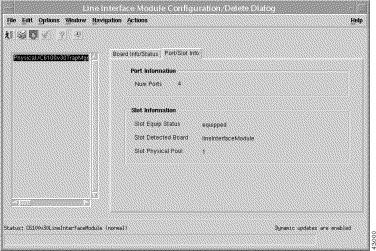
Step 3 Click the Slot Info tab to view information about the associated slot for a module.
An example Slot Info tab is shown in Figure 5-7. This Slot Info tab is on the System Controller Status/Configuration Dialog window and is similar to the windows of other module types.
Figure 5-7 Slot Info Tab
The Slot Info tab includes the following information about a specific module:
Slot Equipment Status—Equipped or not equipped
Slot Detected Board—Type of board the slot is detecting, for example system controller, network interface, CAP ADSL, and so forth.
Slot Physical Pool—Physical Pool 1 or Physical Pool 2. This field displays only for DOH or pooled configurations.
Viewing the Port Status and Configuration Information
The status, configuration, and performance information about a module port is similar for each of the module types. To view status, configuration, and performance information about a modem port, complete the following steps:
Step 1 From the left side of the Map Viewer window under the Physical hierarchy view, right-click C6100v30[Name of]ModemPort to access the object menu, which is shown in Figure 5-8.
Figure 5-8 Module Object Menu
Step 2 Choose Open [Name]Modem Port Configuration Dialog from the object menu.
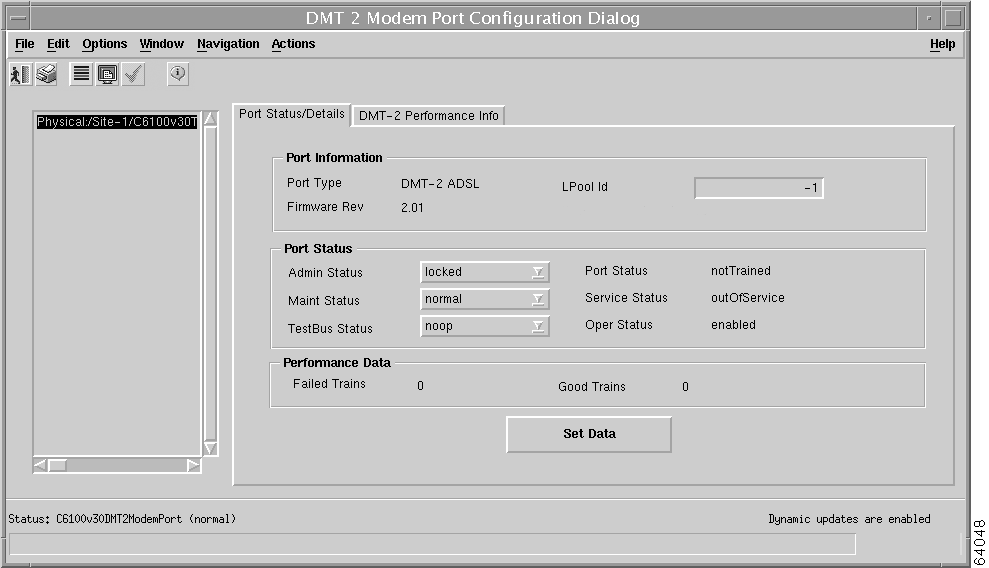
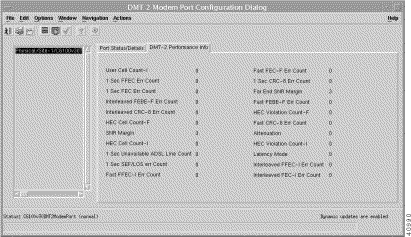
The Modem Port Configuration Dialog window opens. The example shown in Figure 5-9 is for a DMT-2 modem port.
Figure 5-9 DMT-2 Modem Port Configuration Dialog
The Port Status/Details tab contains information about the port, its status, and performance. Table 5-2 describes the fields on this window.
Table 5-2 Modem Port Configuration Dialog Window Description
Window Area
Description
Port Information
Displays some or all of the following information:
Display only—Port type
Display only—Logical pool ID
Display only—Firmware Revision number
Port Status
Verify or change the following settings:
Administrative Status—Locked or unlocked
Maintenance Status—Normal or maint (in maintenance)
TestBus Status—Noop (nonoperational), disable Test Bus, or enable Test Bus
Display only—Port Status (trained, training, or not trained)
Display only—Operation Status (enabled or disabled)
Display only—Service Status (in Service or out of Service)
Performance Data
Displays the number of Failed Trains and Good Trains
DMT-2 Port Performance Information
For DMT-2 ports, more specific performance information is available on the DMT-2 Performance Info tab. To access this tab, complete these steps:
Step 1 From the left side of the Map Viewer window under Physical, right-click C6100v30DMT2ModemPort to access the object menu.
Step 2 Choose Open DMT2 Modem Port Configuration Dialog.
The DMT2 Modem Port Configuration Dialog window, which is shown in Figure 5-10, opens.
Figure 5-10 DMT-2 Modem Port Configuration Dialog—DMT-2 Performance Info Tab
Note For parameters that are subject to inhibiting, see ANSI T1.231 for inhibiting rules.
Table 5-3 DMT-2 Performance Info Tab Description
Field
Description
User Cell Count-I
Displays a count of the total number of cells in the interleaved data path that is delivered at the virtual channel (for ATU-C) or remote transceiver (For ATU-R interface).
1 Sec FFEC1 Err Count
Displays a count of 1-second intervals with one or more FFEC anomalies.
1 Sec FEC2 Err Count
Displays a count of 1-second intervals with one or more FEC anomalies.
Interleaved FEBE-F Err Count
Displays a count of the interleaved data stream FEBE-F anomalies. This parameter is subject to inhibiting.
Interleaved CRC3-8 Err Count
Displays a count of interleaved data stream CRC-8 anomalies that occur during the accumulation period. This parameter is subject to inhibiting.
HEC4 Cell Count-F
Displays a count of the total number of cells that are passed through the cell delineation process that is operating on the fast data while in the SYNC state.
SNR Margin
Represents the amount of increased received noise (in decibels) relative to the noise power that the system is designed to tolerate and still meet the target bit error rate (BER) of 107. This value accounts for all coding (for example, Reed-Solomon forward error correction) gains that are included in the design. The SNR margin ranges from -64.0 dB to +63.5 dB with 0.5 dB steps. The SNR margin is measured at the near end.
HEC Cell Count-I
Displays the total cell count-I performance parameter. This value is a count of the total number of cells that are passed through the cell delineation process that is operating on the interleaved data while in SYNC state.
1 Sec Unavailable ADSL Line Count
Displays a count of 1-second intervals for which the ADSL line is unavailable.
1 Sec SEF5/LOS6 err Count
Displays a count of 1-second intervals with one of the following characteristics:
One or more LOS defects
One or more SEF defects
One or more IPR defects
A value of x or more CRC-8 anomalies; the value of x is for further study and might depend upon the data rate.
Fast FFEC-I Err Count
Displays a count of interleaved data stream FFEC-I anomalies that occur during the accumulation period. This parameter is subject to inhibiting.
Fast FEC-F Err Count
Displays a count of the fast data stream FEC-F anomalies (the number of corrected code words) that occur during the accumulation period. This parameter is subject to inhibiting.
1 Sec CRC-8 Err Count
Displays a count of 1-second intervals that have one or more of the following characteristics:
CRC-8 anomalies
LOS defects
SEF defects
Far End SNR Margin
Represents the amount of increased received noise (in decibels) relative to the noise power that the system is designed to tolerate and still meet the target bit error rate (BER) of 107. This value accounts for all coding (for example, Reed-Solomon forward error correction) gains that are included in the design. The SNR margin ranges from -64.0 dB to +63.5 dB with 0.5 dB steps. The far end SNR margin is measured at the far end.
Fast FEBE-F Err Count
Displays a count of the fast data stream FEBE-F anomalies that occur during the accumulation period. This parameter is subject to inhibiting.
HEC Violation Count-F
Displays the near-end HEC_violation_count-F performance parameter, which is a count of the number of occurrences of near-end hec-F anomaly.
Fast CRC-8 Err Count
Displays a count of fast data stream CRC-8 anomalies that occur during the accumulation period. This parameter is subject to inhibiting.
Attenuation
Displays the near attenuation value. Near attenuation is the difference (in decibels) between the power that is received at the near-end and the power that is transmitted from the far end. Received signal power in decibels per milliwatt is the sum of all data-carrying (that is b i > 0) DMT-2 subcarrier powers averaged over a 1-second period. Transmitted signal power is 3.65 + 10 - log(S gi1) decibels per milliwatt, summed over the data-carrying subcarriers. The attenuation ranges from 0 to 63.5 dB with 0.5 dB steps.
HEC Violation Count-I
Displays the near-end HEC_violation_count-I performance parameter, which is a count of the number of occurrences of a near-end hec-I anomaly.
Latency Mode
Identifies the delay between the time a device requests access to a network and the time it is granted permission to transmit. Or identifies the time a device receives a frame and the time that frame is forwarded out the destination port.
Interleaved FFEC-1 Err Count
Displays a count of interleaved data stream FFEC-I anomalies that occur during the accumulation period. This parameter is subject to inhibiting.
Interleaved FEC-1 Err Count
Displays a count of interleaved data stream FEC-I anomalies (the number of corrected codewords) that occur during the accumulation period. This parameter is subject to inhibiting.
Viewing Digital Off-Hook Status, Configuration, and Performance Information
For DOH, or pooled, configurations, the module status and configuration windows are similar to those for Direct Connect configurations. The DOH windows are described in the following sections.
Viewing Line Controller Chassis Status and Configuration Information
Complete the following steps to view status and configuration information about line controller modules:
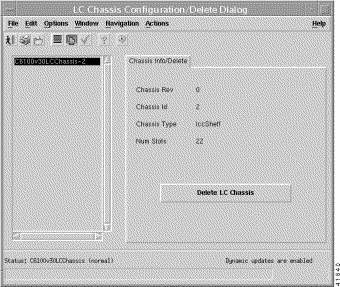
Step 1 From the left side of the Map Viewer window, right-click C6100v30LCChassis to access the Line Controller Chassis object menu, which is shown in Figure 5-11.
Figure 5-11 Line Controller Object Menu
Step 2 Chose Open LC Chassis Status/Configuration/Delete Dialog.
The LC Chassis Status/Configuration Delete Dialog window, which is shown in Figure 5-12, opens.
Step 6 From the list on the left side of this tab, highlight the line interface module for which you want to view the status.
Viewing Physical and Logical Pool Status and Configuration Information
This section provides instructions to view status and configuration information about physical pools and logical pools and includes the following topics:
Steps for Viewing Physical Pool Status and Configuration Information
To view the status and configuration information about physical pools, complete the following steps:
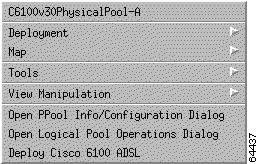
Step 1 From the left side of the Map Viewer window, click C6100v30PhysicalPool to access the Physical Pool object menu, which is shown in Figure 5-15.
Figure 5-15 Physical Pool Object Menu
Step 2 Choose Open PPool Info/Configuration Dialog.
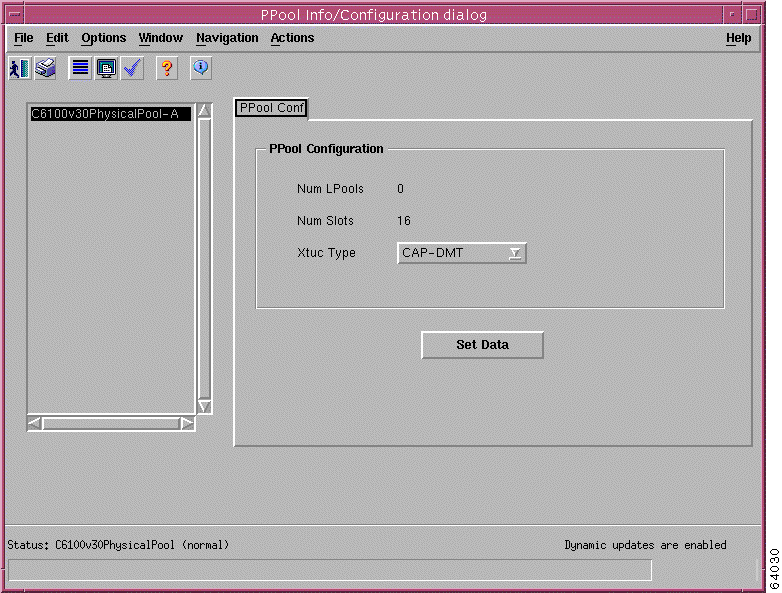
The PPool Configuration Info/Configuration dialog window, which is shown in Figure 5-16, opens.
Step 3 On the left side of this window, highlight the physical pool, either A or B, for which you want to view data.
This window opens to the PPool Info/Create LPool tab. The following fields display data about the physical pool that you have highlighted on the left side of the window:
Num LPools—Displays the number of logical pools that are associated with this physical pool
Num Slots—Displays the number of slots that this pool is using
Xtuc Type—Displays the type of line card that the pool is using, which can only be CAP-ADSL for DOH configurations and either CAP-ADSL or SDSL for direct connection configurations.
Viewing Logical Pool Information
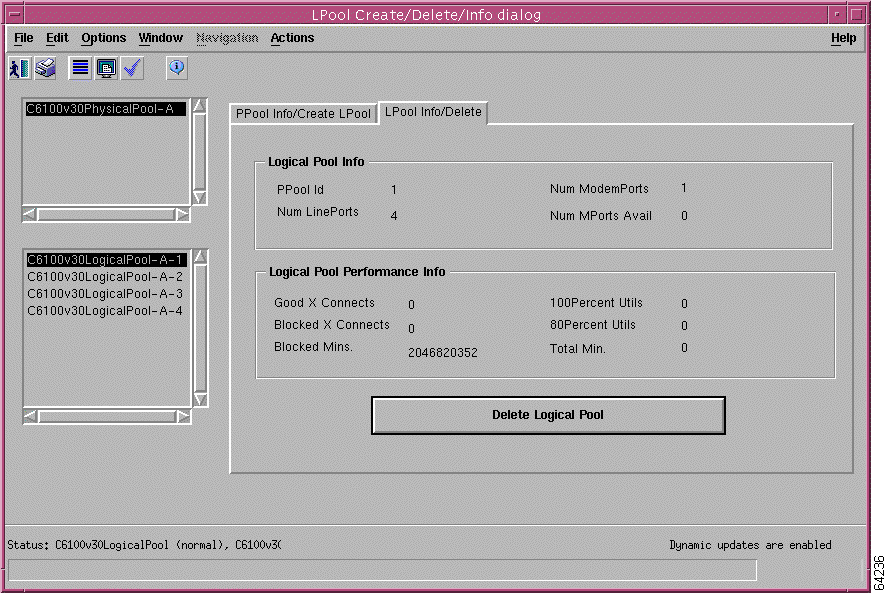
Complete these steps to view information about logical pools:
Step 1 From the left side of the Map Viewer window, click C6100v30PhysicalPool to access the object menu.
Step 2 Choose Open Logical Pool Operations Dialog.
The PPool Configuration & LPool Create/Delete/Info Dialog window, which is shown in Figure 5-17.
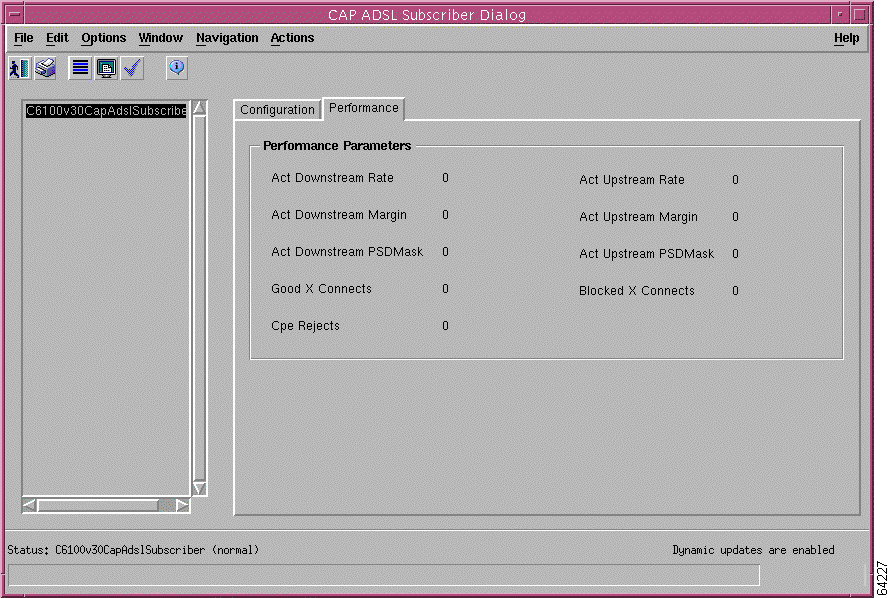
Complete the following steps to view performance data about CAP ADSL subscriber lines.
Step 1 From the left side of the Map Viewer window c6100v30Mgr view, choose C6100v30ManagedElement >C6100v30MultiplexerChassis> C6100ATUCModule > C6100v30CAPADSLModemPort > C6100v30CapAdslSubscriber to access the object menu.
Step 2 Choose Open CAP ADSL Subscriber Dialog from the object menu.
The CAP ADSL Subscriber Dialog window, which is shown in Figure 5-19, opens.
Figure 5-19 CAP ADSL Subscriber Dialog Window
The subscriber from which you accessed this window displays on the left side of the window.
Step 3 Click the Performance tab to view the performance parameters for this subscriber.
Complete the following steps to view performance data about DMT-2 subscriber lines:
Step 1 From the left side of the Map Viewer window c6100v30Mgr view, choose C6100v30ManagedElement > C6100v30MultiplexerChassis > C6100ATUCModule > C6100v30DMT2ModemPort > C6100v30DmtSubscriber to access the object menu.
Step 2 Choose Open DMT-2 Subscriber Dialog from the object menu.
The DMT2 Subscriber Dialog window, which is shown in Figure 5-20, opens.
Figure 5-20 DMT2 Subscriber Dialog Window
The subscriber from which you accessed this window displays on the left side of the window.
Step 3 Click the Performance tab to view the performance parameters for this subscriber.
Complete the following steps to view performance data about DMT-2 subscriber lines:
Step 1 From the left side of the Map Viewer window c6100v30Mgr view, choose C6100v30ManagedElement > C6100v30LCChassis > C6100LineInterfaceModule > C6100v30LinePort > C6100v30LinePortSubscriber to access the object menu.
Step 2 Choose Open Line Port Subscriber Dialog from the object menu.
The Line Port Subscriber Dialog window, which is shown in Figure 5-21, opens.
Figure 5-21 Line Port Subscriber Dialog Window
The subscriber from which you accessed this window displays on the left side of the window.
Step 3 Click the Performance tab to view the performance parameters for this subscriber.
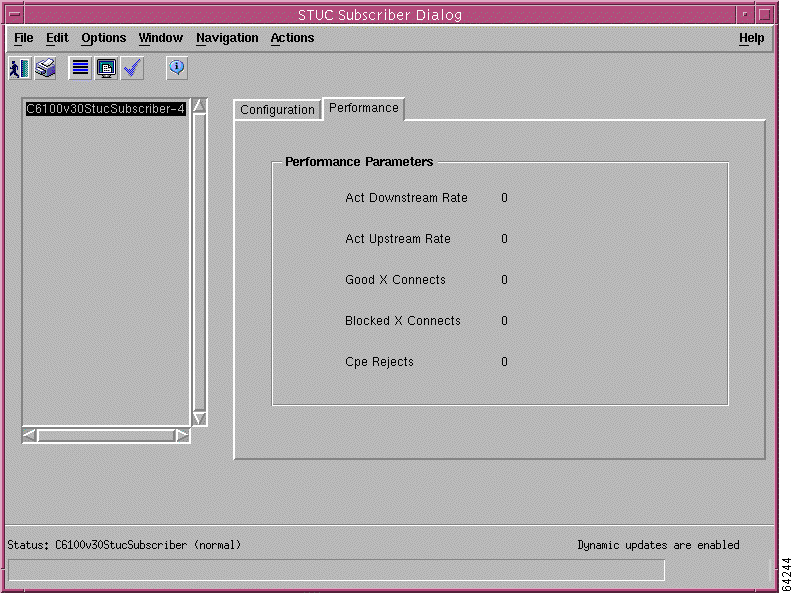
Complete the following steps to view performance data about STU-C subscriber lines:
Step 1 From the left side of the Map Viewer window c6100v30Mgr view, choose C6100v30ManagedElement > C6100v30LCChassis > C6100STUCModule > C6100v30STUCModemPort > C6100v30StucSubscriber to access the object menu.
Step 2 Choose Open STUC Subscriber Dialog from the object menu.
The STUC Subscriber Dialog window, which is shown in Figure 5-22, opens.
Figure 5-22 STUC Subscriber Dialog Window
The subscriber from which you accessed this window displays on the left side of the window.
Step 3 Click the Performance tab to view the performance parameters for this subscriber.