|
|

This chapter describes the CiscoWorks Blue Maps remote source-route bridging (RSRB) application. It contains the following main sections:
If you prefer to view the RSRB information from a web browser, see the chapter "Using the Web Browser."
For information on RSRB daemons, see the appendix "CiscoWorks Blue Maps Daemons and Processes."
The RSRB Maps application discovers IP-based RSRB devices in your network and displays them in a map. Using the RSRB Maps application, you can do the following tasks:
RSRB Maps provides the following main views of your network devices:
From these RSRB map views, you can obtain additional RSRB-related information by selecting the popup menu associated with a device on the map.
This section describes how to start the RSRB application. You can start the RSRB application either from the workstation system prompt or from a network management system, such as NetView for AIX.
The term network management system refers to NetView for AIX, HP OpenView, or Sun Net Manager on the network management workstation.
You can provide network information to RSRB in two ways. You can use the database maintained by a network management system, such as NetView for AIX, HP OpenView, or Sun Net Manager. Or you can list all the network devices in a seed file. If you do not have a network management system, or if the network management system is not up-to-date and cannot be updated, or if you know the network management system database is so large that you do not want a map application to spend the time querying every device listed there, you can create a seed file. A seed file is a text file that lists the routers, and their read community strings, that you want to be recognized by a specific Maps application. Supply this seed file to the Maps application using the procedure in the section "Using a Seed File."
If you are using a network management system database, verify that the network management system has current data to share with Maps applications before you start RSRB. Even if the network management system is not running at this time, verify that it has been run recently in automanage mode or that you have run the discovery process at least once since the last installation of new routers or reconfiguration of existing routers. If you want to discover new routers dynamically as they come online, the network management system must be running in automanage mode continually.
The installation process establishes a sample default user account named cwblue. The user cwblue does not have a starting password. You can either assign a password to cwblue or log in as root and change to cwblue. Then start the RSRB application.
The RSRB application is accessible from $CWBROOT/rsrb/bin. To start the RSRB application from a system prompt, enter the command shown below:
runrsrb
You can log in to a remote UNIX host from your own local UNIX workstation, export the remote host display to your local workstation, and then run the application from the remote host. To start the remote host's RSRB application from your local workstation, use the following procedure:
Step 1 At your local UNIX workstation, enter the following command:
xhost +
Step 2 Log in to the remote UNIX host as cwblue (or with a username of your own choosing).
Step 3 Set your DISPLAY environment variable to export the display from the remote host to your local workstation. Depending on which shell you are using, use one of these commands:
From the K shell (ksh):
export DISPLAY=IP_address:0.0
From the C shell (csh) or TC shell (tcsh):
setenv DISPLAY IP_address:0.0
Step 4 To start RSRB, enter the following commands:
cd $CWBROOT/rsrb/bin
source runrsrb
When you start RSRB, the runrsrb command script automatically starts the monitor and poller daemons that monitor the changes in the network and update the Maps database with the changes. When you exit the RSRB application, all daemons continue to run to maintain the Maps database. If you want to stop them, select Admin>Process Control from the menu bar and stop the daemons.
There are several ways that the RSRB application can discover the routers in a network. You can provide a list of enabled routers in a special file called a seed file. Or you can let the Maps application get its information from the network management system database. The methods of discovery are described in this section, which includes the following sections:
Each record in the seed file can be either a comment or a router specification. You can list the routers in any order within the seed file.
A comment is a single line of text that begins with the # character, as shown in the following line:
# This line is a comment.
A router specification has one of the following formats:
router [ReadCommunityString]
or
router:[ReadCommunityString]
Use the following conventions for the router specification:
You can use the same seed file for all three Maps applications (DLSw, RSRB, and APPN). Although the DLSw application uses a third parameter on each router entry to identify a router as a DLSw key device, that parameter is ignored for the RSRB and APPN applications. The following lines are from a sample seed file:
# Seed file for CiscoWorks Blue Maps applications
# Next is a non-key router with goldilocks read community string
east.cisco.com goldilocks
# Next is a non-key router with default read community string
172.18.7.47
# Next is a key router with default read community string
west.cisco.com:*:key
# Next is a key router with a read community string
east.cisco.com:readstring:key
To use a seed file for discovery, use the following procedure:
Step 1 Use a text editor to create the seed file. Save the seed file, for example with the name $HOME/.dlsw/dlswseed.
Step 2 Start RSRB and select Admin>Discover>Seed File to display the Seed File Discover window.
Step 3 Enter the name of the seed file, verify the correct read community string, and click Discover. Discovery takes place while you wait.
Step 4 After loading the database using the seed file, the application operates accurately until a router is taken off line or a new router is configured. If a new router is added to the network, you can do one of the following:
The network management system maintains a database that includes all SNMP-managed routers in your network. You can use that database to provide the Maps application with the information that it needs to discover the routers in the network. You can do this manually or automatically.
To have the RSRB application discover the network from the network management system database manually, select Admin>Discover>Database from the Maps application menu bar. The Maps application adds the routers found by the network management system to the maps database. The Maps application checks the database for new routers, polls their MIBs, and updates the Maps database with the new MIB information.
Step 1 Select Admin>Process Control from the menu bar.
Step 2 Click the Sync and Discover buttons.
Step 3 Click Start.
The sync daemon searches the network management database and puts routers found by the network management system in the maps database. The discover daemon sends an SNMP query to all devices not yet discovered to find any undiscovered routers that are RSRB---enabled.
If you want to add only one or a few routers to your network, you can discover each router individually by using the following procedure:
Step 1 Select Edit>Add Device(s) from the menu bar.
Step 2 When prompted, enter the router's device name and its read community string.
Step 3 Click OK.
The Maps application adds the router to the Maps database, polls the router's MIB, and adds the MIB information to the Maps database. Watch the status area to see a message that indicates the success or failure of this polling.
It is sometimes useful to rediscover an RSRB router, especially if one of the following events occurs:
To rediscover individual routers you can select Edit>Rediscover Device(s) from the RSRB menu bar.
This section describes how to locate and select devices on the RSRB map. There are two methods for locating a device on the map.
To locate a device from the View menu you must know the device's IP address or device name. Then use the following procedure:
Step 1 From the RSRB menu bar, select View>Locate.
Step 2 Select either By Name or By IP Address.
Step 3 Click Locate.
RSRB displays the part of the map that contains the selected device and highlights the device.
You can move the black frame in one of the following ways:
As you move the frame in the Locator window, you can look for the device you want in the main window. When you find the device you want, you can display the focus view for that router, or use one of the other Maps functions.
There are several ways to select single or multiple devices:
You can rediscover the selected devices to update their status by selecting Edit>Rediscover Device(s) from the menu bar.
You can delete them as a group by selecting Edit>Delete Device(s) from the menu bar.
For more information about rediscovery, see the previous section, "Locating and Selecting Devices on the RSRB Map."
If a set of devices on any map is not up-to-date because automatic update is disabled or is set to an infrequent interval, and you have not chosen to list target devices in a seed file, you can add and delete devices manually. From the Edit menu, you can select either Add Device(s) or Delete Device(s).
When you add or delete a device, RSRB prompts you for the device's host name or IP address and read community string. If the device is found to belong on this map, the application places a new device on the map or removes an existing device, depending on the menu item you selected.
If a Cisco device does not appear on the map, but you know that it exists in the network, you can add a new device in one of the following ways:
After you add or delete a device from the map, you can save the current map to a seed file with the $CWBROOT/etc/CreateSeedFile command:
$CWBROOT/etc/CreateSeedFile -s destination_file
Where destination_file is the name of the seed file.
Each icon on the RSRB map has an associated popup menu. To activate the menu, click the icon with the right mouse button. Table 6-1 lists the popup menus associated with each map icon.
| Icon | Popup Menu Items |
|---|---|
|
| Focus View---When selected from a known router in the global view, displays the focus view for the selected router. In the focus view for a known router, there is no popup menu for the router that is in focus. Peer Info---When selected from the focus view of a peer router, displays information about the focus router's peer router. |
Ring Info---When selected in the focus view for a router, displays information about the selected ring, such as bridge number, ring type, MAC address. PU List---Displays a dependency list of PU names: a list of PUs that are dependent on the selected ring. | |
Virtual Ring View---When selected from the global view, displays a virtual ring view of the network: the routers and real rings that together make up the virtual ring. Global View---When selected from the virtual ring view, displays the global view. |
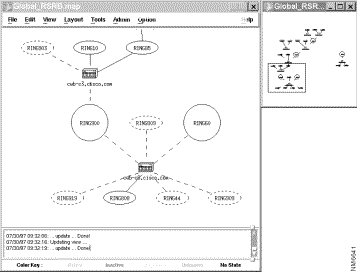
RSRB presents a global (high-level) view of the applicable network devices. The global view presents an up-to-date view of virtual rings (displayed as circles), physical rings (displayed as ovals), pseudo-rings (displayed as dotted ovals), RSRB-enabled peers and their status, physical links (displayed as solid lines), and virtual links (displayed as dashed lines). Dashed lines also show connections to non-RSRB rings.
When you select the global view, the Locator window displays the entire network while the main window displays as much of the network as will fit in a magnified format, which may be the entire network or a subset of the network. The global view is displayed when you start the RSRB application. To display the global view at any other time, select View>Global from the RSRB menu bar. The global view is displayed, as shown in Figure 6-1. If you want to adjust the view, move the black frame in the Locator window to change the view in the main window.
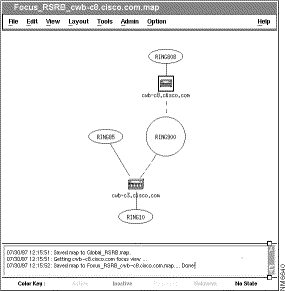
The focus view displays a subset of the network from the viewpoint of a single router, called the focus router. The focus view displays the same map icons and status as the global view. The following sections describe the ways you can display the focus view for a router. Figure 6-2 shows the focus view for router cwb-c8.cisco.com.
To display the focus view for a router from the View menu, use the following procedure:
Step 1 Locate the router in the main window.
Step 2 Click the router with the right mouse button.
Step 3 From the popup menu, select Focus View.
To display the focus view for a router from the View menu, use the following procedure:
Step 1 From the RSRB menu bar select View>Focus. The Focus View Prompt window is displayed.
Step 2 In the Focus View Prompt window, enter the device name of the router.
Step 3 Click OK.
To display the focus view for a router from the View menu, use the following procedure:
Step 1 Locate the router in the main window.
Step 2 Click the router with the left mouse button.
Step 3 Select View>Focus from the menu bar. The Focus View Prompt window is displayed.
Step 4 In the Focus View Prompt window, click OK.
Once you locate a router on the map, you can find and display information about that router's peer routers in the network using the following procedure:
Step 1 Locate the router in the main window.
Step 2 Click the router with the left mouse button.
Step 3 Select View>Focus.
Step 4 Click OK in the Focus Peer Prompt window.
Step 5 In the focus view, select the same router with the right mouse button.
Step 6 From the popup menu, select Peer Information.
To display the virtual ring view from a popup menu, use the following procedure:
Step 1 Locate a virtual ring (virtual rings are round) in the main window.
Step 2 Click the ring with the right mouse button.
Step 3 From the popup menu, select Virtual Ring View.
To display the virtual ring view from the View menu, use the following procedure:
Step 1 Select View>Virtual Ring. The Virtual Ring Prompt window is displayed.
Step 2 In the Virtual Ring Prompt window, enter the virtual ring's number.
Step 3 Click OK.
You can also display the virtual ring view from the View menu using the following procedure:
Step 1 Locate the virtual ring in the main window.
Step 2 Click the ring with the left mouse button.
Step 3 Select View>Virtual Ring. The Virtual Ring Prompt window is displayed.
Step 4 In the Virtual Ring Prompt window, click OK.
You can display information about each Token Ring in the network. The ring information includes the following items:
Before you display the ring information, you must display the focus view for the router to which the Token Ring is attached. To display the ring information, use the following procedure:
Step 1 In the main window, locate the router to which the Token Ring is attached.
Step 2 Click the router with the right mouse button.
Step 3 From the popup menu, select Focus View. The focus view is displayed.
Step 4 From the focus view, select the ring.
Step 5 Click the right mouse button.
Step 6 From the popup menu, select Ring Info. The Ring Information window is displayed.
You can change the way you view the network by selecting one of the following items from the View menu:
Locate finds a specific device on the map. Select View>Locate and enter either the device name or IP address of the device and click Locate. The specified device is selected in the map.
Refresh updates the status of the displayed map immediately. The monitor daemon refreshes the map automatically.
Global presents a high-level view of RSRB-enabled Cisco devices. The map presents the status of devices and links.
Virtual Ring displays information for a specific virtual ring. Select View>Virtual Ring and enter the number of the virtual ring you want to investigate, or point to a virtual ring on the map (round), click the right mouse button, and select Virtual Ring. Either action will display all peer relationships and status across the selected virtual ring.
Focus displays information for a specific device. Select View>Focus and enter the name of a router, or point to a single peer (a router icon), click the right mouse button, and select Focus View. Either action displays the selected peer's perspective of the network, with the in-focus router in a black box. In focus view, two kinds of statistics are available when you press the right mouse button:
PU or LU displays the path to the host for a PU or LU (CiscoWorks Blue SNA View must also be installed). Specify the PU or LU name in the form NAME.DOMAIN. Alternatively, you can point to a real ring (the oval shape) on the map, click the right mouse button, and select PU List. (The CiscoWorks Blue SNA View product must be installed.)
When the CiscoWorks Blue SNA View application is installed on the workstation with Maps, you can retrieve the dependency view information for a PU or LU. SNA View gets the PU and LU information from the VTAM at the mainframe; Maps displays the PU and LU information in logical maps. You can display information about specified PUs and LUs, and you can see their dependency paths through the network to the VTAM host. There are several ways to retrieve PU and LU information, depending on whether you know the PU or LU name, and on what you want to do with the PU or LU once you locate it.
If you know the name of the PU or LU, you can use the View menu on the Maps menu bar to locate a PU or LU and display a dependency view. To view an LU or a PU from the View menu, use the following procedures:
Step 1 From the RSRB application's menu bar, select View. The View menu is displayed.
Step 2 From the View menu, select PU to view a PU, or select LU to view an LU. The PU/LU Prompt window is displayed, as shown in Figure 6-3.

Step 3 In the PU/LU Prompt window, enter the PU name or LU name in the format NAME.DOMAIN.
Step 4 Click OK. Maps displays a PU List window (as described in the upcoming section "Using the PU List Window") or an LU List window (as described in the upcoming section "Using the LU List Window").
If you would rather select the PU names from a filtered list, you can use the PU item on the Tools menu, which lets you set up filtering criteria to search for a PU name based on VTAM information or on its router or Token Ring dependency. From the Maps application's menu bar, select Tools>PU to display the PU Filter window, as shown in Figure 6-4.

The PU Filter window (shown in Figure 6-4) lets you configure a filter that will be used to select the PUs to display in a PU List window.
The PU List window is displayed, showing all the PUs filtered as you requested. The PU List window is described in the upcoming section "Using the PU List Window."
You can filter the PU List based on the PU name, PU state, and PU type.
Step 1 From the PU Filter window, select By VTAM Information.
Step 2 In the PU Name field, enter all of a PU name, or just part of a PU name and wildcards. The PU List will contain PUs whose names match the filter criteria.
Step 3 In the PU State field, select one or more PU states. The PU window will contain the names of PUs that match one of the PU states that you select.
Step 4 In the PU Type field, select one or more PU types. The PU window will contain PUs whose type matches one of the PU types that you select.
Step 5 Click Apply.
You can filter the PU List based on the router or Token Ring dependency. From the PU Filter window, select By Dependency. Then select one or more routers from the Routers field in the PU Filter window, or select one or more Token Rings from the Token Ring box. The PU List window will contain the PUs dependent on the selected routers or Token Rings.
You can select Get All PUs to display a PU List that contains all PUs discovered by SNA View.
You can view the list of all PUs that depend on a specific Token Ring in your network. You must know which Token Ring supports the PU, and you must first display the focus view for the router to which that Token Ring is attached. Then you can use the Token Ring's popup menu to display a PU List window. To display the PU List window from a Token Ring, use the following procedure:
Step 1 In the global view, select the router to which the Token Ring is attached.
Step 2 Click the router with the right mouse button.
Step 3 From the popup menu, select Focus View.
Step 4 In the focus view, select the Token Ring (an oval) whose PUs you want to view.
Step 5 Click the right mouse button.
Step 6 From the Token Ring's popup menu, select PU List. The PU List window is displayed as described in the section "Using the PU List Window."
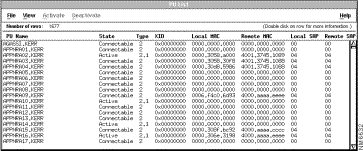
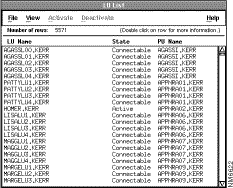
This section describes how to use the functions of the PU List window, shown in
Figure 6-5. The PU List window shows a list of all the PU names that satisfy a set of PU filter criteria.
The PU List window is static; select View>Refresh to update the status.
From the PU List window, you can do the following tasks:
You can activate a PU from the PU List window. This action is comparable to using the VTAM command VARY NET,ACT,ID=PU_name.
To activate a PU from the PU List window, use the following procedure:
Step 1 Select an inactive PU from the PU List window.
Step 2 From the PU List window menu bar, select Activate.
Step 3 From the Activate menu, select one of the following:
Default activates the PU as if you had issued the VTAM command VARY NET,ACT,SCOPE=COMP,ID=PU_name.
All activates the PU and its LUs regardless of the ISTATUS value, which is the status with which the PU was configured through VTAM.
Only activates the selected PU but no LUs regardless of their ISTATUS values, which is the status with which the LU was configured through VTAM.
You can deactivate an active PU from the PU List window. This action is comparable to issuing the VTAM command VARY NET,INACT,ID=PU_name. To activate a PU from the PU List window, use the following procedure:
Step 1 Select an active PU from the PU List window.
Step 2 From the PU List window menu bar, select Deactivate.
Step 3 From the Deactivate menu, select one of the following:
Quiesce deactivates the PU and any subordinate resources when all current sessions are terminated.
Immediate deactivates the PU and any subordinate resources immediately, disrupting active sessions.
Forced deactivates the PU forcibly; this action is recommended for PUs that do not respond to other deactivation methods.
From the PU List window, you can display a list of LUs attached to a PU. To display an LU List, use the following procedure:
Step 1 Select a PU from the PU List window.
Step 2 From the PU List menu bar, select View>Show LU List.
The LU List window is displayed.
For information about using the LU List window, read the upcoming section "Using the LU List Window."
From the PU List window, you can display a dependency view of the path from the PU back toward the VTAM host. To display a dependency view, use the following procedure:
Step 1 Select a PU from the PU List window.
Step 2 From the PU List menu bar, select View>Dependency.
Maps displays the PU dependency view, as shown in Figure 6-6.
Step 3 Because the PU dependency view is static, select View>Refresh to update the status.
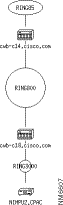
The PU dependency view shows the network components from the PU itself, back toward the mainframe to the host network connection. The PU dependency view shown in Figure 6-6 includes the following network components, from the top down:
From the PU List window, you can configure a new PU filter to display a new set of PU names in the PU List window. To configure a new PU List filter, use the following procedure:
Step 1 From the PU List menu bar, select View>Filter.
Step 2 Choose your filtering options.
Step 3 Click Apply.
Step 4 Click Close.
You can use the LU item on the Tools menu to set up filtering criteria to search for an LU name based on VTAM information or on its router or Token Ring dependency. From the Maps application's menu bar, Tools>LU to display the LU Filter window, as shown in Figure 6-7.
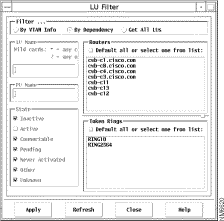
The LU Filter window (shown in Figure 6-7) lets you configure a filter that will be used to select the LUs to display in an LU List window. You can select By VTAM Info to configure the filter to select LUs based on VTAM criteria, you can select By Dependency to configure the filter based on the routers on which the LUs are dependent, or you can select Get All LUs to get all the LUs that SNA View has discovered. The LU List window is described in the upcoming section "Using the LU List Window."
You can filter the LU List based on the LU name, PU name, or LU state.
Step 1 From the LU Filter window, select By VTAM Information.
Step 2 In the LU Name field, enter all of a LU name, or just part of a LU name and wildcards. The LU List will contain LUs whose LU names match the filter criteria.
Step 3 In the LU State field, select one or more LU states. The LU window will contain the names of LUs that match one of the LU states that you select.
Step 4 In the LU Type field, select one or more LU types. The LU window will contain LUs whose type matches one of the LU types that you select.
Step 5 Click Apply.
You can filter the LU List based on the router or Token Ring dependency. From the LU Filter window, select By Dependency. Then select one or more routers from the Routers field in the LU Filter window, or select one or more Token Rings from the Token Ring box. The LU List window will contain the LUs dependent on the selected routers or Token Rings.
You can select Get All LUs to display an LU List that contains all LUs discovered by SNA View.
This section describes how to use the functions of the LU Filter window, shown in
Figure 6-8. The LU List window shows a list of all the LU names that satisfy the same LU filter criteria.
The LU List window is static; select View>Refresh to update the status.
From the LU List window, you can do the following tasks:
You can activate an inactive LU from the LU List window. This action is comparable to issuing the VTAM command VARY NET,ACT,ID=LU_name.
To activate an LU from the LU List window, use the following procedure:
Step 1 Select an inactive LU from the LU List window.
Step 2 From the LU List menu bar, select Activate.
Step 3 From the Activate menu, select one of the following:
Default to activate an LU as if issuing the VTAM command VARY NET,ACT,SCOPE=COMP,ID=LU_name.
All to activate the LU regardless of its ISTATUS value.
You can deactivate an active LU from the LU List window. This is comparable to issuing the VTAM command VARY NET,INACT,ID=LU_name. To deactivate an LU from the LU List window, use the following procedure:
Step 1 Select an active LU from the LU List window.
Step 2 From the LU List menu bar, select Deactivate.
Step 3 From the Deactivate menu, select one of the following:
Quiesce deactivates the LU when all current sessions are terminated.
Immediate deactivates the LU immediately, disrupting active sessions.
Forced deactivates the LU forcibly; this action is recommended for LUs that do not respond to other deactivation methods.
From the LU List window you can display a dependency view of the path from the LU back toward the VTAM host. To display an LU dependency view, use the following procedure:
Step 1 Select an LU from the LU List window.
Step 2 From the LU List menu bar, select View>Dependency.
Maps displays the LU dependency view, as shown in Figure 6-9.
Step 3 Because the LU dependency view is static, select View>Refresh to update the status.
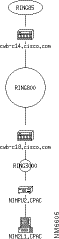
The LU dependency view shows the network components from the LU itself, back toward the mainframe to the host network connection. The LU dependency view shown in Figure 6-9 includes the following network components, from the top down:
From the LU List window, you can configure a new LU filter to display a new set of LU names in the LU List window. To configure a new LU List filter, use the following procedure:
Step 1 From the LU List menu bar, select View>Filter.
The LU Filter window is displayed.
Step 2 Choose your filtering options.
Step 3 Click Apply.
Step 4 Click Close.
The following sections describe how to enable and disable PU and LU activation.
To enable SNA activation, use the following procedure to create the
$CWBROOT/etc/SnaActDeactOn file.
Step 1 If you are already running RSRB, exit the application by selecting File>Exit Program from the menu bar.
Step 2 Become the root user by entering the following command:
su root
Step 3 When prompted, enter the root user's password.
Step 4 Change to the $CWBROOT/etc directory by entering the following command.
cd install_directory/etc
where install_directory is usually /usr/cw-blue for AIX or /opt/CSCOcb for HP-UX and Solaris.
Step 5 Create an SNA activation/deactivation file by entering the following command:
touch SnaActDeactOn
Step 6 Switch back to your username by entering the following command:
exit
Step 7 Restart the RSRB Maps application, as described earlier in the section "Starting RSRB."
To disable SNA activation, use the following procedure to remove the
$CWBROOT/etc/SnaActDeactOn file.
Step 1 If you are already running RSRB, exit the application by selecting File>Exit Program from the menu bar.
Step 2 Become the root user by entering the following command:
su root
Step 3 When prompted, enter the root user's password.
Step 4 Change to the $CWBROOT/etc directory.
cd install_directory/etc
where install_directory is usually /usr/cw-blue for AIX or /opt/CSCOcb for HP-UX and Solaris.
Step 5 Remove the SNA activation/deactivation file by entering the following command:
rm SnaActDeactOn
Step 6 Change back to your username by entering the following command:
exit
Step 7 Restart the RSRB Maps application, as described earlier in the section "Starting RSRB."
To save a custom topology for later use, select File>Save As and enter a name for the topology. When you re-open the topology file, you will see an exact representation of the saved map. Saving is also done automatically when you switch views or end the application normally.
If the CiscoWorks Blue SNA View product is also installed, you can use the SNA View Task Manager window, which is described in the CiscoWorks Blue SNA View Workstation Installation and User Guide. To start the SNA View Task Manager, select Tools>SNA View Task Mgr from the menu bar.
SNA View lets you see beyond the RSRB routers to the PUs and LUs in the network. The Task Manager lets you receive VTAM and MVS messages and issue mainframe commands from your UNIX workstation.
To terminate the RSRB map application, select File>Exit Program from the menu bar.
The colors and symbols on an RSRB map have the following meanings:
Table 6-2 shows the icons that can appear on an RSRB map.
| Icon | Description |
|---|---|

|
Virtual ring |

| Token Ring |

| Unknown ring
|

| Pseudo-ring
|

|
Peer router managed by CiscoWorks Blue Maps |

|
Focus router in a focus view
|

|
Peer router not managed by CiscoWorks Blue Maps |

| PU in a dependency view |

| LU in a dependency view |

| Physical connection |

| Logical connection |
![]()
![]()
![]()
![]()
![]()
![]()
![]()
![]()
Posted: Thu Aug 19 11:02:45 PDT 1999
Copyright 1989-1999©Cisco Systems Inc.