|
|

 |
Note The information in this chapter applies to Windows NT systems (SNA View) only. |
This chapter provides information on using Administration application. Use CiscoWorks Blue SNA View Administration to add, delete, modify, and discover devices in your CiscoWorks Blue database and to select DLSw key devices.
This chapter includes the following main sections:
This section describes how to start CiscoWorks Blue SNA View Administration on Windows NT systems. If CiscoWorks Blue is up and running, you can start the application from the following locations:
You can start SNA View Administration from the Windows Start menu. To start the application from the Start menu, select Start > Programs > CiscoWorks Blue > Administration.
You can start SNA View Administration from the CiscoWorks Blue taskbar icon in the lower-right corner of the screen. The CiscoWorks Blue icon displays on the taskbar only when CiscoWorks Blue is running. To start Administration from the taskbar icon, right click the icon, then select Administration, as shown in Figure 9-1.

You can start SNA View Administration from \TargetDir\CSCOcb\bin. To start the application from a system prompt, enter the following commands:
cd \TargetDir\CSCOcb\binYou can perform the tasks in the following procedures from the CiscoWorks Blue taskbar icon (in the lower-right corner of the screen):
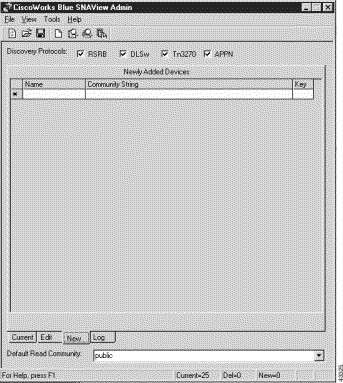
When you start CiscoWorks Blue SNA View Administration for the first time, the New tab of the CiscoWorks Blue SNA View Administration window is displayed. Once you populate the database with devices, the Current tab will be the default tab that is displayed. For more information, see the "CiscoWorks Blue SNA View Administration Window" section.
Use the main SNA View Administration window to perform the following tasks:
You can add one or more devices to the database manually. You might want to add a device that is newly connected to the network. You might want to add a device if a set of devices on a map is not current, perhaps because automatic update is disabled or is set to an infrequent interval and you have not chosen to list target devices in a seed file.
If a Cisco device does not appear on a map or web page, but you know that the device exists in the network, you can add the device using the New tab on the CiscoWorks Blue SNA View Administration window.
When you add a device, the application prompts you for the device's host name or IP address and read community string and key indication. (For more information on key routers, see "Using the Administration Application" section.) The application then places the new device in the database.
Use the following procedure to add a device:

 |
TimeSaver If you use a common read community string other than public, modify the Default Read Community field. |
Step 2 In the Name field, enter the host name or IP address of the device that you want to add.
Step 3 In the Community String field, enter the read community string of the device that you want to add.
 |
Note The Community String field accepts a maximum of 32 characters. |
Step 4 In the Key field, select whether you want this device to be a key device. A key device is an upstream DLSw router through which most sessions flow.
For more information on key devices, see "Using the Administration Application," or "Starting the User Applications."
Step 5 Continue to add new devices, one per line, until you are done. The Discover / Commit button appears once you enter data and press the Enter key.
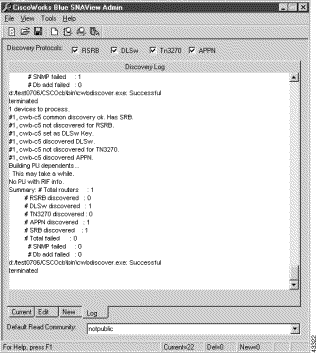
Step 6 Click Discover / Commit in the upper-right corner of the screen. The Log tab displays as the devices are added to the database, as shown in Figure 9-3.
 |
Note The Discover / Commit button appears once you enter data and press the Enter key. For more information on the Discover / Commit button, see the "Deleting a Device From the Database" section. |

The new devices are added to the database. After you add new devices, the DLSw poller and cwbsnamapsd process are automatically restarted to update the following:
Change the read community string or key setting for one or more devices using the following procedure:
See the "CiscoWorks Blue SNA View Administration WindowEdit Tab" section for more information about this window.
Step 2 In the Edit/Modify Routers Settings panel, in the Community String field, enter a new read community string to be applied to all the selected devices. You can use the Shift key to select more than one device to modify.
Step 3 In the Key field, select whether you want the selected devices to be key devices. A key device is an upstream DLSw router through which most sessions flow. You can use the Shift key to select more than one device to modify.
Step 4 To cancel the changes and restore the existing database, select File > Reload From Database.
Step 5 The Discover / Commit button appears once you enter data and press the Enter key.
Click Discover / Commit. The read community string and key setting are changed in the CiscoWorks Blue database for the selected devices (not in the device itself).
 |
Note The Discover / Commit button appears once you enter data and press the Enter key. For more information on the Discover / Commit button, see the "Deleting a Device From the Database" section. |
You might want to rediscover a device if that device is now running different protocols or is running a new IOS version that is using different APPN or DLSw MIBs. You might also want to update the database information about that device but you do not want to wait until the next polling interval. Use the following procedure to rediscover a device:
Step 2 In the Edit/Modify Routers Settings panel, select all the devices that you want to rediscover.
If you select more than one device to rediscover, they must all have the same read community string.
Step 3 Click Rediscover. The devices are rediscovered. Changes made as a result of rediscovery are displayed on a pale yellow background. Note that even if rediscovery fails for a device, the device is not removed from the database.
 |
Note After you run discovery for TN3270 or APPN, cwbsnamapsd process is automatically restarted to refresh its cache. |
Step 4 The Discover / Commit button appears once you modify data and click Rediscover or Delete Devices.
Step 5 Click Discover / Commit. The changes made as a result of rediscovery are validated and stored in the database.
 |
Note The Discover / Commit button appears once you modify data and click Rediscover or Delete Devices. For more information on the Discover / Commit button, see the "Deleting a Device From the Database" section. |
Once you click Discover / Commit, the Abort Discovery button appears in the lower-right corner of the Log tab during discovery. Use Abort Discovery to terminate a running discovery process.
After you rediscover devices, the DLSw poller and cwbsnamapsd are automatically restarted to update the database with circuit information used in SNA correlation and to update the cwbsnamapsd cache with current TN3270 and APPN information.
Use the Delete Device(s) button to remove devices from the database. You might want to delete devices for one or more of the following reasons:
Use the following procedure to delete unwanted devices from the database:
For more information about this window, see the "CiscoWorks Blue SNA View Administration WindowEdit Tab" section.
Step 2 In the Edit/Modify Routers Settings panel, select all the devices that you want to delete. The selected devices are highlighted and marked for deletion. You can use the Shift key to select more than one device.
 |
Note The Community String field accepts a maximum of 32 characters. |
Step 3 Click Mark to delete Device(s) or press the Delete key. SNA View Administration asks you to confirm the deletion. Once you click Yes, the deleted devices are displayed with a strike-through font on a red background.
 |
Note If you have not committed the deletions by clicking Discover / Commit, and you want to cancel one or more deletions, simply edit one of the fields for a deleted device. The device is removed from the to-be-deleted list. |
Step 4 The Discover / Commit button appears once you modify data and click Mark to Delete Device(s) or Mark to Rediscover.
Step 5 Click Discover / Commit. The devices are rediscovered and the selected devices are deleted from the database.
 |
Note The Discover / Commit button appears once you modify data and click Mark to Delete Device(s) or Mark to Rediscover. For more information on the Discover / Commit button, see the "Deleting a Device From the Database" section. |
Step 6 Confirm the deletion by redisplaying the Edit tab. The selected devices are deleted from the database.
When you make a change on the Edit or New tab, whether manually or by using the Rediscover button, the Discover / Commit button is displayed. Your changes are not saved to the database until you click this button and commit your changes. When you click this button, it disappears until you make more changes.
Clicking Discover / Commit commits the changes on all panels, not just the panel that is "on top."
To cancel the changes and restore the existing database, select File > Reload From Database.
In addition to adding, deleting, modifying, and discovering devices manually, you can use seed files to achieve the same results. A seed file is a text file that contains the information contained on one of the SNA View Administration views (Current, Edit, or New). Seed files are especially useful if you need to add a large number of devices quickly.
To create a seed file, use the following procedure:
Step 2 Select File > Save As Seed File.
Step 3 Enter a name and location for the seed file. The information contained in the selected view is saved to that seed file.
To replace an existing view with the information contained in a seed file, use the following procedure:
Step 2 Select File > Open Seed File.
Step 3 Select the seed file whose information you want to use. The information contained in the selected seed file replaces the information displayed in the selected view.
The Discover / Commit button has no effect on the information that you save in seed files. That is, if you change the information in a selected view and save that view as a seed file, the seed file does contain the changed information, even though you did not click Discover / Commit.
You can launch the following applications from the Administration application:
You can launch CiscoWorks Blue SNA View Configuration from the SNA View Administration window. From the menu, select Tools > Configuration Utility. CiscoWorks Blue SNA View Configuration starts and the CiscoWorks Blue SNA View Configuration window is displayed.
You can launch the Process Manager client from the SNA View Administration window. From the menu, select Tools > Process Manager Client. The Process Manager client application starts and the Process Manager window is displayed.
You can launch the Message Log client from the SNA View Administration window. From the menu, select Tools > MessageLog Client. The Message Log client window is displayed.
You can launch the Installation Verification web page from the SNA View Administration window. From the menu, select Tools > Verification Tool. The web browser is started, which displays the Verification web page. The Verification web page verifies the protocols that you configured during installation, checks the cwbinit configuration file, and checks the CiscoWorks Blue database.
You can collect diagnostic data for TAC from the SNA View Administration window. From the menu, select Tools > Collect Diagnostic Data (TAC). The TAC Settings window is displayed.
 |
Note You should only use the TAC settings as instructed by Cisco TAC when you gathering documentation. Changing them may affect product performance. |
CiscoWorks Blue SNA View Administration includes the following windows:
Use the CiscoWorks Blue SNA View Administration window to add, delete, modify, and discover devices in your CiscoWorks Blue database, and to select DLSw key devices.
Menus and Toolbar
The menus and toolbar on the SNA View Administration window provide the following options:
Menu Command
| Description
|
|---|---|
| |
| |
| |
| |
| |
| |
| |
| |
| |
| |
| |
| |
| |
Device Table
The SNA View Administration window has the following tabs:
Tab
| Description
|
|---|---|
| |
| |
| |
| |
Fields
The SNA View Administration window has the following fields:
Field
| Description
|
|---|---|
| |
| |
| |
| |
| |
| |
Button
The SNA View Administration window has the following button:
Button
| Description
|
|---|---|
| |
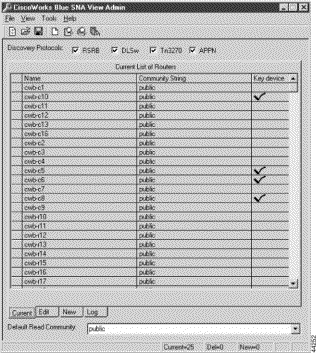
The Current tab on the CiscoWorks Blue SNA View Administration window displays the discovery protocols and current list of devices. If the database changes, you can refresh the Current tab using File > Reload From Database.
The Current tab is the default whenever you launch Administration and there is data in the database (that is, you have defined at least one device). If the database is empty, the New tab is the default.

Fields
The SNA View Administration—Current window has the following fields:
Field
| Description
|
|---|---|
| |
| |
| |
| |
The Edit tab on the CiscoWorks Blue SNA View Administration window allows you to delete, modify, and rediscover devices in your CiscoWorks Blue database. The changes are not committed to the database until you click Discover / Commit on the SNA View Administration window. To cancel the changes and restore the existing database, select File > Reload From Database.
Fields
The SNA View Administration—Edit window has the following fields:
Field
| Description
|
|---|---|
| |
| |
| |
| |
Buttons
The SNA View Administration—Edit window has the following buttons:
Field
| Description
|
|---|---|
| |
| |
The New tab on the CiscoWorks Blue SNA View Administration window allows you to add devices to your CiscoWorks Blue database. The New tab is the default whenever you launch Administration and the database is empty (such as the very first time you launch Administration). If the database is not empty, the Current tab is the default.
Fields
The SNA View Administration—New window has the following fields:
Field
| Description
|
|---|---|
| |
| |
| |
| |
The Log tab on the CiscoWorks Blue SNA View Administration window displays the output from the discovery process.
Field
The SNA View Administration—Log window has the following field:
Field
| Description
|
|---|---|
| |
| |
![]()
![]()
![]()
![]()
![]()
![]()
![]()
![]()
Posted: Mon Sep 4 10:37:38 PDT 2000
Copyright 1989-2000©Cisco Systems Inc.