|
|

This chapter describes how to install BAC in a lab environment to demonstrate product functionality and how to configure a CMTS and Network Registrar to support BAC.
When you install Broadband Access Center for Cable (BAC) in a lab environment, the installation program installs all components on a single server. The lab installation program involves fewer steps than the component installation and automates much of the configuration. When you complete the installation, however, you need to perform some setup on a cable modem termination system (CMTS) and on Network Registrar.
The lab installation program is designed to keep the installation and configuration as simple as possible by using a predefined overall system configuration.
The lab installation program uses predefined default values for the installation that assume a specific network configuration.
You can install BAC in a lab environment on a single computer running the Solaris 8 operating system. Before you run the installation program, use this checklist to ensure that you are ready:
The lab installation prompts for this information:
During a lab installation, a set of predetermined default values are used as a network configuration.
To install BAC in a lab environment, complete these steps:
Step 2 Click Lab when the Choose Installation Type screen appears.
Step 3 Click Next. The lab installation program automatically checks to see if it detects a TFTP server.
 |
Caution When installing BAC on a Solaris server, both the Solaris and Network Registrar TFTP servers must be disabled. |
Provided that a TFTP server is not detected, a PacketCable voice technology screen, similar to that shown in Figure 3-7, appears.
Step 4 Determine if you need to install the voice technology option and click:
Step 5 Click Next and the Destination Directory screen appears.
Step 6 Enter the pathname of the location where you want to install BAC.
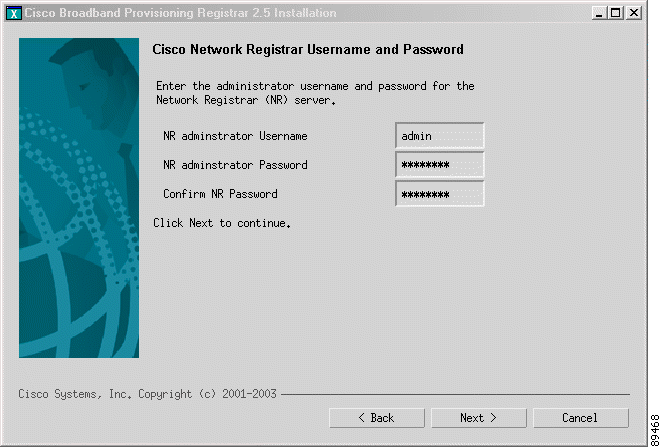
Step 7 Click Next. The installation program verifies that the selected installation directory exists and, if it does not, prompts you to automatically create it. The installation program also confirms that the required disk space is available, and then the Cisco Network Registrar Username and Password screen (Figure 4-1) appears.
Step 8 Enter the Network Registrar administrative username and password.
Step 9 Click Next. The Key Distribution Center Realm Name screen appears.
Step 10 If the default KDC realm name is inappropriate, enter desired KDC Realm, FQDN, and interface address name.
Step 11 Click Next. The PacketCable Properties screen appears.
 |
Note If you did not select the voice technology option from the PacketCable Panel, this screen will not appear. |
Step 12 Enter the appropriate information into the fields shown.
Step 13 The Shared Secret Password screen appears.
Step 14 Enter and confirm the shared secret password. This password is a token that a BAC server uses to authenticate communication with other BAC servers.
Step 15 Click Next and the Lab Installation Parameters screen appears. This screen identifies the values that you have entered in the previous screens. To modify any of the values entered:
Step 16 Click Next and the lab version of BAC is installed. When installation is complete, the Installation Summary screen appears.
Step 17 Click Finish and BAC is completely installed in your lab environment.
|
Note You use the administrator's user interface to configure your license keys. Refer to the Cisco Broadband Access Center for Cable Administrator's Guide for additional information. |
|
Caution After installation is complete, you must install your licenses and the chain of certificates or the KDC will not start. |
The lab installation prompts for this information:
To install BAC in a lab environment, complete the steps described in the "Installing from the Command Line" section:
Step 2 Enter Yes and press Enter. A confirmation message appears.
Step 3 Answer the confirmation question appropriately and press Enter. The program displays this message.
The program then prompts you to enter the destination directory.
Step 4 To accept the default directory, /opt/CSCObpr, press Enter. For example:
The program then asks you to confirm the directory.
Step 5 Press y and Enter to continue. The program prompts you to enter the Cisco Network Registrar username and password.
Step 6 To enter a Network Registrar username and password:
The program then redisplays the administrator username, password, and password confirmation. It then prompts you to confirm this information.
Step 7 Press y and Enter to continue. The program prompts you to enter the KDC realm name. The realm name must be the same one used with all of the DPEs in the provisioning group. For example:
Step 8 Enter the appropriate KDC Interface Address, FQDN, and Realm information and then press Enter.
The program redisplays the KDC information and prompts you to confirm this information.
Step 9 Press y and Enter to continue. The program prompts you to enter PacketCable properties. For example:
Step 10 Enter the appropriate voice technology information. Keep in mind that the KDC Realm name you enter here must be the same as that entered in the previous screen.
Step 11 Press Enter; the program redisplays the PacketCable Properties information and prompts you to confirm the information.
Step 12 Press y and Enter to continue. The program prompts you to enter the shared secret password. This password is a token that a BAC server uses to authenticate communication with other BAC servers. The default password is secret.
Step 13 Enter the password that you want to use for authentication among BAC servers. For example:
The program prompts you to confirm the password.
Step 14 Enter the password again and press y to continue. The program then displays the installation parameters that you selected. For example:
Step 15 Press y and Enter to install the lab software. The program displays a message when the installation is complete.
|
Note You use the administrator's user interface to configure your license keys. Refer to the Cisco Broadband Access Center for Cable Administrator's Guide for additional information. |
|
Caution After installation is complete, you must install your licenses and the chain of certificates or the KDC will not start. |
For BAC to function, you need to set up Network Registrar client-classes, policies, scopes, and selection tags. You also need to perform some configuration of CMTS devices.
To configure Network Registrar and CMTS devices, complete these steps:
|
Note The <BPR_HOME>/cnr_ep/samples/bpr_cnr_hsd_sample_config.nrc md command runs a sample Network Registrar configuration script, which defines client-classes, policies, scopes, selection tags and other related information. You must update this file to reflect the IP address settings on your network. For more information about this file, see "Network Registrar Configuration File Example". For more detailed information about defining client-classes, policies, scopes, and selection tags, see the Network Registrar User's Guide. |
Step 2 Enable the cable interface or interfaces on your CMTS with the correct IP addresses and DHCP helper-address. For example, you might edit the CMTS configuration as follows:
|
Note The IP addresses used here are identical to those in the sample script supplied with the BAC product. You must edit these addresses to match your own IP address range. Do not attempt to use these IP addresses in an operational environment. |
|
Note A sample configuration script file is included with the BAC product. This file, called cmts_sample.cfg, is located in the <BPR_HOME>/cnr_ep/samples directory. |
Step 3 To configure your CMTS to insert the DHCP relay agent information option in forwarded BOOTREQUEST messages, use this Cisco IOS command:
The default device detection logic in BAC uses DHCP option 82 information (relay-agent information) to detect devices.
Step 4 To configure your CMTS so that it does not validate the relay agent information option in forwarded BOOTREPLY messages, use this IOS command:
![]()
![]()
![]()
![]()
![]()
![]()
![]()
![]()
Posted: Thu Jan 15 06:58:42 PST 2004
All contents are Copyright © 1992--2004 Cisco Systems, Inc. All rights reserved.
Important Notices and Privacy Statement.