|
|

This chapter explains the procedures you must follow to correctly install Broadband Access Center for Cable (BAC) components in a Solaris operating system environment.
This chapter contains these topics:
This section explains the procedures that you follow to install one or more of components of BAC using the GUI.
You can choose to install one or all of these components:
For more information about each component see the "Broadband Access Center Components" section.
Before you begin any of these procedures, you must complete the initial installation procedure described in the "Installation and Startup Process" section.
Install the RDU server on a Solaris 8 server that meets the requirements described in the "Hardware Requirements" section.
To install the RDU server, complete the steps described in the "Installation and Startup Process" section, then follow these steps:
Step 2 Accept the default directory or enter a new directory. You can use the Browse button to select a new directory.
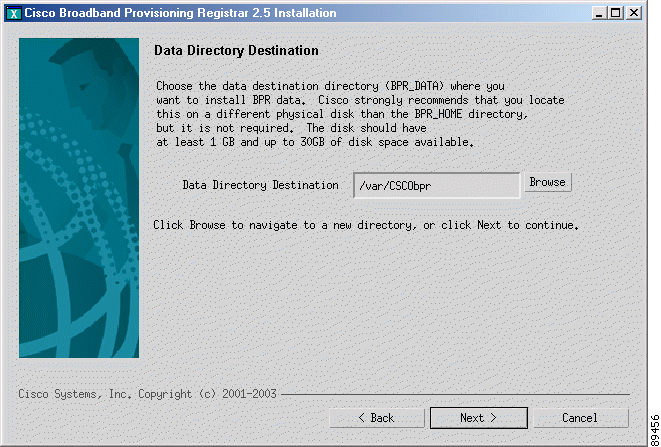
Step 3 Click Next. The installation program displays the Create Directory dialog box. Click Yes to continue. The Data Directory Destination screen appears (Figure 3-2). The default directory is /var/CSCObpr.
Step 4 Accept the default directory or enter a new directory. You can use the Browse button to select a new directory.
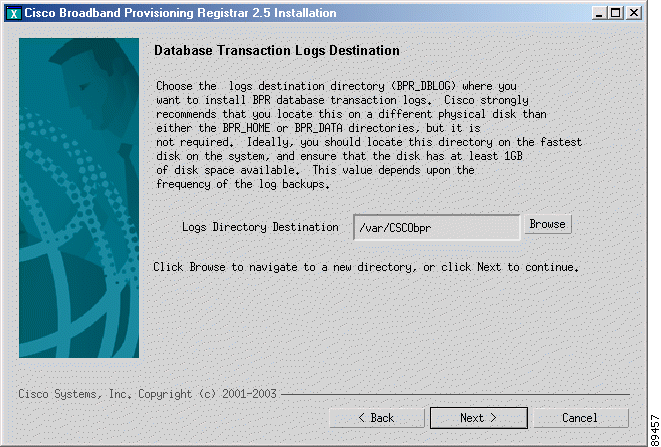
Step 5 Click Next. The installation program displays the Create Directory dialog box. Click Yes to continue. The Database Transaction Logs screen appears (Figure 3-3).
Step 6 Enter the pathname for the directory in which you want the transaction logs (BPR_DBLOG) installed. The default directory is /var/CSCObpr.
 |
Note By default, the installation program installs the database transaction logs directory
(BPR_DBLOG) in the same directory as the data directory (BPR_DATA). Cisco Systems
recommends that you locate the database transaction logs directory on the fastest disk on the
system; for example, /var/disk1/CSCObpr. You also should ensure that the disk has 1 GB of
space available. The directory specified becomes the top-level directory under which the installation program creates a number of subdirectories. |
Step 7 Accept the default directory or enter a new directory. You can use the Browse button to select a new directory.
Step 8 Click Next. The installation program displays the Create Directory dialog box. Click Yes to continue.
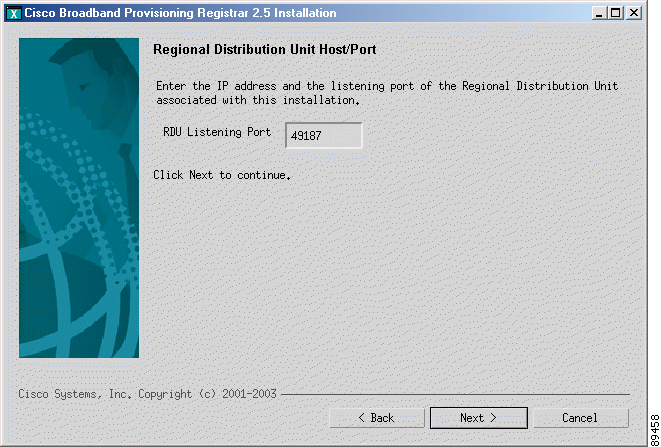
The Regional Distribution Unit Host/Port screen appears (Figure 3-4).
Step 9 Accept the default listening port number or enter a new port number. The default port is 49187.
|
Note The installation program obtains the IP address of the RDU automatically. You do not need to enter this value. |
 |
Caution If you change the default listening port value, ensure that the new value does not conflict with any existing port assignments. Also, ensure that you configure all DPEs and Network Registrar servers with the correct RDU port number. See the Broadband Provisioning Registrar Administrator's Guide for information about configuring the DPE and Network Registrar extensions. |
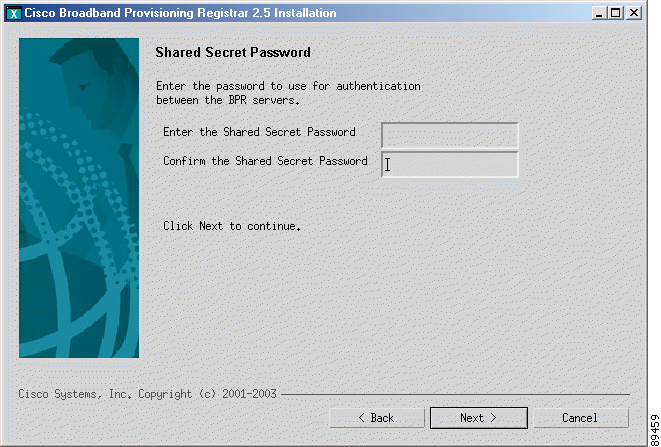
Step 10 Click Next. The Shared Secret Password screen appears (Figure 3-5).
Step 11 Enter and confirm the shared secret password.
|
Note The RDU, DPEs, and Network Registrar extension points all use the same shared secret. This is a character string, or token, that is used to authenticate communication. |
Step 12 Click Next. The Installation Parameters screen appears. This screen identifies the values that you have entered in the previous screens. To modify any of the values entered:
Step 13 Click Next. When the installation is complete, the Installation Summary screen appears. Click Finish to exit the installation program.
|
Note You must configure your license keys using the administrator's user interface. Refer to the Cisco Broadband Access Center for Cable Administrator's Guide for additional information. |
You install BAC extensions on a Network Registrar server. If you are deploying BAC in a failover environment, you also must install the extensions on the failover servers. After you install extensions, you need to configure them.
The remainder of this section explains how to install, configure, and validate these extensions.
Before you install the Network Registrar extensions, complete the steps described in the "Installation and Startup Process" section. To install the extensions:
Step 2 Enter the pathname for the home directory, or click the Browse button to locate the desired directory.
|
Note The installation program does not ask for the home directory when it identifies that you are installing BAC components on a computer that already has a BAC component installed on it. |
Step 3 Click Next. The installation program performs some validation and, prompts you to create the directory, if necessary, before the Data Directory Destination screen similar to Figure 3-2, appears.
Step 4 Accept the default directory or enter a new directory. You can use the Browse button to select a new directory.
Step 5 Click Next. The Regional Distribution Unit Host/Port screen, similar to Figure 3-4, appears.
Step 6 Enter the IP address (or hostname) and the listening port of the host where the RDU software is installed. By default, the name of the local host appears in the RDU IP Address field. The RDU uses the listening port to communicate with the DPEs and Network Registrar extension points.
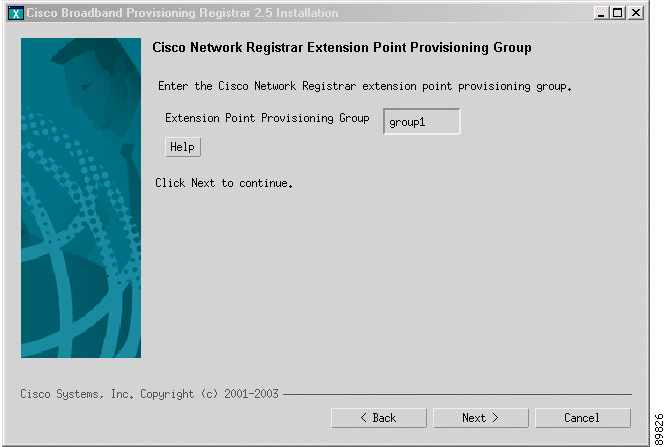
Step 7 Click Next. The Cisco Network Registrar Extension Point Provisioning Group screen appears (Figure 3-6).
Step 8 Enter the name of the extension point provisioning group.
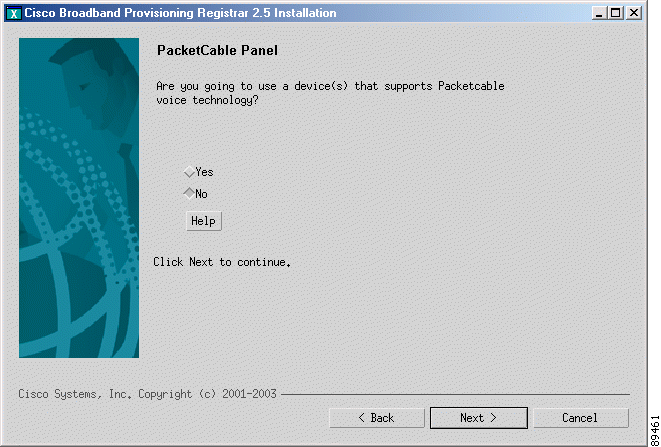
Step 9 Click Next. The PacketCable Panel screen appears (Figure 3-7).
Step 10 Determine if you need to install the voice technology option voice technology option and click:
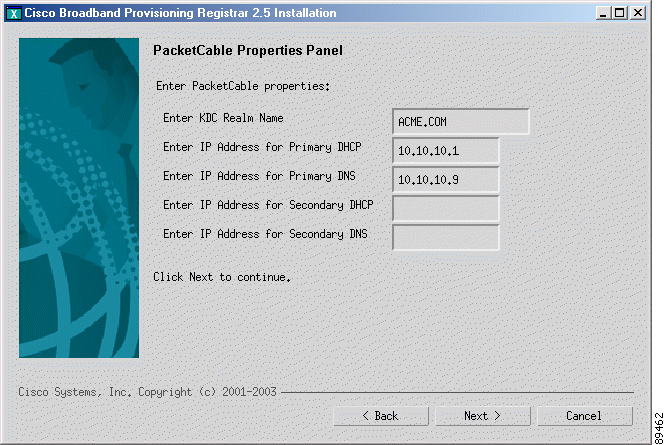
Step 11 Enter the appropriate information into the fields shown.
Step 12 Click Next. The Shared Secret Password screen, similar to Figure 3-5, appears.
Step 13 Enter and confirm the shared secret password.
Step 14 Click Next. The Installation Parameters screen appears. This screen identifies the values that you have entered in the previous screens. To modify any of the values entered click Back until the desired screen appears.
Step 15 Click Next. When the installation is complete, the Installed Components Summary screen appears. Click Finish to exit the installation program.
After you install the BAC extensions to Network Registrar, you must configure the extensions. The procedure described in this section makes these assumptions:
To configure extensions, follow these steps:
Step 2 At the command line, enter these commands:
Step 3 Enter these commands to reload the Network Registrar server:
Alternatively, you can enter this command to reload the server:
|
Caution Be aware that you also must configure client-classes, scope selection tags, policies, and scopes before you can use the Network Registrar server. See the Network Registrar User's Guide for information about configuring these entities. |
In the nrcmd program, run the following command and verify the output is the same:
|
Note The <BPR_HOME> and <BPR_DATA> values may be different in your installation. |
Also in the nrcmd program, run the following command and verify the output is the same:
To install the application programming interface (API), complete the steps described in the "Installation and Startup Process" section, then follow these steps:
Step 2 Enter the pathname for the home directory, or click the Browse button to locate the directory.
|
Note The installation program does not ask for the home directory when it identifies that you are installing BAC components on a computer that already has a BAC component installed on it. |
Step 3 Click Next and, providing that the selected directory exists, the Installation Parameters screen appears. Otherwise, a Create Directory dialog appears. If this occurs, click Yes to create the directory or No to return to the Home Directory Destination screen.
The Installation Parameters screen identifies the values that you have entered in the previous screens. To modify any of the values entered, click Back until the desired screen appears.
Step 4 Click Next. When the installation is complete, the Installed Components Summary screen appears. Click Finish to exit the installation program.
To install the Key Distribution Center (KDC), complete the steps described in the "Installation and Startup Process" section, then follow these steps:
Step 2 Enter the pathname for the home directory, or click the Browse button to locate the desired directory.
|
Note The installation program does not ask for the home directory when it identifies that you are installing BAC components on a computer that already has a BAC component installed on it. |
Step 3 Click Next. The installation program performs some validation and, prompts you to create the directory, if necessary, before displaying the Data Directory Destination screen similar to Figure 3-2.
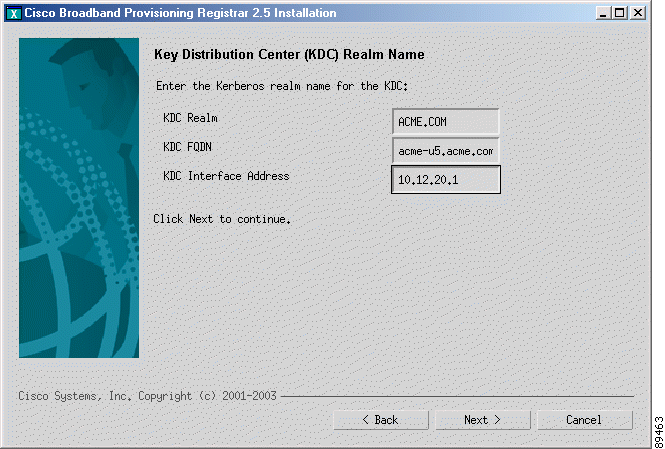
Step 4 Click Next and the Key Distribution Center Realm Name screen appears (Figure 3-9).
Step 5 Enter the appropriate information into the fields shown.
|
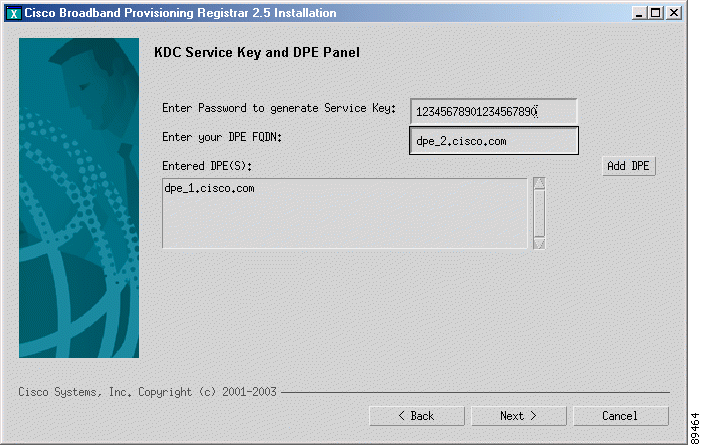
Step 6 Click Next and the KDC Service Key and DPE screen (Figure 3-10) appears.
|
Note The KDC requires a password for each DPE. This password must be entered at the corresponding DPE and MUST match that entered for the KDC otherwise the DPE will not operate. |
Step 7 Enter a 6 to 20 character password (see the example below) and the fully qualified domain name (FQDN), for each DPE, and then click Add. Continue to add additional DPEs as necessary.
Step 8 Click Next, when you are done. The Installation Parameters screen appears.
Step 9 After verifying that the parameters are correct, click Next, to install BAC, or Back to modify the parameters. When installation is complete, the Installation Summary screen appears.
Step 10 Click Finish to end the installation process and exit the installation program.
|
Caution After installing the KDC, you must install your licenses, and the chain of certificates, or the KDC will not start. |
Step 11 Start the BAC Agent. See the Cisco Broadband Access Center for Cable Administrators Guide for additional information on this agent.
This section explains the procedures that you follow to install one or more of components of BAC using the CLI.
Refer to these sections for installation instructions:
For more information about each component see the "Broadband Access Center Components" section.
Before you begin any of these procedures, you must complete the initial installation procedure. For more information, see the "Installing from the Command Line" section.
To install an RDU, complete the steps described in the "Installing from the Command Line" section. Then, follow these steps:
Step 2 To skip installing the extension points, the API, or the KDC, press n and Enter for each option.
You can choose to install these options at a later date. See the "Installing Network Registrar Extensions" section and the "Installing the Application Programming Interface" section for additional information.
The program prompts you to confirm the components that you want to install.
Step 3 Press y and Enter to continue. The program prompts you to start individual component validation.
Step 4 Press Enter to continue. For example:
The program prompts you to enter the home directory destination.
Step 5 To accept the default directory, /opt/CSCObpr, press Enter; or enter another directory. For example:
The program asks you to confirm the directory.
Step 6 Press y and Enter to continue. The program prompts you to enter the data directory destination.
Step 7 To accept the default directory, /var/CSCObpr, press Enter; or enter another directory. For example:
The program then asks you to confirm the directory.
|
Note By default, the installation program installs the data directory (BPR_DATA) on a different directory than the home directory (BPR_HOME). Cisco Systems recommends that the data directory be on a different physical disk than the home directory; for example, /var/disk0/CSCObpr. However, you can install the data directory on the same disk as the home directory. |
Step 8 Press y and Enter to continue. The program prompts you to enter the database transaction logs destination.
Step 9 To accept the default directory, /var/CSCObpr, press Enter; or enter another directory. For example:
The program then asks you to confirm the directory.
|
Note By default, the installation program installs the database transaction logs directory
(BPR_DBLOG) in the same directory as the data directory (BPR_DATA). Cisco Systems
recommends that you locate the database transaction logs directory on the fastest disk on the
system and that you ensure that the disk has 1 GB of space available. The directory specified becomes the top-level directory under which the installation program creates a number of subdirectories. |
Step 10 Press y and Enter to continue. The program prompts you to enter the listening port for the RDU.
Step 11 To accept the default value, 49187, press Enter; or enter another port number. For example:
|
Note The installation program obtains the IP address of the RDU automatically. You do not need to enter this value. |
The program then prompts you to confirm the listening port number.
|
Note The RDU listens on all interfaces. The listening port is the port number that the RDU uses to communicate with other BAC components, such as DPEs and Network Registrar extension points. |
Step 12 Press y and Enter to continue. The program prompts you to enter the shared secret password.
|
Note You must use the same shared secret password for all RDUs, DPEs, and Network Registrar extension points in your network. The default password is secret. |
Step 13 Enter the password that you want to use for authentication among BAC servers. For example:
The program prompts you to confirm the password.
Step 14 Enter the password again and press y to continue. The program displays the installation parameters you have selected. For example:
Step 15 Press y to install the RDU component. The program displays a message when the installation is complete.
|
Caution You must configure your license keys using the administrator's user interface. Refer to the Cisco Broadband Access Center for Cable Administrator's Guide for further information. |
Before you install Network Registrar extensions, complete the steps described in the "Installing from the Command Line" section and ensure that Network Registrar is running. To install the extensions:
To skip installing an RDU, the API, and the KDC, press n and Enter for these options.
The program prompts you to confirm the components that you want to install.
Step 2 Press y and Enter to continue. The program displays a message that it is starting individual component validation.
Step 3 Press Enter to continue. For example:
The program prompts you to enter the home directory destination.
Step 4 To accept the default home directory destination, /opt/CSCObpr/, press Enter; or enter another directory. For example:
The program then asks you to confirm the directory.
Step 5 Press y and Enter to continue. The program prompts you to enter the data directory destination
Step 6 To accept the default directory, /var/CSCObpr, press Enter; or enter another directory. For example:
|
Note By default, the installation program installs the data directory (BPR_DATA) on a different directory than the home directory (BPR_HOME). Cisco Systems recommends that the data directory be on a different physical disk than the home directory; for example /var/disk0/CSCObpr. However, you can install the data directory on the same disk as the home directory. |
Step 7 Press y and Enter to continue. The program prompts you to enter the host IP address and the listening port of the RDU.
Step 8 Enter the IP address (or hostname) and listening port of the host where the RDU software is installed. The program prompts you to confirm this information. For example:
Step 9 Press y and Enter to continue. The program prompts you to enter the name of the extension point provisioning group.
Step 10 Enter the name of the Network Registrar extension point group. For example:
Step 11 Press y and Enter to continue. The program then lets you decide if you are going to be provisioning voice technology devices. For example:
Step 12 Press y if you are using voice technology devices or n if you are not. If you are not using voice technology devices, you will be prompted to enter a shared secret password as described in Step 14. If you press y, the program will prompt you to enter several voice technology properties. For example:
Step 13 Press y and Enter to continue. The program prompts you to enter the shared secret password.
Step 14 Enter the password that you want to use for authentication among BAC servers. For example:
The program prompts you to confirm the password.
Step 15 Enter the password again.
Step 16 Press y and Enter to continue. The program then displays the installation parameters you have selected. For example:
Step 17 Press y and Enter to install the Network Registrar extensions. The program displays a message when the installation is complete.
Step 18 To configure the extensions complete the procedure described in the "Configuring Extensions" section.
To install the application programming interface (API), complete the steps described in the "Installation and Startup Process" section, then follow these steps:
To skip installing an RDU, Network Registrar extension points, and the KDC, enter n and Enter for these options. For example:
The program prompts you to confirm the components that you want to install.
Step 2 Press y and Enter to continue. The program displays a message that it is starting individual component validation.
Step 3 Press Enter to continue. For example:
The program prompts you to enter the home directory destination.
Step 4 To accept the default home directory destination, /opt/CSCObpr/, press Enter, or enter another directory. For example:
The program then asks you to confirm the directory.
Step 5 Press y and Enter to continue. The program displays the installation parameters that you selected. For example:
Step 6 Press y and Enter to install the API. The program displays a message when the installation is complete.
|
Note If you want to use the tools described in the Cisco Broadband Access Center for Cable Administrator's Guide, and need the bpr.jar file, you can install the API client and therefore use the BAC bpr.jar file. |
To skip installing an RDU and Network Registrar extension points, enter n and Enter for these options.
The program prompts you to confirm the components that you want to install.
Step 2 Press y and Enter to continue. The program displays a message that it is starting individual component validation.
Step 3 When validation is complete, the program prompts you to enter the home directory destination. Validation involves checking to verify that the correct patches have been installed. If they are not, error messages appear on screen.
Step 4 To accept the default home directory destination, /opt/CSCObpr/, press Enter, or enter another directory. For example:
Step 5 When validation is complete, the program prompts you to enter the data directory destination.
Step 6 To accept the default data directory destination, /var/CSCObpr/, press Enter, or enter another directory. For example:
The program prompts you to confirm the components that you want to install.
Step 7 Press y and Enter to create the directory and continue. The program prompts you to enter the KDC realm name. For example:
The program prompts you to confirm the realm name.
Step 8 Press y and Enter to confirm your entry and continue. The program prompts you to enter the KDC service key and the DPE panel. For example:
|
Note Please be aware that the service key consists of 48 characters. If all are not entered the service key will be invalid. |
Step 9 The program prompts you to enter the information for another DPE. Press y and enter to add another DPE, or press n and enter to continue.
Step 10 Press y and Enter to continue. The program displays the installation parameters that you selected. For example:
Step 11 Press y and Enter to install the KDC. The program displays a message when the installation is complete.
|
Caution After installing the KDC, you must install your licenses and the chain of certificates or the KDC will not start. |
Step 12 Start the BAC Agent. See the Cisco Broadband Access Center for Cable Administrators Guide for additional information on this agent.
A spoofing DNS server redirects all DNS requests to the same IP address. This can be used to enforce a self-provisioning flow for a new subscriber.
For example, assume that a DNS host is dns.acme.com, and has an IP address of 10.10.10.5. Assume also, that the Web server with the self-provisioning flow is 10.10.10.6.
On the DNS server, set the following in Network Registrar:
When DNS reloads, the changes will take effect.
On the DHCP server, set the following in Network Registrar:
This section describes how to configure the syslog utility on both the Network Registrar extension points and RDU server to receive alerts and debugging information from BAC.
Step 2 At the command line, create the log file. For example:
Step 3 Open the /etc/syslog.conf file with a text editor.
Step 4 Add this line to the /etc/syslog.conf file:
Step 5 Save and close the /etc/syslog.conf file.
Step 6 To force the syslog utility to take the new configuration, at the command line enter these commands:
|
Note The pid in this example is 217, but may change when you run ps -ef | grep syslogd. Use the correct output, from that command, as the input to kill -HUP. |
Syslog is now ready to receive alerts from BAC.
The program described in this section uninstalls the RDU, Network Registrar extensions, the API, and the KDC, but it does not uninstall the Network Registrar application. Prior to removing BAC you have to manually unconfigure Network Registrar.
The uninstallation program removes all files located under the installation directory (the default installation directory is /opt/CSCObpr). If the database is found under the installation directory, as is the case in the lab installation program, the program displays a warning message that it is deleting the database. You can exit from the uninstallation program at that time, or you can choose to proceed.
The uninstallation program also shuts down and removes these processes if they are detected: RDU, KDC, SNMP Agent, JRun, BAC agent, and (for lab installations) the DPE.
The uninstallation program does not remove files that were placed outside the installation directory. For example, a component installation places the database and database transaction logs directories under /var/CSCObpr. So theses files are not removed. The uninstallation program also does not remove any files that are located under the Network Registrar directory.
|
Caution If you uninstall BAC after configuring your Network Registrar servers to use BAC extensions, your network will no longer function correctly. You must uninstall BAC extensions in Network Registrar to completely uninstall the BAC program. |
There are two methods or removing BAC:
To uninstall BAC using the graphical user interface:
Step 2 Manually unconfigure the BAC extensions on the Network Registrar server. You can unconfigure Network Registrar from any server that has nrcmd installed and connectivity with Network Registrar. Follow these steps:
|
Note This procedure assumes the default installation directories for BAC and Network Registrar. It also uses the default Network Registrar username and password. If you installed these products in other directories, you should enter those directory names instead. |
Alternatively, enter this command:
Step 3 At the CLI prompt, enter:
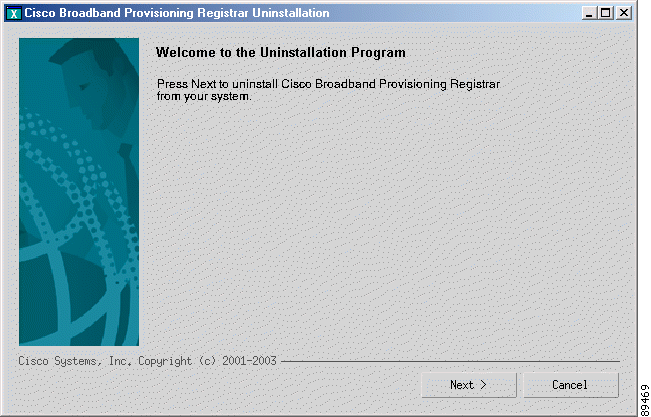
The uninstallation program's Welcome screen appears (Figure 3-11).
Step 4 Click Next. The uninstallation program begins removing BAC files.
When the uninstallation is complete, the Cisco Broadband Provisioning Registrar was Uninstalled screen appears.
Step 5 To exit the uninstallation program, click Finish.
|
Note Should the uninstallation program fail to successfully uninstall BAC, error messages will appear on screen. |
To uninstall BAC from the console mode:
|
Note If you are uninstalling BAC from a lab installation, and you are using the console mode, the database is automatically deleted. To prevent the accidental or unplanned deletion of the database, you should either use the administrator's user interface to uninstall BAC or copy the database files and log files as instructed in the Cisco Broadband Access Center for Cable Administrator's Guide. |
Step 2 Manually unconfigure the BAC extensions on the Network Registrar server. You can unconfigure Network Registrar from any server that has nrcmd installed and connectivity with Network Registrar. Follow these steps:
|
Note This procedure assumes the default installation directories for BAC and Network Registrar. It also uses the default Network Registrar username and password. If you installed these products in other directories, you should enter those directory names instead. |
Alternatively, enter this command:
Step 3 At the CLI prompt, enter:
Step 4 Press Enter to start the removal process. When uninstallation is complete these messages appear:
Step 5 Press Enter to exit the program.
![]()
![]()
![]()
![]()
![]()
![]()
![]()
![]()
Posted: Thu Jan 15 07:01:26 PST 2004
All contents are Copyright © 1992--2004 Cisco Systems, Inc. All rights reserved.
Important Notices and Privacy Statement.