|
|

Table Of Contents
Configuring CWMP Service Security
Key and Certificate Management in BAC
Configuring DPE Keystore by Using the Keytool
Configuring Security for DPE Services
Configuring CPE Authentication
Configuring CWMP Service Security
This chapter describes security options for Broadband Access Center's (BAC) CWMP services, including authentication and encryption. It describes how to enable HTTP over SSL transport, called SSL in this chapter, for the CWMP services and the HTTP file services on the DPE, and use the certificate-management tool to create a certificate store on the DPE.
This chapter provides:
•
Overview
•
•
Overview
BAC supports secure provisioning of CWMP devices by using SSL, specifically SSL 3.0 and TLS 1.0, as defined in RFC 2246. It supports device authentication based on shared secrets with the DPE by using Basic and Digest authentication as defined in RFC 2617.
BAC provides multiple services at the DPE: two instances of the CWMP service and two instances of the HTTP file service. You enable and configure each service independently, with different security options providing the flexibility of handling various devices differently on the same DPE.
BAC also provides secure device authentication by using unique or generic client certificates.
•
•
BAC supports a unique option of performing client-certificate authentication at a hardware load balancer and SSL accelerator such as Cisco 11500 Content Services Switch (CSS). In this scenario, the downstream Cisco CSS performs certificate validation, extracts information about the SSL session, specifically client certificate fields, from the device certificate, and inserts that data into special HTTP headers. BAC then retrieves the CN field from the Cisco CSS header ClientCert-Subject-CN to form the unique device identifier.
BAC allows a mix of authentication options. For example, you can validate that the device has a generic certificate by using SSL and then perform additional HTTP Basic or Digest authentication once SSL connection is established.
BAC also provides an option of no-device authentication. This option is useful if the device is authenticated downstream from the DPE and the identity that the device presents can be trusted. If the BAC DPE is configured to perform no-authentication, it extracts the device identity from the Inform message and trusts it.
You can encrypt traffic between the device and a DPE by using SSL. BAC supports a variety of cipher suites, which determine the encryption algorithms to be used with the device and the encryption key length. You can configure acceptable cipher suites on the DPE by using the CLI. Another option is to terminate SSL at a hardware load balancer and accelerator for higher scalability.
Note
Key and Certificate Management in BAC
The DPE stores the certificates that the SSL protocol requires for authentication in the keystore. This keystore is a database in the form of a file that contains private keys and their associated public key X.509 certificates.
There are two keystores on the DPE server. The keystores are the cacerts keystore and the server certificates keystore. The cacerts keystore contains public key certificates that the DPE trusts for authenticating devices' client certificates. The server certificates keystore contains the private key and the associated certificate chain for the server-side certificate, which is used to authenticate the DPE to the devices.
All DPE SSL services share a single cacerts keystore. This keystore can contain any number of signing authority certificates. The name of the cacerts keystore is fixed, and it must always reside in BPR_HOME/jre/lib/security directory. BAC ships with a default cacerts keystore, which can be manipulated by adding and removing signing authority certificates.
In contrast to the cacerts keystore, there can be multiple server certificate keystores and you can configure each SSL service in the DPE to use a different server certificate keystore. Each server certificate keystore should contain only one certificate chain. The server certificate keystores must reside in the BPR_HOME/dpe/conf directory.
If SSL is being terminated on the DPEs, and the provisioning group contains multiple DPEs, then all the DPEs must be configured with an identical keystore. An identical keystore is required since the same fully qualified domain name (FQDN) URL of the autoconfiguration server (ACS) is used to resolve to all DPEs in the provisioning group. As defined in the TR-069 specification, the ACS URL must be identical to the Common Name (CN) value of the server certificate, which is imported into the keystore.
Note
Configuring SSL Service
To enable SSL on BAC:
Step 1
Step 2
Step 3
Step 4
Note
Configuring DPE Keystore by Using the Keytool
You use BAC to configure the server certificate keystore and the cacerts keystore by using the keytool utility. The keytool is a key and certificate-management utility, which you use to administer the certificates on the DPE server.
The keytool utility resides in the BAC default installation directory, at /opt/CSCObac/jre/bin/keytool. Run the keytool utility by using a secure connection to the DPE server.
Note
To configure a server certificate:
Step 1
Step 2
Step 3
Step 4
Step 5
Step 6
Step 7
Step 8
Note
Importing an Existing Signed Server Certificate
If you already have the signed server certificate and you want to load it into the keystore, you must know the private key that is associated with the certificate. In this case, instead of following the procedure described above, follow the steps outlined in this section. Use the PCKS#12 file format, which combines both the private key and the signed certificate. You can load this file into a keystore by using the keystore import-pkcs12 command.
To configure a server certificate with an existing signed server certificate, follow these steps:
Step 1
When using this command, the syntax is:
keystore import-pkcs12 keystore-filename pkcs12-filename keystore-password key-passwordexport-password export-key-password•
Note
•
and certificate.•
•
•
•
For example:
dpe# keystore import-pkcs12 example.keystore example.pkcs12 changeme changeme changeme
changeme
% Reading alias [1]% Reading alias [1]: key with format [PKCS8] algorithm [RSA]% Reading alias [1]: cert type [X.509]% Created JKS keystore: example.keystore% OKStep 2
Step 3
Step 4
Using the Keytool Commands
The keytool utility uses command arguments to configure a DPE keystore. Table 13-1 lists the keytool commands and their descriptions.
Note
Generating Server Certificate Keystore and Private Key for a New Certificate
The keytool -genkey command generates a key pair (a public key and an associated private key), and wraps the public key into an X.509 self-signed certificate, which is stored as a single-element certificate chain. This certificate chain and the private key are stored in a new keystore entry identified by alias.
Note
Example 13-1 Keytool -genkey
The following example uses train-1.keystore as the name of the keystore file. You can use any file name, but using servercerts is not recommended because this conflicts with the sample keystore that BAC provides.
dpe# ./keytool -keystore train-1.keystore -alias train-1 -genkey -keyalg RSAEnter keystore password: changemeWhat is your first and last name?[Unknown]: train-1.bac.testWhat is the name of your organizational unit?[Unknown]: BAC TrainingWhat is the name of your organization?[Unknown]: Acme Device, Inc.What is the name of your City or Locality?[Unknown]: BoxboroughWhat is the name of your State or Province?[Unknown]: MAWhat is the two-letter country code for this unit?[Unknown]: USIs CN=train-1.bac.test, OU=BAC Training, O="Acme Device, Inc.", L=Boxborough, ST=MA, C=US correct?[no]: yesEnter key password for <train-1>(RETURN if same as keystore password):In this example, train-1.bac.test goes into the CN field of the certificate and represents the FQDN that the ACS URL contains. According to the TR-069 specification, the device validates the certificate signature and ensures that the CN field in the certificate matches that of the URL it contacts.
Displaying Self-Signed Certificate
The keytool -list argument displays the contents of the keystore entry identified by alias. If you do not specify an alias, the entire contents of the keystore appear.
If you combine -list with -v, the certificate chain associated with the alias appears. The following keytool -list sample output displays the keystore containing a single self-signed certificate.
Example 13-2 Keytool -list
# ./keytool -keystore train-1.keystore -list -vEnter keystore password: changemeKeystore type: jksKeystore provider: SUNYour keystore contains 1 entryAlias name: train-1Creation date: Nov 8, 2005Entry type: keyEntryCertificate chain length: 1Certificate[1]:Owner: CN=train-1.bac.test, OU=BAC Training, O="Acme Device, Inc.", L=Boxborough, ST=MA, C=USIssuer: CN=train-1.bac.test, OU=BAC Training, O="Acme Device, Inc.", L=Boxborough, ST=MA, C=USSerial number: 43714f22Valid from: Tue Nov 08 20:21:38 EST 2005 until: Mon Feb 06 20:21:38 EST 2006Certificate fingerprints:MD5: CF:D4:CB:D1:20:6F:8C:12:ED:EA:2F:21:53:57:E5:1DSHA1: DD:AE:96:02:71:55:F8:1F:14:4F:D7:64:9C:FE:91:DE:65:C9:BB:49Generating a Certificate-Signing Request
At this point in the procedure, the keystore contains a private key and a X.509 self-signed certificate. If the DPE ACS tries to respond with this certificate to a device's initial handshake, the device will reject the certificate with a TLS alert
bad CA, indicating that the certificate authority that the CPE trusted did not sign the certificate. Therefore, the signing authority that the CPE trusts must sign the certificate.
Note
The keytool -certreq command parameter generates a certificate-signing request (CSR). This command generates the CRS in the industry standard PKCS#10 format.
Example 13-3 Keytool -certreq
The following example uses a keystore with a preexisting self-signed certificate under alias train-1 to generate a certificate-signing request and output the request into the
train-1.csrfile.dpe# ./keytool -keystore train-1.keystore -alias train-1 -certreq -file train-1.csrEnter keystore password: changemeThe next step is to submit the CSR file to your signing authority. Your signing authority or your administrator, who is in possession of the private key for the signing authority, will generate a signed certificate based on this request. From the administrator, you must also obtain the public certificate of the signing authority.
Verifying the Signed Certificate
After you have received the signed certificate, use the keytool -printcert command to verify if the self-signed certificate is in the correct file format and uses the correct owner and issuer fields. The command reads the certificate from the -file cert_file parameter, and prints its contents in a human-readable format.
Example 13-4 Keytool -printcert
The train-1.crt file in this example identifies the signed certificate that the administrator provides.
dpe# ./keytool -printcert -file train-1.crtOwner: CN=train-1.bac.test, OU=BAC Training, O="Acme Device, Inc.", ST=MA, C=USIssuer: EMAILADDRESS=linksys-certadmin@cisco.com, CN=Acme Device Provisioning Root Authority 1, OU=Acme Device Certificate Authority, O="Acme Device, Inc.", L=Irvine, ST=California, C=USSerial number: 1Valid from: Tue Nov 08 12:40:28 EST 2005 until: Thu Nov 08 12:40:28 EST 2007Certificate fingerprints:MD5: 25:8E:98:C5:5C:23:5C:A0:4D:51:CF:2A:AA:2A:FC:42SHA1: 05:C1:2D:C6:94:78:D1:40:88:6A:55:67:43:27:68:D3:AC:43:C6:A5
Note
Importing Signing Authority Certificate into Cacerts Keystore
Before importing the certificate into the server certificate keystore, you must import the public certificate of the signing authority into the cacerts keystore; because when a certificate is being imported into the keystore, the keytool checks if a chain of trust can be established between the certificate and its signing authority. If a chain of trust cannot be established, an error message appears.
Note
The cacerts keystore does not need to be copied anywhere. The DPE will use the new keystore as soon as it is restarted.Example 13-5 Keytool -import Signing Authority Certificate
# ./keytool -import -alias DeviceProvRoot -file rootCA4.crt -keystore
/opt/CSCObac/jre/lib/security/cacerts
Enter keystore password: changeitOwner: EMAILADDRESS=linksys-certadmin@cisco.com, CN=Acme Device Provisioning Root Authority 1, OU=Acme Device Certificate Authority, O="Acme Device, Inc.", L=Irvine, ST=California, C=USIssuer: EMAILADDRESS=linksys-certadmin@cisco.com, CN=Acme Device Provisioning Root Authority 1, OU=Acme Device Certificate Authority, O="Acme Device, Inc.", L=Irvine, ST=California, C=USSerial number: 8bcbc07a0768c1eb78e6c5c93c0c2ff0Valid from: Fri Jul 01 21:22:12 EDT 2005 until: Mon Jun 29 21:22:12 EDT 2015Certificate fingerprints:MD5: C4:D4:09:6A:60:34:A0:00:96:4F:4D:47:23:86:8C:FASHA1: B0:CC:6D:CD:BB:62:1B:A1:15:D3:2D:68:7E:D0:4A:0C:91:C2:A5:FDTrust this certificate? [no]: yesCertificate was added to keystore.
Note
Importing the Signed Certificate into Server Certificate Keystore
Once you import the public certificate of the signing authority into the cacerts keystore, you must import the signed server certificate into the DPE server certificate keystore. You will already have a keystore with private key and corresponding self-signed certificate (public key). By importing the certificate reply (signed certificate), the keystore is modified to associate the signed certificate with the existing private key in the server certificate keystore.
When importing the certificate reply into the keystore, you must use the -trustcacerts flag with the -import command for certificates in the cacerts file to be used to establish chains of trust with the certificate reply in the subject's keystore.
Example 13-6 Keytool -import (Signed Server Certificate)
dpe# ./keytool -import -trustcacerts -file train-1.crt -keystore train-1.keystore -alias
train-1
Enter key password: changeme2Enter keystore password: changemeCertificate reply was installed in keystore.Certificate was added to keystore.After you import the signed server certificate into the DPE server certificate keystore, use the keytool -printcert command to verify the keystore contents, as outlined in Verifying the Signed Certificate. The -printcert output should now show the issuer to be the signing certificate authority, and that a chain of trust has been established via the signing authority with the root trusted certificate.
Importing Certificates for Client Authentication
This step is required only if you have configured client authentication by using client certificates on the DPE. If you have enabled client authentication by using client certificates, the cacerts keystore must contain the public certificate of the signing authority that signed the CPE client certificates. This certificate must be present to enable the DPE to validate certificates presented to it.
Example 13-7 Keytool -import (Signing Authority Certificate)
# ./keytool -import -alias DeviceClientRoot -file rootCA3.crt -keystore
/opt/CSCObac/jre/lib/security/cacerts
Enter keystore password: changeitOwner: EMAILADDRESS=linksys-certadmin@cisco.com, CN=Acme Device Client Root Authority 1, OU=Acme Device Certificate Authority, O=Acme Device LLC., L=Irvine, ST=California, C=USIssuer: EMAILADDRESS=linksys-certadmin@cisco.com, CN=Acme Device Client Root Authority 1, OU=Acme Device Certificate Authority, O=Acme Device LLC., L=Irvine, ST=California, C=USSerial number: d07d8a7badba7cb6446998b1ea89879fValid from: Fri Jul 01 21:19:50 EDT 2005 until: Mon Jun 29 21:19:50 EDT 2015Certificate fingerprints:MD5: 40:B0:40:49:37:3A:51:1F:0D:78:B6:B3:E2:2C:1A:E8SHA1: 96:F5:84:71:84:CC:0A:A2:1E:7B:44:A2:B6:F5:B7:3D:C4:9F:81:3BTrust this certificate? [no]: yesCertificate was added to keystore
Note
Providing the DPE with the service-provider keystore
Once you have a new service certificate keystore, which contains the signed public key certificate, you must copy the keystore file to the DPE. The file must be copied to the BPR_HOME/dpe/conf directory.
Example 13-8 Copy Keystore to DPE Configuration Directory
dpe# cp train-1.keystore /opt/CSCObac/dpe/confOnce you complete this step, you can configure the DPE services to use the new keystore by using the DPE CLI.
Note
For more information, see Configuring Security for DPE Services. For additional information on DPE configuration commands, refer to the Cisco Broadband Access Center DPE CLI Reference, Release 3.0.
Configuring Security for DPE Services
This section describes how to configure authentication options and configure SSL on the DPE services.
You can configure DPE security options from the DPE CLI. For more information, refer to the Cisco Broadband Access Center DPE CLI Reference, Release 3.0.
The DPE supports running two CWMP and two HTTP file services concurrently. Each service can have a different configuration of security options and runs on a different port. By default, only one CWMP and one HTTP service are enabled, and they are configured without SSL. Two additional services are configured for SSL, but are disabled by default.
Table 13-2 specifies the defaults settings for each instance of the CWMP service and the HTTP file service:
Configuring SSL on a DPE
To enable SSL on any given service:
Step 1
Step 2
Step 3
Step 4
Step 5
Step 6
Step 7
Step 8
Enabling SSL for the CWMP Service
The following example describes the commands that you use to enable SSL for an instance of the CWMP service. In this example, double authentication is enabled for the SSL clients by using client certificates and HTTP authentication in Basic mode.
dpe# service cwmp 2 client-auth basic% OK (Basic authentication was enabled. Digest authentication was disabled. Requires DPE restart "> dpe reload")dpe# service cwmp 2 port 7548% OK (Requires DPE restart "> dpe reload")dpe# service cwmp 2 ssl enable true% OK (Requires DPE restart "> dpe reload")dpe# service cwmp 2 ssl keystore train-1.keystore changeme changeme2% OK (Requires DPE restart "> dpe reload")dpe# service cwmp 2 ssl client-auth client-cert-unique% OK (Requires DPE restart "> dpe reload")dpe# service cwmp 1 enabled false% OK (Requires DPE restart "> dpe reload")dpe# service cwmp 2 enable true% OK (Requires DPE restart "> dpe reload")dpe# dpe reloadProcess dpe has been restarted.% OK
Note
train-1.keystoreis preloaded with the signed public key certificate for the server and that the keystore file was moved to the BPR_HOME/dpe/conf directory on the DPE.Enabling SSL for the HTTP File Service
The following example describes the commands that you use to enable the SSL protocol for an instance of the HTTP file service. In this example, client authentication is disabled; thus allowing access without an authentication challenge.
dpe# service http 2 client-auth none% OK (Requires DPE restart "> dpe reload")dpe# service http 2 port 7550% OK (Requires DPE restart "> dpe reload")dpe# service http 2 ssl enable true% OK (Requires DPE restart "> dpe reload")dpe# service http 2 ssl keystore train-1.keystore changeme changeme2% OK (Requires DPE restart "> dpe reload")dpe# service http 2 ssl client-auth none% OK (Requires DPE restart "> dpe reload")dpe# service http 1 enable false% OK (Requires DPE restart "> dpe reload")dpe# service http 2 enable true% OK (Requires DPE restart "> dpe reload")dpe# dpe reloadProcess dpe has been restarted.% OK
Note
Configuring CPE Authentication
CPE authentication is supported through:
•
•
•
The objective of authentication is to establish a trusted device ID, which is used to look up device instructions in the DPE cache. This device ID correlates to the device identifier preprovisioned for the device record at the BAC RDU database. In case of shared secret HTTP-based authentication, the username serves to establish the identity of the device and is treated as a device ID. In case of authentication using unique client certificates, the device ID is obtained from the device certificate's CN field. With client certificate authentication by an external entity (such as a Cisco CSS 15000 series load balancer), the certificate data, including the CN field, is passed to the DPE in the HTTP headers.
Note
You can configure CPE authentication options from the DPE CLI.
Shared Secret Authentication
BAC supports HTTP authentication based on a shared password between the CPE and the DPE. This authentication is available in two modes: Basic and Digest.
Note
To configure authentication in the Basic or Digest mode from the DPE CLI, use:
# service {cwmp | http} num client-auth mode•
•
–
–
–
For detailed information, refer to the Cisco Broadband Access Center DPE CLI Reference, Release 3.0.
Changing a Device Password
You can configure the shared secret for the device in BAC. The shared secret is stored on the device record by using the
IPDeviceKeys.CPE_PASSWORDproperty. The CPE must prove knowledge of this password during HTTP-based authentication. In the Basic mode, the password is transmitted as encoded clear text, while in the Digest mode, the device is allowed to prove knowledge of the password (shared secret) without transmitting it.You can configure the password:
•
IPDeviceKeys.CPE_PASSWORD.•
Note
The CPE password is optional if you have enabled client authentication by using SSL and with client certificates.A distinction should be drawn between changing the password used by BAC and the password used by the device. When you configure a password on the device record in BAC, the outcome differs depending on the previous value of the password. If the password was already set on the device record, BAC changes it and initiates the process of changing the password on the actual device. However, if the prior password value on the device record did not exist (or was an empty string), BAC sets the new password on the device record, but does not initiate the change of password on the actual device. Hence, if you wish to change the password from the existing value to another value only in BAC, you must first reset the value in BAC (set it to an empty string) and then set it to a new value.
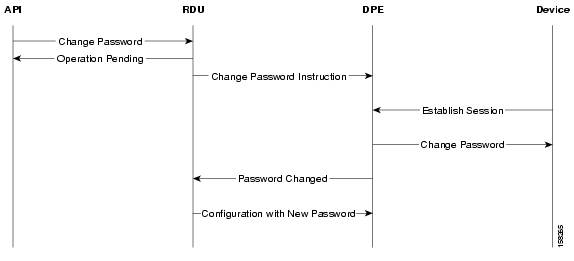
Figure 13-1 describes the process that BAC uses to change the password on the actual device. This process is complicated by the fact that BAC needs to use the old password to authenticate the device first, and then set the new password. Only after the password change is acknowledged can BAC forget the previous password and remove it from its database.
Figure 13-1 Change Password Flow
After the password is changed on the device object in the RDU, the change password instruction is included in the device configuration. At this point, the old password is still used to authenticate the device. The new configuration instruction is then forwarded to all the DPEs in the device's provisioning group.
When the device creates its next session with BAC, the device is authenticated with its old password; then, its new password is set via the SetParameterValues RPC. Once the DPE notifies the RDU of the change, the RDU changes the device password and generates a new configuration instruction, which includes the new password. Thereafter, the old password is no longer stored in BAC.
It is possible to change the new password up until it is set on the device. For example, if the original password of a device (password) has been changed to newpassword. But with the device yet to connect with BAC in order to set the new password, you can still change the password; for this purpose of this example, assume that the password is now changed to n3wpa550d. The device continues to be authenticated with the old password (password) until the device connects to BAC. The new password (n3wpa550d) is set during the device's next session with BAC.
Correcting a Device Password
You can also change an incorrectly spelled password, in the RDU. For example, if you entered passwrod instead of password, first remove the password and then submit it. At this point, the device object does not have a password associated with it. Then, add the password on the device.
Note
To correct a device password from the administrator user interface:
Step 1
Step 2
Step 3
Step 4
Step 5
The password is now changed on the device record in the RDU; no change of password on the actual device is initiated after this procedure.
Client Certificate Authentication
You can configure the DPE to require a validated device-provided certificate for authentication. These certificates could be:
•
•
If the device certificates are unique, it is not necessary to use HTTP authentication. But if the same certificate is used for all devices (that is, a single device certificate that a service provider uses), you should configure an additional HTTP authentication.
To configure client certification authentication from the DPE CLI, use:
# service {cwmp | http} num ssl client-auth mode•
–
–
•
–
–
–
External Client Certificate Authentication
An SSL connection can be terminated outside of the DPE, such as at a load balancer. In this case, the DPE may be configured without SSL service.
If a load balancer such as CSS 11500, is used to terminate the SSL connections, the DPE does not receive the unique certificate, making it impossible to identify the device without HTTP authentication (Basic or Digest). To overcome this, the load balancer inserts additional HTTP headers that include the certificate information.
If a single session includes multiple TCP connections, each of the connections will be authenticated (if enabled). The session cookie binds the device to the existing session state.
For details on how to configure client certificate authentication with CSS, see Configuring Client Certificate Authentication on Cisco CSS.
Authentication Options in BAC
This section provides a summary of possible combinations of client-authentication options available in BAC for the CWMP and the HTTP file services. You can configure each instance of these services separately from the DPE CLI to suit your requirements.
BAC supports HTTP authentication in the Basic and Digest modes based on a shared password between the CPE and the DPE. If HTTP-based authentication is used, Cisco recommends use of the Digest mode.
You can also configure CPE authentication by using certificates unique to each CPE. In this case, HTTP authentication is not necessary. However, if you configure CPE authentication using generic certificates that are common to all CPE or a large subset of CPE, it is recommended that you configure the DPE to require an additional HTTP authentication.
Table 13-3 lists the various options that BAC supports and the commands you use to configure authentication from the DPE CLI. For details on each command, refer to the Cisco Broadband Access Center DPE CLI Reference, Release 3.0.
![]()
![]()
![]()
![]()
![]()
![]()
![]()
![]()
Posted: Thu Aug 31 23:37:30 PDT 2006
All contents are Copyright © 1992--2006 Cisco Systems, Inc. All rights reserved.
Important Notices and Privacy Statement.