|
|

Table Of Contents
Cisco ONS 15305 Quick Installation Guide
Cisco Product Security Overview
Reporting Security Problems in Cisco Products
Obtaining Technical Assistance
Cisco Technical Support Website
Definitions of Service Request Severity
Obtaining Additional Publications and Information
Installation Materials for ONS 15305
Installing the ONS 15305 in a 19-in. (482.6-mm) Rack
Installing 48-V Power and Ground to the ONS 15305
Installing the ONS 15305 AC 230V Power
Installing External Ground to the ONS 15305
Small Form-Factor Pluggable Modules
Interconnections and Cable Handling
Installation Checklist for ONS 15305
Commissioning the IP Address Using the VT100 Interface
Further Configuration of ONS 15305
Quick Start Guide
Cisco ONS 15305 Quick Installation Guide
Release 2.0
December 2004
1 Obtaining Documentation
Cisco documentation and additional literature are available on Cisco.com. Cisco also provides several ways to obtain technical assistance and other technical resources. These sections explain how to obtain technical information from Cisco Systems.
Cisco.com
You can access the most current Cisco documentation at this URL:
http://www.cisco.com/univercd/home/home.htm
You can access the Cisco website at this URL:
You can access international Cisco websites at this URL:
http://www.cisco.com/public/countries_languages.shtml
Documentation DVD
Cisco documentation and additional literature are available in a Documentation DVD package, which may have shipped with your product. The Documentation DVD is updated regularly and may be more current than printed documentation. The Documentation DVD package is available as a single unit.
Registered Cisco.com users (Cisco direct customers) can order a Cisco Documentation DVD (product number DOC-DOCDVD=) from the Ordering tool or Cisco Marketplace.
Cisco Ordering tool:
http://www.cisco.com/en/US/partner/ordering/
Cisco Marketplace:
http://www.cisco.com/go/marketplace/
Ordering Documentation
You can find instructions for ordering documentation at this URL:
http://www.cisco.com/univercd/cc/td/doc/es_inpck/pdi.htm
You can order Cisco documentation in these ways:
•
Registered Cisco.com users (Cisco direct customers) can order Cisco product documentation from the Ordering tool:
http://www.cisco.com/en/US/partner/ordering/
•
2 Documentation Feedback
You can send comments about technical documentation to bug-doc@cisco.com.
You can submit comments by using the response card (if present) behind the front cover of your document or by writing to the following address:
Cisco Systems
Attn: Customer Document Ordering
170 West Tasman Drive
San Jose, CA 95134-9883We appreciate your comments.
3 Cisco Product Security Overview
Cisco provides a free online Security Vulnerability Policy portal at this URL:
http://www.cisco.com/en/US/products/products_security_vulnerability_policy.html
From this site, you can perform these tasks:
•
•
•
A current list of security advisories and notices for Cisco products is available at this URL:
If you prefer to see advisories and notices as they are updated in real time, you can access a Product Security Incident Response Team Really Simple Syndication (PSIRT RSS) feed from this URL:
http://www.cisco.com/en/US/products/products_psirt_rss_feed.html
Reporting Security Problems in Cisco Products
Cisco is committed to delivering secure products. We test our products internally before we release them, and we strive to correct all vulnerabilities quickly. If you think that you might have identified a vulnerability in a Cisco product, contact PSIRT:
•
•
Tip
Never use a revoked or an expired encryption key. The correct public key to use in your correspondence with PSIRT is the one that has the most recent creation date in this public key server list:
http://pgp.mit.edu:11371/pks/lookup?search=psirt%40cisco.com&op=index&exact=onIn an emergency, you can also reach PSIRT by telephone:
•
•
4 Obtaining Technical Assistance
For all customers, partners, resellers, and distributors who hold valid Cisco service contracts, Cisco Technical Support provides 24-hour-a-day, award-winning technical assistance. The Cisco Technical Support Website on Cisco.com features extensive online support resources. In addition, Cisco Technical Assistance Center (TAC) engineers provide telephone support. If you do not hold a valid Cisco service contract, contact your reseller.
Cisco Technical Support Website
The Cisco Technical Support Website provides online documents and tools for troubleshooting and resolving technical issues with Cisco products and technologies. The website is available 24 hours a day, 365 days a year, at this URL:
http://www.cisco.com/techsupport
Access to all tools on the Cisco Technical Support Website requires a Cisco.com user ID and password. If you have a valid service contract but do not have a user ID or password, you can register at this URL:
http://tools.cisco.com/RPF/register/register.do
Note
Submitting a Service Request
Using the online TAC Service Request Tool is the fastest way to open S3 and S4 service requests. (S3 and S4 service requests are those in which your network is minimally impaired or for which you require product information.) After you describe your situation, the TAC Service Request Tool provides recommended solutions. If your issue is not resolved using the recommended resources, your service request is assigned to a Cisco TAC engineer. The TAC Service Request Tool is located at this URL:
http://www.cisco.com/techsupport/servicerequest
For S1 or S2 service requests or if you do not have Internet access, contact the Cisco TAC by telephone. (S1 or S2 service requests are those in which your production network is down or severely degraded.) Cisco TAC engineers are assigned immediately to S1 and S2 service requests to help keep your business operations running smoothly.
To open a service request by telephone, use one of the following numbers:
Asia-Pacific: +61 2 8446 7411 (Australia: 1 800 805 227)
EMEA: +32 2 704 55 55
USA: 1 800 553-2447For a complete list of Cisco TAC contacts, go to this URL:
http://www.cisco.com/techsupport/contacts
Definitions of Service Request Severity
To ensure that all service requests are reported in a standard format, Cisco has established severity definitions.
Severity 1 (S1)—Your network is "down," or there is a critical impact to your business operations. You and Cisco will commit all necessary resources around the clock to resolve the situation.
Severity 2 (S2)—Operation of an existing network is severely degraded, or significant aspects of your business operation are negatively affected by inadequate performance of Cisco products. You and Cisco will commit full-time resources during normal business hours to resolve the situation.
Severity 3 (S3)—Operational performance of your network is impaired, but most business operations remain functional. You and Cisco will commit resources during normal business hours to restore service to satisfactory levels.
Severity 4 (S4)—You require information or assistance with Cisco product capabilities, installation, or configuration. There is little or no effect on your business operations.
5 Obtaining Additional Publications and Information
Information about Cisco products, technologies, and network solutions is available from various online and printed sources.
•
http://www.cisco.com/go/marketplace/
•
•
•
http://www.cisco.com/go/iqmagazine
•
•
http://www.cisco.com/en/US/learning/index.html
6 Quick Overview
The ONS 15305 is a traffic concentrator that supports different types of transmission media. It can be used in networks based on fiber and copper media. The ONS 15305 concentrates both IP and TDM traffic and is able to interface to both TDM and IP backbone networks. The TDM part of the ONS 15305 is a cross-connect that can work as a terminal multiplexer, add/drop multiplexer, or nonblocking cross-connect. The IP part consists of a L2 switch.
The ONS 15305 is a very small device with a very high port density. It is also designed to be flexible and highly scalable. It is targeted for a number of different applications. Please refer to the ONS 15305 Installation and Operations Guide for further details.
The ONS 15305 is a very flexible device owing to its modular design. The ONS 15305 consists of a chassis with a motherboard with room for up to eight plug-in modules. Four of the plug-in modules are interface modules. The remaining four modules are: two redundant power supply modules, one fan module, and one system controller module. The ONS 15305 is a very flexible network component that can be used in star, ring, chained, and meshed networks.
7 Before Starting
This guide provides basic instructions for installing the Cisco ONS 15305 system and contains information about installing the ONS 15305 and commissioning the ONS 15305.
Use this guide as a general reference when performing an installation. For detailed installation instructions, refer to the most recent Cisco ONS 15305 Installation and Operations Guide.
Warning
8 Translated Warnings
Power Disconnection Warning
Laser Radiation Warning
9 Installation Materials for ONS 15305
Several items are needed to complete the installation of the ONS 15305. Some of these items are supplied by Cisco and some need to be supplied by the user. The following are the Cisco-supplied materials:
•
•
•
•
•
•
•
•
The following materials, tools, and equipment are recommended but are not supplied with the ONS 15305:
•
•
•
•
•
•
•
•
•
•
•
•
•
•
10 Installing the ONS 15305
To install the ONS 15305, complete the following procedures:
1.
2.
3.
4.
6.
7.
9.
10.
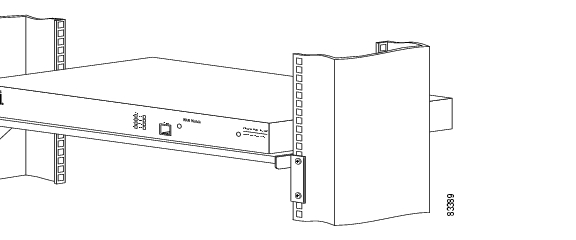
Installing the ONS 15305 in a 19-in. (482.6-mm) Rack
The shelf assembly is allocated for installation in a 19-in. (482.6-mm) rack.
Note
Step 1
Step 2
Step 3
Step 4
Figure 1 Front Face-Out in a 19-in. (482.6-mm) Rack
Figure 2 Connector Array in Front in a 19-in. (482.6-mm) Rack
Installing 48-V Power and Ground to the ONS 15305
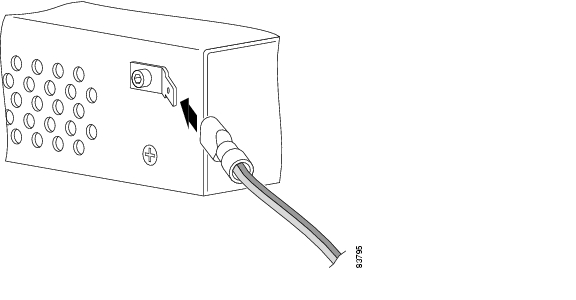
The power needs to be properly installed and grounded for operation of the ONS 15305. Figure 3 shows the location of the 48-V connector.
Figure 3 Location of the Power Connector on the ONS 15305 Faceplate (Connector Array)
The ONS 15305 cabinet shall always be tied to a suitable earth reference potential as described in the "Installing External Ground to the ONS 15305" section. The 48-V power interface of ONS 15305 is galvanically insulated from the cabinet. The positive pole of the 48-V supply (0 VDC) shall always be connected to the same earth potential at the station battery on the PDP side. Use the following procedure to install power and ground to the ONS 15305:
Warning
Step 1
Step 2
Table 1
Power Wire Colors and Function
Note
Note
Installing the ONS 15305 AC 230V Power
The following sections explain how to install ONS 15305 AC power connections.
Warning
Warning
Warning
Caution
Figure 4 shows the AC 230V module.
Figure 4 AC 230V Module
AC 230V Module Not Installed in ONS 15305
Warning
Power On
Warning
Step 1
Step 2
Power Off
Warning
Caution
Step 1
Step 2
Step 3
Installing External Ground to the ONS 15305
It is vital that the ONS 15305 cabinet is properly grounded. When installed in a rack, the ONS 15305 cabinet will be tied to the rack reference potential through the mounting brackets (earth, ground potential).
Note
When not installed in a rack, the cabinet can be tied to an earth reference potential through the ground connector of the power supply plug as shown in Figure 3, or by mounting an extra connector to one of the cabinet screws as shown in Figure 5.
Figure 5 Ground Connector Position on the ONS 15305
Installing the Ground Connector
Step 1
Step 2
Step 3
Step 4
Step 5
Step 6
Figure 6 Connection of the Ground Cable with a Crimp Tool
Installing Service Modules
This section describes installation procedures that are common and independent of service module type. For details on each service module, see the ONS 15305 Installation and Operations Guide. Interconnections and cabling are described in "Interconnections and Cable Handling" section.
It is possible to freely mix the four interface modules. There are no fixed positions for specific modules.
Note
Note
Insertion or withdrawal of new modules does not affect the other modules. No manual configuration is needed if a module is replaced with a module of the same type.
It is possible to protect a module by adding a redundant module in the chassis.
All modules store inventory data in nonvolatile memory. The inventory data is accessible from the system controller and the management system.
All modules contain a LED that indicates the status of the module. The LED is green when the module is active. The LED is red if the module is failed. The LED is extinguished when the module is deactivated.
All modules support hot insertion and removal. When the module is replaced the switch must be activated and then the MOD FAIL LED must be extinguished before the module is removed. It is also possible to deactivate the module from the Cisco Edge Craft terminal. A special tool, the Card Extraction Tool ( Figure 7) is needed to remove the module.
Figure 7 Card Extraction Tool
The following service modules are described in the ONS 15305 Installation and Operations Guide:
•
•
•
•
•
•
•
•
•
•
•
•
•
•
Small Form-Factor Pluggable Modules
The Small Form-factor Pluggable (SFP) modules to be used together with the GigE-WAN-2 service module are available from Cisco.
Caution
For details about the installation of SFP modules, please see the following documents:
•
http://www.cisco.com/univercd/cc/td/doc/product/ong/15400/454spint/gbicsfp.htm
•
Interconnections and Cable Handling
Installing the ONS 15305 Fiber Cable
Caution
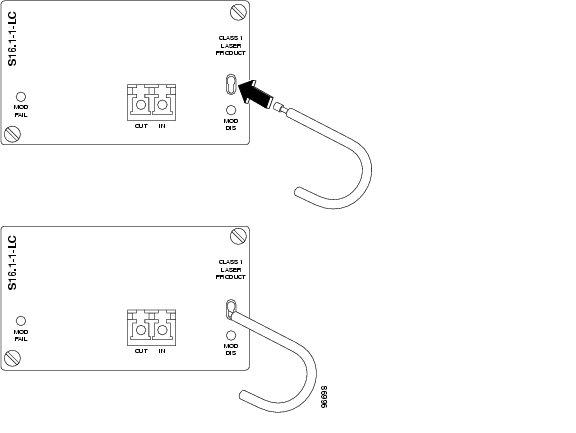
To install fiber-optic cables in the ONS 15305, connect a fiber cable with LC connector type to the transmit and receive ports of the transmission system. On the ONS 15305 module, the transmit and receive ports are located at the connector array of the unit. The receive port is named IN and the transmit port is named OUT.
Cisco recommends that you label the transmit and receive fiber (before installation) to and from the optical transmission system at each end of the fiber span to avoid confusion with cables that are similar in appearance.
Warning
Warning
Warning
Connecting the Fiber Cable
Step 1
Step 2
Step 3
Step 4
Step 5
Installing the ONS 15305 Electrical Cable
Caution
To install electrical connection cables in the ONS 15305, connect the electrical cable with the corresponding ports of the transmission system. On the ONS 15305 module, the electrical ports are located at the connector array of the system. Cisco recommends that you label the electrical cable at each end before installation to avoid confusion with cables that are similar in appearance.
Caution
Connecting the Electrical Cables
Step 1
Step 2
Step 3
Warning
Installation Checklist for ONS 15305
The following list is an installation checklist. Use this list as a reference when performing an installation. For detailed installation instructions, refer to the Cisco ONS 15305 Installation and Setup Manual (Release 1.0). To check the installation, verify the following items:
•
•
•
•
•
•
•
•
Note
11 ONSCLI—Command Line Interface
ONSCLI is a line-oriented ASCII-based management interface to ONS 15305, by means of which simple commands—possibly with parameters—can be issued to access or modify the ONS 15305 configuration.
Commissioning the IP Address Using the VT100 Interface
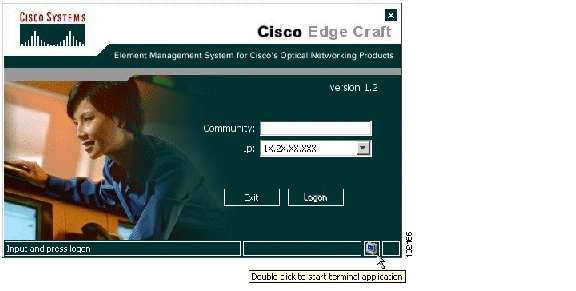
A local terminal with VT100 emulation is required during the first commissioning of the network element in order to set up the necessary communications parameters enabling access to the element through Cisco Edge Craft over the management port. After the first commissioning, the VT100 interface can be used to modify the communications parameters and perform status checks of the network element. The VT100 interface is password protected.
Accessing the ONSCLI
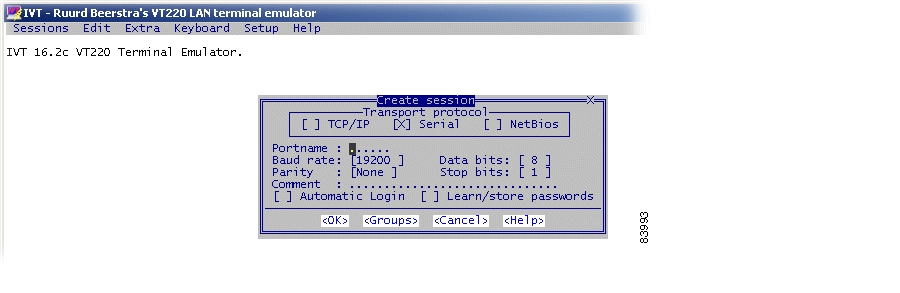
The ONSCLI is accessed through the VT100 port or through an IP connection (Telnet). The serial connection communications parameters are fixed ( Table 2). VT100 terminal codes are used.
Table 2 EIA/TIA-232 Parameters
Speed
19200 bps
Data bits
8
Parity
None
Stop bits
1
Flow control
None
The VT100 port (Console port) for the ONS 15305 is provided using a RJ-45 connector. The cable for connecting the VT100 port to the serial port on the PC are provided.
Invoke ONSCLI
Step 1
Step 2
Step 3
Figure 8 Logon Window
.
Step 4
Figure 9 Start Window
Step 5
Step 6
>ONSCLI--------------------------------------------------ONS 15305 Command Line Interface--------------------------------------------------Enter ONSCLI password: ******ONSCLI>Step 7
IP-Configuration(Management-Port):Show-Current-Alarms:Change-Passwords: Manage CLI/TELNET passwordsErase-CDB:Reset-Device:Display-Event-Log:Clear-Event-Log:Community-Handler:Management-Modes:Running-Config:Exit:It is sufficient to type leading characters of the command name to avoid ambiguity—the same applies to keywords.
Note
Note
Incorrect Password
Each password characters is echoed as '*'. An incorrect password is rejected with the message:
invalid passwordand the password prompt is reissued.
An authorized ONSCLI user obtains full access rights to the available management information.
Exit
The Exit command is used to terminate an ONSCLI session. The ONSCLI session is automatically terminated after a period of 30 minutes of inactivity. ONSCLI does not accept simultaneous sessions.
Syntax Rules
An ONSCLI command line begins with a prompt (issued by ONSCLI), which serves to indicate the current position in the command hierarchy.
An ONSCLI command is issued by typing the command and then pressing Enter. Optionally, and only at the lowest level in the command hierarchy, one or more parameters might be supplied. These are identified by keywords. The command name, parameter keywords, and parameter values are delimited by one or more spaces.
Note
Some commands (in particular, the Show command) can potentially produce many lines of output. After a predetermined number of lines of output in response to a single command, the user is prompted to enter y(es) or n(o) to continue the output. The line number limit is defined with the DISPLAY-LINES parameter of the Command-Line-Interface command.
Basic Command Syntax
A basic command has the following syntax:
Example 1 Basic Command Syntax
<basic command> ::= [<path>]<command> [<parameter>]... <CR><path> ::= [\]<command\>[<command>\]...<command> ::= <command name> | ..<parameter> ::= <spaces> <keyword>=<value> | ?<value> ::= <integer> |<choice> |<IP address> |<string> |<MAC address> |<NSAP address> |<time> |<date> |<KLM> |<portList> |<port><NSAP address> ::= <area address>:<system id>:<selector><portList> ::= <port>[,<port>]..<areaAddressList> ::= <area address>[,<area address>]...where:
<spaces> is a string of one or more ASCII spaces;<integer> is a decimal integer in the range [m:n], where the values m and n are context-dependent;<choice> is a literal string, whose permissable values and their significance are context-dependent and may be obtained by using the help ("?") parameter;<IP address> is an IP address of the form ddd.ddd.ddd.ddd, where d is a decimal digit. Leading zeroes in each ddd may be omitted;<string> is a string of graphical ASCII characters, excluding quotation marks ("). If the string contains one or more spaces, then it MUST be enclosed in quotation marks. The maximum length of the string is context-dependent;<MAC address> is exactly 12 hexadecimal digits;<time> is a time-of-day of the form hh:mm:ss, where h, m and s are decimal digits;<date> is a date of the form dd/mm/yy, where d, m and y are decimal digits;<KLM> is a string of the form k.l.m, where k is a decimal digit in the range [1:3], l is a decimal digit in the range [1:7], and m is a decimal digit in the range [1:3].<port> is a decimal integer;<area address> is a hexadecimal string;<system id> is a hexadecimal string;<selector> is a hexadecimal string;The Help Command
Press the question mark (?) key to invoke the help command. This command displays all available commands at the current level, each with a short description. For example, typing "?" at the root level will list the commands that are available at that level.
Command Hierarchy
In the command hierarchy, the lowest level is represented by a basic command with one or more parameters.
If the help command is given, any other parameters are ignored and the basic command usage is displayed.
Table entries are accessed by introducing an additional command level giving access to the entire table. At this lowest level, the Add command (with the index and required table entries as parameters) can be used to add an element to the table and the Edit command can be used to replace an existing element in the table (if these operations are permitted on the table).
Similarly the Remove command (with the entry index as parameter) can be used to remove an existing element from the table, if this is permitted.
The Show command with an entry index value as a parameter displays the specified table entry. If no parameter is supplied with the Show command, the current content of the entire table is displayed.
12 Initial Configuration
Use the procedures in this section to do the most important configurations of ONS 15305. The most important tasks involved in initial configuration of ONS 15305 are:
Configure Community-handler
The following example shows how to set community for a default user. If setting community for a specific user, the corresponding IP address must be entered instead of 0.0.0.0.
Step 1
ONSCLI> comStep 2
ONSCLI> Community-handler\llStep 3
Add: Add-Community-entryEdit: Edit-Community-entryRemove: Remove-Community-entryShow: Show-Community-entryExit:ONSCLI> Community-handler\Step 4
ONSCLI>Community-handler\add man=0.0.0.0 com=public acc=super traps=disableMANAGER: 0.0.0.0COMMUNITY: publicACCESS: superTRAPS: disableONSCLI>Community-handler\Assign an IP Address
The ONS 15305 supports remote management solutions by means of Telnet and SNMP. The possibilities that regard to connectivity can be rather advanced for the ONS 15305, so the only explained solution in this document is when directly connected the management port (MNGT). For more information refer Cisco Edge Craft User Guide and the ONS 15305 Installation and Operations Guide.
To achieve one of the above mentioned management solutions, you must assign an IP address, subnet mask, and if required, a default gateway address.
System Mode
In ONS 15305 Release 2.0, an additional management mode, system mode, is added. System mode has two options: IP and IPUNNUMBERED.
The desirable system mode should be set before configuring the IP settings on the ONS 15305, since this is a strategic choice to align with the existing design of management data communication network. By default the system mode is IP, which means that all physical indices must have a unique IP address and subnet mask. For more information refer CiscoEdge Craft User Guide and the ONS 15305 Installation and Operations Guide.
Step 1
ONSCLI> Management-modes\sys ?Step 2
Usage:System-Mode[SYSTEM-MODE=<ip|ipunnumbered>]System Mode—IP (Default)
Step 1
ONSCLI>Management-modes\sys sys=ipChange management configuration, are you sure? (y/n)?Step 2
Step 3
ONSCLI>Device\Management-Configuration\IP-Configuration
IP-ADDRESS=193.69.136.104, SUBNET-MASK=255.255.255.0
Step 4
System Mode—IP Unnumbered
Step 1
ONSCLI> Management-modes\sys sys=ipunChange management configuration, are you sure? (y/n)?Step 2
Step 3
ONSCLI>Device\Management-Configuration\IP-Configuration
IP-ADDRESS=193.69.136.104, SUBNET-MASK=255.255.255.0
For most commands, if no parameters are supplied, then all of the current parameter values are displayed.
ONSCLI>IP-ConfigurationIP-ADDRESS: 10.0.0.1SUBNET-MASK: 255.255.255.0DEFAULT-GATEWAY: 10.0.0.254 (optional)Change Passwords
Step 1
ONSCLI>ch ?Step 2
Usage:Change-Passwords[ONSCLI -PASSWORD=<string[6:12]>][TELNET-PASSWORD=<string[6:12]>]By this command, TELNET and ONSCLI passwords can be changed. Both passwords can be changed in the same command or they can be changed one by one.
Erase a Community String
To remove a community string, use the following command:
Step 1
ONSCLI>Community-Handler\remove manager=0.0.0.0 community=publicStep 2
MANAGER: 0.0.0.0COMMUNITY: publicremoved.
13 Further Configuration of ONS 15305
Please see CiscoEdge Craft Software Guide for instructions related to further configuration and ONS 15305 Installation and Operations Guide for details concerning the equipment.
Tip
Recommended Order
1.
2.
3.
4.
5.
6.
7.
8.
9.
10.
11.
12.
13.
![]()
![]()
![]()
![]()
![]()
![]()
![]()
![]()
Posted: Fri Sep 14 09:07:18 PDT 2007
All contents are Copyright © 1992--2007 Cisco Systems, Inc. All rights reserved.
Important Notices and Privacy Statement.