|
|

This chapter describes the Line module (LM).
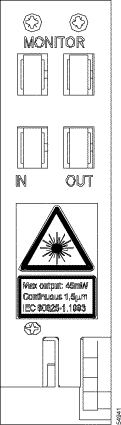
The LM enables monitoring of input and output signals, with 10 percent of the light directed to the monitor outputs at the top of the front panel. The LM also converts from internal MU connectors to SC or FC line connectors. There is typically one LM on the A-side of the ONS 15252 Multichannel Unit (MCU) and another on the B-side (for protected systems).
Figure 7-1 illustrates the LM.
 |
Note The LM is passive and does not include alarm or supervisory subunit functions. |
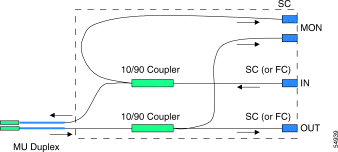
The LM transfers the optical signal to and from the last HFM module and the DWDM layer. In the process, the optical signal present on the FC or SC line connectors is transferred to a duplex MU connector.
|
Note For some customers, FC connectors are required on the front panel input and output. In this case the standard front panel is replaced with an optional FC version. |
One LM is present on the A-side of the ONS 15252 MCU and another is present on the B-side. Figure 7-2 illustrates a block diagram of the LM.
LM connectors include two monitor ports, and one IN port and one OUT port.
This section covers optical, environmental, and mechanical specifications for the LM. The LM is a passive device; therefore, electrical specifications and default thresholds do not apply.
The maximum output power for the LM is 16.5 dBm when used in the ONS 15252 Multichannel Unit.
For optical loss information, refer to Chapter 1 of the Cisco ONS 15200 Product Description.
Table 7-1 lists environmental specifications for the LM during operating conditions.
The LM consists of the following parts:
The fiber type is 0.9-mm diameter SMF except for the fiber close to the MU connector, which has a 2.0-mm jacket.
|
Note When the LM monitor ports are not being used, they must be plugged with dust caps. |
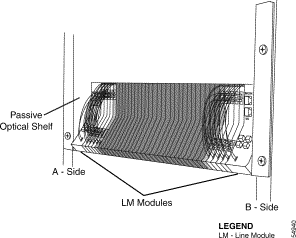
This section explains how to remove and replace the LM. The LM is installed in the passive optical shelf of the ONS 15252 MCU (Figure 7-3).The replacement module and any supplies, such as tagging materials, should be present on site before beginning the removal and replacement procedures.
 |
Warning The ONS 15252 Multichannel Unit (MCU) is energized with -48 VDC power. |
 |
Caution Static electricity can damage electro-optical modules. While handling electro-optical modules, wear a grounding wrist strap to discharge the static buildup. Wrist straps are designed to prevent static electricity damage to equipment. |
|
Warning Follow proper safety procedures when removing modules without switching off the relevant subrack. |
|
Warning Do not look directly at the optical connector output beams during connector removal. The beams can cause permanent eye damage. |
Step 2 Disconnect the fiber that protrudes from the LM and connects to the adjacent Hub Filter module. The fiber ends with a duplex MU connector.
Step 3 Put fiber end caps on the disconnected fiber.
Step 4 Insert dust plugs into the Hub Filter module adapter.
Step 5 Remove one or two Dummy Filter modules to create more work space.
Step 6 Disconnect the DWDM-side optical fibers and protect the ends with fiber caps.
Step 7 Put plugs in the holes of the fiber adapters on the LM.
Step 8 Push at the bottom, pull upward, and carefully slide the LM out of the passive optical shelf (see Figure 7-3 for the LM position).
|
Caution Make sure not to damage optical fiber. |
Step 9 Insert enough Dummy Filter modules to fill the empty space left by the removed LM. Place the Dummy Filter modules in the middle to fill the passive optical shelf.
Step 10 Close the passive optical shelf cover.
|
Warning Follow proper safety procedures when removing modules without switching off the relevant subrack. |
|
Warning Do not look directly at the optical connector output beams during connector removal. The beams can cause permanent eye damage. |
Step 2 Remove as many Dummy Filter modules as necessary to make space for the LM.
Step 3 Align the LM with the relevant position in the passive optical shelf and carefully slide the LM in.
Make sure to fit together the crossbar at the shelf back with the groove on the LM back.
Step 4 Press the retainer button located at the bottom front of the LM and make sure the LM locks into place.
Step 5 Remove the plugs on the adjacent Hub Filter module to allow fiber insertion.
Step 6 Remove the dust caps from the two fibers extending from the LM.
Step 7 Clean and inspect the duplex MU connector.
Step 8 Connect the duplex MU connector to the adjacent Hub Filter module.
Step 9 Remove the dust caps from the DWDM optical fiber cables.
Step 10 Remove the dust plugs on the adapter on the LM.
Step 11 Clean and inspect the connectors on the DWDM optical fiber cables.
Step 12 Connect the DWDM optical fiber cables to the LM.
Step 13 Close the passive optical shelf cover, being careful not to pinch or bend the DWDM optical fiber cables.
![]()
![]()
![]()
![]()
![]()
![]()
![]()
![]()
Posted: Thu Apr 17 14:37:37 PDT 2003
All contents are Copyright © 1992--2002 Cisco Systems, Inc. All rights reserved.
Important Notices and Privacy Statement.