|
|

This chapter describes the turn up and test procedures for the ONS 15200 system including the ONS 15252 Multichannel Unit (MCU), the ONS 15201 Single-Channel Unit (SCU), and the system span test. "Acceptance Test Plan" contains the tables and forms that you must complete during system turn up and testing.
After adding channels to the ONS 15200 system configuration, test the added channels using procedures
You need the following equipment to turn up and test the ONS 15200 system:
This section describes how to turn up and test an ONS 15252 MCU.
| Channel Number | Frequency (THz) | Wavelength (nm) |
|---|---|---|
23 | 192.3 | 1558.98 |
25 | 192.5 | 1557.36 |
27 | 192.7 | 1555.75 |
29 | 192.9 | 1554.13 |
31 | 193.1 | 1552.52 |
33 | 193.3 | 1550.92 |
35 | 193.5 | 1549.32 |
37 | 193.7 | 1547.72 |
43 | 194.3 | 1542.94 |
45 | 194.5 | 1541.35 |
47 | 194.7 | 1539.77 |
49 | 194.9 | 1538.19 |
51 | 195.1 | 1536.61 |
53 | 195.3 | 1535.04 |
55 | 195.5 | 1533.47 |
57 | 195.7 | 1531.90 |
Step 2 Compare the data in Table B-4 with data provided by the network planner, and verify that the data is consistent. Complete Step 2 of Table B-3.
Step 3 Compare the order of the Hub Filter modules (HFMs) on the A and B sides of the passive optical shelf with those provided by the network planner and verify that the order is the same. Complete Step 3 of Table B-3.
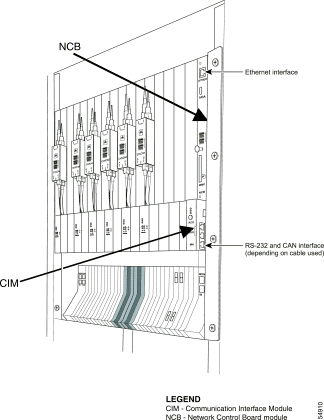
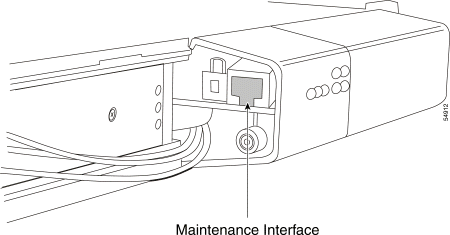
Step 4 Using a CIM RS-232 cable, connect the laptop to the management access (MA) port on the Communication Interface module (CIM). See Figure 4-1.
Step 5 Use HyperTerminal to configure the RS-232 parameters listed in Table 4-2. See the following steps for an example of the procedure you may follow when using HyperTerminal.
 |
Note The steps in this procedure are an example of the steps you might follow when using HyperTerminal to configure the RS-232 parameters. Not all HyperTerminal installations are the same. |
a. Choose Start > Programs > Accessories > Communications > HyperTerminal. HyperTerminal opens.
b. On the Connection Description dialog box, type a session name and click OK.
c. On the Connect To dialog box, choose COM1 from the Connect Using drop-down list. Click OK.
d. On the COM1 Properties dialog box, choose the port settings shown in Table 4-2. Click OK.
e. Choose File > Properties.
f. On the Properties dialog box, click the Settings tab and then click the ASCII Setup button.
g. On the ASCII Setup dialog box, check Send line ends with line feeds. Click OK until all dialog boxes are closed. Leave the HyperTerminal window open.
| Parameter | Value |
|---|---|
Speed | 19200 bps |
Data bits | 8 |
Parity | None |
Stop bits | 1 |
Flow control | None |
ASCII | Send EOL with LF |
Step 6 After you have connected the CIM RS-232 adapter cable (Step 4) and set the parameters in Table 4-2, press Enter in the HyperTerminal window. The system responds with a logon prompt. Press Enter again. Because no password is needed, press Enter a third time.
Step 7 Create a user with administrator privileges:
a. At the NCB:> prompt, type create user <user1> and press Enter. The system responds: Created <user1>. The user1:# prompt appears on the screen.
b. At the user1:# prompt, type password <password1> and press Enter to create a password for a new user.
c. Type privileges administrator and press Enter to assign administrator privileges to the new user.
d. Type exit to return to the NCB:> prompt.
e. At the NCB:> prompt, type commit user <user1> to finish adding a user with administrator privileges.
Step 8 Create a user with operator privileges:
a. At the NCB:> prompt, type the command create user <user2> and press Enter. The system responds: Created <user2>. The user2:# prompt appears on the screen.
b. Type password <password2> and press Enter to create a password for the new user.
c. Type privileges operator and press Enter to assign operator privileges to the new user.
d. Type exit to return to the NCB:> prompt.
e. At the NCB:> prompt, type commit user <user2> to finish adding a user with operator privileges.
Step 9 Set the initial IP address of the NCB module:
a. At the NCB:> prompt, type con sys and press Enter.
b. At the NCB:= prompt, type ipconf <ipaddr> <subnet> <gateway> and press Enter.
Step 10 Reboot the system for the changes to take effect. At the NCB:> prompt, type reboot and press Enter.
Step 11 Disconnect the CIM RS-232 adapter cable. The Subnetwork Manager on the NCB module now has an IP address and can be accessed directly at the Ethernet port on the NCB module front panel with the standard protocols (telnet, ftp, and http).
Step 12 Connect a crossover Ethernet cable to the PC and the Ethernet port on the NCB module.
Step 13 Start a telnet session on the host computer by typing the command telnet <ipaddr> at a command prompt (MS-DOS prompt).
Step 14 Log into the system as a user with operator privileges.
Step 15 Set the system time (in 24-hour format), if necessary. A soft reboot does not restart the clock.
a. At the NCB:> prompt, type con sys and press Enter.
b. At the NCB:= prompt, type the time <yyyy:mm:dd> <hh:mm:ss> command and press Enter.
c. At the NCB:= prompt, type exit and press Enter to return to the NCB:> prompt.
Step 16 At the NCB:> prompt, type show inventory and press Enter. Verify that an inventory of all installed CLIP modules appears, and that the CLIP module slot number and ITU channel number match the information in Table B-4. Complete Step 15 of Table B-3.
Step 17 Check wavelength and output power:
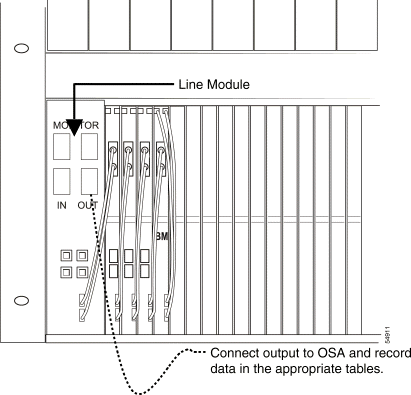
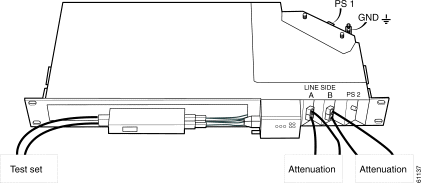
a. Connect a fiber from the A-side LM output port to a wavelength meter or an optical spectrum analyzer (OSA) as shown in Figure 4-2.
b. Set the wavelength range to a value between 1530 and 1560 nm. Record the wavelength and output power in Table B-5.
c. Repeat on the B-side LM output port. Record the wavelength and output power in Table B-6.
|
Note Your network planner can provide the following values: expected output power, maximum, and minimum. Actual transmit power on the LM OUT port must fall within the range provided by the network planner. |
Use the following steps to check DWDM receivers and client transmit levels.
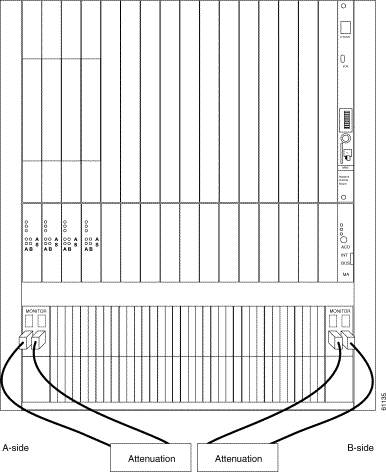
Step 18 Attenuate the DWDM transmit port:
a. Attenuate the output port of the B-side LM of the MCU so that the optical power measured is within the DWDM receiver specification for each wavelength.
The receiver operating range is -31 and -8 dBm, but the default warning thresholds of -28 and -10 should be used on all CLIP interfaces. As a rough guide, the power level for each channel should be between -19 and -10 dBm.
b. Record the attenuated power level for each channel in Table B-7.
c. Insert the attenuated fiber-optical cable into the B-side IN port (Figure 4-3).
Step 19 Retrieve the DWDM receive level:
a. At the NCB:> prompt, type show power. Press Enter. This retrieves the measured optical power levels from the DWDM receivers. Record the values in Table B-7.
b. Calculate the expected receive power on the A and B sides and record the values in Table B-7.
To calculate the expected receive power, take the measured attenuated transmit power from Table B-7 and subtract the associated losses from the dropping of the channel (see the formula and explanation below). The actual receive power should be ±2.5 dB of the expected receive power.
Formula:
ERp = MTp - (HFM x 0.5 - 2.5)
ERp—Expected receiver power
MTp—Measured transmitted power at the LM OUT port with attenuators attached
HFM—Number of filters the signal passes through, starting at the LM IN port, before it reaches the CLIP module
2.5—Value (in dB) that must be subtracted to account for the combined loss in the pass-through of the NAM and the drop in the HFM and the LM.
|
Note Do not remove the fibers. |
Step 20 Set the data rate for each CLIP module if the desired rate differs from the default value (the default is OC-48/STM-16):
a. At the NCB:> prompt, type configure element clip_xxx where xxx is the serial number of the CLIP module. Press Enter. (The CLIP module serial number can be found on the CLIP module, or by typing the show inventory command.)
b. Type list value and press Enter. Verify the data rate.
c. To change the data rate, type datarate <rate>, where <rate> is stm_1, stm_4, stm_16, or gbit_eth. Press Enter.
d. Type list value and press Enter to verify that the change was accepted.
Step 21 Check the client side transmit levels:
a. Connect a fiber from the transmit port of the signal generator to the client IN port for the first CLIP (slot one). The valid input range on the client side receive is -3 to -18 dBm.
b. Run a jumper cable from the client OUT port of the first CLIP to your power meter.
c. Set the wavelength on the power meter to 1310 nm.
d. Measure and record the output power of the client side transmit in Table B-8.
e. Repeat Steps a - d for all remaining CLIPs (connect the test set to the IN port of the current CLIP and the power meter to the OUT port of the same CLIP).
Continue with the following steps to verify that no alarms exist.
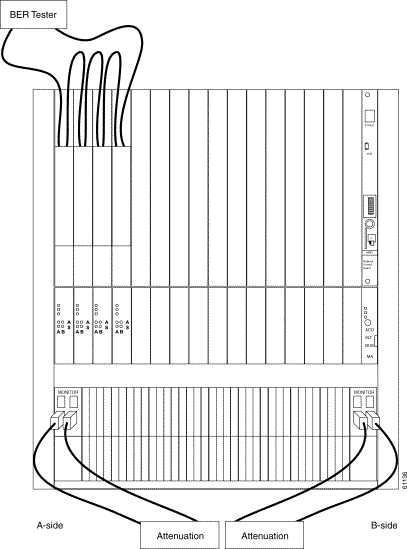
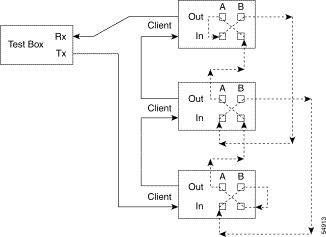
Step 22 Connect all CLIP modules in a daisy chain:
a. Connect a fiber from the transmit port of the signal generator to the client IN port on the first CLIP (Slot 1). The valid input range on the client side receiver is -3 to -18 dBm.
b. Run a jumper cable from the Client OUT port of the first CLIP module to the client IN port of the second CLIP module (Slot 2).
c. Repeat until all CLIP modules are daisy-chained together with the last CLIP module's OUT port returning to the test set, as shown in Figure 4-4.
Step 23 Type show alarm and press Enter. Verify that no alarms exist and that no red diodes are lit on any of the NAMs or on the CIM. Complete Step 23 in Table B-3.
If the network design does not provide optical protection, skip the "Check Optical Protection" section and proceed to the "Test the Bit Error Rate" section.
Continue with the following steps to check optical protection.
Step 24 Set the switchmode for all CLIP modules to automatic:
a. Record the current switchmode setting for each CLIP module in Table B-9. You will need to revert to the original switchmode setting after checking the bit error rate.
b. At the NCB:> prompt, type conf element clip_xxx (where xxx is the serial number of the CLIP module) and press Enter.
c. Type cd dwdm and press Enter.
d. Type list value and press Enter.
e. Type switchmode automatic and press Enter.
Step 25 Remove the fiber jumper cable from the LM A-side INPUT and verify that the Active LED on the A side goes out and the B side switches from Standby to Active on each CLIP module. Complete Step 25 in Table B-3.
Step 26 Reconnect the jumper cable on the A side and verify that the A-side green Standby LED is illuminated on each CLIP module and that the B-side Active LED remains illuminated. Complete Step 26 in Table B-3.
Step 27 Remove the fiber jumper from the LM B-side INPUT and verify that the Active LED on the B side turns off. Verify that the A side switches from Standby to Active on each CLIP module. Complete Step 27 in Table B-3.
Step 28 Reconnect the jumper cable on the B side and verify that the B-side green Standby LED is illuminated on each CLIP module and that the A-side Active LED remains illuminated. Complete Step 28 in Table B-3.
Step 29 Before continuing with the bit error rate testing, complete the following:
Continue with the following steps (as applicable) to test the BER.
Step 30 To test bit error rate on unprotected modules, clear all errors on the test set and run BER tests error free for 15 minutes. Complete Step 30 in Table B-3.
Step 31 Test A-side protected channels and all non-protected channels:
a. Break the connection on the B-side LM. All of the protected channels should have the Active light on the A side illuminated and no LED illuminated on the B side. Unprotected channels should have either the Active light on the A side illuminated or no lights illuminated. Bit errors are caused by a broken connection.
b. Reconnect the B-side jumper and ensure that the A-side Active LED remains illuminated on protected CLIP modules and that all unprotected CLIP modules are active on either the A side or B side.
c. Clear all errors on the test set and run the BER test error-free for 15 minutes. Complete Step 31 in Table B-3.
Step 32 Test B-side protected channels and all non-protected channels:
a. Break the connection on the A-side LM. All of the protected channels should have the B-side Active LED illuminated and no LED illuminated on the A side. Unprotected channels should either have the B-side Active LED illuminated or no LED illuminated. Bit errors are caused by a broken connection.
b. Reconnect the A-side jumper cable and verify the following: the B-side Active LED remains lit on the protected CLIP modules, the A-side Standby LED illuminates, and all unprotected CLIP modules are Active on either the B side or the A side.
c. Clear all errors on the test set and run the BER test error-free for 15 minutes. Complete Step 32 in Table B-3.
Step 33 Return the CLIP switchmode setting to the original setting (Table B-9).
Use the following procedures to turn up and test the ONS 15201 SCU.
Step 2 Open Maintenance Manager and expand the ONS 15201 SCU information.
Step 3 Record the information for the Client Layer Interface Port (CLIP) module in Table B-11. Locate the CLIP information in the following places:
Step 4 Compare data in Table B-11 with data provided by the network planner, and verify that the data is consistent. Complete Step 4 in Table B-10.
Step 5 Check the output power. Unprotected channels will have an output on only one of the ports.
a. Connect an optical-fiber jumper cable from the A-side output port to a wavelength meter or an optical spectrum analyzer (OSA).
b. Set the wavelength range on the OSA to a value betwen 1530 and 1560 nm. Record the wavelength and the output power in Table B-12.
c. Repeat Steps a - b for the B side and record the information in Table B-12.
|
Note The network planner provides the expected output power. |
Continue with the following steps to check DWDM receivers and client transmit levels.
Step 6 Attenuate the DWDM transmit port:
a. Attenuate the output port of the B-side of the SCU so that the optical power measured is within the DWDM receiver specification for each wavelength. The receiver operating range is -31 and -8 dBm, but the default warning thresholds of -28 and -10 should be used on all CLIP interfaces. As a rough guide, the input power for each channel should be between -25 and -10 dBm.
b. Record the B-side attenuated power level in Table B-13.
c. Insert the attenuated jumper into the B input port, as shown in Figure 4-6.
d. Repeat Steps a - c on the A side. Record the A-side attenuated power level in Table B-13.
e. Check the received power using the Maintenance Manager, and record the values in Table B-13.
To calculate the expected receive power, take the measured transmit power and subtract the associated losses caused by the channel dropping. Actual received power should be within 2 dB of the expected received power.
Formula:
ERp = MTp - 2
ERp—Expected received power
MTp—Measured transmitter power (with attenuators attached) on the OUT port of the SCU side in use
2—Value (in dB) that must be subtracted to account for the combined loss from the connectors and drop in the CFM
Step 7 Double-click the data rate parameter in Maintenance Manager, and set the data rate to OC-48 (datarate stm_16). Verify the data rate.
Step 8 Check the client side transmit levels.
a. Connect a fiber from the transmit port of the signal generator to the client IN port for the CLIP. (The valid input range on the client side receive is -3 to -18 dBm.)
b. Run a jumper cable from the client OUT port of the CLIP to your power meter.
c. Set the wavelength on the power meter to 1310 nm.
d. Measure and record the output power of the client side transmit in Table B-14.
Step 9 Disconnect the power meter from the client side output and run a fiber from the client OUTPUT interface to the receive of the signal generator.
|
Note Do not remove any fibers. |
Step 10 Verify that red LEDs on the ONS 15201 SCU are not illuminated. Click the folder CLIP alarms and ensure that no alarms are active. Complete Step 10 in Table B-10.
If the network design is not configured with protected channels, skip the "Check Optical Protection" section and proceed to the "Test the Bit Error Rate (Single SCU)" section.
Continue with the following steps to check optical protection.
|
Note Before changing the switchmode, record the current setting for the CLIP module in Table B-14. You will need to reset the original switchmode setting after checking the bit error rate. |
Step 11 Set the switchmode to automatic. See Step 24 .
Step 12 Remove the fiber jumper cable from the B-side INPUT to simulate a break in the B-side path. The Active LED for the A side should be illuminated. Complete Step 12 in Table B-10.
Step 13 Reconnect the fiber jumper cable pulled in Step 12. The Standby green light for the B-side should be illuminated, and the A side Active LED should remain illuminated. Complete Step 13 in Table B-10.
Step 14 Remove the fiber jumper cable from the A side and verify that the Active LED on the A side goes out and the B-side switches from Standby to Active. Complete Step 14 in Table B-10.
Step 15 Replace the jumper on the A side and verify that the A green Standby LED is illuminated and that the B Active LED remains illuminated. Complete Step 15 in Table B-10.
Continue with the following steps, if applicable, to test the bit error rate for a single SCU.
Step 16 Test the A-side protected channel:
a. Remove the jumper cable from the B-side input and verify that the A side is Active.
b. Reconnect the B-side jumper cable. Verify that the A-side Active LED and the B-side Standby LED are illuminated.
c. Clear all errors on the test set and run the BER test error-free for 15 minutes. Complete Step 16 in Table B-10.
Step 17 Test the B-side protected channel or unprotected channel:
a. Remove the jumper cable from the A-side input. For a protected SCU or an uprotected SCU configured as 0/100, verify that the B side is Active. For an unprotected SCU configured as 100/0, verify that neither the A side or B side is Active.
b. Reconnect the A-side jumper cable. F or a protected SCU, verify that the B-side Active LED and the A-side Standby LED are illuminated. For an unprotected SCU configured as 0/100, the B-side Active will be illuminated with no Standby, and for an unprotected SCU configured as 100/0, the A-side Active will be illuminated with no Standby.
c. Clear all errors on the test set and run the BER test error-free for 15 minutes. Complete Step 17 in Table B-10. The turn up and test for a single ONS 15201 SCU is complete.
Step 18 Reset the original switchmode settings (Table B-15).
Continue with the following steps to test the bit error rate for multiple SCUs at a site.
Step 19 Configure the SCUs for testing:
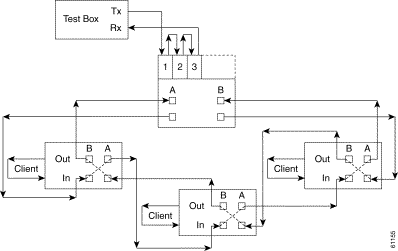
a. Connect the signal generator transmit fiber to the client INPUT port of the top SCU.
b. Connect the receive of the signal generator to the bottom SCU client-side OUTPUT port.
c. Daisy-chain client INPUT and OUTPUT ports of all other SCUs together as shown in Figure 4-7.
d. Loop the A-side INPUT and OUTPUT ports together on the top SCU.
e. Loop the B-side INPUT and OUTPUT ports together on the bottom SCU.
f. Attenuate the output of the A and B ports between -10 and -28 to avoid damage to the CLIP DWDM receivers before looping them back.
g. Run a fiber from the B-side OUTPUT port of the top SCU to the A-side INPUT port of the second SCU.
Check each OUTPUT port with an OSA before connecting it to the next INPUT port and before inserting the required number of attenuators. Verify that the level of the channel to be dropped at the next SCU is within operating levels of the DWDM receivers. As a rough guide, the input power should be between -25 and -10 dBm (receiver operating range is -30 and -8 dBm).
h. Repeat Step 3d. — g. for all SCUs, connecting the B-side OUTPUT port to the A-side INPUT port as shown in Figure 4-7.
i. From the bottom SCU, run a fiber from the A-side OUTPUT port to the B-side INPUT port of the previous SCU. Check each OUTPUT port with an OSA before connecting it to next INPUT port.
j. Repeat Step 3f. for all SCUs, connecting the A-side OUTPUT to the B-side INPUT, as shown in Figure 4-7.
k. Verify that the level of the channel to be dropped at the next SCU is within operating levels of the DWDM receivers. As a rough guide, the input power should be between -25 and -10 dBm (receiver operating range is -30 and -8 dBm).
Step 20 To test unprotected channels, clear all errors on the test set and run the BER test error-free for 15 minutes. Complete Step 20 in Table B-10.
Step 21 Test A-side protected channels and all unprotected channels:
a. Disconnect the jumper cable on the B-side INPUT port of the bottom SCU in loopback mode.
b. Reconnect the B-side jumper cable and verify that all protected SCUs identify the A side as Active and the B side as Standby.
c. Clear all errors on the test set and run the BER test error-free for 15 minutes. Complete Step 21 in Table B-10.
Step 22 Test B-side protected channels and all unprotected channels:
a. Disconnect the jumper cable on the A-side INPUT port of the top SCU in loopback mode.
b. Reconnect the A-side jumper cable and verify that all protected ONS 15201 SCUs identify the B side as Active and the A side as Standby.
c. Clear all errors on the test set and run the BER test error-free for 15 minutes. Complete Step 22 in Table B-10.
Step 23 Reset the original switchmode settings (Table B-15).
Use the following procedures to perform ONS 15200 system span testing for a hub configuration.
|
Note First complete the individual turn up and test procedures for each ONS 15252 MCU and ONS 15201 SCU in the network. |
Step 2 Daisy chain the remaining CLIP modules together by using fiber-optic jumper cables to connect the OUTPUT port of the previous CLIP module to the INPUT port of the next CLIP module. The last CLIP module OUTPUT port is connected to the receive on the signal generator.
Step 3 Beginning at the MCU hub node, use an OSA to measure and record the power level of each wavelength on the LM A-side OUTPUT port and the LM B-side OUTPUT port. Record the measured values in Table B-17.
Step 4 Run a fiber from the OUTPUT port on the A-side LM of the MCU counterclockwise to the B-side INPUT port of the first node in the ring (per customer design).
Step 5 At the first node (counterclockwise) connected to the A-side LM, use an OSA to measure and record the signal level of each wavelength going into the B-side INPUT port.
If necessary, use attenuators to reduce the level of the dropped wavelength to within receiver specification range. As a rough guide, the input power should be between -19 and -7 dBm for the wavelength (receiver operating range is -30 and -8 dBm). Record the (unattenuated) measured OSA incoming signal levels in Table B-18.
Step 6 Use an OSA to measure and record the optical power level on the A-side OUTPUT port for each wavelength. Record the measured OSA outgoing signal levels in Table B-18.
Step 7 Connect a fiber from the A-side OUTPUT port of the first node to the B-side INPUT port of the next node in the ring. Continue until the ring is completed by connecting the fiber from the last node A-side OUTPUT port to the INPUT port of the originating MCU B-side INPUT port (Figure 4-8).
Record the OSA-measured B-side receive levels and A-side transmit levels in Table B-18 for each remote node in the ring. At the originating hub node, record the incoming signal on the B-side in Table B-17.
Step 8 At the first node (clockwise) connected to the B-side LM, use an OSA to measure and record the signal level of each wavelength going into the A-side INPUT port. If necessary, use attenuators to reduce the level of the dropped wavelength to within receiver specification. As a rough guide, the input power should be between -19 and -7 dBm for the wavelength (receiver operating range is -30 and -8 dBm). Record in Table B-18.
Step 9 Use an OSA to measure and record the optical power level on the B-side OUTPUT port for each wavelength. Record the measured OSA outgoing signal levels in Table B-18.
Step 10 From the first node, connect a fiber from the B-side OUTPUT port to the A-side INPUT port of the next node in the ring. Continue until the ring is complete by connecting the fiber from the last node B-side OUTPUT port to the A-side INPUT port of the originating ONS 15252 MCU (Figure 4-8).
Record the OSA-measured A-side receive levels and B-side transmit levels in Table B-18 for each remote node in the ring. At the hub node, record the incoming signal on the A side in Table B-17.
Step 11 Log into the MCU and verify that the data rate is set to stm_16 (or another data rate that conforms with the test set) for each MCU and SCU CLIP in the ring.
Step 12 Type show power at the CLI to obtain the signal level at the receivers. Compare the receive power at each node with the results given by your network planner and complete Table B-19 for the hub node and Table B-20 for the remote nodes.
Continue with the following steps to test the bit error rate for unprotected channels. If you have one or more protected channels, proceed with Step 14 .
Step 13 Clear all errors on test box and run the bit error rate test (BERT) error free for two hours. Complete Step 12 in Table B-16.
You have completed the span test for networks with no protection.
Continue with the following steps to test the BER for protected channels.
Step 14 Test the A-side protected channels:
a. Write down the switchmode of all protected CLIPs in Table B-21.
b. Set the switchmode to forced_a for all protected CLIPs.
c. Verify through the web browser that all of the protected channels are active on the A side.
d. Clear all errors on the test set and run BERT error free for two hours. Complete Step 13 in Table B-16.
Step 15 Test the B-side protected channels:
a. Set the switchmode to forced_b for all protected CLIPs.
b. Verify through the web browser that all of the protected channels are active on the B side.
c. Clear all errors on the test set and run BERT error free for two hours. Complete Step 14 in Table B-16.
Step 16 Reset the original switch mode settings recorded in Table B-21.
![]()
![]()
![]()
![]()
![]()
![]()
![]()
![]()
Posted: Sat Jan 5 12:53:25 PST 2002
All contents are Copyright © 1992--2002 Cisco Systems, Inc. All rights reserved.
Important Notices and Privacy Statement.