|
|

This chapter describes the installation procedures for the Cisco ONS 15501 chassis and its components.
This chapter includes the following sections:
Before beginning any of the procedures in this document:
 |
Warning Only trained and qualified personnel should be allowed to install, replace, or service this equipment. |
We recommend keeping a site log (or a section of a larger site log) to record all actions related to the Cisco ONS 15501. The log should be kept near the chassis where anyone who works on the equipment can access it. Site log entries might include the following:
Make a copy of the "Installation Checklist" section and insert it into the site log. Make entries on the checklist as you complete each procedure.
Use the site log as a record of ongoing system maintenance. Each time a procedure is performed on the Cisco ONS 15501, update the site log to reflect situations such as maintenance schedules and requirements, intermittent problems, changes and updates, configuration changes, and related comments and notes.
You need the following tools and parts to install the Cisco ONS 15501:
Electrostatic discharge (ESD) damage occurs when electronic cards or components are mishandled and can result in complete or intermittent failures. Note the following guidelines before you install or service the system:
The installation checklist includes the procedures for initial hardware installation of the Cisco ONS 15501. Mark the entries as you complete each procedure. Make a copy of this checklist, as needed, for the site log.
Installation checklist for site:
| Task | Verified By | Date |
|---|---|---|
The Cisco ONS 15501 mounts in a standard 19-inch, 23-inch, or ETSI equipment rack and occupies 1RU (one rack unit is 1.75 inches) of vertical space. The unit is designed for front, middle, or rear mounting. It is attached to the rack as shown in Figure 2-1 .
 |
Caution Use only the hardware provided with the Cisco ONS 15501. Failure to use the provided hardware may result in unintended damage. If hardware is lost, contact Cisco Systems, Inc. for a replacement. |
To install the Cisco ONS 15501 in a rack, follow these steps:
Step 2 Determine the desired point of mounting and position the two mounting brackets accordingly.
Step 3 Attach the mounting brackets to the unit with the supplied screws using a Phillips screwdriver.
Step 4 Attach the unit to the rack with the supplied rack mounting screws using a Phillips screwdriver.
|
Warning Infra-red laser energy may be present on the cable connected to the receiving (input) connector. The transmitting (output) optical fiber connector and the monitoring (output monitor) connector are equipped with shutters that automatically close when a cable is removed. To avoid potential damage to the eyes, do not look directly into an optical fiber cable or a connector (whether shuttered or not). When an optical cable is not attached, place the supplied protective cap over the cable's connector. The output monitor output connector should be capped when not in use. |
|
Warning Invisible laser radiation may be emitted from the end of the unterminated fiber cable or connector. Do not view directly with optical instruments. Viewing the laser output with certain optical instruments (for example, eye loupes, magnifiers, and microscopes) within a distance of 100 mm may pose an eye hazard. |
|
Warning Use of controls, adjustments, or performing procedures other than those specified may result in hazardous radiation exposure. |
To connect the customer-supplied optical fiber cable to the SC/UPC optical ports, follow these steps:
Step 2 Connect the output optical fiber cable to the output connector (see Figure 2-2 and Figure 2-3). Avoid making sharp bends in the cable.
The Cisco ONS 15501 AC can be powered directly from the facility VAC input through the Cisco ONS 15501 120-240 VAC power supply. This section describes how to connect AC power to the chassis.
|
Caution Check the power at your site to ensure that you are receiving clean power (free of spikes and noise). Install a power conditioner, if necessary, to ensure proper voltages and power levels in the source voltage. |
|
Caution Use only the hardware provided with the Cisco ONS 15501. Failure to use the provided hardware may result in unintended damage. If hardware is lost, contact Cisco Systems for a replacement. |
 |
Note The AC power cord that connects to the Cisco ONS 15501 120-240 VAC power supply power cord and then to the building VAC is not shipped with the Cisco ONS 15501. You must order this power cord separately. |
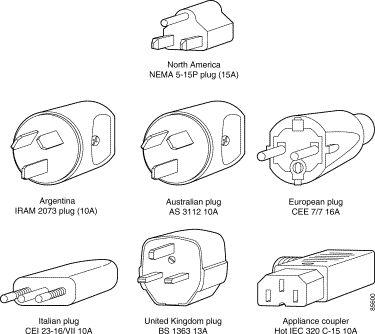
There are six styles of AC-input power supply power cords available (differing in plug type); make sure you have the correct style for your site (see Figure 2-4). All AC-input power supply power cords measure 8 feet (2.5 m). We recommend that you do the following:
Table 2-1 lists the AC power cord options.
Table 2-2 lists the nominal and acceptable value ranges for source AC power.
To connect the provided grounding lug to the tapped frame grounding holes, follow these steps:
Step 2 Identify the two tapped frame grounding holes at the upper right side of the Cisco ONS 15501 AC front panel. (See Figure 2-2.)
Step 3 Remove the two screws provided for securing the ground lug to the Cisco ONS 15501 AC.
Step 4 Connect the 8 AWG grounding wire to the grounding lug. The other end of the wire should be suitably grounded.
Step 5 Install the grounding lug on the Cisco ONS 15501 AC, using the two provided screws and washers.
Step 6 Test for proper frame ground using the ohmmeter section of a digital voltmeter. Place one prod on the Cisco ONS 15501 AC and the other on the frame grounding bus to which the grounding lug and grounding wire is connected. Observe for a zero-resistance ground.
The section describe how to ground the Cisco ONS 15501 DC and connect DC power to it.
|
Caution Check the power at your site to ensure that you are receiving clean power (free of spikes and noise). Install a power conditioner, if necessary, to ensure proper voltages and power levels in the source voltage. |
|
Caution Use only the hardware provided with the Cisco ONS 15501 DC. Failure to use the provided hardware may result in unintended damage. If hardware is lost, contact Cisco Systems for a replacement. |
|
Caution The protective cover for the DC power terminals should be installed at all times when the equipment is energized, except for any necessary maintenance or troubleshooting. |
|
Warning When installing or replacing the unit, the ground connection must always be made first and disconnected last. |
To connect the provided grounding lug to the tapped frame grounding holes, follow these steps:
Step 2 Remove the cover from the DC power terminal connectors. Identify the two tapped frame grounding holes at the upper right side of the Cisco ONS 15501 DC front panel. (See Figure 2-3.)
Step 3 Remove the two screws provided for securing the ground lug to the Cisco ONS 15501 DC.
Step 4 Connect the 8 AWG grounding wire to the grounding lug. The other end of the wire should be suitably grounded.
Step 5 Install the grounding lug on the Cisco ONS 15501 DC, using the two provided screws and washers.
Step 6 Test for proper frame ground using the ohmmeter section of a digital voltmeter. Place one prod on the Cisco ONS 15501 DC and the other on the frame grounding bus to which the grounding lug and grounding wire is connected. Observe for a zero-resistance ground.
|
Note There is an alternate grounding point on the chassis, located on the left side of the rear panel. |
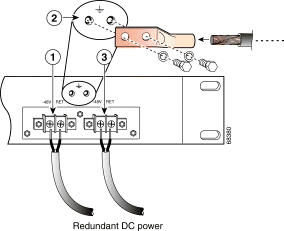
To connect the power wiring to the DC power terminal connectors, follow these steps:
Step 2 Install the primary DC power wiring to the right-hand barrier strip. (See Figure 2-5.) The left-hand screw is the -48 V connection. The right-hand screw, marked "RET," is the ground connection.
Step 3 Install the redundant DC power wiring to the left-hand barrier strip. (See Figure 2-5.) The left-hand screw is the -48 V connection. The right-hand screw, marked "RET," is the ground connection.
Step 4 Replace the power connector cover.
Step 5 Apply power to the primary and redundant DC circuits.
The Cisco ONS 15501 communicates in three ways:
See "Connector Pinouts,"for the wiring layouts of the RJ-45 and RS-232 connectors.
See the "Configuring Local Serial Communication" section for detailed information about the RS-232 console port.
To set up alarm contacts, follow these steps:
Step 2 Connect the stub end of the alarm cable to the alarm system contacts, either to miscellaneous discrete inputs on terminal equipment or to a central office alarm panel.
Step 3 Connect the RJ-45 connector to the Cisco ONS 15501.
See the"Alarm Contact Closures" section and the "Cisco ONS 15501 LED Alarm Definitions" section.
You can connect to a Cisco ONS 15501 locally using a serial connection or remotely through SNMP. See the "Configuring Local Serial Communication" section for instructions on setting up either of these options. After you establish a connection, use the following commands to complete the hardware installation. See "Command Reference," for a complete list of available commands.
You can use the following commands to establish communication with the Cisco ONS 15501 and to access additional information about the amplifier.
You can use the following commands to review the overall status of the Cisco ONS 15501.
![]()
![]()
![]()
![]()
![]()
![]()
![]()
![]()
Posted: Thu May 8 02:00:48 PDT 2003
All contents are Copyright © 1992--2003 Cisco Systems, Inc. All rights reserved.
Important Notices and Privacy Statement.