|
|

This chapter describes how to install the Cisco 6500/7600 Series Manager.
This chapter includes these sections:
The following steps outline a typical workflow for the Cisco 6500/7600 Series Manager:
 |
Note You must install a fully licensed version of the full CEMF application before you can install the Cisco 6500/7600 Series Manager software. See the "Installing the Cisco Element Manager Framework" section. |
Step 2 Ensure that the C65/76M is using the correct Perl binary. The C65/76M software uses the Perl binary provided by CEMF. If another version of Perl is installed on the system and is used instead of the one provided by CEMF, the C65/76M software may not function correctly. See the "Checking the Perl Binary" section for more information.
Step 3 Check the Catalyst 6500 series switch hardware setup or the Cisco 7600 OSR setup. See the "Configuration Procedures" section for more information.
Step 4 (Optional) Mount a remote CD-ROM to install the Cisco 6500/7600 Series Manager from a remote system. See the "Mounting a Remote CD-ROM Drive" section for more information.
Step 5 Install the C65/76M software using eminstall. See the "Installing the Cisco 6500/7600 Series Manager Server Using eminstall" section for more information.
Step 6 (Optional) Set up the CEMF server as a TFTP server.
Step 7 Deploy a C65/76M object into the CEMF. Refer to the "Getting Started" chapter in the Cisco 6500/7600 Series Manager User Guide for more information.
|
Note Check Cisco.com for details of the latest patch releases for the Cisco 6500/7600 Series Manager application. See the "Cisco.com" section on for further details. |
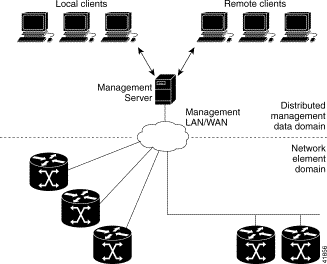
You can install the Cisco 6500/7600 Series Manager in a distributed manner, utilizing the power of multiple machines. Two types of installation (server and client) can be performed from the CD-ROM. Figure 2-1 shows a typical deployment.
You must install the Cisco 6500/7600 Series Manager server on the same system as the CEMF server. The server contains all the server processes that track the current state of the network, such as models, user access, and events. The server also contains all client windows.
You can optionally install clients on separate workstations. Client installations run Cisco 6500/7600 Series Manager applications that access objects on the server. A client installation contains only those parts of the Cisco 6500/7600 Series Manager system necessary to run a Cisco 6500/7600 Series Manager user session. The user session communicates with the CEMF server to retrieve management information.
You can install client software onto the local machine; you do not need to mount files across the network. The only network traffic occurs when the client requires more data from the server.
|
Note When you install a Cisco 6500/7600 Series Manager server, you also install all files that run a Cisco 6500/7600 Series Manager user session on the server system. The server system provides server and client functionality. The system allows you to upgrade by adding separate client machines later. |
CEMF requires a license key to operate. Refer to the Cisco Element Management Framework User Guide version 3.1 for details or contact the Cisco Technical Assistance Center (TAC) for assistance.
The Cisco 6500/7600 Series Manager can be deployed in a number of configurations, from a single hardware system solution to a multi-site distributed management system. The Cisco 6500/7600 Series Manager runs on Sun Solaris/SPARC hardware in a Solaris operating environment, release 2.6.
Use the Cisco 6500/7600 Series Manager with the following supervisor engine IOS releases:
Small deployments require a Sun Ultra 60 configured as follows:
Large deployments require a Sun Enterprise 450 configured as follows:
A typical client requires a Sun Ultra 60 configured as follows:
|
Note If you are planning to run graphically intensive applications on this workstation, we recommend that you use a Sun color card (for example, 24-bit color card). A typical server installation requires 300 MB of free disk space in a file system (for example, /opt). An appropriate amount of free disk space for database files is also required. |
You must install and run CEMF version 3.1 with Patch 1 before you can install the Cisco 6500/7600 Series Manager. Refer to the Cisco Element Management Framework Installation and Administration Guide version 3.1 for more information.
The Cisco 6500/7600 Series Manager software uses the Perl binary provided by CEMF version 3.1. If Perl is installed independently on the system running CEMF version 3.1, it may cause the Cisco 6500/7600 Series Manager software not to function correctly. To determine which Perl binary is to be used by the Cisco 6500/7600 Series Manager software, follow these steps:
Step 2 Enter this command:
Step 3 Enter this command:
This command should return the /opt/cemf/tools/bin/perl directory. If it does not, then the C65/76M software may use an independent version of Perl that may cause the C65/76M software not to function correctly. You must remove the path to the independent Perl installation from the superuser PATH environment variable.
|
Note The /opt/cemf/bin/tools directory is always appended to the superuser PATH environment variable. To ensure that the correct version of the Perl binary is used by the Cisco 6500/7600 Series Manager software, verify that a version of the Perl binary does not exist in the superuser PATH environment variable. |
You must configure the following prerequisites before the Cisco 6500/7600 Series Manager can manage a Catalyst 6500 series switch or a Cisco 7600 OSR.
|
Note To perform the procedures in this section, you must enter these commands through the console port on the supervisor engine of the Catalyst 6500 series switch or the Cisco 7600 OSR. |
To set the enable password, perform these steps:
The prompt changes to the privileged EXEC prompt (#) as follows:
Step 2 Enter the configure terminal command to enter configuration mode:
Step 3 Set the enable password as follows:
Step 4 Exit configuration mode as follows:
To set the IP address for the Catalyst 6500 series switch or for the Cisco 7600 OSR, perform these steps:
Step 2 Enter the configure terminal command to enter configuration mode:
Step 3 Enter interface configuration mode as follows:
|
Note type is the type of Ethernet module; it can be ethernet, fastethernet, or gigabitethernet. slot and port identify the slot number and port number of the interface that provides network connectivity to the CEMF server. |
Step 4 Enter the IP address and netmask as follows:
Step 5 Exit configuration mode and interface configuration mode as follows:
The CEMF server should now be able to ping the Catalyst 6500 series switch or the Cisco 7600 OSR.
To verify that the Catalyst 6500 series switch or the Cisco 7600 OSR accepts Telnet sessions, enter the telnet ip_address command from the CEMF server:
|
Note ip_address is the IP address for the Catalyst 6500 series switch or for the Cisco 7600 OSR. |
If there is no response, perform these steps:
Step 2 Enter the configure terminal command to enter configuration mode:
Step 3 Configure the Telnet session as follows:
Step 4 Exit configuration mode and interface configuration mode as follows:
|
Note If the SNMP server is not set, you must perform this procedure. |
To set the SNMP server on the Catalyst 6500 series switch or on the Cisco 7600 OSR, perform these steps:
Step 2 Enter the configure terminal command to enter configuration mode:
Step 3 Set the SNMP read community string as follows:
Step 4 Set the SNMP write community string as follows:
Step 2 Enter the configure terminal command to enter configuration mode:
Step 3 Enable SNMP traps as follows:
Step 4 Set the SNMP server to send traps to the CEMF server as follows:
To install software onto a system that does not have its own CD-ROM drive, you need to mount the CD on the remote system and then export the device to make it accessible over the network. To mount a remote CD-ROM drive, perform these steps:
Step 2 Log in as superuser on the remote host. Enter /usr/bin/ps -ef | grep vold to verify that the volume manager is running.
When the Volume Manager is running, you see a message similar to this one:
Step 3 If you do not see a message similar to the one shown above, start the Volume Manager by entering:
Step 4 Export the CD-ROM device on the remote host as follows:
The listing displayed includes the /cdrom mount point.
Step 5 Mount the remote CD-ROM on the local host (from where the installation is to take place) as follows:
|
Note Replace the remote-host with the host name of the remote device. |
The contents of the CD-ROM are visible under the /mnt/cdfiles mount point.
|
Note The following procedure assumes that a valid CEMF server is installed and running. Refer to the Cisco Element Management Framework Installation and Administration Guide version 3.1 for further details. |
To install Cisco C65/76M using eminstall, perform these steps:
Step 2 To insert the C65/76M CD-ROM, change the directory into the CD-ROM area by entering the following:
Step 3 To run the install script, enter the following:
You must install the server package (option 1) on the same host as the CEMF server. If you are using CEMF in the client/server mode, then you must install the client package (option 3) on each host running the CEMF client.
|
Note Because the above example is from a host where the CEMF server package was installed, Option 3 indicates an error "Incompatible type c." This indicates that the client package cannot be installed on this host. |
|
Note Options 2 or 4 are available only if you are upgrading a currently installed Cisco 6500/7600 Series Manager to a newer version. |
Step 4 Select the installation you require. The utility performs the appropriate installation.
|
Note If a CEMF session is currently running, the Cisco 6500/7600 Series Manager installation process automatically closes all CEMF windows. |
Step 5 When the installation is complete, exit the CD-ROM area as follows:
Step 6 Remove the Cisco C65/76M CD-ROM by entering the following:
Step 7 Ensure the Cisco C6M was installed correctly by starting a CEMF session and entering the following:
Step 8 Log on with your user name and password.
Step 9 From the CEMF Launchpad, select the Viewer application. If the Cisco C6M was installed correctly, the containment hierarchy on the left side of the Viewer window will include the Cisco 6500 Manager containment view.
The Cisco C6M is now ready to use.
All Cisco 6500/7600 Series Manager processes stop and are uninstalled when the eminstall script is run with the -r option. To uninstall the Cisco 6500/7600 Series Manager, perform these steps:
Step 2 Insert the C65/76M CD-ROM.
Step 3 Change the directory into the CD-ROM area by entering the following:
Step 4 Run the uninstallation script by entering the following:
A menu similar to the one shown below is displayed:
|
Note Additional options may be available if additional Element Managers other than the Cisco 6500/7600 Series Manager are installed on the CEMF server. |
Step 5 Select the CSCOC65M Server Package option.
You are notified that the uninstallation is about to take place. When you proceed with the uninstallation, the window scrolls through the software as it is deleted and this message appears:
Removal of package was successful.
The option remove CSCOC65M Server Package was completed successfully
![]()
![]()
![]()
![]()
![]()
![]()
![]()
![]()
Posted: Sat Jan 18 09:05:57 PST 2003
All contents are Copyright © 1992--2002 Cisco Systems, Inc. All rights reserved.
Important Notices and Privacy Statement.