|
|

This chapter describes how to configure Voice over IP (VoIP) routing on the Cisco Catalyst 4000 Access Gateway Module (AGM).
This chapter includes the following sections:
Voice network modules convert telephone voice signals into a form that can be transmitted over an IP network. When configuring voice interfaces on the AGM, you will need to perform the software configuration only for the cards that you have installed.
To configure a voice interface, you must use configuration mode. In this mode, you enter Cisco IOS command-line interface (CLI) commands at the Gateway prompt.
Before you can configure your AGM to use VoIP, you need to complete these tasks:
Before you configure an interface, have the following information available:
Obtain this information from your system administrator or network plan before you begin AGM configuration.
Whenever you install a new interface, or if you want to change the configuration of an existing interface, you must configure the interface. If you replace a module that was already configured, the AGM recognizes it and brings up the interface in the existing configuration.
Use a voice interface card (VIC) for a voice connection. For information about installing these components in a AGM, see Installing Voice and WAN Interface Modules.
 |
TimeSaver Before you begin, disconnect all WAN cables from the AGM to prevent it from trying to run the AutoInstall process. The AGM tries to run AutoInstall when you power it on if there is a WAN connection on both ends and the AGM does not have a valid configuration file stored in NVRAM (for instance, when you add a new interface). The AGM can take several minutes to determine that AutoInstall is not connected to a remote TCP/IP host. |
To configure a voice interface, use configuration mode (manual configuration). In this mode, you can enter Cisco IOS commands at the AGM prompt.
To enter configuration mode, follow this procedure:
Step 1 Connect a console to the Catalyst 4000 family switch supervisor engine.
Step 2 Power on the AGM by inserting it into a powered chassis or by powering on the chassis. If the current configuration is no longer valid, after about one minute you see the following prompt:
Would you like to enter the initial dialog? [yes/no]:
Enter No. You will enter the normal operating mode of the AGM. If the current configuration is valid, you enter the normal operating mode automatically.
Step 3 After a few seconds, you see the user EXEC prompt (gateway>). Enter enable and the password to enter enable mode:
gateway> enable

Password: <password>
Configuration changes can be made only in enable mode. The prompt changes to the privileged EXEC (enable) prompt:
gateway#
Step 4 Enter the configure terminal command to enter configuration mode:
gateway# configure terminal

gateway(config)#
The AGM enters global configuration mode, indicated by the gateway (config) # prompt.
Step 5 If you have not configured the AGM, or want to change the configuration, use Cisco IOS commands to configure global parameters, passwords, network management, and routing protocols. In this example, IP routing is enabled:
gateway(config)# ip routing
For complete information about global configuration commands, refer to the Cisco IOS Configuration Guides and Command References.
Step 6 If you have not already done so, configure the WIC that you plan to use for IP traffic. For instructions, see Installing the Access Gateway Module or the configuration note for the WAN interface card.
Step 7 To configure another interface, enter the exit command to return to the gateway(config) # prompt.
Step 8 To configure the AGM for voice traffic, refer to the detailed instructions in the Voice over IP Configuration documentation.
Step 9 When you finish configuring interfaces, exit configuration mode and return to the enable prompt by pressing Ctrl-z. To see the current operating configuration, including any changes you just made, enter the show running-config command:
gateway# show running-config
To see the configuration currently stored in NVRAM, enter the show startup-config command at the enable prompt:
gateway# show startup-config
Step 10 The results of the show running-config and show startup-config commands differ from each other if you have made changes to the configuration, but have not yet written them to NVRAM. To write your changes to NVRAM, and make them permanent, enter the copy running-config startup-config command at the enable prompt:
gateway# copy running-config startup-config

Building configuration. . .
[OK]
gateway#
The AGM is now configured to boot in the new configuration.
If you want to use Media Gateway Control Protocol (MGCP), configuration of the AGM differs, depending on whether you are using it with Cisco CallManager 3.0 or 3.1.
With Cisco CallManager 3.1 and later, you can create the MGCP gateway configuration on the Cisco CallManager server and download the configuration to the AGM. For the details of this configuration procedure, refer to the Cisco CallManager 3.1 online help and to Configuring Cisco IP Telephony Gateways, available online at Cisco.com.
With Cisco CallManager 3.0, you must configure each voice port for MGCP on the AGM and then duplicate this configuration in Cisco CallManager Administration. The following sections describe how to perform this configuration on the AGM:
For more information on using MGCP with Cisco CallManager 3.0, refer to the Cisco CallManager 3.0 online help and to Configuring Cisco IP Telephony Gateways, available online at Cisco.com.
To configure the AGM so that it can be controlled by Cisco CallManager Release 3.0 using MGCP, you must identify the primary and any backup Cisco CallManager servers that you want to use in case the primary server becomes unavailable. You must also configure each voice gateway as an MGCP gateway in Cisco CallManager, as described in the Cisco CallManager Administration Guide. Finally, you must configure the voice ports installed on your gateway. The following sections describe these procedures.
To enable generic MGCP support on a Cisco voice gateway, enter the following commands from the global configuration mode prompt:
Gateway(config)#mgcp

Gateway(config)#mgcp call-agent hostname
where hostname identifies the Cisco CallManager server (or possibly a generic MGCP call agent).
To enable support for Cisco CallManager within MGCP, enter the following command:
Gateway(config)#ccm-manager MGCP
Cisco CallManager controls dial-plan-related configuration elements, and they should not be configured in the Cisco voice gateway for MGCP-managed endpoints (those with application MGCPAPP in the dial-peer statement). You should not configure any of the following elements when using MGCP:
 |
Note H.323 and MGCP configurations will coexist when you enable MGCP gateway fallback. |
To identify up to two backup Cisco CallManager servers, enter the following command:
Gateway(config)#ccm-manager redundant-host hostname1 hostname2
where hostname1 identifies the first backup Cisco CallManager server using the DNS host name or dotted decimal format, and hostname2 identifies the second backup Cisco CallManager server.
If you configure one or two backup Cisco CallManager servers, you can control how the gateway behaves if the primary server becomes unavailable at some point and then later becomes available again: this is called switchback.
To configure gateway switchback, enter the following command:
Gateway(config)#ccm-manager switchback

 {graceful|imm[ediate]|sch[edule-time] hh:mmm|uptime[-delay] minutes}
During switchover and switchback, Cisco CallManager maintains active connected calls. Transient calls (calls in progress or on hold without an active voice connection) are torn down. An exception applies for PRI interfaces that MGCP controls, in which case both active and transient calls are torn down during switchover and switchback. Table 5-1 describes each switchback option.
You can also manually redirect a Cisco voice gateway to the backup Cisco CallManager server by entering the following command:
Gateway(config)#ccm-manager switchover-to-backup
In this case, the switchover will occur immediately. This command will not switch the gateway to the backup Cisco CallManager server if you have the switchback option set to immediate and the primary Cisco CallManager server is still running.
To view the current configuration of a Cisco voice gateway, enter the show ccm-manager command from privileged EXEC mode.
Example 5-1 illustrates a typical display that appears in response to this command.
router#sh ccm-manager
MGCP Domain Name: router
Priority        Status                   Host
============================================================
Primary         Registered               172.20.71.44
First backup    None
Second backup   None

Current active Call Manager:    172.20.71.44
Backhaul/Redundant link port:   2428
Failover Interval:              30 seconds
Keepalive Interval:             15 seconds
Last keepalive sent:            00:54:14 (elapsed time: 00:00:13)
Last MGCP traffic time:         00:54:14 (elapsed time: 00:00:13)
Last switchover time:           None
Switchback mode:                Graceful
MGCP Fallback mode:             Not Selected
Last MGCP Fallback start time:  00:00:00
Last MGCP Fallback end time:    00:00:00

PRI Backhaul link info:
    Link Protocol:      TCP
    Remote Port Number: 2428
    Remote IP Address:  172.20.71.44
    Current Link State: OPEN
    Statistics:
        Packets recvd:   0
        Recv failures:   0
        Packets xmitted: 0
        Xmit failures:   0
    PRI Ports being backhauled:
       Slot 1, port 1
Configuration Auto-Download Information
=======================================
 No configurations downloaded
Current state: Automatic Configuration Download feature is disabled
Configuration Error History:
FAX relay mode: cisco-fax-relay
You use the same commands to configure both Foreign Exchange Service (FXS) and Foreign Exchange Office (FXO) ports. The gateway recognizes the type of voice interface card that is installed in each voice network module and applies the configuration you enter based on the port position you specify in the command.
To enable FXS or FXO ports with MGCP, enter the following commands:
Gateway(config)# dial-peer voice <number> pots

Gateway(config-dial-peer)# application MGCPAPP

Gateway(config-dial-peer)# port <portnumber>
To use these commands, replace <number> with a unique numeric ID, and replace <portnumber> with the port identifier in the form slot#/voice module#/port#. Use the application MGCPAPP command to place the port under control of the Cisco CallManager MGCP call agent.
For example, the following command string configures voice port 0 in voice interface card 1 with MGCP:
Gateway(config)# dial-peer voice 1 pots

Gateway(config-dial-peer)# application MGCPAPP

Gateway(config-dial-peer)# port 1/1/0
You can use MGCP with the following emulation types:
To configure T1-CAS E&M emulation with MGCP using Cisco CallManager Administrator, perform the following steps to configure the route pattern and dial plan:
Step 1 Identify the T1 port number and enter the information provided by your local carrier.
Identify the port number and then enter the configuration information provided by your local carrier, as in the following example:
Gateway(config)# controller T1 1/port#

Gateway(config-controller)# framing esf

Gateway(config-controller)# clock source internal

Gateway(config-controller)# linecode b8zs
Step 2 Assign time slots to the DS-0 group and identify the emulation type.
You can define each DS-0 group to use FXS, FXO, or E&M, using the following command:
Gateway(config-controller)# ds0-group group<groupnumber> timeslots <timeslotnumber> type
emulationtype
Replace emulationtype with e&m-wink-start or e&m-delay-dial.
Replace <groupnumber> with the DS-0 group number and replace <timeslotnumber> with the number of DS-0 time slots to allocate to the group. For example, the following command configures the first DS-0 group with one time slot using FXS emulation in loop-start mode:
Gateway(config-controller)# ds0-group 0 timeslots 1 type fxs-loop-start
As mentioned earlier, you can configure DS-0 hunt groups by assigning a range of time slots to a DS-0 group and then configuring multiple voice peers with the same destination pattern pointing to multiple voice ports.
For example, the following command assigns 12 time slots to DS-0 group 1:
Gateway(config-controller)# ds0-group 1 timeslots 1-12 type fxs-loop-start
Step 3 Enable MGCP for the port by entering the following commands:
Gateway(config)# dial-peer voice 1 pots
Gateway(config-dial-peer)# application mgcpapp port <portnumber>:<ds0group>
Replace portnumber with the port number on the voice gateway you are configuring and ds0group with the DS0 group number.
Example 5-2 illustrates a typical configuration of T1-CAS E&M emulation with MGCP:
Gateway(config-controller)# ds0-group 0 timeslots 1 type e&m-wink-start

Gateway(config)# dial-peer voice 1 pots

Gateway(config-dial-peer)# application MGCPAPP

Gateway(config-dial-peer)# port 1/0:0
To configure an E1/T1 multiflex interface with ISDN-PRI signalling, use the Cisco IOS command line to perform the procedures in this section.
To configure a new T1 interface or to change the configuration of an existing interface, perform the following procedure:
Step 1 Identify the port number and enter line-specific information provided by your local carrier.
a. Choose the T1/PRI interface to configure:
Gateway(config)# controller t1 1/0
This example configures a T1 interface in slot 1 and unit 0.
b. Specify which end of the circuit provides clocking:
Gateway(config-controller)# clock source line
Set the clock source to use internal clocking only for testing the network. Set one end of the T1 line to internal.
c. Specify the framing type:
Gateway(config-controller)# framing esf
d. Specify the line code format:
Gateway(config-controller)# linecode b8zs
Step 2 Configure parameters for the voice interface.
a. Specify the PRI group and time slots to be mapped:
Gateway(config-controller)# pri-group timeslots 1-24 service mgcp
For multiflex trunk interfaces, you can configure only channel 0.
b. Configure each PRI group as a virtual serial interface:
Gateway(config-controller)# interface serial 1/0:23
c. Specify the T1 interface and unit number to modify:
interface Serial 1/0:23
 no ip address
 no logging event link-status
 isdn switch-type primary-5ess
 isdn incoming-voice voice
 no cdp enable
Step 3 Configure the PRI port by entering the following command:
Gateway(controller-t1)# pri-group timeslots 1-24 service mgcp
Step 4 Bind Layer 3 to the Cisco CallManager for PRI Q.931:
Gateway(config-if)# isdn bind-l3 ccm-manager
This command backhauls (tunnels) ISDN Layer 3 and above to the Cisco CallManager.
PRI/Q.931 signaling backhaul transports signals (Q.931 and higher layers) for processing from a PRI trunk physically connected to an MGCP gateway to a MGCP call agent.
The ISDN lower layer information (Q.921 and below) is terminated and processed on the gateway. The Layer 3 information (Q.931 and above) is transported over TCP to the Cisco CallManager (MGCP call agent).
Step 5 Enable MGCP for the port by entering the following commands:
Gateway(config)# dial-peer voice 1 pots

Gateway(config-dial-peer)# application mgcpapp port <portnumber>:<ds0group>
Replace portnumber with the port number on the voice gateway you are configuring and ds0group with the DS0 group number.
Step 6 To view the status of the PRI line, enter the following command:
Gateway # show ccm-manager backhaul
This command displays information about the status of the TCP backhaul link and the status of any PRI D-channels in the gateway.
Example 5-3 shows the kind of information the system displays.
PRI Backhaul link info:
    Link Protocol:      TCP
    Remote Port Number: 2428
    Remote IP Address:  172.20.71.44
    Current Link State: OPEN
    Statistics:
        Packets recvd:   0
        Recv failures:   0
        Packets xmitted: 0
        Xmit failures:   0
    PRI Ports being backhauled:
       Slot 1, port 1
       Slot 1, port 0
The following example shows the overall configuration required to enable MGCP on a T1/PRI line:
isdn switch-type primary-5ess
controller T1 1/0
 framing crc4
 linecode hdb3
 pri-group timeslots 1-24 service mgcp
interface Serial1/0:23
 no ip address
 no logging event link-status
 isdn switch-type primary-net5
 isdn incoming-voice voice
 no cdp enable
 isdn bind-l3 ccm-manager

dial-peer voice 1 pots
 application mgcpapp
 port 1/0:0
To configure a new E1 interface (balanced or unbalanced) or to change the configuration of an existing interface, use the following procedure:
Step 1 Identify the port number and enter line-specific information provided by your local carrier.
a. Choose the E1/PRI interface to configure by entering the following command from Global configuration mode:
Gateway(config)# controller e1 1/0
This example configures an E1 interface in slot 1 and unit 0.
b. Specify the framing type:
Gateway(config-controller)# framing crc4
c. Specify the line code format:
Gateway(config-controller)# linecode hdb3
Step 2 Configure parameters for the voice interface.
a. Specify the PRI group and time slots to be mapped:
Gateway(config-controller)# pri-group timeslots 1-31 service mgcp
b. Configure each PRI group as a virtual serial interface:
Gateway(config-controller)# interface serial 1/0:15
c. Specify the E1 interface and unit number to modify:
interface Serial1/0:15
 no ip address
 no logging event link-status
 isdn switch-type primary-net5
 isdn incoming-voice voice
 no cdp enable
Step 3 Configure the PRI port by entering the following command:
Gateway(controller-e1)# pri-group timeslots 1-31 service mgcp
Step 4 Bind Layer 3 to the Cisco CallManager for PRI Q.931:
Gateway(config-if)# isdn bind-l3 ccm-manager backhaul q931
This command backhauls (tunnels) ISDN Layer 3 and above to the Cisco CallManager.
PRI/Q.931 signaling backhaul transports signals (Q.931 and higher layers) for processing a PRI trunk physically connected to an MGCP call agent.
The ISDN lower layer information (Q.921 and below) is terminated and processed on the gateway. The Layer 3 information (Q.923 and above) is transported over TCP to the Cisco CallManager (MGCP call agent).
Step 5 Enable MGCP for the port by entering the following commands:
Gateway(config)# dial-peer voice 1 pots

Gateway(config-dial-peer)# application mgcpapp port <portnumber>:<ds0group>
Replace portnumber with the port number on the voice gateway you are configuring and ds0group with the DS0 group number.
Step 6 To view the status of the PRI line, enter the following command:
Gateway # show ccm-manager backhaul
This command displays information about the status of the PRI backhaul link and the status of any PRI D channels in the gateway.
Example 5-4 illustrates the kind of information the system displays.
PRI Backhaul link info:
    Link Protocol:      TCP
    Remote Port Number: 2428
    Remote IP Address:  172.20.71.44
    Current Link State: OPEN
    Statistics:
        Packets recvd:   0
        Recv failures:   0
        Packets xmitted: 0
        Xmit failures:   0
    PRI Ports being backhauled:
       Slot 1, port 1
       Slot 1, port 0
The following example shows the overall configuration required to enable MGCP on a E1/PRI line:
isdn switch-type primary-5ess
controller E1 1/0
 framing esf
 linecode b8zs
 pri-group timeslots 1-31 service mgcp
interface Serial 1/0:15
 no ip address
 no logging event link-status
 isdn switch-type primary-5ess
 isdn incoming-voice voice
 no cdp enable
 isdn bind-l3 ccm-manager backhaul q931

dial-peer voice 1 pots
 application mgcpapp
 port 1/0:0
At this point, you should make sure that Cisco CallManager is properly configured to provision the voice gateway and to configure MGCP endpoints or H.323 route patterns as required. Refer to the documentation and online help provided with Cisco CallManager. Refer to the Cisco IOS software configuration guide and command reference publications for more advanced configuration topics. For troubleshooting information, refer to the system error messages and debug command reference publications.
Access these publications on the Documentation CD-ROM that came with your gateway, or on the World Wide Web from the Cisco home page.
Compared to Media Gateway Control Protocol (MGCP), H.323 requires more configuration on a gateway because the gateway must maintain the dial plan and route pattern. The gateway must have enough information to direct calls to the correct end point, which must be an H.323-capable device.
When using H.323, ensure that you configure Cisco CallManager correctly to provision the AGM as an H.323 gateway, with route patterns configured to route calls to a AGM.
To provision the gateway using Cisco CallManager Administration, select the Add a New Gateway option from Device > Gateway. Assign the Gateway Type as H.323 Gateway, and the Device Protocol as H.225.
To configure a route pattern using CCM Administrator, select Route Plan > Route Pattern and enter the route pattern. Then select Cisco Catalyst 4000 AGM from a drop-down list, click the Route this option button for the Route Option, and check the Provide Outside Dial Tone box for Offnet (the default is OnNet).
To configure a specific interface or line signalling type, see the appropriate section provided later in this chapter. In general, you need to perform the following steps to complete H.323 configuration.
Step 1 Identify the port number and enter line-specific information provided by your local carrier, as described in the following sections:
Step 2 Configure parameters for the voice interface you are using, as described in the section referred to above.
Step 3 Configure H.323 endpoints connected to the AGM voice ports.
To configure plain old telephone service (POTS) dial peers, use the following command strings:
gateway(config)# dial-peer voice <number> pots

gateway(config-dial-peer)# destination-pattern <endpoint#>

gateway(config-dial-peer)# port 1/<portnumber>:<DS0groupnumber>
Replace:
For example, the following commands could be used to route all calls with the prefix 222 to the DS-0 hunt group 1 of controller T1 1/0:
gateway(config)# dial-peer voice 222 pots

gateway(config-dial-peer)# destination-pattern 222....
gateway(config-dial-peer)# port 1/0:1

gateway(config-dial-peer)# prefix 222
The prefix command at the end is required to replace the digits that the AGM strips off from the dialed digit string based on the wildcard destination pattern.
Step 4 Configure H.323 endpoints connected to the AGM Ethernet port.
To configure H.323 endpoints, use the following command strings:
gateway(config)# dial-peer voice <number>  voip

gateway(config-dial-peer)# destination-pattern <endpoint#>
gateway(config-dial-peer)# session target {ipv4:ipaddress|dns:hostname}

gateway(config-dial-peer)# codec codecid
If you use the IP address, it must be preceded by the parameter ipv4. If you use the DNS host name, this must be preceded by the parameter dns, and the host name must resolve correctly to the IP address of the target. Finally, you must identify the coder-decoder (CODEC) used by the VoIP dial peer.
For example, the following commands assign extension 2001 to the IP device with the network address 192.168.100.1:
gateway(config)# dial-peer voice 1 voip

gateway(config-dial-peer)# destination-pattern 2001

gateway(config-dial-peer)# session target ipv4:192.168.100.1

gateway(config-dial-peer)# codec g711u1aw
Step 5 Direct calls using wildcard destination patterns, as needed.
You can use wildcard destination patterns to simplify your dial plan configuration. For instance, you can direct all incoming calls starting with specific digits, such as 525, to a Cisco CallManager configured as an H.323 endpoint. You might direct all calls starting with a 9 to voice ports connected to the Public Switched Telephone Network (PSTN), or direct all calls beginning with an 8 to a private branch exchange (PBX).
gateway(config-dial-peer)# destination-pattern pattern ....
For example, the following command directs all calls starting with 525 to a Cisco CallManager with the DNS host name CCM30:
gateway(config-dial-peer)# destination-pattern 525....

gateway(config-dial-peer)# session target dns:CCM30
The number of digits that you substitute for pattern plus the number of periods in the wildcard (...) must match the total number of digits configured for use by the AGM in Cisco CallManager Administration. Also, keep in mind that the numbers that you substitute for pattern are removed by the AGM. When the call is forwarded to the destination number, only the digits in the position of the wildcard pattern (...) will be received by the destination endpoint. If you want to replace the digits that are stripped off (or add a different set of digits), use the prefix command.
Step 6 Complete and save the configuration by entering the following commands:
gateway# line con 0

gateway# transport input none

gateway# line aux 0

gateway# line vty 0 4

gateway# login

gateway# no scheduler allocate

gateway# end

gateway# copy running-config startup-config

Building configuration. . .
[OK]
gateway#
You can connect the T1-CAS (channel associated signalling) port on a AGM to one of the following:
To configure T1-CAS analog emulation with H.323 T1, perform the following steps. After completing these steps, configure the route pattern and dial plan and save your configuration, as described in "H.323 Gateway Configuration" section.
Step 1 Identify the port number and then enter the configuration information provided by your telco, as in the following example:
gateway(config)# controller T1 1/port#

gateway(config-controller)# framing esf

gateway(config-controller)# clock source internal

gateway(config-controller)# linecode b8zs
Step 2 Assign timeslots to the DS-0 group and identify the emulation type.
You can define each DS-0 group to use FXS, FXO, or E&M, using the following command:
gateway(config-controller)# dso-group group <groupnumber>

timeslots <timeslotnumber> type emulationtype
Replace:
For example, the following command configures the first DS-0 group with one timeslot using FXS emulation in loop-start mode:
gateway(config-controller)# dso-group 0 timeslots 1 type fxs-loop-start
As mentioned earlier, you can configure DS-0 hunt groups by assigning a range of timeslots to a DS-0 group, and then configuring multiple voice peers with the same destination pattern pointing to multiple voice ports.
For example, the following command assigns 12 timeslots to DS-0 group 1:
gateway(config-controller)# dso-group 1 timeslots 1-12 type fxs-loop-start
|
Note After completing these steps, configure the route pattern and dial plan and save your configuration, as described in "H.323 Gateway Configuration" section. |
When using the FXO ports on a AGM, set the input gain to greater than 10 to achieve adequate audio quality for Cisco IP voice applications or the Cisco IP Phone 7960. Enter the following series of commands from the Cisco IOS command line to set the correct value for input gain:
gateway# configure terminal

gateway(config)# voice-port <x/x/x> input gain <value>
Permitted entries for <value> are from -6 to 14. Gain values higher than 12 may cause dual tone multifrequency (DTMF) recognition difficulties.
By connecting the T1-CAS port on a AGM to a T1 channel bank using FXS emulation, you can achieve high port density when interconnecting POTS and VoIP endpoints. You can configure the dial plan for this configuration by treating Cisco CallManager as the only H.323 endpoint, or by configuring H.323 endpoints on a AGM. If you configure Cisco CallManager as an H.323 endpoint, you must use Cisco CallManager Administration to define the route patterns required to route calls to the AGM.
The following example illustrates how to configure a single DS-0 group. Repeat the relevant commands to configure additional groups. This example is for a scenario in which all of the POTS devices connected to a T1 channel bank are configured with a destination number beginning with 526. In this example, Cisco CallManager has the host name CCM30 and is configured as an H.323 endpoint that manages all the telephones and other devices on the IP network, which have numbers beginning with 525.
gateway(config)# interface FastEthernet5/0

gateway(config)# ipaddress 172.20.71.48 255.255.255.0

gateway(config)# no ip directed-broadcast

gateway(config)# no keepalive

gateway(config)# duplex auto

gateway(config)# speed 10


gateway(config)# controller T1 1/0

gateway(config-controller)# framing esf

gateway(config-controller)# clock source internal

gateway(config-controller)# linecode b8zs

gateway(config-controller)# dso-group 0 timeslots 1 type fxo-loop-start


gateway(config)# dial-peer voice 1 pots

gateway(config-dial-peer)# destination-pattern 526....
gateway(config-dial-peer)# port 1/0:0

gateway(config-dial-peer)# destination-pattern 525....

gateway(config-dial-peer)# session target dns:CCM30

gateway(config-dial-peer)# codec g711u1aw


gateway# line con 0

gateway# transport input none

gateway# line aux 0

gateway# line vty 0 4

gateway# login

gateway# no scheduler allocate

gateway# end

gateway# copy running-config startup-config

Building configuration. . .
[OK]
gateway#
To use FXO emulation to connect the T1-CAS port to the PSTN, you must have Direct Inward Dialing (DID) enabled on incoming DS-0 groups. DID allows the gateway or Cisco CallManager to identify the extension to which each call on an incoming DS-0 group is directed. Because DID only works on incoming connections, you must have separate DS-0 groups allocated for incoming and outgoing calls. To configure the gateway to accept DID information, enter the following command:
gateway(config-dial-peer)# direct-inward-dial
The first and last parts of the configuration are the same as for the FXO example. However, you must configure your DS-0 groups for FXS by changing the emulation type and enabling direct inward dialing (DID). Then enter the destination patterns required for routing voice calls to and from the PSTN. The commands required to make these changes are shown below:
gateway(config-controller)#dso-group 0 timeslots 1 type fxo-loop-start


gateway(config)# dial-peer voice 1 pots

gateway(config-dial-peer)# direct-inward-dial

gateway(config-dial-peer)# port 1/0:0

gateway(config-dial-peer)# destination-pattern 9.......
To connect the T1-CAS port to a trunk (tie) line using E&M emulation, you can enable one of the following modes:
The first and last parts of the configuration are the same as for the FXO example. However, you must configure your DS-0 groups for E&M by changing the emulation type. Then enter the destination patterns required for routing voice calls to and from the PBX to which the gateway is connected. The commands required to make these changes are shown below (all the extensions on the PBX begin with the prefix 625):
gateway(config-controller)# dso-group 0 timeslots 1 type e&m-immediate-start

gateway(config)# dial-peer voice 1 pots

gateway(config-dial-peer)# port 1/0:0

gateway(config-dial-peer)# destination-pattern 625....
To configure an ISDN BRI interface, perform the following steps. After completing these steps, configure the route pattern and dial plan and save your configuration, as described in "H.323 Gateway Configuration" section.
Step 1 Enter an ISDN switch type by entering the following command in global configuration mode:
gateway(config)# isdn switch-type <switch-type>
See Table 5-3 for a list of ISDN switch types.
|
Note Switch types configured in interface configuration mode override this setting for the configured interface. |
Step 2 Assign the switch type to the interface by entering the following commands. The following example assigns the switch type basic-5ess:
gateway(config)# interface bri 0/0

gateway(config-if)# isdn switch-type basic-5ess
For details on configuring Cisco CallManager, refer to the Cisco CallManager Administration Guide.
|
Note After completing these steps, configure the route pattern and dial plan and save your configuration, as described in "H.323 Gateway Configuration" section. |
Before using a AGM with an ISDN BRI interface, you must order a correctly configured ISDN BRI line from your local telecommunications service provider.
The ordering process varies from provider to provider and from country to country; however, here are some general guidelines:
ISDN BRI provisioning refers to the types of services provided by the ISDN BRI line. Although provisioning is performed by your ISDN BRI service provider, you must tell the provider what you want.
Table 5-4 lists the provisioning you should order for your AGM for each switch type.
| Switch Type | Provisioning |
|---|---|
5ESS Custom BRI | For voice only:
|
5ESS National ISDN (NI-1) BRI |
|
DMS-100 BRI |
|
| 1Service profile identifier 2Terminal endpoint identifier |
Some service providers assign service profile identifiers (SPIDs) to define the services to which an ISDN device subscribes. If your service provider requires SPIDs, your ISDN device cannot place or receive calls until it sends a valid SPID to the service provider when initializing the connection. A SPID is usually a seven-digit telephone number plus some optional numbers, but service providers might use different numbering schemes. SPIDs have significance at the local access ISDN interface only; remote AGMs are never sent the SPID.
Currently, only DMS-100 and NI-1 switch types require SPIDs. Two SPIDs are assigned for the DMS-100 switch type, one for each B channel. The AT&T 5ESS switch type might support SPIDs, but Cisco recommends that you set up that ISDN service without SPIDs.
If your service provider assigns you SPIDs, you must define these SPIDs on the AGM. To define SPIDs and the local directory number (LDN) on the gateway for both ISDN BRI B channels, use the following isdn spid commands:
gateway (config-if)# isdn spid1 spid-number [ldn]
gateway (config-if)# isdn spid2 spid-number [ldn]
|
Note Although the LDN is an optional parameter in the command, you might need to enter it so the gateway can answer calls made to the second directory number. |
For further information on configuring ISDN, refer to the chapters "Configuring ISDN" and "Configuring DDR" in the Wide-Area Networking Configuration Guide publication.
The following example shows how to configure a BRI port for direct-inward dialing (DID). This configuration allows the called number information from the ISDN Q.931 setup message to be used for routing on an ISDN line.
In this example, a call comes in to AGM 1 on the BRI port. The DID information allows the AGM to route the call based on the called number. If the called number is 2xxx, the call is routed to AGM 2000; if the called number is 3xxx, the call is routed to AGM 3000.
Figure 5-1 illustrates the topology of this connection example.
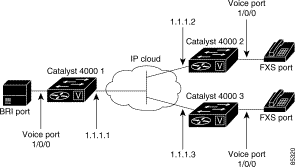
This is the sample configuration for gateway 1:
dial-peer voice 1 pots
	 port 1/0/0
	 destination-pattern 1...
	 direct-inward-dial
dial-peer voice 2 voip
	 session target ipv4:1.1.1.2
	 destination-pattern 2...
dial-peer voice 3 voip
		 session target ipv4:1.1.1.3
	 destination-pattern 3...
This is the sample configuration for gateway 2:
dial-peer voice 1 pots
	 port 1/0/0
	 destination-pattern 2000
This section describes how to configure an ISDN PRI interface or T1/E1 multiflex trunk interface on your AGM. This section contains the following subsections:
Use the following procedure to configure a new T1 interface or to change the configuration of an existing interface. After completing these steps, configure the route pattern and dial plan and save your configuration, as described in "H.323 Gateway Configuration" section.
Step 1 Identify the port number and enter line-specific information provided by your local carrier.
a. Select the T1/PRI interface to configure.
gateway(config)# controller t1 1/0
b. Specify which end of the circuit provides clocking.
gateway(config-controller)# clock source line
c. Specify the framing type.
gateway(config-controller)# framing esf
d. Specify the line code format.
gateway(config-controller)# linecode b8zs
Step 2 Configure parameters for the voice interface.
a. Specify the PRI group and time slots to be mapped.
gateway(config-controller)# pri-group timeslots 1-24
b. Configure each pri-group as a virtual serial interface.
gateway(config-controller)# interface serial 1/0:15
c. Specify the T1 interface, unit number, and channel group to modify, as in the following example input:
interface Serial pri-group
 no ip address
 no logging event link-status
 isdn switch-type primary-5ess
 isdn incoming-voice voice
 no cdp enable
|
Note After completing these steps, configure the route pattern and dial plan and save your configuration, as described in "H.323 Gateway Configuration" section. |
This is a sample configuration for an ISDN PRI interface or T1/E1 multiflex trunk interface on your AGM:
isdn switch-type primary-5ess
isdn voice-call-failure 0
controller T1 1/0
 framing esf
 linecode b8zs
 pri-group timeslots 1-24
interface Serial1/0:23
 no ip address
 no logging event link-status
 isdn switch-type primary-5ess
 isdn incoming-voice voice
 no cdp enable
Use the following procedure to configure a new E1 or CE1/PRI interface (balanced or unbalanced) or to change the configuration of an existing interface.
Step 1 Identify the port number and enter line-specific information provided by your local carrier.
a. Select the CE1/PRI interface to configure by entering the following command from global configuration mode. This example configures an E1 interface in slot 1 and unit 0.
gateway(config)# controller e1 1/0
b. Specify the framing type.
gateway(config-controller)# framing crc4
c. Specify the line code format.
gateway(config-controller)# linecode hdb3
Step 2 Configure parameters for the voice interface.
a. Specify the PRI group and time slots to be mapped.
gateway(config-controller)# pri-group timeslots 1-31
b. Configure each channel group as a virtual serial interface.
gateway(config-controller)# interface serial 1/0:31
c. Specify the E1 interface, unit number, and channel group to modify, as in the following example:
interface Serial1/0:23
 no ip address
 no logging event link-status
 isdn switch-type primary-5ess
 isdn incoming-voice voice
 no cdp enable
|
Note After completing these steps, configure the route pattern and dial plan and save your configuration, as described in "H.323 Gateway Configuration" section. |
This is a sample configuration for an E1 or CE1/PRI interface (balanced or unbalanced) on your AGM
isdn switch-type primary-5ess
isdn voice-call-failure 0
controller E1 1/0
 framing esf
 linecode b8zs
 pri-group timeslots 1-31
interface Serial 1/0:15
 no ip address
 no logging event link-status
 isdn switch-type primary-5ess
 isdn incoming-voice voice
 no cdp enable
This section describes how to configure voice network modules with recEive and transMit (E&M), Foreign Exchange Office (FXO), and Foreign Exchange Station (FXS) interfaces for your AGM. Your actual configuration procedures depend upon the topology of your network. You will need to customize the following example scenarios to reflect your network topology.
The following VoIP configuration examples are included:
The following example shows how to configure VoIP for simple FXS-to-FXS connections.
In this example, a very small company that consists of two offices integrates VoIP into an existing IP network. One basic telephony device is connected to the AGM AGLB-1. The AGM AGLB-1 is configured for one POTS peer and one VoIP peer. Because one POTS telephony device is connected to AGM AGLB-2, it is also configured for one POTS peer and one VoIP peer. In this example, only the calling end (AGM AGLB-1) is requesting RSVP.
Figure 5-2 illustrates the topology of this FXS-to-FXS connection example.
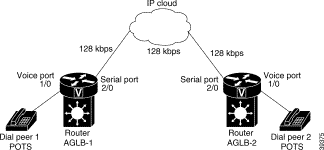
The following example shows the AGLB-1 configuration:
hostname aglb-1
! Create voip dial-peer 10
dial-peer voice 10 voip
! Define its associated telephone number and IP address
 destination-pattern +4155264002
 sess-target ipv4:10.0.0.2
! Request RSVP
 req-qos guaranteedDelay
! Create pots dial-peer 1
dial-peer voice 1 pots
! Define its associated telephone number and voice port
 destination-pattern +4085264001
 port 1/0
! Configure serial interface 2/0
interface Serial2/0
 ip address 10.0.0.1 255.0.0.0
 no ip mroute-cache
! Configure RTP header compression
 ip rtp header-compression
 ip rtp compression-connections 25
! Enable RSVP on this interface
 ip rsvp bandwidth 96 96
 fair-queue 64 256 36
 clockrate 128000
gateway igrp 888
 network 10.0.0.0
 network 20.0.0.0
 network 40.0.0.0
The following example shows the AGLB-2 configuration:
hostname ag1b-2
! Create pots dial-peer 2
dial-peer voice 2 pots
! Define its associated telephone number and voice-port
 destination-pattern +4155264002
 port 1/0
! Create voip dial-peer 20
dial-peer voice 20 voip
!Define its associated telephone number and IP address
 destination-pattern +4085264001
 sess-target ipv4:10.0.0.1
! Configure serial interface 2/0
interface Serial2/0
 ip address 10.0.0.2 255.0.0.0
 no ip mroute-cache
! Configure RTP header compression
 ip rtp header-compression
 ip rtp compression-connections 25
! Enable RSVP on this interface
 ip rsvp bandwidth 96 96
 fair-queue 64 256 3
 clockrate 128000
! Configure IGRP
gateway igrp 888
 network 10.0.0.0
 network 20.0.0.0
 network 40.0.0.0
The following example shows how to configure VoIP to link users with the PSTN gateway using an FXO connection.
In this example, users connected to the AGM in San Jose can reach PSTN users in Salt Lake City through AGM in Salt Lake City. The AGM in Salt Lake City is connected directly to the PSTN through an FXO interface.
Figure 5-3 illustrates the topology of this connection example.
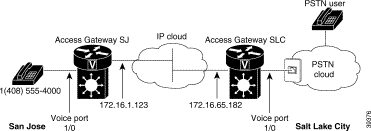
|
Note This example assumes that the company already has established a working IP connection between its two remote offices. |
This is a sample configuration for the SJ site.
! Configure pots dial-peer 1
dial-peer voice 1 pots
 destination-pattern +14085554000
 port 1/0
! Configure voip dial-peer 2
dial-peer voice 2 voip
 destination-pattern +9...........
 session target ipv4:172.16.65.182
! Configure the serial interface
interface serial 2/0
 clock rate 2000000
 ip address 172.16.1.123
 no shutdown
This is a sample configuration for the SLC site.
! Configure pots dial-peer 1
dial-peer voice 1 pots
 destination-pattern +9...........
 port 1/0
! Configure voip dial-peer 2
dial-peer voice 2 voip
 destination-pattern +14085554000
 session target ipv4:172.16.1.123
! Configure serial interface
interface serial 2/0
 ip address 172.16.65.182
 no shutdown
The following example shows how to configure VoIP to link users with the PSTN gateway using an FXO connection in PLAR mode.
In this example, PSTN users in Salt Lake City can dial a local number and establish a private line connection in a remote location. As in the previous example, the AGM SLC in Salt Lake City is connected directly to the PSTN through an FXO interface.
Figure 5-4 illustrates the topology of this connection.

|
Note This example assumes that the company already has established a working IP connection between its two remote offices. |
This is a sample configuration for the SJ site.
! Configure pots dial-peer 1
dial-peer voice 1 pots
 destination-pattern +14085554000
 port 1/0
! Configure voip dial-peer 2
dial-peer voice 2 voip
 destination-pattern +9...........
 session target ipv4:172.16.65.182
! Configure the serial interface
interface serial 2/0
 clock rate 2000000
 ip address 172.16.1.123
 no shutdown
This is a sample configuration for the SLC site.
! Configure pots dial-peer 1
dial-peer voice 1 pots
 destination-pattern +9...........
 port 1/0/0
! Configure voip dial-peer 2
dial-peer voice 2 voip
 destination-pattern +14085554000
 session target ipv4:172.16.1.123
! Configure the voice port
voice port 1/0
connection plar 14085554000
! Configure the serial interface
interface serial 2/0
 ip address 172.16.65.182
 no shutdown
![]()
![]()
![]()
![]()
![]()
![]()
![]()
![]()
Posted: Thu Dec 19 10:06:26 PST 2002
All contents are Copyright © 1992--2002 Cisco Systems, Inc. All rights reserved.
Important Notices and Privacy Statement.