|
|

Before installing the Catalyst 3000, read this chapter carefully.
This chapter covers the following topics:
Follow these guidelines to ensure general safety:
Follow these guidelines when working on equipment powered by electricity.
Electrostatic discharge (ESD) can damage equipment and impair electrical circuitry. It occurs when electronic components are improperly handled and can result in complete or intermittent failures. Always follow ESD-prevention procedures when removing and replacing components. Ensure that the chassis is electrically connected to earth ground using an ESD mat or a ground wire. Wear an ESD-preventive wrist strap, ensuring that it makes good skin contact. To safely channel unwanted ESD voltages to ground, connect the clip to an unpainted surface of the chassis frame. To properly guard against ESD damage and shocks, the wrist strap and cord must operate effectively. If no wrist strap is available, ground yourself by touching the metal part of the chassis.
 | Caution For safety, periodically check the resistance value of the antistatic strap, which should be between 1 and 10 megohm. |
Following are the site requirements for installation.
Choose a clean, dust-free, (preferably) air-conditioned location. Avoid direct sunlight, heat sources, or areas with high levels of EMI (Electro-Magnetic Interference).
Make sure the front and rear panel of the equipment is accessible so that you can monitor the LED indicators and access the control switches. Leaving enough clearance at the front and rear will also allow easier cabling and service.
Two fans, which are located at the rear of the switch, cool the interior by drawing air through vents on the sides and forcing heated air out through holes in the rear. If the internal temperature exceeds 122°F (50°C), a temperature error is reported to the console.
The source electrical outlet should be installed near the switch, be easily accessible, and be properly grounded. Power should come from a building branch circuit. Use a maximum breaker current rating of 20A for 110V or 8A for 230V. To avoid an overload, note the power consumption ratings of the all the equipment connected to the circuit breaker before applying power.
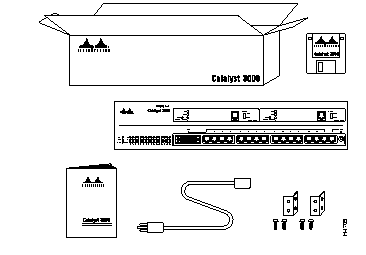
Upon receipt, examine all shipping containers and contents for damage. If any damage has occurred, notify the shipping carrier. Unpack the unit by removing the packing material and lifting it from its protective enclosures. Visually examine the equipment and check the container for related parts and accessories. You should have the following items:
Fill out the warranty registration sheet and mail or fax it to Cisco Systems, Inc. today. Report any missing parts and any damage not related to shipping to your customer service representative.
If you have received your equipment before your site is fully prepared, after inspection, you should keep all of the components in the original shipping containers and store them in a physically and environmentally safe place.
When you are ready to begin the installation, please refer to the next Chapter 5, "Installation" for important instructions and directions.
|
|
