|
|

This chapter provides step-by-step instructions for installing, cabling and verifying the installation for:
A detailed description and installation instructions for all of the optional expansion modules for the Catalyst 3200 are described in Chapter 5, "Expansion Components Installation and Configuration."
The Catalyst 3200 and the Catalyst Matrix mount in a standard 19-inch rack or cabinet. The installation area should be near a power source and should have enough room around the front and rear panels for cabling and access to controls. Use the following procedures for the installation of Catalyst Stack equipment.
If you install the Catalyst 3200 in a closed or multi-unit rack, observe the environmental guidelines from Chapter 3, "Preparing for Installation." Observe the following warnings and use the following steps for a rack or cabinet installation.
 | Warning Do not stack the chassis on any other equipment. If the chassis falls, it can cause severe bodily injury and equipment damage. |
| Warning To prevent bodily injury when mounting or servicing this unit in a rack, you must take special precautions to ensure that the system remains stable. The following guidelines are provided to ensure your safety: |
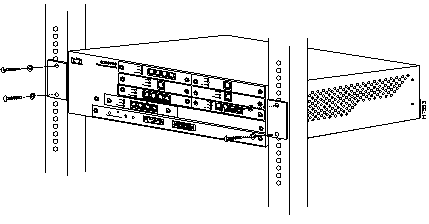
The following steps describe how to mount the Catalyst 3200 or Catalyst Matrix in a rack or cabinet. Only fixed brackets are supplied with these units. If you want to install a sliding pull-out mount, you will need to provide the extra mounting hardware.
Step 1 For this step, use the L-shaped mounting brackets and four 8-mm M4 screws that are supplied with the units. With a Phillips (cross-head) screwdriver, attach the two L-shaped mounting brackets to both sides of the Catalyst 3200 or the Catalyst Matrix with two each 8-mm M4 screws (see Figure 4-2). The position of the brackets are the same on the Catalyst Matrix.

Before starting the next step, be sure you have the proper hardware for mounting the unit to your cabinet or rack.
Step 2 Position the Catalyst 3200 or the Catalyst Matrix in the rack or cabinet and slide it up or down until the rack holes line up with the bracket holes. Attach the Catalyst 3200 to the rack with appropriate mounting screws (see Figure 4-3).
 | Caution Due to weight constraints, place no more than one unit (or the equivalent weight of other equipment) directly on top of another chassis. More than one unit on top of another unit may cause damage to the lower unit. |
The Catalyst 3200 should be mounted in an appropriate mounting rack, but if the situation warrants, such as a shortage of rack space or location constraints, the Catalyst 3200 can be surface mounted. The unit operates at a low noise level, which makes it suitable for a work area or almost anywhere with a large enough flat surface such as a table or desktop. Simply place the unit on a clear and level location. Leave enough room around the unit for ventilation and access to the controls and cable connectors.
There are two Catalyst Stack configurations.
How to cable the Catalyst Stack equipment is described in the next two sections. The first section explains connecting two Catalyst switches back-to-back. The next section describes how to connect Catalyst switches to the Catalyst Matrix.
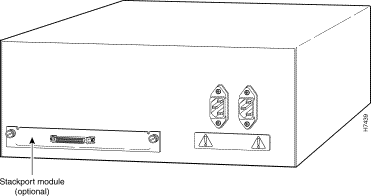
To connect two Catalyst 3000 series switches together, an installed WS-X3004 module must be in the expansion slot in the back of each Catalyst switch. (See Figure 4-4.) For a description of how to install the WS-X3004 rear expansion module into the Catalyst 3200 see Chapter 5, "Expansion Components Installation and Configuration" for the section, "Installing WS-X3004 Stack Port (Rear) Expansion Module." Observe the following statements and cautions and use the following steps to install two Catalyst switches in a back-to-back configuration.
Step 1 Connect one end of the Stack port cable to the Stack port (of the WS-X3004 module) on one Catalyst switch. It does not matter which end of the cable to use. Either end of the Stack port cable can be connected to either one of the Catalyst switches.
Step 2 Connect the other end of the cable to the Stack port on the other Catalyst switch.
The following illustrations, Figure 4-4 and Figure 4-5, show how two Catalyst switches are cabled together. (The cable connector is shown at an angle for illustration purposes.)
Up to eight Catalyst switches can be connected to a Catalyst Matrix. For a detailed description of the Catalyst Matrix see Chapter 5, "Expansion Components Installation and Configuration."
This configuration requires a Catalyst Matrix and a Stack port cable and a WS-X3004 module for each Catalyst switch. The connection is made through one of the eight I/O Stack ports on the back panel of the Catalyst Matrix to the single I/O Stack port on the WS-X3004 installed in the back of each Catalyst switch. Use the following instructions (after mounting the Catalyst switches and Catalyst Matrix in a rack or cabinet) to cable the units together.
Step 1 Attach one end of the Stack port cable to Port 1 (recommended port to use first) on the Catalyst Matrix. (See Figure 4-6.) It does not matter which end of the cable is used and it does not matter if the Catalyst switch or Catalyst Matrix is powered on or off.
| Caution When installing the Stack port cable connector, keep the connector straight as you insert it into the Stack port connector. Inserting the connector at an angle may cause bent pins. (The cable connector in the following figures are shown at an angle for illustration purposes only.) |
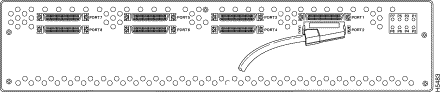
Step 2 Attach the other end of the cable to the WS-X3004 Stack Port connector on the back of a Catalyst switch (see Figure 4-7). Repeat these steps for each Catalyst switch using the next highest numbered port on the Catalyst Matrix.
Before you apply power, inspect the equipment thoroughly. Verify that all cables are installed correctly. Check their routing, so they are not damaged or create a safety hazard. Be sure all equipment is mounted properly and securely.
The following figure, Figure 4-8, is an illustration of several Catalyst switches cabled to a Catalyst Matrix
| Warning Read the installation instructions before you connect the system to its power source. |
| Warning This unit might have more than one power cord. To reduce the risk of electric shock, disconnect the two power supply cords before servicing the unit. |
| Warning This product relies on the building's installation for short-circuit (overcurrent) protection. Ensure that a fuse or circuit breaker no larger than 120 VAC, 15A U.S. (240 VAC, 10A international) is used on the phase conductors (all current-carrying conductors). |
| Warning This device is designed to work with TN power systems. |
| Warning This equipment is intended to be grounded. Ensure that the host is connected to earth ground during normal use. |
| Warning Care must be given to connecting units to the supply circuit so that wiring is not overloaded. |
| Warning A voltage mismatch can cause equipment damage and may pose a fire hazard. If the voltage indicated on the label is different from the power outlet voltage, do not connect the chassis to that receptacle. |
| Caution There are no user serviceable parts inside the Catalyst 3200. Any internal upgrades or service should be performed by Qualified Personnel ONLY. |
Use the following steps to power on your Catalyst Stack units:
Step 1 Ensure that you are using the correct power source.
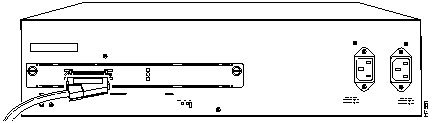
Step 2 Using the supplied power cables, plug the female end of the cables into each of the two AC receptacles on the Catalyst 3200 or each Catalyst Matrix module.
Step 3 Plug the male end of the power cord(s) into a properly grounded electrical outlet.
Step 4 Verify that the power (PWR) LED is on for each module in the Catalyst Matrix (For the Catalyst Matrix LEDs, see the section "Catalyst Matrix Control Panels" in Chapter 5). For the Catalyst 3200, check that the PS1 and PS2 LEDs on the Supervisor Engine module are on. If the PWR LEDs are not on, make sure the power source is working properly. If the outlet is working, but the power LEDs and the fans are not on, see Chapter 10, "Troubleshooting."
Step 5 When the Catalyst 3200 powers on, observe the self-test diagnostic that the unit runs for approximately 6-8 minutes. The DIAG LED on the Supervisor Engine module is on for the duration of the test, turning off when the self-test is complete.
Step 6 If at any time the FAULT LED turns on or is flashing, see Chapter 10, "Troubleshooting."
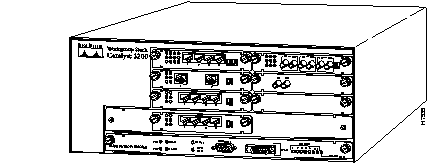
The following, Figure 4-11, Table 4-1, Table 4-2, and Table 4-3, provide details for the front control panel switches, LEDs and connectors on the Supervisor Engine (CPU card).
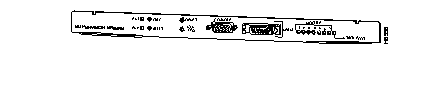
| Switch | Function |
|---|---|
| RESET | Full system reset of software and hardware |
| SYS REQ | Initiates a set of system request menus on the attached console |
| LED | Color | Function when illuminated |
|---|---|---|
| PS1
PS2 | Green | Indicates Power Supplies are functioning properly |
| DIAG | Yellow | Running self- diagnostic test |
| FAULT | Red | When on, an unrecoverable error has occurred
If blinking, see Chapter 10, "Troubleshooting," for details |
| modules | Green
| Numbers 1 to 7; Indicate a module is installed in that (front) slot
Module 1 is top left. Numbering sequence is left to right, top to bottom Number 8 indicates a rear Stack Port module is installed |
| Connector | Function |
|---|---|
| CONSOLE EIA(RS)-232 (DB-9 conn.) | Console connection for viewing configuration menus and diagnostics |
| SPAN AUI - DB15 connector | Switch Probe ANalyser port
This port is for monitoring only. Only one port at a time can be monitored. The monitoring is set through the console or SNMP |
|
|