|
|

 |
Warning Before you install, operate, or service the system, read the Site Preparation and Safety Guide. This guide contains important safety information you should know before working with the system. Statement 200 |
|
Warning Only trained and qualified personnel should be allowed to install, replace, or service this equipment. Statement 1030 |
This chapter describes how to prepare your site for the installation of your switch and contains these sections:
 |
Note See the "Site-Planning Checklist" section to help ensure that you complete all site-planning activities before you install the switch. |
|
Note Catalyst 2948G, 2948G-GE-TX, and 2980G switches have internal power supplies. All of the switches support Cisco Redundant Power System (RPS) for redundant operation. |
This section provides site power requirements and heat dissipation specifications for the Catalyst 2948G, 2948G-GE-TX, and 2980G switches. You should verify site power before you install a switch.
Power requirements can vary for each Catalyst switch. Knowing the power requirements can be useful for planning the power distribution system needed to support the switches. Heat specifications are used for determining the air-conditioning requirements for an installation.
|
Note Refer to the Site Preparation and Safety Guide for site power requirements, preinstallation requirements, and EMI recommendations. |
Table 2-1 describes the power requirements and heat dissipation specifications for the Catalyst 2948G, 2948G-GE-TX, and 2980G switches.
Table 2-1 Power Requirements and Heat Dissipation Specifications
|
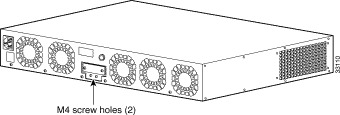
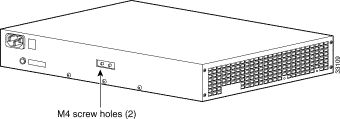
Two system (earth) grounding holes are provided in an enclosure near the power supplies.
|
Note These guidelines do not apply to the Catalyst 2948G-GE-TX switches. |
See Figure 2-1 for the location of the grounding holes on the Catalyst 2948G switches and Figure 2-2 for the location on the Catalyst 2980G switches.
To make an adequate grounding connection, you need these components and tools:
The grounding lugs are not available from Cisco Systems; any electrical-connector vendor can provide this lug.
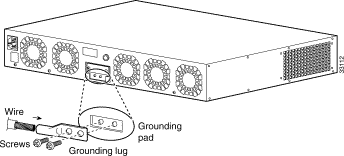
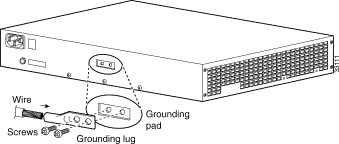
This procedure describes how to connect the Catalyst 2948G, 2948G-GE-TX, and 2980G switches to earth ground. We strongly recommend that you complete this procedure before connecting system power or turning on your switch.
To attach the grounding lug and cable to the grounding pad on the Catalyst 2948G, 2948G-GE-TX, and 2980G switches, follow these steps:
Step 2 Insert the stripped end of the grounding wire into the open end of the grounding lug.
Step 3 Use the crimping tool to secure the grounding wire in place in the grounding lug.
Step 4 Locate the grounding pad on the switch.
See Figure 2-3 for the location of the grounding pad on the Catalyst 2948G switch and Figure 2-4 for the Catalyst 2980G switch.
Step 5 Remove the label that covers the grounding pad.
Step 6 Place the grounding lug against the grounding pad on the rear panel of the switch.
Step 7 Install locking washers; tighten them to secure the grounding lug to the grounding pad.
Step 8 Insert two screws through the holes in the grounding lug and the grounding pad. Ensure that the grounding lug and the attached wire will not interfere with other switch hardware or rack equipment.
Step 9 Prepare the other end of the grounding wire and connect it to an appropriate grounding point at your site to ensure adequate earth ground for the switch.
Table 2-2 lists the site-planning activities that you should complete before you install the Catalyst 2948G, 2948G-GE-TX, and 2980G switches. Completing each activity helps ensure a successful switch installation.
Table 2-2 Site-Planning Checklist
![]()
![]()
![]()
![]()
![]()
![]()
![]()
![]()
Posted: Thu Nov 20 07:23:20 PST 2003
All contents are Copyright © 1992--2003 Cisco Systems, Inc. All rights reserved.
Important Notices and Privacy Statement.