|
|

This appendix describes how to install, upgrade, and maintain the Cisco Catalyst 1800 Token Ring switch. Before installing a Catalyst 1800 module, turn off the Token Ring switch.
This chapter contains the following sections:
Complete the following procedure to install an 8-port switch module into the Catalyst 1800 chassis.
If you are starting with a Catalyst 1800 chassis without any switch modules installed or you need to replace the switch module, follow these instructions to install an 8-port switch module.
Step 1 To remove the original 8-port switch module, unscrew the two screws fastening the switch and pull the module out of the chassis.
Step 2 To install the new module, slide it into slot 1 (the bottom slot) and secure the board into the chassis using the two screws on each side of the board.
Step 3 Locate the power switch on the power supply and turn it to the ON position. The POST routine, a series of diagnostic tests, completes in less than a minute.
Before installing the Catalyst 1800 switch, turn it off. The switch modules are not hot-swappable.
If you want to upgrade the Catalyst 1800 switch to a 16-port device, or replace the switch modules on a 16-port Catalyst 1800 switch, follow these instructions:
Step 1 Insert the first Catalyst 1800 module into the top slot (slot 2).
Step 2 Insert the second Catalyst 1800 module into the bottom slot (slot 1).
Step 3 Turn on the power switch. The POST diagnostic tests complete in less than a minute and the System Status LED illuminates green.
Follow this procedure to install a Catalyst 1800 4TR+FDDI board into a chassis that already contains a Catalyst 1800 Token Ring-8 board. For instructions on downloading files, see the section "Upgrading to New Software Releases through the Serial Port."
Step 1 Power off the chassis and remove the Token Ring-8 board from the bottom slot.
Step 2 Insert the Catalyst 1800 4TR+FDDI board into the bottom slot and the Token Ring-8 board into the top slot and power on the chassis.
Step 3 Turn the chassis back on.
Use a terminal emulation program that supports the Xmodem protocol to download the new image.
Step 4 Attach the console cable from the terminal emulation system to the front console port on the Catalyst 1800 switch.
Step 5 Set your terminal emulation program communication speed to 38400. (At 38400 a download normally takes 3 to 4 minutes.)
Step 6 Type the software download command. The monitor prompt appears (=>).
If unreadable bytes are displayed on your screen or the prompt does not appear, press Return several times so that the monitor can autobaud the serial line.
Step 7 At the Monitor prompt, type do. The message Downloading appears.
Step 8 The Monitor is now ready to accept the Xmodem download file.
Step 9 Start the Xmodem download procedure.
Step 10 Once the image has been downloaded, a Download Complete message appears and the Monitor prompt is displayed.
Step 11 Type go. Messages display to indicate the image is being stored in Flash memory.
Step 12 You must cycle power to start the new, downloaded image.
Step 13 The switch will start running the new code when you power it on.
Step 14 The Password Menu will be displayed after boot-up.
When you receive new software image files, you can update your system software. Before you start, make sure that
Perform these steps:
Step 1 Attach the console cable from the terminal emulation system to the front console port on the Catalyst 1800 switch.
Step 2 Set your terminal emulation program communication speed to 38400 baud. (At this speed, a download normally takes 3 to 4 minutes.)
Step 3 Type the software download command (sys do y). The monitor prompt appears (=>).
If unreadable bytes display on your screen or the prompt does not appear, press Return several times so that the monitor can autobaud the serial line.
Step 4 At the monitor prompt, type do. The following message appears:
Downloading
The monitor is now ready to accept the image file(s).
Step 5 Start the Xmodem download procedure and type the download image name, using the appropriate file. See the Release Notes for the software file names.
Step 6 Once the image has been downloaded, the following message appears:
Download Complete
The monitor prompt redisplays.
Step 7 Type go. Messages display, indicating that the image is being stored in Flash memory for use by subsequent reboots.
Step 8 To use the new downloaded image, turn the power off, then on.
The Password menu appears.
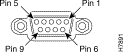
The Catalyst 1800 switch is a DTE that expects signals from either a DCE or a DTE connected via a null modem. The following table shows the pin assignments and signal directions for the DB-9 connector.
| Pin Number | Signal | Direction |
|---|---|---|
8 | CTS (Clear to Send) | <— (The signal is received.) |
9 | Not connected | N/A |
1 | Not connected | N/A |
4 | DTR (Data Terminal Ready) | —> (The signal is sent.) |
7 | RTS (Request to Send) | —> |
2 | RD (Receive Data) | <— |
5 | GND (Ground) | N/A |
3 | TD (Transmit Data) | —> |
6 | DSR (Data Set Ready) | <— |
The following illustrations show the pin assignments on the DB-9 connectors.
 Male DB-9 Connector
 Female DB-9 Connector
The power supplies (either one or two) are accessed from the rear of the Catalyst 1800 switch. To remove a power supply, follow this procedure:
Step 1 Turn the power supply off using the switch located on the power supply panel.
Step 2 Remove the power cord.
Step 3 Loosen the two screws holding the power supply in place.
Step 4 Pull the supply directly back and out of the Catalyst 1800 switch.
Step 5 To insert the new power supply, slide it directly into the empty slot in the rear of the Catalyst 1800 switch.
Step 6 Push it firmly into place to insure the connector inside the unit engages.
Step 7 Secure the power supply by tightening the two screws into the Catalyst 1800 chassis.
Step 8 Connect a power cord to each power supply.
Step 9 Turn the power supply (or supplies) on using the switch on the power supply panel(s).
![]()
![]()
![]()
![]()
![]()
![]()
![]()
![]()
Posted: Tue Dec 17 18:47:27 PST 2002
All contents are Copyright © 1992--2002 Cisco Systems, Inc. All rights reserved.
Important Notices and Privacy Statement.