|
|

Table Of Contents
Configuring the MNLB Forwarding Agent
Enabling Cisco Express Forwarding
Configuring the Router as a Forwarding Agent
Monitoring the Forwarding Agent
3
Configuring the MNLB Forwarding Agent
This chapter describes how to configure a Cisco router as an MNLB Forwarding Agent to operate in conjunction with a Cisco LocalDirector serving as Services Manager
The components of the MNLD Feature Set for LocalDirector are described in Chapter 1, " Overview: Load Balancing with the MNLB Feature Set for LocalDirector".
Configuration Tasks
The following sections describe forwarding agent configuration tasks.
•
Enabling Cisco Express Forwarding
•
Enabling Cisco Express Forwarding
Cisco Express Forwarding (CEF) is advanced Layer 3 IP switching technology. CEF optimizes network performance and scalability for networks with large and dynamic traffic patterns, such as the Internet, on networks characterized by intensive Web-based applications, or interactive sessions.
To enable CEF, use the following command in global configuration mode:
Note
Enabling NetFlow Switching
We recommend that you enable NetFlow switching on all interfaces that will carry MNLB traffic, although it is not required. To enable NetFlow switching, use the following commands, beginning in global configuration mode:
Normally the size of the NetFlow cache will meet your needs. However, you can increase or decrease the number of entries maintained in the cache by using the following command in global configuration mode
Router(config)# ip flow-cache entries numberChanges the number of entries maintained in the NetFlow cache. The number of entries can be 1024 to 524288. The default is 64536.
Enabling Multicast Routing
You must enable multicast routing on all interfaces to the services manager.
To enable multicast routing on all interfaces, use the following command in global configuration mode:
To have the router join a multicast group and enable IGMP, use the following command in interface configuration mode:
Joins a multicast group.
1 This command must be configured on all interfaces that will listen for the services manager multicasts.
2 The group address must match that configured within the services manager configuration.
Configuring the Router as a Forwarding Agent
To configure the router as a forwarding agent, use the following commands, beginning in global configuration mode:
Note
If you are running CASA, you must configure ip pim dense. Some Forwarding Agents might be many hops away, so TTL=1 might not work in some cases.
Monitoring the Forwarding Agent
To monitor the status of the forwarding agent, use the following commands in EXEC mode:
Configuration Examples
This section provides the following configuration examples:
•
•
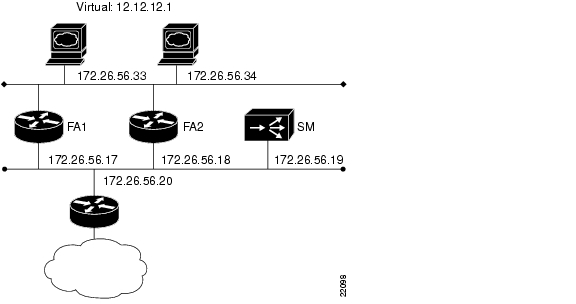
The network configured is shown in .
Figure 2 MultiNode Load Balancing Network Configuration
Forwarding Agent Configuration for FA2
In the following example all disabled interfaces have been omitted to simplify the display.
FA2#wr tBuilding configuration...Current configuration:!version 12.0service timestamps debug uptimeservice timestamps log uptimeno service password-encryptionservice udp-small-serversservice tcp-small-servers!hostname FA2!!microcode CIP flash slot0:cip26-5microcode reloadip subnet-zerono ip domain-lookup!ip cef distributedip casa 206.10.20.34 224.0.1.2forwarding-agent 1637!interface Ethernet0/0ip address 172.26.56.18 255.255.255.224no ip directed-broadcastip route-cache flowip igmp join-group 224.0.1.2no ip mroute-cache!interface Ethernet0/1ip address 172.26.56.37 255.255.255.224no ip directed-broadcast!!!router eigrp 777network 172.26.0.0!no ip classless!line con 0exec-timeout 0 0transport input noneline aux 0line vty 0 4exec-timeout 0 0login!endServices Manager Configuration for SM
SM# wr tBuilding configuration...: Saved: LocalDirector 420 Version 3.0.0.127syslog output 20.3no syslog consoleenable password 000000000000000000000000000000 encryptedhostname SMno shutdown ethernet 0no shutdown ethernet 1no shutdown ethernet 2no shutdown ethernet 3interface ethernet 0 autointerface ethernet 1 autointerface ethernet 2 autointerface ethernet 3 automtu 0 1500mtu 1 1500mtu 2 1500mtu 3 1500multiring allno secure 0no secure 1no secure 2no secure 3ping-allow 0ping-allow 1ping-allow 2ping-allow 3ip address 172.26.56.19 255.255.255.248route 172.26.10.249 255.255.255.255 172.26.56.20 1route 206.10.20.33 255.255.255.255 172.26.56.17 1route 206.10.20.34 255.255.255.255 172.26.56.18 1no rip passivefailover ip address 0.0.0.0failoverpassword ciscotelnet 161.0.0.0 255.0.0.0no snmp-server contactno snmp-server locationcasa service-manager port 1638casa service-manager multicast-ttl 60tftp-server 172.26.10.249 /tftpboot/LDvirtual 172.26.56.13:0:0:tcp isvirtual 172.26.56.2:0:0:tcp isredirection 172.26.56.13:0:0:tcp dispatched casa wildcard-ttl 60 fixed-ttl 60 igmp 224.0.1.2 port 1637redirection 172.26.56.2:0:0:tcp dispatched casa wildcard-ttl 60 fixed-ttl 60 igmp 224.0.1.2 port 1637real 172.26.56.34:0:0:tcp isreal 172.26.56.33:0:0:tcp isreal 172.26.56.6:0:0:tcp isreal 172.26.56.10:0:0:tcp isbind 172.26.56.13:0:0:tcp 172.26.56.33:0:0:tcpbind 172.26.56.13:0:0:tcp 172.26.56.34:0:0:tcpbind 172.26.56.2:0:0:tcp 172.26.56.10:0:0:tcpbind 172.26.56.2:0:0:tcp 172.26.56.6:0:0:tcp: end
![]()
![]()
![]()
![]()
![]()
![]()
![]()
![]()
Posted: Mon Jun 20 12:57:25 PDT 2005
All contents are Copyright © 1992--2005 Cisco Systems, Inc. All rights reserved.
Important Notices and Privacy Statement.