|
|

You can configure LocalDirector to specify general parameters, and also define real and virtual servers.
Determine network and server design, and diagram the implementation. Ensure that any virtual IP address you configure is from a valid IP network. If the virtual address is to be accessed from the Internet, the IP address must be part of a NIC-allocated network number.
The section, "Configuration Examples," later in this chapter provides details for implementing different LocalDirector configurations.
Connect to the LocalDirector via the console with settings 9600, 8-N-1 as described in Chapter 2, "Installing LocalDirector." Enter the enable command in unprivileged mode and configure terminal in privileged mode to access LocalDirector configuration commands. Configure LocalDirector as follows:
Step 1 Assign the LocalDirector IP address and subnet mask with the ip address command.
Step 2 Change the privileged mode password with the enable password command.
Step 3 If preferred, change the host name for the LocalDirector command line prompt with the hostname command.
Step 4 Define virtual servers with the virtual command and specify the type of port traffic the virtual server will load balance.
Step 5 Set the type of load balancing for each virtual server with the predictor command.
Step 6 Define real servers with the real command and specify the port traffic that will run on the server.
Step 7 Associate each virtual server to real server(s) with the bind command.
Step 8 Designate real and virtual servers as in service with the in-service command.
Step 9 Check the configuration by using the write terminal, show real, show virtual, and show bind commands.
Step 10 Store the configuration in flash memory with the write memory command. The configuration stored in flash memory can be verified with the show config command.
The basic configuration is complete. Exit configuration mode by entering ^Z, and exit privileged mode with the disable command.
The following is an example of a basic configuration with one virtual server bound to two real servers:
LocalDirector# show configuration
: Saved
: Local Director Version 1.6.3
syslog output 20.3
no syslog console
hostname LocalDirector
interface ethernet 0 auto
interface ethernet 1 auto
ip address 192.168.1.89 255.255.255.0
no rip passive
no failover
virtual 192.168.1.99 is
predictor 192.168.1.99 leastconns
real 192.168.1.2 is
real 192.168.1.1 is
bind 192.168.1.99 192.168.1.1
bind 192.168.1.99 192.168.1.2
no snmp-server contact
no snmp-server location
LocalDirector#
If a server is not responding to requests or responding with TCP RSTs, LocalDirector will fail the server. There are two cases when a real server will respond with a TCP RST:
Values set with the reassign and threshold commands are used to determine if a server is considered failed, and these commands can be used to adjust how quickly a server that is not accepting connections will be taken out of service. The default threshold value is 8, and the default reassign value is 3. Each real server can have different threshold and reassign values.
The reassign command controls how many times a packet from a requesting client is sent to a non-responding server before it is reassigned to another server. The default is three attempts. After the third packet receives no response or a TCP RST from the server, the fourth packet is sent to another server.
Each reassign process increments the threshold tally by one. When the tally reaches the threshold value, the server is considered failed. With a default threshold value of 8, the reassign process will happen eight times before the server is considered failed.
To increase how quickly servers are considered failed, reduce the threshold and reassign values. To keep servers that are refusing connections from being failed by the LocalDirector, increase the threshold and reassign values. For example, a site receiving 400 connections per second may need to increase the threshold value to 30.
The retry command determines how quickly a server is put in "testing" mode and given another packet after being failed by this process. The retry default is 60 seconds. On the sixty first second, a packet from a virtual server will be directed to the server to determine if it responds. If that packet receives a response, the server is no longer in the failed state, and it will be put back in-service with the reassign and threshold tallies reset to zero. To increase how quickly a server is given a packet after being failed by LocalDirector, reduce the value of the retry command.
The autounfail command is used to bring a failed server back in-service immediately if it responds with data on an existing connection (established before it was failed by the LocalDirector). The LocalDirector will put the server into testing mode, and if it responds to a new live connection it will then be put in-service. If the server does not accept the new connection (either by not answering or by responding with a TCP RST), then it will be marked as failed again.
When autounfail is on (it is by default), LocalDirector will bring the server back in-service as soon as it responds to an existing connection. This will bring a server back in service before waiting for the retry time to pass, and it will only work with servers that are responding with data.
Use the data command to limit the number of connections sent to a server that is not sending data. When a real machine reaches the number of unanswered connections set with the data command, the LocalDirector will check to see if other machines bound to the virtual server are also at 80 percent of their threshold capacity (DataIn value). If the other machines are close to reaching this value, then the LocalDirector assumes the site is busy and will not fail the machine.
The timeout command is used to set the number of minutes an idle connection to the server will be maintained. This will prevent incomplete connections from being counted toward LocalDirector load balancing.
This section provides example server configurations, including the following:
In this example, the LocalDirector is load balancing all TCP traffic over two servers to provide web services. Figure 3-1 shows the network configuration required.

All traffic destined for virtual IP address 192.168.1.99 is load balanced across real servers with IP addresses 192.168.1.1 and 192.168.1.2. Only the virtual server appears in the Domain Name System (DNS). The following example shows the commands used to set up this configuration:
The enable command starts privileged mode. Then configure t starts configuration mode:
LocalDirector> enable
Password:
LocalDirector# configure t
The ip address command specifies LocalDirector IP address 192.168.1.89, and subnet mask 255.255.255.0:
LocalDirector(config)# ip address 192.168.1.89 255.255.255.0
The interface ethernet command with the auto option automatically determines the speed of the Ethernet interface:
LocalDirector(config)# interface ethernet 0 auto
LocalDirector(config)# interface ethernet 1 auto
The no failover command indicates that the failover option is not being used:
LocalDirector(config)# no failover
The name command is used to identify 192.168.1.99 as www.site.com, and then the virtual command is used to define www.site.com as a virtual server:
LocalDirector(config)# name 192.168.1.99 www.site.com
LocalDirector(config)# virtual www.site.com
The name command is used to identify IP address 192.168.1.1 as server1 and 192.168.1.2 as server2:
LocalDirector(config)# name 192.168.1.1 server1
LocalDirector(config)# name 192.168.1.2 server2
The real command is used to identify server1 and server2 as real servers, and the is (in-service) option enables the real servers to start accepting connections:
LocalDirector(config)# real server1 is
LocalDirector(config)# real server2 is
The bind command associates www.site.com with server1 and server2 and establishes the load-balancing relationship between the virtual and real servers:
LocalDirector(config)# bind www.site.com server1 server2
The is (in-service) command brings the virtual server in-service:
LocalDirector(config)# is virtual www.site.com
Finally, the write mem command saves the new settings:
LocalDirector(config)# write mem
Building configuration...
[OK]
Except for failover, the default settings for LocalDirector were not changed in this example:
Use the write terminal command to view the running configuration before it is saved. View the saved configuration with the show configuration command, as follows:
LocalDirector# show configuration
: Saved
: Local Director Version 1.6.3
syslog output 20.3
no syslog console
hostname LocalDirector
interface ethernet 0 auto
interface ethernet 1 auto
ip address 192.168.1.89 255.255.255.0
no rip passive
no failover
virtual 192.168.1.99 is
predictor 192.168.1.99 leastconns
real 192.168.1.2 is
real 192.168.1.1 is
name 192.168.1.1 server1
name 192.168.1.2 server2
name 192.168.1.99 www.site.com
bind 192.168.1.99 192.168.1.1
bind 192.168.1.99 192.168.1.2
no snmp-server contact
no snmp-server location
LocalDirector#
In this example, four virtual addresses are bound to a single web server, as shown in Figure 3-2, allowing you to provide multiple DNS entries with one server. In other words, one real server supports multiple domain names. Virtual IP addresses 192.168.1.99, 192.168.1.100, 192.168.1.101, and 192.168.1.102 are identified as www.pete.com, www.joe.com, www.scott.com, and www.mary.com, respectively. Port 80 traffic for each virtual IP address is bound to different ports on real server IP 192.168.1.2.
All web traffic destined for www.pete.com will access information on real server 192.168.1.2 through port 8000. Traffic destined for www.joe.com will access information on real server 192.168.1.2 through port 8001, and so on.
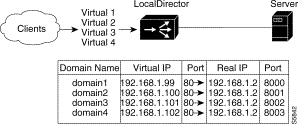
Also, by defining a virtual server as an IP address and a port, you can restrict traffic to a specific port. Port 80 is specified for each of the virtual servers, and ports 8000, 8001, 8002, and 8003 are specified for the real server. The virtual server ports and real server ports are bound to each other directly. In addition, if the application running on port 8000 fails, the entire server will not be taken out of service by the LocalDirector solution; the remaining ports will continue to accept connections.
A configuration example follows:
The name command is used to identify the IP addresses of the virtual and real servers:
LocalDirector(config)# name 192.168.1.99 www.pete.com
LocalDirector(config)# name 192.168.1.100 www.joe.com
LocalDirector(config)# name 192.168.1.101 www.scott.com
LocalDirector(config)# name 192.168.1.102 www.mary.com
LocalDirector(config)# name 192.168.1.2 server
The real command is used to identify the IP address named "server" as a real server that is accepting connections on ports 8000, 8001, 8002, and 8003:
LocalDirector(config)# real server 8000
LocalDirector(config)# real server 8001
LocalDirector(config)# real server 8002
LocalDirector(config)# real server 8003
The virtual command is used to identify the named IP addresses "www.pete.com," "www.joe.com," "www.scott.com," and "www.mary.com" as virtual servers accepting connections on port 80:
LocalDirector(config)# virtual www.pete.com 80
LocalDirector(config)# virtual www.joe.com 80
LocalDirector(config)# virtual www.scott.com 80
LocalDirector(config)# virtual www.mary.com 80
The bind command is used to direct port 80 network traffic from each virtual server to a different port on the real server:
LocalDirector(config)# bind www.pete.com 80 server 8000
LocalDirector(config)# bind www.joe.com 80 server 8001
LocalDirector(config)# bind www.scott.com 80 server 8002
LocalDirector(config)# bind www.mary.com 80 server 8003
The is (in-service) command is used with the all option to indicate that all ports of the real server are in service:
LocalDirector(config)# is real server all
The is (in-service) command is used to indicate that the virtual servers are in service:
LocalDirector(config)# is virtual www.pete.com 80
LocalDirector(config)# is virtual www.joe.com 80
LocalDirector(config)# is virtual www.scott.com 80
LocalDirector(config)# is virtual www.mary.com 80
The show bind command is used to view the association between the virtual server ports and real server ports:
LocalDirector(config)# show bind
               Virtual                      Real
   www.pete.com       80 (IS)
                                   server     8000 (IS)
    www.joe.com       80 (IS)
                                   server     8001 (IS)
  www.scott.com       80 (IS)
                                   server     8002 (IS)
   www.mary.com       80 (IS)
                                   server     8003 (IS)
LocalDirector(config)#
You can combine multiple virtual and real servers so that each virtual server sends network traffic to the same port across real servers, as shown in Figure 3-3. All traffic destined for virtual server 192.168.1.100 is load balanced across the three real servers on port 8001. Traffic destined for virtual server 192.168.1.101 is load balanced across the real servers on port 8002.
A combination of virtual servers and real servers can also be used to load balance traffic across server clusters, as shown in Figure 3-4.
Each virtual server can have a different load balancing option set with the predictor command. For example, 192.168.1.100 can be configured to use the leastconns option, and 192.168.1.101 can be configured to use the weighted option.
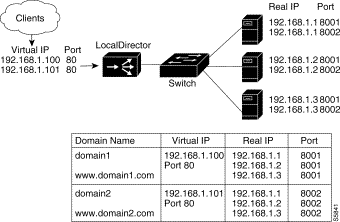
A configuration example follows:
The real command is used to identify three real servers, each accepting connections on ports 8001 and 8002. The is (in-service) option is used to indicate that the real servers are in service:
LocalDirector(config)# real 192.168.1.1 8001 is
LocalDirector(config)# real 192.168.1.1 8002 is
LocalDirector(config)# real 192.168.1.2 8001 is
LocalDirector(config)# real 192.168.1.2 8002 is
LocalDirector(config)# real 192.168.1.3 8001 is
LocalDirector(config)# real 192.168.1.3 8002 is
The virtual command is used to create two virtual servers accepting connections on port 80:
LocalDirector(config)# virtual 192.168.1.100 80
LocalDirector(config)# virtual 192.168.1.101 80
The bind command is used to direct network traffic from port 80 on the two virtual servers to ports 8001 and 8002 on the three real servers:
LocalDirector(config)# bind 192.168.1.100 80 192.168.1.1 8001
LocalDirector(config)# bind 192.168.1.100 80 192.168.1.2 8001
LocalDirector(config)# bind 192.168.1.100 80 192.168.1.3 8001
LocalDirector(config)# bind 192.168.1.101 80 192.168.1.1 8002
LocalDirector(config)# bind 192.168.1.101 80 192.168.1.2 8002
LocalDirector(config)# bind 192.168.1.101 80 192.168.1.3 8002
The is (in-service) command is used to bring the virtual servers in service:
LocalDirector(config)# is virtual 192.168.1.100 80
LocalDirector(config)# is virtual 192.168.1.101 80
The show bind command is used to view the association between the virtual and real servers:
LocalDirector(config)# show bind
               Virtual                      Real
  192.168.1.100       80 (IS)
                              192.168.1.3     8001 (IS)
                              192.168.1.2     8001 (IS)
                              192.168.1.1     8001 (IS)
  192.168.1.101       80 (IS)
                              192.168.1.3     8002 (IS)
                              192.168.1.2     8002 (IS)
                              192.168.1.1     8002 (IS)
LocalDirector(config)#
In Figure 3-4, TCP connections to www.pete.com are load balanced across real servers 192.168.1.1, 192.168.1.2, and 192.168.1.3. Connections to www.joe.com are load balanced across servers 192.168.1.4, 192.168.1.5, and 192.168.1.6.
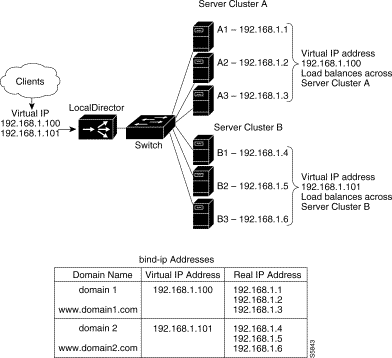
A configuration example follows:
The real command is used to identify the six real servers, and the is (in-service) option is used to indicate that the real servers are in service:
LocalDirector(config)# real 192.168.1.1 is
LocalDirector(config)# real 192.168.1.2 is
LocalDirector(config)# real 192.168.1.3 is
LocalDirector(config)# real 192.168.1.4 is
LocalDirector(config)# real 192.168.1.5 is
LocalDirector(config)# real 192.168.1.6 is
The virtual command is used to identify the two virtual servers:
LocalDirector(config)# virtual 192.168.1.100
LocalDirector(config)# virtual 192.168.1.101
The bind command is used to direct network traffic from virtual server 192.168.1.100 to real servers 192.168.1.1, 192.168.1.2, and 192.168.1.2, and to direct network traffic from virtual server 192.168.1.101 to real servers 192.168.1.4, 192.168.1.5, and 192.168.1.6:
LocalDirector(config)# bind 192.168.1.100 192.168.1.1 192.168.1.2 192.168.1.3
LocalDirector(config)# bind 192.168.1.101 192.168.1.4 192.168.1.5 192.168.1.6
The is (in-service) command is used to bring the virtual servers in service:
LocalDirector(config)# is virtual 192.168.1.100
LocalDirector(config)# is virtual 192.168.1.101
The show bind command is used to view the association between the virtual and real servers:
| LocalDirector(config)# show bind | ||
|---|---|---|
| Virtual | Real | |
| 192.168.1.100 | default (IS) |
|
| 192.168.1.3 default (IS) | |
| 192.168.1.2 default (IS) | |
| 192.168.1.1 default (IS) | |
| 192.168.1.101 | default (IS)
|
|
| 192.168.1.6 default (IS) | |
| 192.168.1.5 default (IS) | |
| 192.168.1.4 default (IS) | |
| LocalDirector(config)# | ||
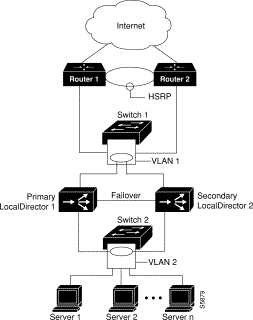
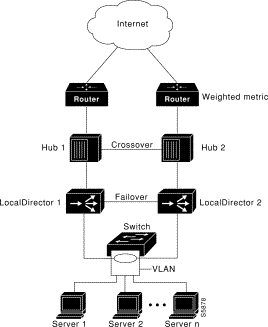
Figure 3-5 and Figure 3-6 show highly redundant, fault-tolerant configurations. All ports on the switches must be on the same virtual LAN (VLAN).
Using Cisco 4500 Series routers and Catalyst 5000 Series switches as examples, the following commands are used to implement this configuration. This assumes that you are connected to the unit (via the console or Telnet) and are in configuration mode.
The following provides a command summary and example for configuring the routers:
network <ip address>
offset-list <access-list number or 0 for all networks> in|out <offset>
router rip
network 192.168.1.0
offset-list 0 out 1
In the example above, router rip accesses the RIP menu. The network command specifies that the router will broadcast RIP messages for 192.168.1.0. The offset-list command is used to add 1 to the metric (hop count) associated with the route. This is done on the secondary router. The primary router is given exactly the same commands without the offset-list command.
The following provides a command summary and example for configuring the switches:
set vlan <vlan id> <module/port....>
set vlan 2 1/1,2/1-12
The set vlan command creates a VLAN called vlan 2 which consists of module 1, port 1 and module 2, ports 1 through 12.
TCP services can be directed to specific servers. Figure 3-7 illustrates how to send HTTP traffic to Servers A and B, and direct all other traffic to Servers C and D. Two virtual servers have IP address 192.168.1.100; one accepts only HTTP traffic (port 80), and the other accepts all other connections (default).
Names can also be used to refer to the real and virtual servers in this example.
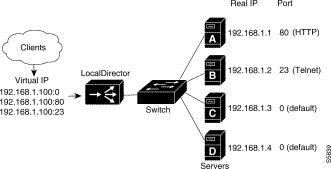
A sample configuration follows:
The real command is used to identify two real servers accepting connections on port 80 and two real servers accepting default traffic:
LocalDirector(config)# real 192.168.1.1 80 is
LocalDirector(config)# real 192.168.1.2 80 is
LocalDirector(config)# real 192.168.1.3 is
LocalDirector(config)# real 192.168.1.4 is
The virtual command is used to identify two virtual servers for IP address 192.168.1.100, one accepting connections on port 80 and the other accepting default traffic:
LocalDirector(config)# virtual 192.168.1.100 80
LocalDirector(config)# virtual 192.168.1.100
The bind command is used to direct traffic for virtual server 192.168.1.100, port 80 to port 80, on real servers 192.168.1.1 and 192.168.1.2:
LocalDirector(config)# bind 192.168.1.100 80 192.168.1.1 80

192.168.1.2 80
The bind command is used to direct all other connections (not port 80) for virtual server 192.168.1.100 to real servers 192.168.1.3 and 192.168.1.4:
LocalDirector(config)# bind 192.168.1.100 192.168.1.3 192.168.1.4
The show bind command is used to view the association between the virtual and real servers:
| LocalDirector(config)# show bind | |||
|---|---|---|---|
| Virtual |
| Real |
|
| 192.168.1.100 | 80 (IS) |
|
|
| 192.168.1.2 | 80 (IS) | |
| 192.168.1.1 | 80 (IS) | |
| 192.168.1.100 | default (IS) |
|
|
| 192.168.1.4 default (IS) | ||
| 192.168.1.3 default (IS) | ||
| LocalDirector(config)# | |||
The is (in-service) command is used to bring the virtual servers in service:
LocalDirector(config)# is virtual 192.168.1.100 80
LocalDirector(config)# is virtual 192.168.1.100
With the maxconns command you can specify the maximum number of connections that each real server can have at one time. A server administrator can set the maximum connections to a level that avoids exceeding the capacity threshold of the server. Often, server administrators have a good idea of the load that a server can bear, and the maxconns command can be used to prevent a server from failing due to capacity overload. Clients requesting connections to a server farm with no available connections will receive a timeout message. For more information about optimizing server response time, see Appendix B, "Load Balancing Options."
A higher percentage of connections can be directed to servers with increased performance. This is done by selecting the weighted option of the predictor command and setting values with the weight command.
Figure 3-8 shows four servers with varying performance indexes, maximum connections settings, and weight values set. In this example, a weight of 2 is assigned to the HP 9000 server, which will send 13 percent of the connections to that server. This particular server cannot accept more than 500 simultaneous connections, so maxconns is set to 500. The same reasoning applies to the Pentium 200 MHz server and the two SPARCStations.
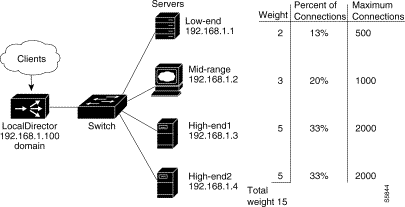
A sample configuration follows:
The virtual command is used to identify 192.168.1.100 as a virtual server. The is (in-service) option indicates that it is in service:
LocalDirector(config)# virtual 192.168.1.100 is
The name command is used to associate a name to the virtual server:
LocalDirector(config)# name 192.168.1.100 www.site.com
The real command is used to identify four real servers. The is (in-service) option indicates that they are in service:
LocalDirector(config)# real 192.168.1.1 is
LocalDirector(config)# real 192.168.1.2 is
LocalDirector(config)# real 192.168.1.3 is
LocalDirector(config)# real 192.168.1.4 is
The name command is used to associate names to the real servers:
LocalDirector(config)# name 192.168.1.1 HP9000
LocalDirector(config)# name 192.168.1.2 pentium200
LocalDirector(config)# name 192.168.1.3 sparc1
LocalDirector(config)# name 192.168.1.4 sparc2
The bind command is used to direct traffic for virtual server www.site.com to real servers HP9000, pentium200, sparc1, and sparc2:
LocalDirector(config)# bind www.site.com HP9000 pentium200 sparc1 sparc2
The predictor command is used to set load balancing to the weighted option:
LocalDirector(config)# predictor www.site.com weighted
The weight command is used to assign weight values to each of the real servers:
LocalDirector(config)# weight HP9000 2
LocalDirector(config)# weight pentium200 3
LocalDirector(config)# weight sparc1 5
LocalDirector(config)# weight sparc2 5
The maxconns command is used to limit the number of connections that each real server can accept:
LocalDirector(config)# maxconns HP9000 500
LocalDirector(config)# maxconns pentium200 1000
LocalDirector(config)# maxconns sparc1 2000
LocalDirector(config)# maxconns sparc2 2000
The show real command is used to view the status of the real servers:
LocalDirector(config)# show real
Real Machines:
                                                                                            No Answer  TCP Reset  DataIn
      Machine           Port    Connect    State    Thresh    Reassigns Reassigns    Conns
        sparc2      default                0          IS              8                    0                  0            0
        sparc1      default                0          IS              8                    0                  0            0
pentium200      default                0          IS              8                    0                  0            0
        hp9000      default                0          IS              8                    0                  0            0
The show bind command is used to view the association between the virtual and real servers:
LocalDirector(config)# show bind
               Virtual                      Real
   www.site.com  default (IS)
                                   hp9000  default (IS)
                               pentium200  default (IS)
                                   sparc1  default (IS)
                                   sparc2  default (IS)
The show weight command is used to view the weight values assigned to the real servers:
LocalDirector(config)# show weight
        Machine     Port Weight
         sparc2  default      5
         sparc1  default      5
     pentium200  default      3
         hp9000  default      2
To configure SYSLOG, use the following commands:
To configure a UNIX system to accept SYSLOG messages, take the following steps:
Step 1 Use the LocalDirector syslog host command to configure the LocalDirector to send SYSLOG messages to the UNIX host's IP address.
Step 2 Log into the UNIX system as root (superuser) and execute the following commands; change name to the log file in which you want SYSLOG messages to appear:
Step 3 While still logged in as root, edit the /etc/syslog.conf file with a UNIX editor and add the following selector and action pairs for each message type you want to capture:
| Message Priority | UNIX syslog.conf File Keyword |
|---|---|
0 - Emergency | local n.emerg |
1 - Immediate action | local n.alert |
2 - Critical condition | local n.crit |
3 - Error | local n.err |
4 - Warning | local n.warning |
5 - Notice | local n.notice |
6 - Information | local n.info |
7 - Debug | local n.debug |
In the syslog.conf file, code each selector and action pair for the messages you want to receive. For example, if you want to receive messages in a file called localdirector for message priorities 0, 1, 2, and 3, and you use the default LOCAL4 facility, the syslog.conf statements would be:
This configuration directs LocalDirector SYSLOG messages to the specified file. Alternatively, if you want the message sent to the logging host console or emailed to a system administrator, refer to the UNIX syslog.conf(4) manual page.
Entries in /etc/syslog.conf must obey these rules:
Step 4 Inform the SYSLOG server program on the UNIX system to reread the syslog.conf file by sending it a HUP (hang up) signal with the following commands:
The first command lists the SYSLOG process ID. This number may vary by system. The second command sends SYSLOG the HUP signal to restart.
See the "syslog" command reference page in Chapter 4, "Command Reference" for more information.
To configure SNMP, use the following commands:
LocalDirector supports the following mib variables.
LocalDirector supports the following SNMP traps. SNMP traps are sent out on both interfaces.
If you are using CiscoWorks for Windows with SNMPc, load the following mibs to see the traps:
Step 1 Get the files http://www.cisco.com/public/mibs/v1/CISCO-SYSLOG-MIB-V1SMI.my and http://www.cisco.com/public/mibs/traps/CISCO-SYSLOG-MIB.traps.
Step 2 Rename the above two files so that they end in ".mib" as follows:
If you are using HP OpenView (UNIX) load the following mibs to see the traps:
Step 1 Get the file http://www.cisco.com/public/mibs/contrib/trapd.conf.
Step 2 As root use the command "/opt/OV/bin/xnmevents -load trapd.conf" to integrate the Cisco Syslog traps into HP OpenView.
Step 3 Use xnmevents to modify the linkUP, linkDown, warmStart traps so that they are displayed in the HP OpenView Event viewer. By default the traps are set to "LOG ONLY". If the log option is not changed then you will not see the linkUP, linkDown, WarmStart traps in your event viewer.
See the "snmp-server" command reference page in Chapter 4, "Command Reference" for more information.
The sticky command ensures that the same client gets the same server for multiple connections. This command is used when applications require a consistent and constant connection to the same server. The sticky command allows you to get back to the same real server again and retain the statefulness of the system. For example, if a client is completing an online form, the sticky command ensures that multiple connections are sent to the same server in order to complete the transaction. Without this command set, each connection attempt to a virtual server is routed according to the predictor option selected for that virtual server, without regard to prior history of the foreign host.
The sticky command does not time how long a client is connected, it times periods of inactivity. If the sticky command is set to five, and the client is active, new requests from the client are not sent to another server via load balancing after five minutes. However, if five minutes of connection inactivity elapse, the requests from the client could be sent to another real server.
LocalDirector supports Secure Socket Layer (SSL) protocol; however, it is essential for the sticky command on the LocalDirector to be set in order for an SSL transaction to occur. The sticky command enables an SSL handshake to occur between the client and server. This establishes an SSL session which then allows all communication to be encrypted.
A sample configuration follows:
The virtual command is used to identify 192.168.1.100 443 as a server accepting traffic on port 443 (SSL):
LocalDirector(config)# virtual 192.168.1.100 443
The sticky command is used to ensure that requests from the same client will be sent to the same real server until 10 minutes of inactivity have elapsed:
LocalDirector(config)# sticky 192.168.1.100 443 10
Some webservers (especially those running Microsoft Windows NT 4.0) will continue to establish connections to a real server even though the daemon or application running on that port is dead. Use the data command to limit the number of connections sent to a server that is not sending data.
LocalDirector does not load balance UDP applications like RealAudio, although LocalDirector can bridge UDP applications. UDP packets sent to a virtual IP address will be dropped, and UDP packets sent directly to the real server IP address are bridged.
|
|