|
|

To install and configure LocalDirector you need an ASCII terminal or a computer with serial communications software installed and running. The computer can be any computer such as a Windows workstation or a UNIX system.
Install LocalDirector as follows:
Step 1 Unpack LocalDirector and place it in your equipment rack or on a level surface.
Step 2 Connect the power cord to LocalDirector and plug it in.
Step 3 Connect the null modem serial cable to the LocalDirector DB-9 console port.
Step 4 Connect the LocalDirector serial console cable DB-25 connector to your ASCII terminal or computer. Use the gender adapter if necessary.
Step 5 Configure the serial port in your computer or terminal with these settings: 9600 baud, 8 data bits, no parity, and 1 stop bit; that is, set 9600, 8-N-1. Ensure your communications software is running.
Step 6 If you are configuring your LocalDirector for failover, connect the failover cable between the two LocalDirector units. For more information on the failover feature, see Appendix A, "LocalDirector Hot-Standby Failover."
Step 7 Unlock the LocalDirector front panel and turn on the power switch. Because LocalDirector ships with its software already in flash memory, LocalDirector can boot without a system diskette. The front panel of the LocalDirector is shown in Figure 2-1.

As LocalDirector boots, messages appear on your computer or terminal such as the following:
Step 8 Connect the network cable from the hub or switch containing the physical servers to one of the network interface connections on the back of the LocalDirector.
Step 9 Connect the network cable from the router on the remainder of your network to the other network interface connection on the back of the LocalDirector.
When the bridging feature is verified, you are ready to configure the LocalDirector as described in Chapter 3, "Configuring LocalDirector."
Figure 2-2 shows a diagram of LocalDirector network using FDDI interfaces. Note that Port-B is on the top of the FDDI card, and Port-A is on the bottom. The FDDI interface uses SC connectors.

To install a FDDI interface board in a LocalDirector:
Step 1 Read the Regulatory Compliance and Safety Information for the Cisco LocalDirector for important safety information.
Step 2 Open the front access panel and power-off the unit. Remove the power cord and any cabling related to the board you are replacing.
Step 3 Remove the unit from the equipment rack and place on a stable work surface.
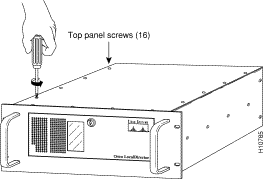
Step 4 Detach and remove the top access panel by using a Phillips-head screwdriver to remove the 16 screws securing the top panel as shown in Figure 2-3:

Step 5 Remove the screw that secures the Ethernet interface board to the rear of the chassis as shown in Figure 2-4:

Step 6 Insert the FDDI board in the slot that held the Ethernet board so that the mounting bracket faces the rear of the unit as shown in Figure 2-5. Port B is on the top of the interface, and port A is on the bottom:

Step 7 Attach the screw to the mounting bracket, and replace the top access panel.
LocalDirector ships with its software already in flash RAM, and LocalDirector can boot without a system diskette. To upgrade the LocalDirector software, insert a diskette with the new version of software on it and enter the reload command, or reboot the LocalDirector. The existing configuration will run on the new software version.
At the CCO home page (www.cisco.com), log in and follow the following links:
1 ) Service & Support
2 ) Software Center
3 ) Cisco Software Products
4 ) Cisco LocalDirector (in the Internet Products section)
You will see a screen similar to the following:
Cisco LocalDirector
Select the file to download:
File             Description
ldxxx.exe NetBU  LocalDirector disk file and rawrite files
ldxxx.bin NetBU  LocalDirector disk file
ldxxx.txt        Readme for NetBU LocalDirector disk file
rawrite.exe      Rawrite file
ldxxx.exe is a self-extracting file for MS-DOS or Windows that includes the binary, readme, and rawrite files.
ldxxx.bin is a binary file for the LocalDirector software.
ldxxx.txt is a readme file that includes directions for creating a LocalDirector bootable diskette.
rawrite.exe is a utility for MS-DOS that is used to write the ldxxx.bin file for LocalDirector to diskette.
To create a bootable LocalDirector diskette, perform the following steps:
Step 1 Download the ldxxx.bin file to your local directory.
Step 2 Insert a diskette into the workstation drive, and run the following command:
dd bs=18b if=./ldxxx.bin of=/dev/rfd0 (SUN OS)
Step 3 Put the diskette into the LocalDirector 3.5" drive. The LocalDirector runs the new version of the software once rebooted, and will use the configuration saved in flash memory.
Step 1 Download the self-extracting ldxxx.exe file to your local hard drive.
Step 2 Run rawrite from a DOS command prompt. When prompted, enter ldxxx.bin as the filename, and your diskette drive as the destination drive. You will see prompts similar to the following:
Step 3 Put the diskette into the LocalDirector 3.5" drive. The LocalDirector runs the new version of the software once rebooted, and will use the configuration saved in flash memory.
|
|