|
|

This chapter provides a quick way to become familiar with the main Cisco IPeXchange Monitor features. The entire tutorial should take about 15 minutes. It has the following sections:
You should work through each section in order.
To start the tutorial, follow these steps:
Step 1 Start the monitor and log in.
See the chapter "Starting and Exiting the Cisco IPeXchange Monitor" for more information.
The main monitor window (also called "home") appears.

The main monitor window shows the three main features of the monitor: access control, snapshots for monitoring connections, and diagnostics for tracing the Cisco IPeXchange Internet Gateway. It also has a link for changing the monitor supervisor password.
Step 2 Click Access Manager.
The Access Manager window appears.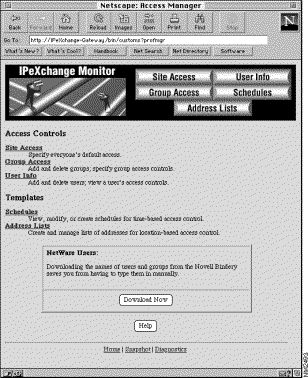
The monitor provides two ways to control access to the Internet: site and group access controls. Unless they are a member of a group, users have access according to the site access control profile. In addition, users that have not been entered into the monitor are also subject to site access controls.
 | Time Saver You can save time by taking the users and groups directly from the NetWare Bindery instead of entering them manually. The group and user information is added to any information already present in the monitor. If you want to control access according to specific times or address lists, you need to define schedules and address lists. |
 | Caution If you delete one or more users from a NetWare group in the monitor, then download the NetWare groups and users again, the users are moved back into the group. If possible, your NetWare groups should match your monitor groups to avoid this problem. For example, if in the monitor you delete a user FRED from a the NetWare group ENG, FRED will be added back to the group if you download again. However, if in the monitor you add FRED to the NetWare group SALES, Fred will stay in SALES if you download again. |
Step 3 To download groups and users from NetWare, click Download Now.
Now that you have users entered into the monitor, you can look at connections.
To look at information about the current connections through the gateway, follow these steps:
Step 1 Click Snapshot.
The monitor collects information about the connections through the gateway, then the Snapshot window appears.

Following are the meanings of the fields:
Kilobytes In. The kilobytes transferred from the Internet location to the IPX user.
Kilobytes Out. The kilobytes transferred from the IPX user to the Internet location.
User. The login user name of the user.
IP Address. The destination IP address that the user has connected to on the Internet or TCP/IP network.
Port. The destination IP port, such as FTP, for the connection.
Connection Start Time. The time the connection started.
Details. Click an arrow to get more details about a connection.
Whenever you click a Snapshot link in another window, a new snapshot is taken.
While you are viewing the Snapshot window, it is not automatically updated. To display the most current data, click Refresh.
Step 2 In the Sort By pull-down menu, choose User. Then click Refresh.
A new snapshot is taken, and the list is sorted by the new method.
Step 3 To get more information about one connection, click an arrow in a Details column.
A window appears.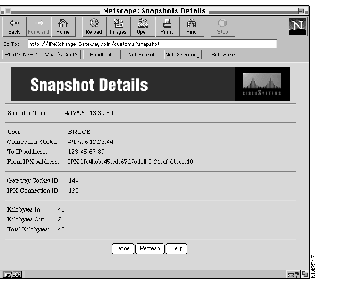
Following are the meanings of the fields:
Snapshot Time. The time the snapshot of connections was taken.
User. The login user name of the user.
Connection Started. The time the connection started.
To IP Address. The destination IP address the user has connected to on the Internet or TCP/IP network.
From IPX Address. The IPX address that the user has originated the connection from.
Gateway Socket ID. The socket identifier on the gateway that is used for the connection.
IPX Connection ID. The IPX connection identifier on the gateway that is used for the connection.
Kilobytes In. The kilobytes transferred from the Internet location to the IPX user.
Kilobytes Out. The kilobytes transferred from the IPX user to the Internet location.
Total Kilobytes. The total kilobytes transferred through the gateway for this connection.
To display the most current data, click Refresh.
Step 4 Click Done.
Next, you will look at access controls for the site.
Follow these steps:
Step 1 Click Access Manager.
The Access Manager window appears.
Step 2 Click Site Access.
The Site Access window appears.
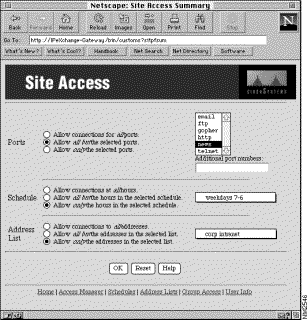
If you have not specified your site access controls yet or you want to change them, you can do so now. Remember that if you change the controls, the change takes affect immediately for the gateway.
Following are the meanings of the different Ports access control options:
Allow connections for all ports. This option does not restrict port access.
Allow all but the selected ports. This option denies access to the ports you have selected in the list and have typed in the Additional port numbers field.
Allow only the selected ports. This option allows access to the ports you have selected in the list and have typed in the Additional port numbers field only.
Shift-click to select multiple items in the list. Delimit port numbers with a space or comma (,).
Following are the meanings of the different Schedule access control options:
Allow connections at all times. This option does not restrict access by time.
Allow all but the times in the selected schedule. This option denies access at the times in the schedule selected in the pull-down menu.
Allow only the times in the selected schedule. This option allows access only at the times in the schedule selected in the pull-down menu.
Following are the meanings of the different Address List access control options:
Allow connections to all addresses. This option does not restrict access by location.
Allow all but the addresses in the selected list. This option denies access to the locations in the address list selected in the pull-down menu.
Allow only the addresses in the selected list. This option allows access to only the locations in the address list selected in the pull-down menu. For example, you could create an intranet of corporate addresses only.
Step 3 If you want to change the site access controls, click OK to accept the changes. To undo all the changes since you last clicked OK, click Reset.
You stay in the Site Access window.
You will now create a schedule.
Follow these steps:
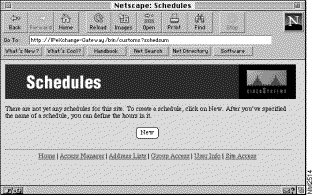
Step 1 Click Schedules.
The Schedules window appears.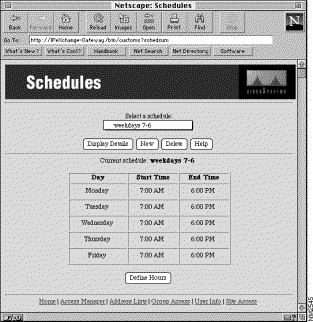
If you have not yet entered any schedule names, the following window appears instead.
Step 2 Click New to add a new schedule.
The New Schedule window appears.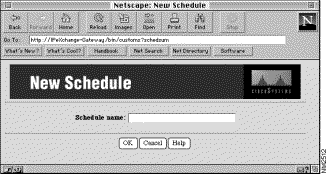
Step 3 Type Sample Schedule in the Schedule name field.
A name can contain any ASCII characters and spaces.
Step 4 Click OK to add the schedule.
The Schedules window appears. Sample Schedule appears in the pull-down menu.
Now you will specify times for the schedule.
Step 5 Click Define Hours to define the times in a schedule.
A window appears.

Step 6 For each day of the week you want to include, click the check box to select it. Then choose a Start Time and End Time from the pull-down menus.
You can make your Sample Schedule look like the following schedule:
Note that selecting Start of Day and End of Day specifies an entire 24-hour day. 12:00 AM is the same as Start of Day.
Step 7 Click OK to accept the changes.
The Schedules window appears.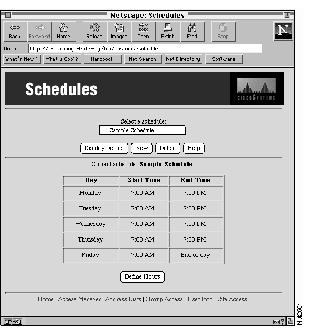
Note that when you select a different schedule from the pull-down menu, the times do not automatically appear in the Schedules window. To display the times, click Display Details.
Now you will create an address list.
Follow these steps:
Step 1 Click Address Lists.
The Address Lists window appears.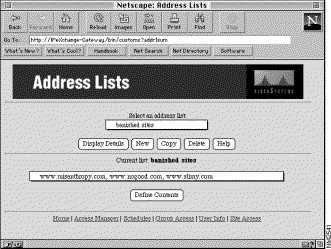
If you have not yet entered any address list names, the following window appears instead.

Step 2 Click New to add a new address list.
The New Address List window appears.
Step 3 Type Sample Address List in the List name field.
A name can contain any ASCII characters and spaces.
Step 4 Click OK to add the list.
The Address Lists window appears. Sample Address List appears in the pull-down menu.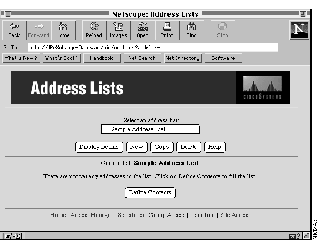
You will now specify addresses.
Step 5 Click Define Contents to define the addresses in a list.
The Define Address List Contents window appears.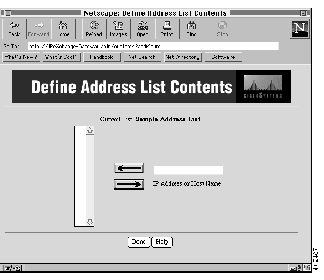
Step 6 To add a site to the list, type an IP address or host name in the IP Address or Host Name field, then click the left-pointing arrow.
Remember that an IP address is made of four integers separated by a period--for example, 123.45.67.89 is a valid IP address. Use a comma (,) to delimit multiple entries.
You can make your address list look like the following:
Step 7 Click Done to accept the changes.
The Address Lists window appears.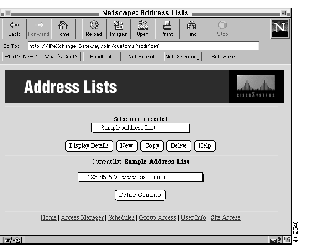
You can also copy an existing list to start a new list.
Note that when you select a different address list from the pull-down menu, the locations do not automatically appear in the Address Lists window. To display locations, click Display Details.
You will now add a user.
Follow these steps:
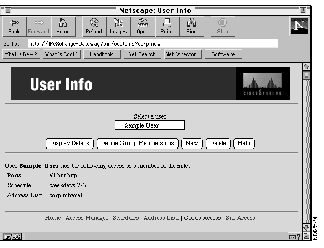
Step 1 Click User Info.
The User Info window appears.
If you have not yet entered any user names, the following window appears instead.

Step 2 Click New to add a new user.
The following window appears.
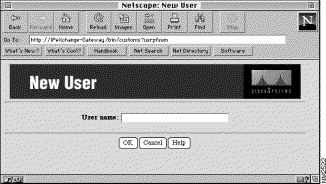
Step 3 Type Sample User in the User name field.
A name can contain any ASCII characters and spaces.
Step 4 Click OK to add the user.
The User Info window appears. The Sample User appears in the Select a user pull-down menu.
A new user is not a member of any group and is governed by site access controls. You will now define a new group and add Sample User to it.
Follow these steps:
Step 1 Click Group Access.
The Group Access window appears.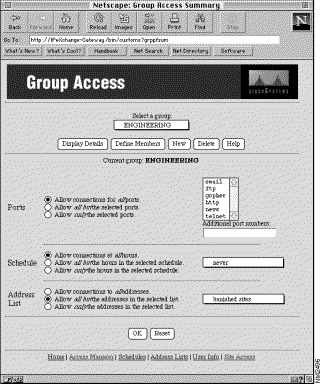
If you have not yet entered any group names, the following window appears instead.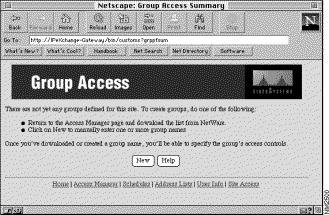
Step 2 Click New to add a new group.
The following window appears.
Step 3 Type Sample Group in the Group name field.
A name can contain any ASCII characters and spaces.
Step 4 Click OK to add the group.
The Group Access window appears. Sample Group appears in the Select a group pull-down menu.
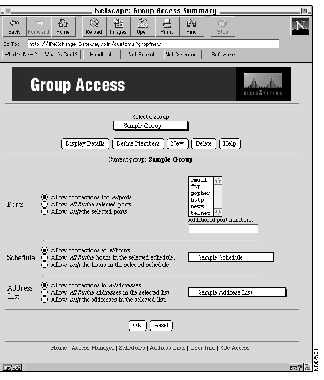
A new group has no members, and the default access control is unrestricted access.
Step 5 Click Define Members.
The Define the Members of a Group window appears.
Step 6 Add Sample User to the Group Members list.
Select Sample User in the All Other Users list, and click the left-pointing arrow to move the user to the Group Members list. 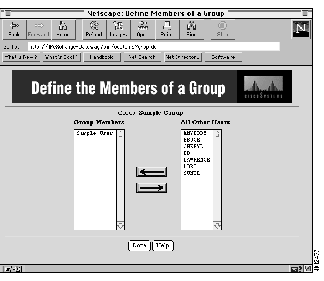
Sample User has been added to Sample Group. Sample User is now no longer subject to site access controls, but is governed by the Sample Group access controls.
Step 7 Click Done to return to the Group Access window.
Step 8 Select the access control options you want.
You can make your group access controls look like the following window: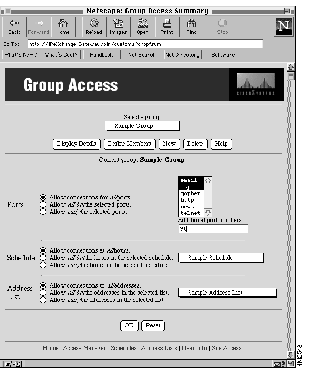
Step 9 Click OK to accept the changes.
The Group Access window remains open. Clicking Reset returns the window back to the settings since the last time you clicked OK.
One user can be a member of more than one group. The permissions of all groups are combined to form the permissions for a user. The most liberal permissions apply. For example, if a user is a member of two groups, and during normal work hours one group allows access to internal IP addresses only while the other group allows FTP connections to all IP addresses, the user can use FTP to connect to any IP address during work hours.
Note that when you select the group from the Select a group pull-down menu, the group access controls do not automatically appear in the Group Access window. To display the group access controls, click Display Details.
You will now delete the Sample information you just entered.
Follow these steps:
Step 1 Make sure Sample Group is selected in the Select a group pull-down menu.
Step 2 Click Delete to delete the group.
The group no longer appears in the pull-down menu. (Note that clicking Reset does not undo a deletion.)
Step 3 Click User Info.
Step 4 Select Sample User from the Select a user pull-down menu. Then click Display Details.
Note that the user is no longer a member of any group. That means the user is now governed by site access controls. When you delete groups, the access controls change for any group members.
Step 5 Click Delete to delete the user.
The user no longer appears in the pull-down menu.
Step 6 Click Schedules.
The Schedules window appears.
Step 7 Select Sample Schedule from the pull-down menu.
Step 8 Click Delete to delete the schedule.
The schedule no longer appears in the pull-down menu. Remember that if you delete a schedule that the site or one or more groups use, the access controls default to permitting all times.
Step 9 Click Address Lists.
The Address Lists window appears.
Step 10 Select Sample Address List from the pull-down menu.
Step 11 Click Delete to delete the address list.
The address list no longer appears in the pull-down menu. Remember that if you delete an address list that the site or one or more groups use, the access controls default to permitting all locations.
You have now completed the tutorial.
|
|